Note
Access to this page requires authorization. You can try signing in or changing directories.
Access to this page requires authorization. You can try changing directories.
This tutorial covers how to set up Continuous Integration (CI) and Continuous Delivery (CD) of a ColdFusion application to an Azure Web App. In order to follow this tutorial, you should know how to deploy ColdFusion to an Azure Web App, you can find a detailed tutorial on this here. If you need a general walkthrough on how to set up web applications and CI/CD in Visual Studio Team Services (VSTS), you can find it here.
The basic steps that will be covered in this tutorial is:
- How to package a ColdFusion application into a single
*.warfile using Ant. - How to set up a build job on VSTS to using the Ant build process.
- How to deploy the build artifact (
*.war) file produced by the build to an Azure web app.
Packaging a ColdFusion Application using Ant
We will be working on a very simple ColdFusion Application, which contains a single *.cfm file, which looks like this:
 <html>

<head>
<title>Test</title>
</head>
<body>

  <cfset message = "WORLD"/>
  <cfoutput>Hello <b>#message#</b>!</cfoutput>

</body>

</html>
In order to package that into a *.war file with the ColdFusion server application, we will use an Ant build.xml file, which looks something like this:
 <project name="MyCFProject" basedir="." default="UpdateWar">
    <property name="base.war.url" value="<URL OF BASE WAR FILE>" />
    <property name="code.dir" value="code/" />
    <property name="target.war.name" value="cfusion.war" />
    <property name="target.prefix" value="myApplication" />

    <target name="UpdateWar" description="Updates WAR file">
    <delete dir="build" />
    <mkdir dir="build" />
    <get src="${base.war.url}" dest="build/${target.war.name}" />
        <war destfile="build/${target.war.name}" update="true">
            <zipfileset dir="${code.dir}"  prefix="target.prefix"/>
        </war>
    </target>

</project>
For an introduction to the Ant build system and how to write simple build files look here.
What this build.xml file does is:
- Download a base
*.warfile containing ColdFusion. Please see this tutorial for details on how to generate such a file. You should not upload that to a URL that is publically accessible without a key. One solution would be to use Azure BLOB storage with a shared access signature (SAS). - Take the code in a certain folder (
code/in this case) and add it to that*.warfile (in a specified ___location)
The resulting cfusion.war file will be stored in the build folder. This *.war file is ready to be deployed on a JEE server (e.g. a Tomcat server running on a Web App in Azure).
Setting up CI/CD with VSTS
Create a git repository containing:
    |
   |-code
   |   |
   |   +-index.cfm
   |
   |-build.xml
   |
Push this repository to a VSTS projects code repository and select "Set Up Build". If this is an unfamiliar process to you, please walk through the basic CI/CD Web App Tutorial. You should pick the Ant build template:

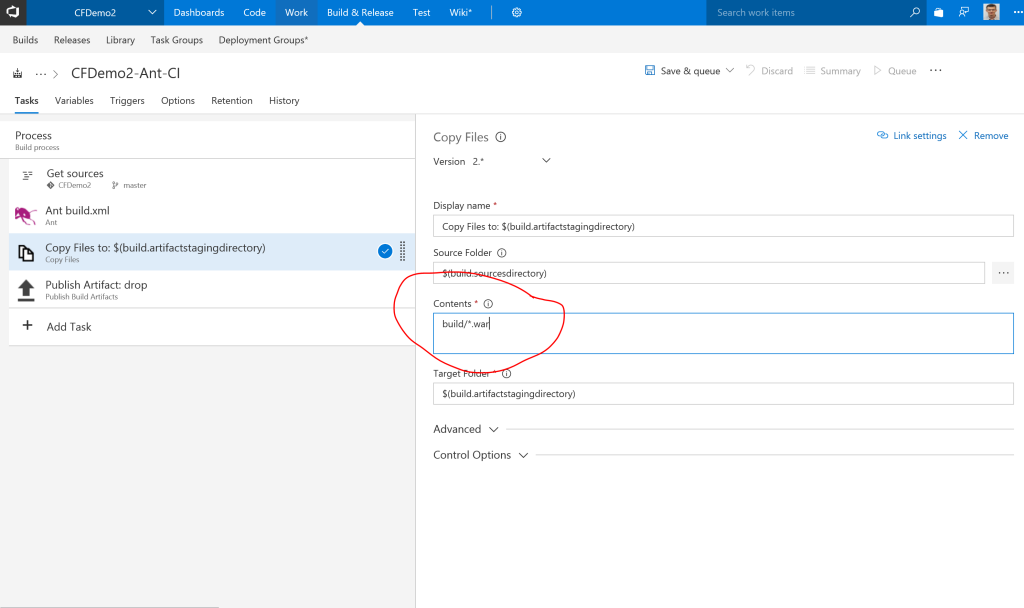
Select a "Hosted" agent and in the Copy step, modify the copy process to cope the *.war file the Ant build is creating:
Remember to set up triggering if you want the build to run automatically when code is checked into the repository.
After that select "Save and Queue" to queue up a build with your new configuration. Once the build has succeeded you can create a new release definition using the "Deploy Azure App Service" template. Configure the Azure App Service deployment to pick up the *.war file created by the build and deploy it to an Azure Web App running a Tomcat server.

Let me know if this tutorial was helpful to you and if you have any questions/comments.