Note
Access to this page requires authorization. You can try signing in or changing directories.
Access to this page requires authorization. You can try changing directories.
Azure AI Foundry Agent Service offers Standard Setup with private networking environment setup, allowing you to bring your own (BYO) private virtual network. This setup creates an isolated network environment that lets you securely access data and perform actions while maintaining full control over your network infrastructure. This guide provides a step-by-step walkthrough of the setup process and outlines all necessary requirements.
Security features
By default, the Standard Setup with Private Network Isolation ensures:
No public egress: foundational infrastructure ensures the right authentication and security for your agents and tools, without you having to do trusted service bypass.
Container injection: allows the platform network to host APIs and inject a subnet into your network, enabling local communication of your Azure resources within the same virtual network.
Private resource access: If your resources are marked as private and nondiscoverable from the internet, the platform network can still access them, provided the necessary credentials and authorization are in place.
For customers without an existing virtual network, the Standard Setup with Private Networking template simplifies deployment by automatically provisioning the necessary network infrastructures.
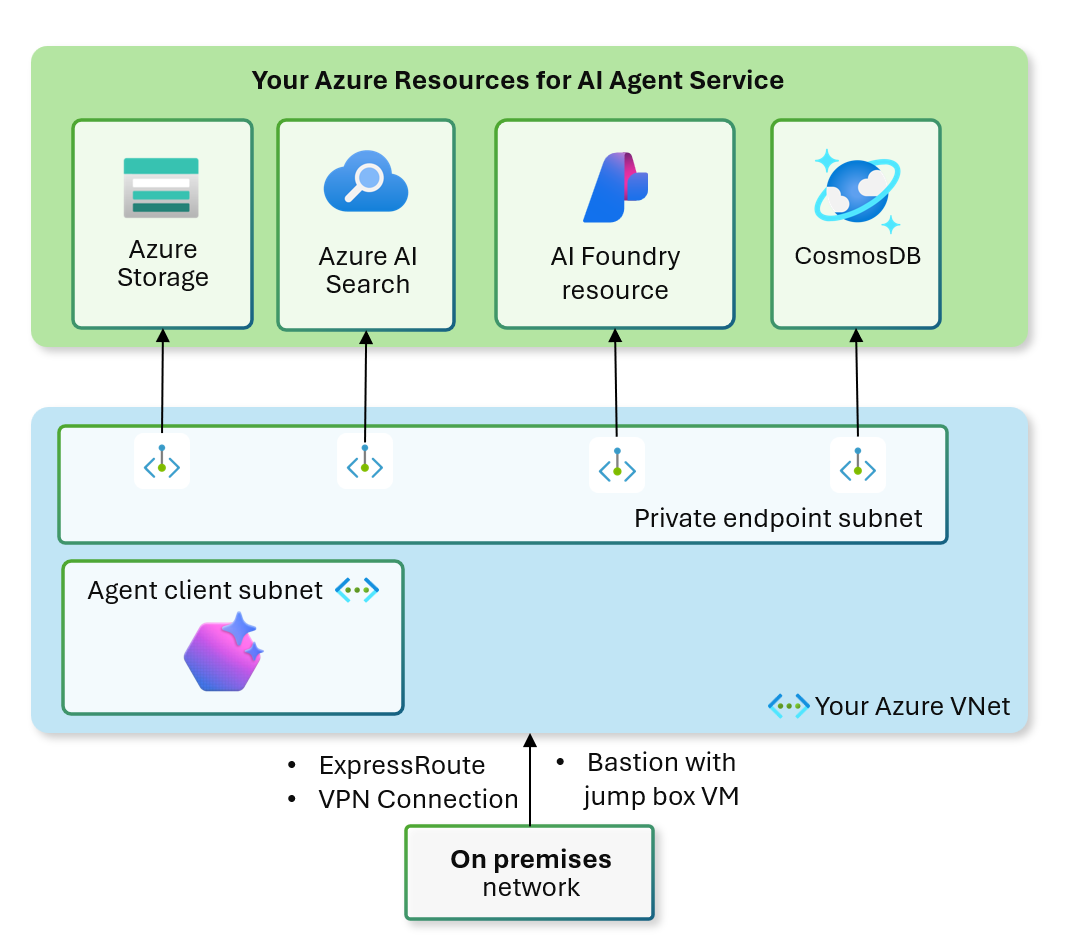
Architecture diagram
Known limitations
- Subnet IP address limitation: both subnets must have IP ranges under
172.16.0.0/12or192.168.0.0/16, i.e. class B or C private address ranges reserved for private networking. Public Class A, B or C address ranges are not supported. Private Class A address ranges have limited region support. For more information, see our Private Network Secured Agent deployment template on GitHub. - Agent subnet exclusivity: The agent subnet cannot be shared by multiple Azure AI Foundry resources. Each AI Foundry must use a dedicated agent subnet.
- Agent subnet size: The recommended size of the delegated Agent subnet is /24 (256 addresses) due to the delegation of the subnet to
Microsoft.App/environment. For more on the subnet sizing, see Configuring virtual networks for Azure Container Apps. - Agent subnet egress firewall allowlisting: If you are integrating an Azure Firewall with your private network secured standard agent, please allowlist the Fully Qualified Domain Names (FQDNs) listed in the Integrate with Azure Firewall article.
- All Foundry workspace resources must be deployed in the same region as the virtual network (VNet). This includes Cosmos DB, Storage Account, AI Search, Foundry Account, Project, and Managed Identity.
- Exception: You may connect your Foundry Project to models deployed in a different region (on another AI Foundry or Azure OpenAI resource) by configuring an appropriate AI Services connection on the Project's capability host.
- Region availability:
- For supported regions for model deployments, see: Azure OpenAI model region support.
- Azure Blob Storage: using Azure Blob Storage files with the File Search tool isn't supported.
Prerequisites
An Azure subscription - Create one for free.
Ensure that the individual creating the account and project has the Azure AI Account Owner role at the subscription scope
The person deploying the template must also have permissions to assign roles to required resources (Cosmos DB, Search, Storage).
- The built-in role needed is Role Based Access Administrator.
- Alternatively, having the Owner role at the subscription level also satisfies this requirement.
- The key permission needed is:
Microsoft.Authorization/roleAssignments/write
Once the agent environment is configured, ensure that each team member who wants to use the Agent Playground or SDK to create or edit agents has been assigned the built-in Azure AI User RBAC role for the project.
- The minimum set of permissions required is: agents/*/read, agents/*/action, agents/*/delete
Register providers. The following providers must be registered:
Microsoft.KeyVaultMicrosoft.CognitiveServicesMicrosoft.StorageMicrosoft.MachineLearningServicesMicrosoft.SearchMicrosoft.NetworkMicrosoft.AppMicrosoft.ContainerService- To use Bing Search tool:
Microsoft.Bing
   az provider register --namespace 'Microsoft.KeyVault'
   az provider register --namespace 'Microsoft.CognitiveServices'
   az provider register --namespace 'Microsoft.Storage'
   az provider register --namespace 'Microsoft.MachineLearningServices'
   az provider register --namespace 'Microsoft.Search'
   az provider register --namespace 'Microsoft.Network'
   az provider register --namespace 'Microsoft.App'
   az provider register --namespace 'Microsoft.ContainerService'
   # only to use Grounding with Bing Search tool
   az provider register --namespace 'Microsoft.Bing'
Configure a new network-secured environment
Note
- Programmatic deployment is required to setup a network-secured environment for Azure AI Foundry Agent Service. Deployment through the Azure portal is currently not supported.
- If you want to delete your Foundry resource and Standard Agent with secured network set-up, delete your AI Foundry resource and virtual network last. Before deleting the virtual network, ensure to delete and purge your AI Foundry resource.
- In the Standard Setup, agents use customer-owned, single-tenant resources. You have full control and visibility over these resources, but you incur costs based on your usage.
You can deploy and customize the Standard Setup with Private Networking using either Bicep or Terraform. The provided samples allow you to bring your own virtual network and customize the deployment to meet your specific requirements:
- Foundry account and Foundry project are created.
- A gpt-4o model is deployed.
- Azure resources for storing customer data — Azure Storage, Azure Cosmos DB, and Azure AI Search — are automatically created if existing resources are not provided.
- These resources are connected to your project to store files, threads, and vector data.
- Microsoft-managed encryption keys for Storage Account and Cognitive Account (AI Foundry) are used by default.
Select one of the available deployment methods:
Bicep templates: follow instructions in this sample from GitHub.
Terraform configuration: follow instructions in this sample from GitHub.
Deep Dive Standard Setup with Private Networking Template
When you use the Standard Setup with Private Networking Agent Template, the following will automatically be provisioned, unless you bring your own:
Network Infrastructure
- A Virtual Network (192.168.0.0/16) is created
- Agent Subnet (192.168.0.0/24): Hosts Agent client
- Private endpoint Subnet (192.168.1.0/24): Hosts private endpoints
Private DNS Zones The following DNS zones are configured:
- privatelink.blob.core.windows.net
- privatelink.cognitiveservices.azure.com
- privatelink.documents.azure.com
- privatelink.file.core.windows.net
- privatelink.openai.azure.com
- privatelink.search.windows.net
- privatelink.services.ai.azure.com
Virtual network (Vnet) capabilities
Virtual networks enable you to specify which endpoints can make API calls to your resources. The Azure service automatically rejects API calls from devices outside your defined network. You can establish allowed networks using either formula-based definitions or by creating an exhaustive list of permitted endpoints. This security layer can be combined with other security measures for enhanced protection.
Note
If you bring your existing virtual network and subnet with the Microsoft.App/environments delegation, the minimize size of your subnet should be /27 (32 addresses). We recommend a subnet size of /24 (256 addresses), which is the default subnet size set in the network secured template.
Network rules
All accounts and their corresponding projects are protected by default with Public network access Disabled flag, requiring explicit configuration to allow access through private endpoints.
These rules apply to all protocols, including REST and WebSocket. Even internal testing tools like Azure portal's test consoles require explicit permission to access your account and its child resources—ensuring complete security across all agent projects.
Private endpoints
For Agents, private endpoints ensure secure, internal-only connectivity for the following Azure resources:
- Azure AI Foundry
- Azure AI Search
- Azure Storage
- Azure Cosmos DB
DNS zone configurations summary
| Private Link Resource Type | Sub Resource | Private DNS Zone Name | Public DNS Zone Forwarders |
|---|---|---|---|
| Azure AI Foundry | account | privatelink.cognitiveservices.azure.comprivatelink.openai.azure.comprivatelink.services.ai.azure.com |
cognitiveservices.azure.comopenai.azure.comservices.ai.azure.com |
| Azure AI Search | searchService | privatelink.search.windows.net |
search.windows.net |
| Azure Cosmos DB | Sql | privatelink.documents.azure.com |
documents.azure.com |
| Azure Storage | blob | privatelink.blob.core.windows.net |
blob.core.windows.net |
To create a conditional forwarder in the DNS Server to the Azure DNS Virtual Server, use the list of zones mentioned in the above table. The Azure DNS Virtual Server IP address is 168.63.129.16.
Access your secured agents
Once your template deployment is complete, you can access your Foundry project behind a virtual network using one of the following methods:
- Azure VPN Gateway: Connects on-premises networks to the virtual network over a private connection. Connection is made over the public internet. There are two types of VPN gateways that you might use:
- Point-to-site: Each client computer uses a VPN client to connect to the virtual network.
- Site-to-site: A VPN device connects the virtual network to your on-premises network.
- ExpressRoute: Connects on-premises networks into the cloud over a private connection. Connection is made using a connectivity provider.
- Azure Bastion: In this scenario, you create an Azure Virtual Machine (sometimes called a jump box) inside the virtual network. You then connect to the VM using Azure Bastion. Bastion allows you to connect to the VM using either an RDP or SSH session from your local web browser. You then use the jump box as your development environment. Since it is inside the virtual network, it can directly access the workspace.
Summary
Private Networking for Standard Agent Setup delivers enterprise-grade isolation and control:
- ✅ All inbound and outbound traffic remains isolation from public internet
- ✅ Dedicated private endpoints secure all your customer data
- ✅ Automatic private DNS resolution for seamless internal access
- ✅ Strict deny-by-default network rules for maximum security
This setup enables AI agents to operate entirely within a dedicated, isolated virtual network. By leveraging private network isolation (BYO VNet), organizations can enforce custom security policies, ensuring that AI agents operate within their trusted infrastructure.
Our goal is to accelerate the development and deployment of AI agents without compromising critical security requirements. With our bicep and ARM templates, you can quickly setup your agent environment while still maintaining full control over their networking and data.
What's next?
You’ve now successfully configured a Network Secure Account and project, use the quickstart to create your first agent.