Note
Access to this page requires authorization. You can try signing in or changing directories.
Access to this page requires authorization. You can try changing directories.
Azure AI Foundry offers a unified platform for building, managing, and deploying AI solutions with a wide array of models and tools. Azure AI Foundry playgrounds are interactive environments within the Azure AI Foundry portal designed for exploring, testing, and prototyping with various AI models and tools.
Use this article to get started with Conversational Language understanding using Azure AI Foundry or the REST API.
Note
- If you already have an Azure AI Language or multi-service resource—whether used on its own or through Language Studio—you can continue to use those existing Language resources within the Azure AI Foundry portal.
- For more information, see How to use Azure AI services in the Azure AI Foundry portal.
- We highly recommended that you use an Azure AI Foundry resource in the AI Foundry; however, you can also follow these instructions using a Language resource.
Prerequisites
- Azure subscription. If you don't have one, you can create one for free.
- Requisite permissions. Make sure the person establishing the account and project is assigned as the Azure AI Account Owner role at the subscription level. Alternatively, having either the Contributor or Cognitive Services Contributor role at the subscription scope also meets this requirement. For more information, see Role based access control (RBAC).
- Azure AI Foundry resource. For more information, see Configure an Azure AI Foundry resource. Alternately, you can use an Azure AI Language resource.
- A Foundry project created in the Azure AI Foundry. For more information, see Create an AI Foundry project.
Get started with Azure AI Foundry
To complete this quickstart, you need a Conversational Language Understanding (CLU) fine-tuning task project that includes a defined schema and labeled utterances.
You can download our sample project file, which comes preconfigured with both a schema and labeled utterances. This project enables the prediction of user intent for commands such as reading emails, deleting emails, and attaching documents to emails.
Let's begin:
- Navigate to the Azure AI Foundry.
- If you aren't already signed in, the portal prompts you to do so with your Azure credentials.
- Once signed in, you can create or access your existing projects within Azure AI Foundry.
- If you're not already at your project for this task, select it.
- On the left side navigation pane, select Playgrounds, navigate to the Language playground tile, and then choose the Try the Language playground button.

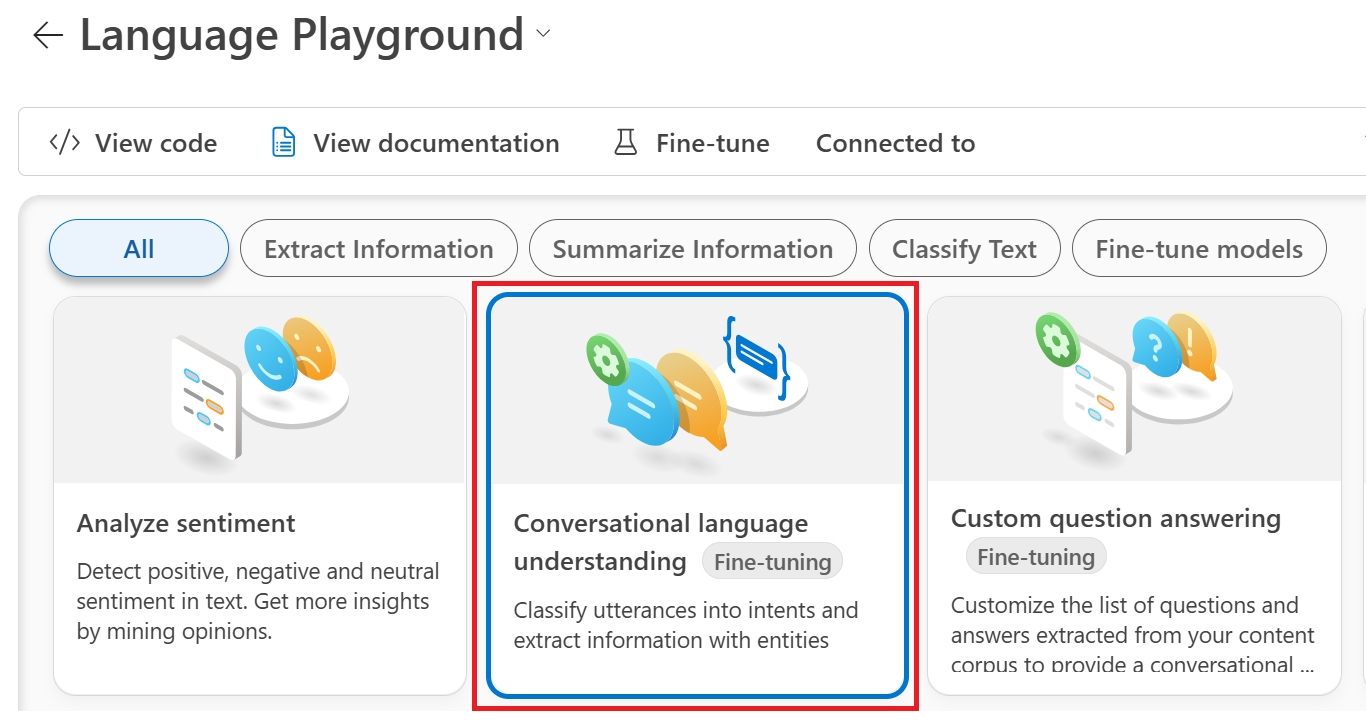
Try the Language playground
The top section of the Language playground is where you can view and select the available Language services.
Select the Conversational language understanding tile.
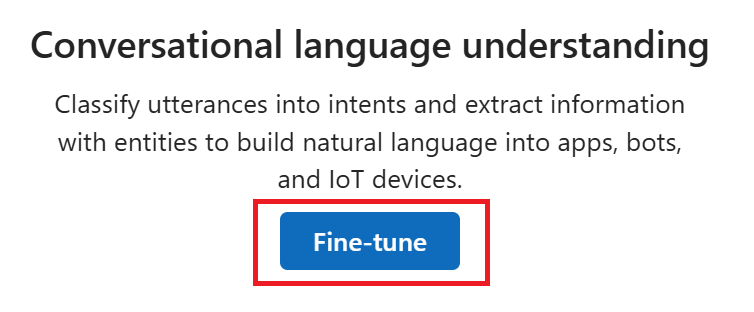
Next, scroll to and select the Fine-tune button.
From Create service fine-tuning window, choose the Conversational language understanding card. Then select Next.

In Create CLU fine tuning task window, select Import an existing project, then choose your Connected service from the drop-down menu and complete the Name field.

Next, add the sample project file that you downloaded earlier to the upload area.
Select the Create button. It can take a few minutes for the creating operation to complete.
Once your fine-tuning task project is created, the Getting started with fine-tuning page opens.


Train your model
After project creation, the next steps are schema construction and utterance labeling. For this quickstart, these steps are preconfigured in the sample project. Therefore, you can go ahead and initiate a training job by selecting Train model from the Getting Started menu to generate your model.

Select the ➕Train model button from the Train your model window.

Complete the Select a mode form by completing the Model name field and selecting a Training mode. For this quickstart, select the free Standard training mode. For more information, see Training modes.
Choose a Training version from the drop-down menu, then select the Next button.
Check your selections in the Review window, then select the Create button

Deploy your model
Typically, after training a model, you review its evaluation details. For this quickstart, you can just deploy your model and make it available to test in the Language playground, or by calling the prediction API. However, if you wish, you can take a moment to select Evaluate your model from the left-side menu and explore the in-depth telemetry for your model. Complete the following steps to deploy your model within Azure AI Foundry:
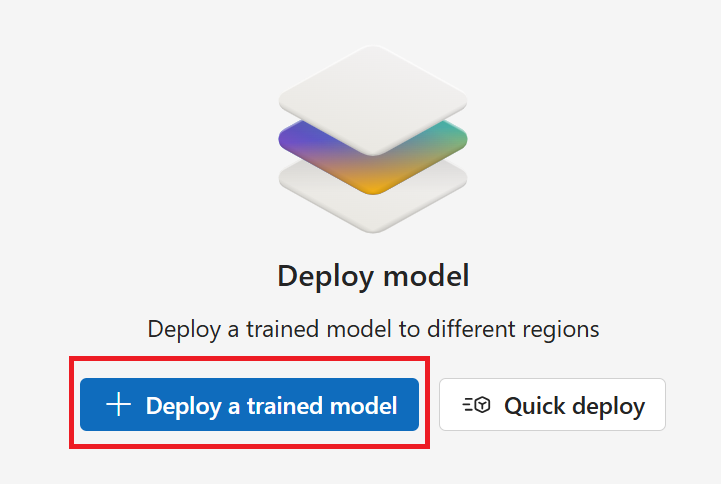
Select Deploy model from the left-side menu.
Next, select ➕Deploy a trained model from the Deploy your model window.
Make sure the Create a new deployment button is selected.
Complete the Deploy a trained model window fields:
Create a deployment name.
Select your trained model from the Assign a model drop-down menu.
Select a subscription from the Subscription drop-down menu.
Select a region from the Region drop-down menu.
Select a resource from the Resource drop-down menu. The resource must be in the same deployment region.

Finally, select the Create button. It may take a few minutes for your model to deploy.
After successful deployment, you can view your model's deployment status on the Deploy your model page. The expiration date that appears marks the date when your deployed model becomes unavailable for prediction tasks. This date is usually 18 months after a training configuration is deployed.

From the far-left menu, navigate to the Language playground.
Playgrounds → Language playground (Try the Language playground).Select the Conversational language understanding card.
A Configuration window with your deployed model should appear in the main/center window.
In the text box, enter an utterance to test. For example, if you used our sample project application for email-related utterances you could enter Check email.
After you enter your test text, select the Run button.
After you run the test, you should see the response of the model in the result.

You can view the results in a text or JSON format view.

That's it, congratulations!
In this quickstart, you deployed a CLU model and tested it in the Azure AI Foundry Language playground. Next, learn how to Create your own fine-tuning task project for your applications and workflows.
Clean up resources
If you no longer need your project, you can delete it from the Azure AI Foundry.
Navigate to the Azure AI Foundry home page. Initiate the authentication process by signing in, unless you already completed this step and your session is active.
Select the project that you want to delete from the Keep building with Azure AI Foundry
Select Management center.
Select Delete project.

To delete the hub along with all its projects:
Navigate to the Overview tab inn the Hub section.

On the right, select Delete hub.
The link opens the Azure portal for you to delete the hub there.

Prerequisites
- Azure subscription - Create one for free.
Create a new resource from the Azure portal
Sign in to the Azure portal to create a new Azure AI Language resource.
Select Create a new resource.
In the window that appears, search for Language service.
Select Create.
Create a Language resource with the following information:
Instance detail Required value Region One of the supported regions for your Language resource. Name Required name for your Language resource. Pricing tier One of the supported pricing tiers for your Language resource.
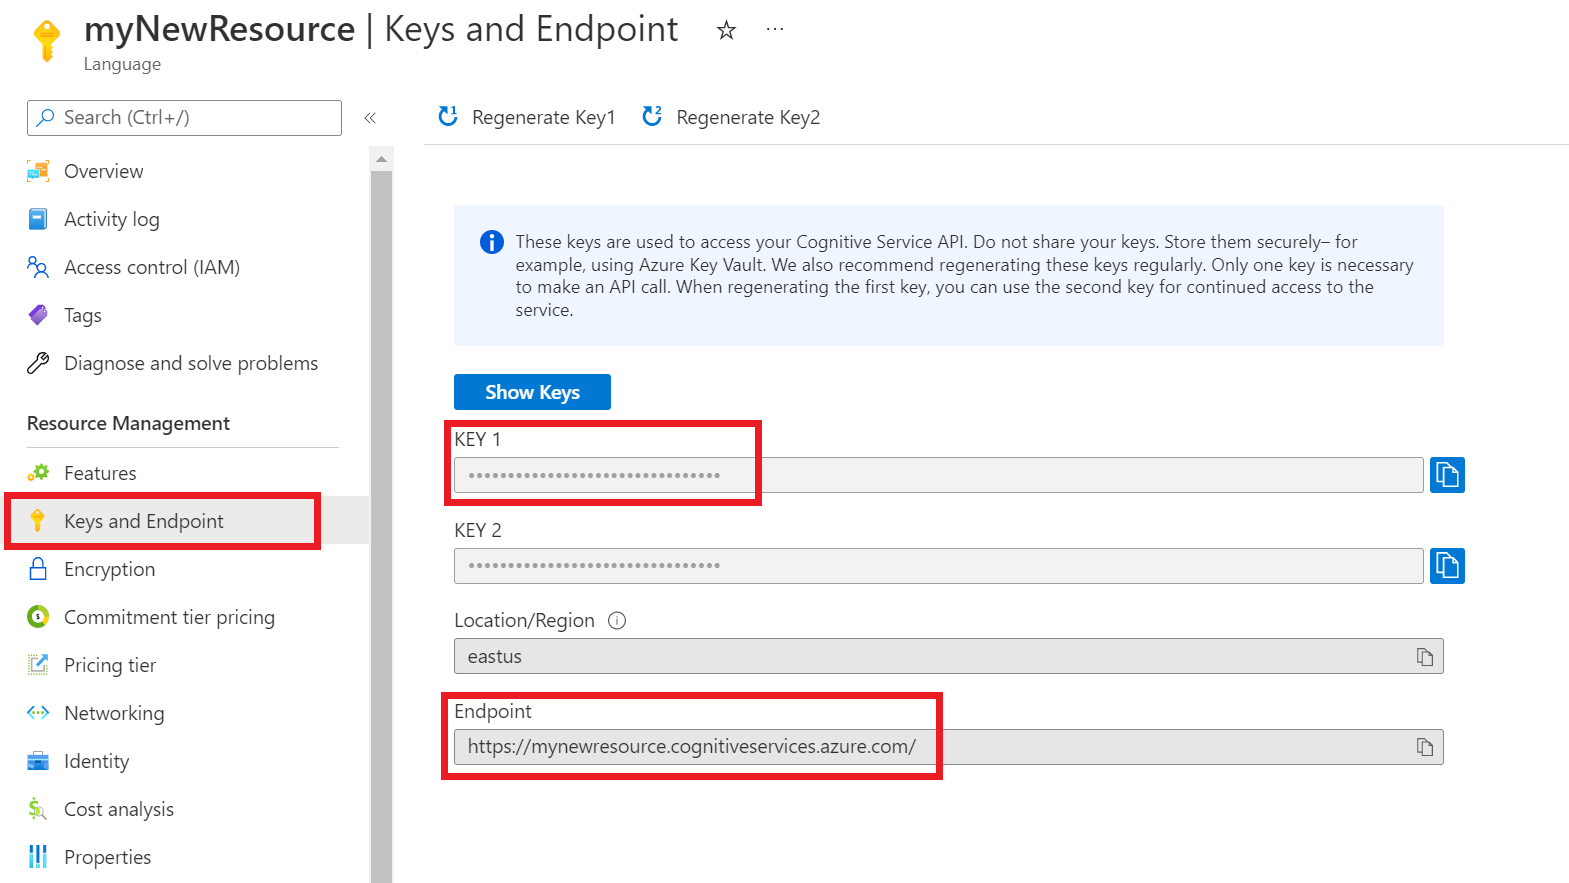
Get your resource keys and endpoint
Go to your resource overview page in the Azure portal.
From the menu on the left side, select Keys and Endpoint. You need the endpoint and key for API requests.

Import a new CLU sample project
Once you have a Language resource created, create a conversational language understanding project. A project is a work area for building your custom ML models based on your data. Only you and others who have access to the language resource being used can access your project.
For this quickstart, you can download this sample project and import it. This project can predict the intended commands from user input, such as: reading emails, deleting emails, and attaching a document to an email.
Trigger the import project job
Submit a POST request by using the following URL, headers, and JSON body to import your project.
Request URL
Use the following URL when you create your API request. Replace the placeholder values with your own values.
{ENDPOINT}/language/authoring/analyze-conversations/projects/{PROJECT-NAME}/:import?api-version={API-VERSION}
| Placeholder | Value | Example |
|---|---|---|
{ENDPOINT} |
The endpoint for authenticating your API request. | https://<your-custom-subdomain>.cognitiveservices.azure.com |
{PROJECT-NAME} |
The name for your project. This value is case sensitive and must match the project name in the JSON file that you're importing. | EmailAppDemo |
{API-VERSION} |
The version of the API that you're calling. | 2023-04-01 |
Headers
Use the following header to authenticate your request.
| Key | Value |
|---|---|
Ocp-Apim-Subscription-Key |
The key to your resource. Used for authenticating your API requests. |
Body
The JSON body you send is similar to the following example. For more information about the JSON object, see the reference documentation.
{
  "projectFileVersion": "{API-VERSION}",
  "stringIndexType": "Utf16CodeUnit",
  "metadata": {
    "projectKind": "Conversation",
    "settings": {
      "confidenceThreshold": 0.7
    },
    "projectName": "{PROJECT-NAME}",
    "multilingual": true,
    "description": "Trying out CLU",
    "language": "{LANGUAGE-CODE}"
  },
  "assets": {
    "projectKind": "Conversation",
    "intents": [
      {
        "category": "intent1"
      },
      {
        "category": "intent2"
      }
    ],
    "entities": [
      {
        "category": "entity1"
      }
    ],
    "utterances": [
      {
        "text": "text1",
        "dataset": "{DATASET}",
        "intent": "intent1",
        "entities": [
          {
            "category": "entity1",
            "offset": 5,
            "length": 5
          }
        ]
      },
      {
        "text": "text2",
        "language": "{LANGUAGE-CODE}",
        "dataset": "{DATASET}",
        "intent": "intent2",
        "entities": []
      }
    ]
  }
}
| Key | Placeholder | Value | Example |
|---|---|---|---|
{API-VERSION} |
The version of the API that you're calling. | 2023-04-01 |
|
projectName |
{PROJECT-NAME} |
The name of your project. This value is case sensitive. | EmailAppDemo |
language |
{LANGUAGE-CODE} |
A string that specifies the language code for the utterances used in your project. If your project is a multilingual project, choose the language code of most of the utterances. | en-us |
multilingual |
true |
A Boolean value that enables you to have documents in multiple languages in your dataset. When your model is deployed, you can query the model in any supported language, including languages that aren't included in your training documents. | true |
dataset |
{DATASET} |
For information on how to split your data between a testing and training set, see Label your utterances in AI Foundry. Possible values for this field are Train and Test. |
Train |
After a successful request, the API response contains an operation-___location header with a URL that you can use to check the status of the import job. The header is formatted like this example:
{ENDPOINT}/language/authoring/analyze-conversations/projects/{PROJECT-NAME}/import/jobs/{JOB-ID}?api-version={API-VERSION}
Get the import job status
When you send a successful project import request, the full request URL for checking the import job's status (including your endpoint, project name, and job ID) is contained in the response's operation-___location header.
Use the following GET request to query the status of your import job. You can use the URL you received from the previous step, or replace the placeholder values with your own values.
{ENDPOINT}/language/authoring/analyze-conversations/projects/{PROJECT-NAME}/import/jobs/{JOB-ID}?api-version={API-VERSION}
| Placeholder | Value | Example |
|---|---|---|
{ENDPOINT} |
The endpoint for authenticating your API request. | https://<your-custom-subdomain>.cognitiveservices.azure.com |
{PROJECT-NAME} |
The name for your project. This value is case-sensitive. | myProject |
{JOB-ID} |
The ID for locating your import job status. | xxxxxxxx-xxxx-xxxx-xxxx-xxxxxxxxxxxxx |
{API-VERSION} |
The version of the API you are calling. | 2023-04-01 |
Headers
Use the following header to authenticate your request.
| Key | Description | Value |
|---|---|---|
Ocp-Apim-Subscription-Key |
The key to your resource. Used for authenticating your API requests. | {YOUR-PRIMARY-RESOURCE-KEY} |
Response body
Once you send the request, you'll get the following response. Keep polling this endpoint until the status parameter changes to "succeeded".
{
  "jobId": "xxxxx-xxxxx-xxxx-xxxxx",
  "createdDateTime": "2022-04-18T15:17:20Z",
  "lastUpdatedDateTime": "2022-04-18T15:17:22Z",
  "expirationDateTime": "2022-04-25T15:17:20Z",
  "status": "succeeded"
}
Start training your model
Typically, after you create a project, you should build schema and tag utterances. For this quickstart, we already imported a ready project with built schema and tagged utterances.
Create a POST request using the following URL, headers, and JSON body to submit a training job.
Request URL
Use the following URL when creating your API request. Replace the placeholder values with your own values.
{ENDPOINT}/language/authoring/analyze-conversations/projects/{PROJECT-NAME}/:train?api-version={API-VERSION}
| Placeholder | Value | Example |
|---|---|---|
{ENDPOINT} |
The endpoint for authenticating your API request. | https://<your-custom-subdomain>.cognitiveservices.azure.com |
{PROJECT-NAME} |
The name for your project. This value is case-sensitive. | EmailApp |
{API-VERSION} |
The version of the API you are calling. | 2023-04-01 |
Headers
Use the following header to authenticate your request.
| Key | Value |
|---|---|
Ocp-Apim-Subscription-Key |
The key to your resource. Used for authenticating your API requests. |
Request body
Use the following object in your request. The model will be named after the value you use for the modelLabel parameter once training is complete.
{
  "modelLabel": "{MODEL-NAME}",
  "trainingMode": "{TRAINING-MODE}",
  "trainingConfigVersion": "{CONFIG-VERSION}",
  "evaluationOptions": {
    "kind": "percentage",
    "testingSplitPercentage": 20,
    "trainingSplitPercentage": 80
  }
}
| Key | Placeholder | Value | Example |
|---|---|---|---|
modelLabel |
{MODEL-NAME} |
Your Model name. | Model1 |
trainingConfigVersion |
{CONFIG-VERSION} |
The training configuration model version. By default, the latest model version is used. | 2022-05-01 |
trainingMode |
{TRAINING-MODE} |
The training mode to be used for training. Supported modes are Standard training, faster training, but only available for English and Advanced training supported for other languages and multilingual projects, but involves longer training times. Learn more about training modes. | standard |
kind |
percentage |
Split methods. Possible Values are percentage or manual. See how to train a model for more information. |
percentage |
trainingSplitPercentage |
80 |
Percentage of your tagged data to be included in the training set. Recommended value is 80. |
80 |
testingSplitPercentage |
20 |
Percentage of your tagged data to be included in the testing set. Recommended value is 20. |
20 |
Note
The trainingSplitPercentage and testingSplitPercentage are only required if Kind is set to percentage and the sum of both percentages should be equal to 100.
Once you send your API request, you will receive a 202 response indicating success. In the response headers, extract the operation-___location value. It will be formatted like this:
{ENDPOINT}/language/authoring/analyze-conversations/projects/{PROJECT-NAME}/train/jobs/{JOB-ID}?api-version={API-VERSION}
You can use this URL to get the training job status.
Get the training job status
Training may take time to complete - sometimes between 10 and 30 minutes. You can use the following request to keep polling the status of the training job until it successfully completes.
When you send a successful training request, the full request URL for checking the job's status (including your endpoint, project name, and job ID) is contained in the response's operation-___location header.
Use the following GET request to get the status of your model's training progress. Replace the placeholder values below with your own values.
Request URL
{ENDPOINT}/language/authoring/analyze-conversations/projects/{PROJECT-NAME}/train/jobs/{JOB-ID}?api-version={API-VERSION}
| Placeholder | Value | Example |
|---|---|---|
{YOUR-ENDPOINT} |
The endpoint for authenticating your API request. | https://<your-custom-subdomain>.cognitiveservices.azure.com |
{PROJECT-NAME} |
The name for your project. This value is case-sensitive. | EmailApp |
{JOB-ID} |
The ID for locating your model's training status. | xxxxxxxx-xxxx-xxxx-xxxx-xxxxxxxxxxxxx |
{API-VERSION} |
The version of the API you are calling. | 2023-04-01 |
Headers
Use the following header to authenticate your request.
| Key | Value |
|---|---|
Ocp-Apim-Subscription-Key |
The key to your resource. Used for authenticating your API requests. |
Response Body
Once you send the request, you will get the following response. Keep polling this endpoint until the status parameter changes to "succeeded".
{
  "result": {
    "modelLabel": "{MODEL-LABEL}",
    "trainingConfigVersion": "{TRAINING-CONFIG-VERSION}",
    "trainingMode": "{TRAINING-MODE}",
    "estimatedEndDateTime": "2022-04-18T15:47:58.8190649Z",
    "trainingStatus": {
      "percentComplete": 3,
      "startDateTime": "2022-04-18T15:45:06.8190649Z",
      "status": "running"
    },
    "evaluationStatus": {
      "percentComplete": 0,
      "status": "notStarted"
    }
  },
  "jobId": "xxxxx-xxxxx-xxxx-xxxxx-xxxx",
  "createdDateTime": "2022-04-18T15:44:44Z",
  "lastUpdatedDateTime": "2022-04-18T15:45:48Z",
  "expirationDateTime": "2022-04-25T15:44:44Z",
  "status": "running"
}
| Key | Value | Example |
|---|---|---|
modelLabel |
The model name | Model1 |
trainingConfigVersion |
The training configuration version. By default, the latest version is used. | 2022-05-01 |
trainingMode |
Your selected training mode. | standard |
startDateTime |
The time training started | 2022-04-14T10:23:04.2598544Z |
status |
The status of the training job | running |
estimatedEndDateTime |
Estimated time for the training job to finish | 2022-04-14T10:29:38.2598544Z |
jobId |
Your training job ID | xxxxx-xxxx-xxxx-xxxx-xxxxxxxxx |
createdDateTime |
Training job creation date and time | 2022-04-14T10:22:42Z |
lastUpdatedDateTime |
Training job last updated date and time | 2022-04-14T10:23:45Z |
expirationDateTime |
Training job expiration date and time | 2022-04-14T10:22:42Z |
Deploy your model
Generally after training a model you would review its evaluation details. In this quickstart, you deploy your model and call the prediction API to query the results.
Submit deployment job
Create a PUT request using the following URL, headers, and JSON body to start deploying a conversational language understanding model.
Request URL
{ENDPOINT}/language/authoring/analyze-conversations/projects/{PROJECT-NAME}/deployments/{DEPLOYMENT-NAME}?api-version={API-VERSION}
| Placeholder | Value | Example |
|---|---|---|
{ENDPOINT} |
The endpoint for authenticating your API request. | https://<your-custom-subdomain>.cognitiveservices.azure.com |
{PROJECT-NAME} |
The name for your project. This value is case-sensitive. | myProject |
{DEPLOYMENT-NAME} |
The name for your deployment. This value is case-sensitive. | staging |
{API-VERSION} |
The version of the API you are calling. | 2023-04-01 |
Headers
Use the following header to authenticate your request.
| Key | Value |
|---|---|
Ocp-Apim-Subscription-Key |
The key to your resource. Used for authenticating your API requests. |
Request Body
{
  "trainedModelLabel": "{MODEL-NAME}",
}
| Key | Placeholder | Value | Example |
|---|---|---|---|
| trainedModelLabel | {MODEL-NAME} |
The model name that will be assigned to your deployment. You can only assign successfully trained models. This value is case-sensitive. | myModel |
Once you send your API request, you will receive a 202 response indicating success. In the response headers, extract the operation-___location value. It will be formatted like this:
{ENDPOINT}/language/authoring/analyze-conversations/projects/{PROJECT-NAME}/deployments/{DEPLOYMENT-NAME}/jobs/{JOB-ID}?api-version={API-VERSION}
You can use this URL to get the deployment job status.
Get deployment job status
When you send a successful deployment request, the full request URL for checking the job's status (including your endpoint, project name, and job ID) is contained in the response's operation-___location header.
Use the following GET request to get the status of your deployment job. Replace the placeholder values with your own values.
Request URL
{ENDPOINT}/language/authoring/analyze-conversations/projects/{PROJECT-NAME}/deployments/{DEPLOYMENT-NAME}/jobs/{JOB-ID}?api-version={API-VERSION}
| Placeholder | Value | Example |
|---|---|---|
{ENDPOINT} |
The endpoint for authenticating your API request. | https://<your-custom-subdomain>.cognitiveservices.azure.com |
{PROJECT-NAME} |
The name for your project. This value is case-sensitive. | myProject |
{DEPLOYMENT-NAME} |
The name for your deployment. This value is case-sensitive. | staging |
{JOB-ID} |
The ID for locating your model's training status. | xxxxxxxx-xxxx-xxxx-xxxx-xxxxxxxxxxxxx |
{API-VERSION} |
The version of the API you are calling. | 2023-04-01 |
Headers
Use the following header to authenticate your request.
| Key | Value |
|---|---|
Ocp-Apim-Subscription-Key |
The key to your resource. Used for authenticating your API requests. |
Response Body
Once you send the request, you'll get the following response. Keep polling this endpoint until the status parameter changes to "succeeded".
{
    "jobId":"{JOB-ID}",
    "createdDateTime":"{CREATED-TIME}",
    "lastUpdatedDateTime":"{UPDATED-TIME}",
    "expirationDateTime":"{EXPIRATION-TIME}",
    "status":"running"
}
Query model
After your model is deployed, you can start using it to make predictions through the prediction API.
Once deployment succeeds, you can begin querying your deployed model for predictions.
Create a POST request using the following URL, headers, and JSON body to start testing a conversational language understanding model.
Request URL
{ENDPOINT}/language/:analyze-conversations?api-version={API-VERSION}
| Placeholder | Value | Example |
|---|---|---|
{ENDPOINT} |
The endpoint for authenticating your API request. | https://<your-custom-subdomain>.cognitiveservices.azure.com |
{API-VERSION} |
The version of the API you are calling. | 2023-04-01 |
Headers
Use the following header to authenticate your request.
| Key | Value |
|---|---|
Ocp-Apim-Subscription-Key |
The key to your resource. Used for authenticating your API requests. |
Request body
{
  "kind": "Conversation",
  "analysisInput": {
    "conversationItem": {
      "id": "1",
      "participantId": "1",
      "text": "Text 1"
    }
  },
  "parameters": {
    "projectName": "{PROJECT-NAME}",
    "deploymentName": "{DEPLOYMENT-NAME}",
    "stringIndexType": "TextElement_V8"
  }
}
| Key | Placeholder | Value | Example |
|---|---|---|---|
participantId |
{JOB-NAME} |
"MyJobName |
|
id |
{JOB-NAME} |
"MyJobName |
|
text |
{TEST-UTTERANCE} |
The utterance that you want to predict its intent and extract entities from. | "Read Matt's email |
projectName |
{PROJECT-NAME} |
The name of your project. This value is case-sensitive. | myProject |
deploymentName |
{DEPLOYMENT-NAME} |
The name of your deployment. This value is case-sensitive. | staging |
Once you send the request, you will get the following response for the prediction
Response body
{
  "kind": "ConversationResult",
  "result": {
    "query": "Text1",
    "prediction": {
      "topIntent": "inten1",
      "projectKind": "Conversation",
      "intents": [
        {
          "category": "intent1",
          "confidenceScore": 1
        },
        {
          "category": "intent2",
          "confidenceScore": 0
        },
        {
          "category": "intent3",
          "confidenceScore": 0
        }
      ],
      "entities": [
        {
          "category": "entity1",
          "text": "text1",
          "offset": 29,
          "length": 12,
          "confidenceScore": 1
        }
      ]
    }
  }
}
| Key | Sample Value | Description |
|---|---|---|
| query | "Read Matt's email" | the text you submitted for query. |
| topIntent | "Read" | The predicted intent with highest confidence score. |
| intents | [] | A list of all the intents that were predicted for the query text each of them with a confidence score. |
| entities | [] | array containing list of extracted entities from the query text. |
API response for a conversations project
In a conversations project, you'll get predictions for both your intents and entities that are present within your project.
- The intents and entities include a confidence score between 0.0 to 1.0 associated with how confident the model is about predicting a certain element in your project.
- The top scoring intent is contained within its own parameter.
- Only predicted entities will show up in your response.
- Entities indicate:
- The text of the entity that was extracted
- Its start ___location denoted by an offset value
- The length of the entity text denoted by a length value.
Clean up resources
When you don't need your project anymore, you can delete your project using the APIs.
Create a DELETE request by using the following URL, headers, and JSON body to delete a conversational language understanding project.
Request URL
{ENDPOINT}/language/authoring/analyze-conversations/projects/{PROJECT-NAME}?api-version={API-VERSION}
| Placeholder | Value | Example |
|---|---|---|
{ENDPOINT} |
The endpoint for authenticating your API request. | https://<your-custom-subdomain>.cognitiveservices.azure.com |
{PROJECT-NAME} |
The name for your project. This value is case sensitive. | myProject |
{API-VERSION} |
The version of the API that you're calling. | 2023-04-01 |
Headers
Use the following header to authenticate your request.
| Key | Value |
|---|---|
Ocp-Apim-Subscription-Key |
The key to your resource. Used for authenticating your API requests. |
After you send your API request, you receive a 202 response that indicates success, which means that your project was deleted.