Note
Access to this page requires authorization. You can try signing in or changing directories.
Access to this page requires authorization. You can try changing directories.
This article gives you clear steps and important tips for building and deploying a CQA agent. Whether you're new to this process or updating your skills, this guide helps you set up and launch your agent successfully.
Note
- If you already have an Azure Language in Foundry Tools or multi-service resource—whether used on its own or through Language Studio—you can continue to use those existing Language resources within the Microsoft Foundry portal. For more information, see How to use Foundry Tools in the Foundry portal.
- In Foundry, a fine-tuning task serves as your workspace for your CQA solutions. Previously, a fine-tuning task was referred to as a CQA project. You might encounter both terms used interchangeably in older CQA documentation.
- We highly recommend that you use a Foundry resource in the Foundry; however, you can also follow these instructions using a Language resource.
Prerequisites
Before you get started, you need the following resources and permissions:
- An active Azure subscription. If you don't have one, create one for free.
- Requisite permissions. Make sure the person establishing the account and project is assigned as the Azure AI Account Owner role at the subscription level. Alternatively, having either the Contributor or Cognitive Services Contributor role at the subscription scope also meets this requirement. For more information, see Role based access control (RBAC).
- A Foundry resource or a Language resource.
- An Azure AI Search resource (required for accessing CQA). For more information on how to connect your Azure AI Search resource, see Configure connections in Foundry
- A Foundry project created in the Foundry with a deployed CQA knowledge base. For more information, see Create and deploy a CQA project
Step 1: Get started
Let's begin:
Navigate to the Foundry.
If you aren't already signed in, the portal prompts you to do so with your Azure credentials.
Once signed in, you can create or access your existing projects within Foundry.
If you're not already in your Foundry project with your deployed CQA knowledge base, select it now.
Step 2: Deploy an OpenAI model in Foundry (required)
An OpenAI model serves as the foundational source of intelligence and advanced reasoning for your agent.
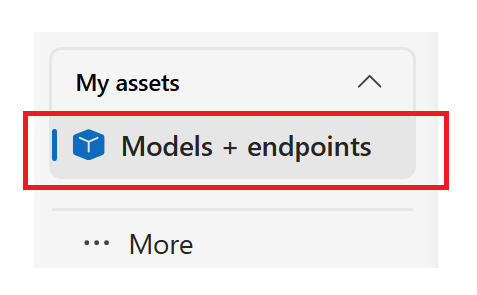
Select Models + endpoints from the My assets section of the navigation menu:
From the main window, select the + Deploy model button.
Select Deploy base model from the drop-down menu.

From the Select a model window, select the gpt-4 base model for this project.
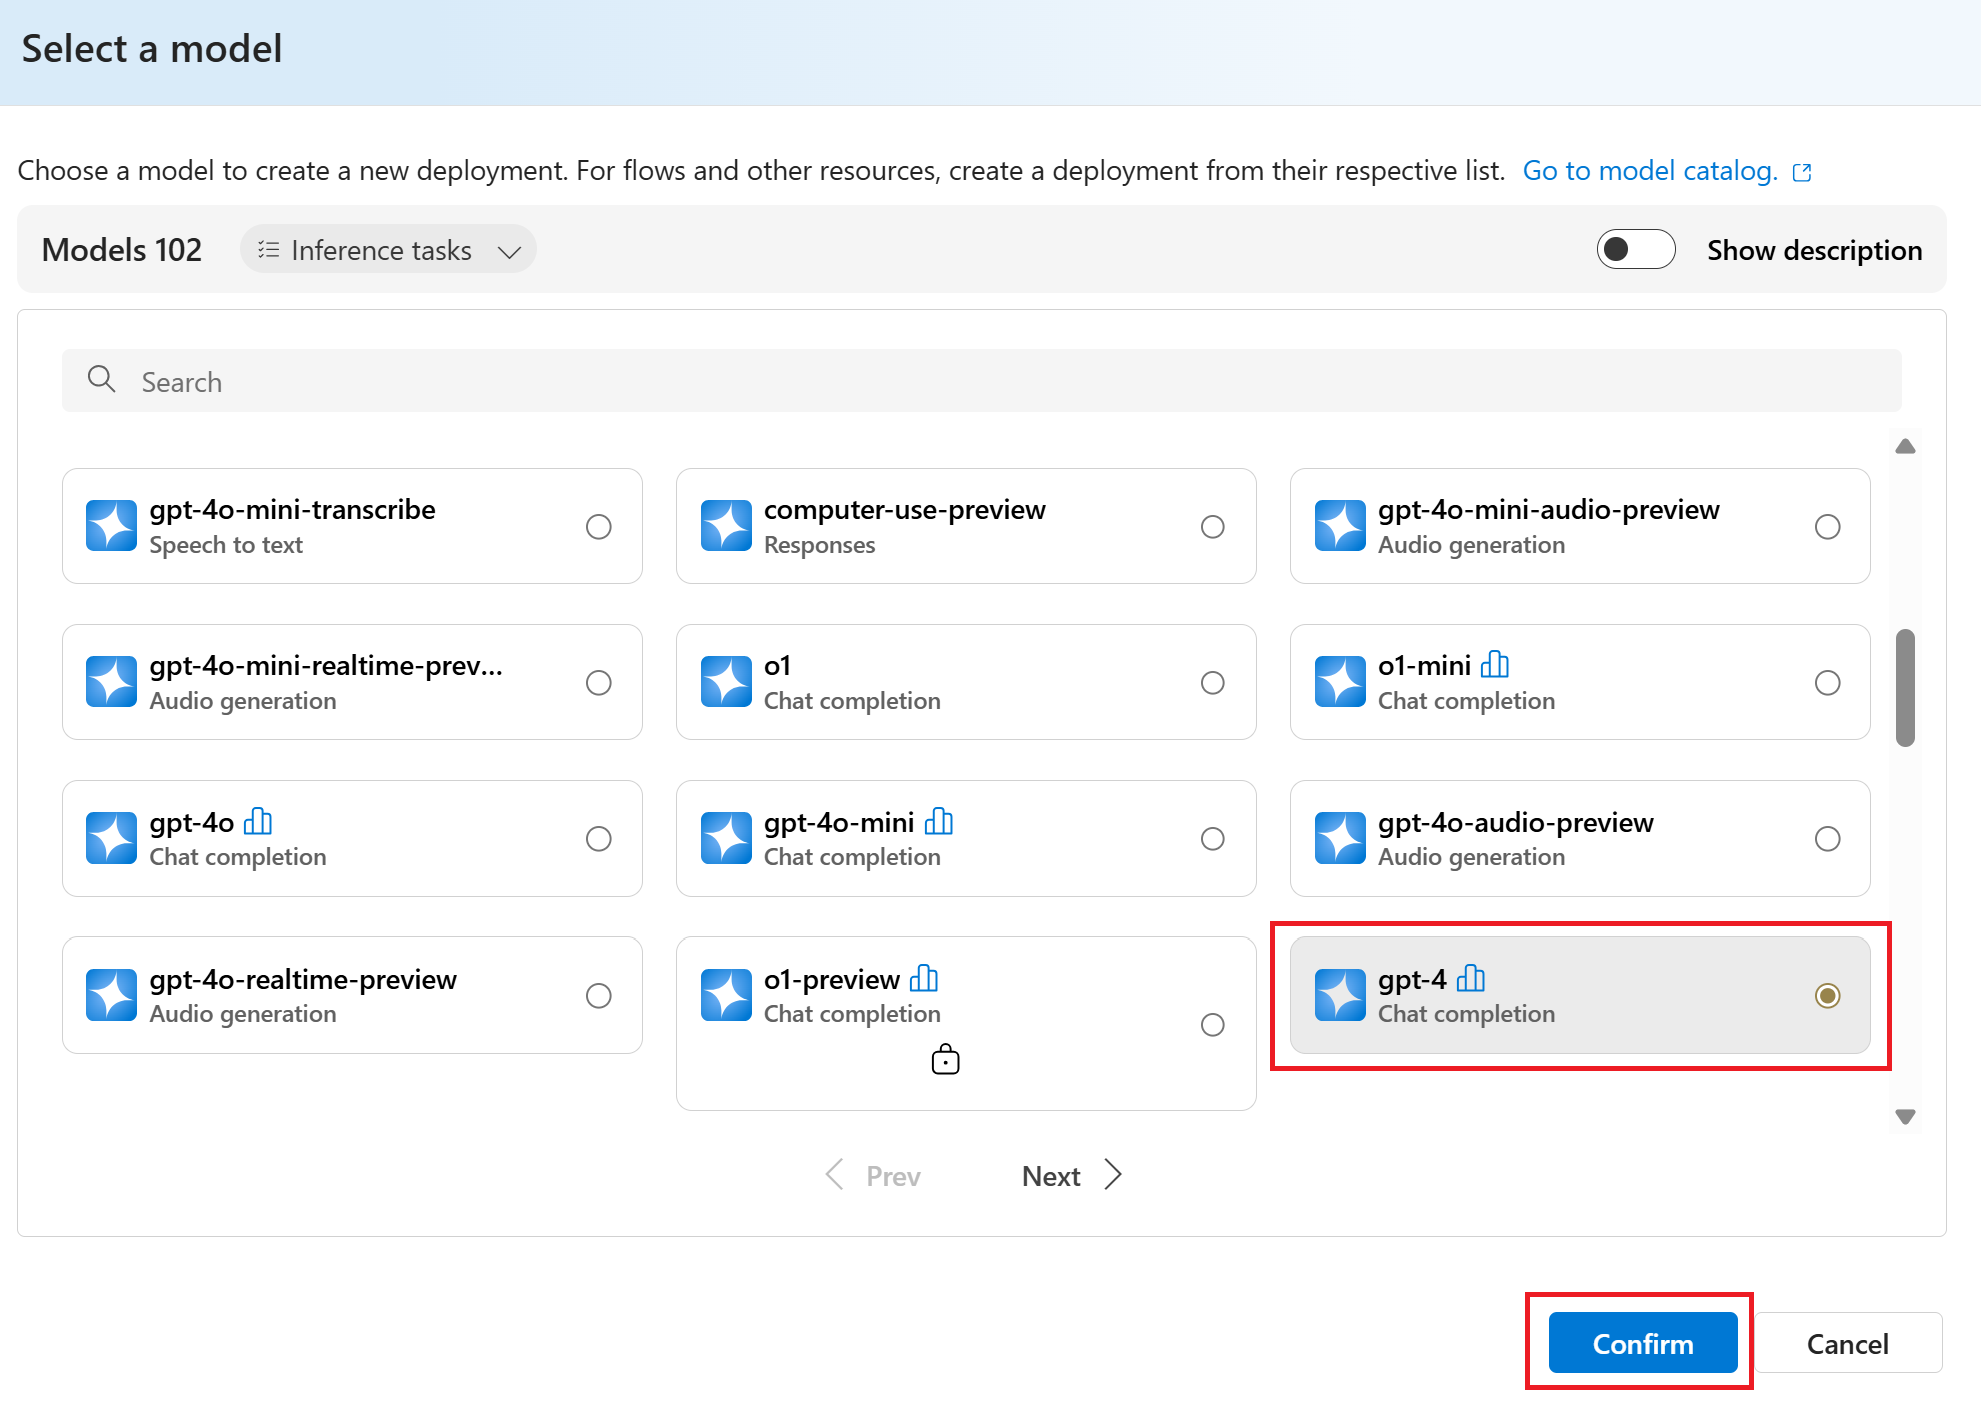
Next, select the Confirm button.
In the Deploy gpt-4 window, keep the default values and select the Deploy button.
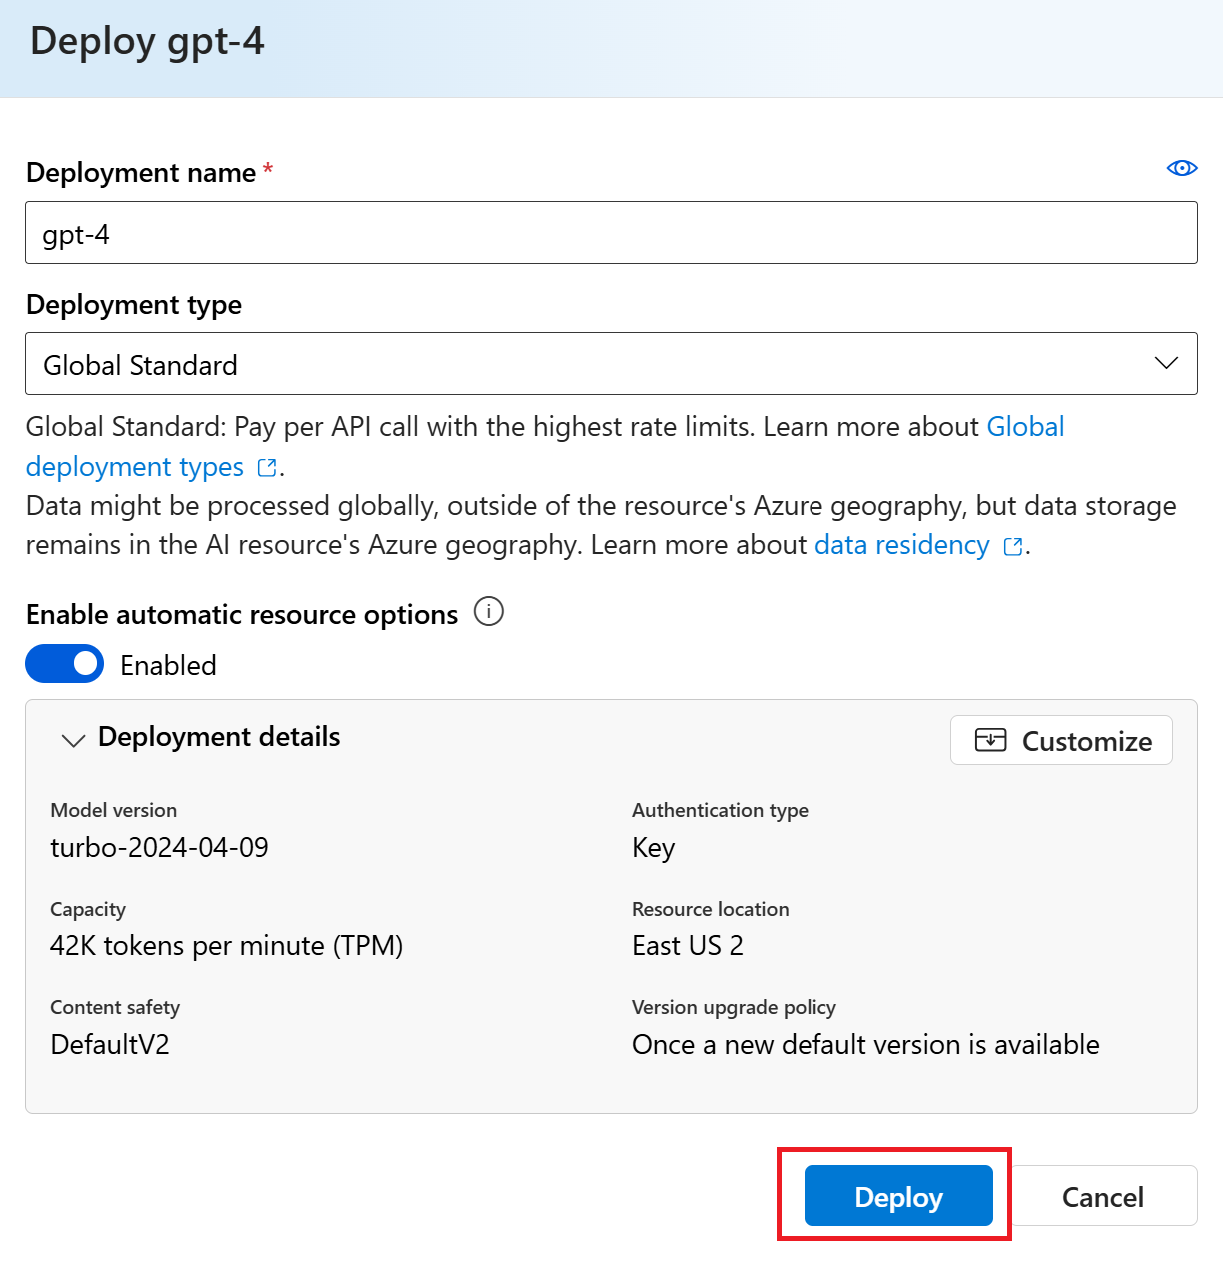
Great! The model deployment step is complete.
Step 3: Connect a custom key (required)
A custom key serves as an enhanced security credential for your agent.
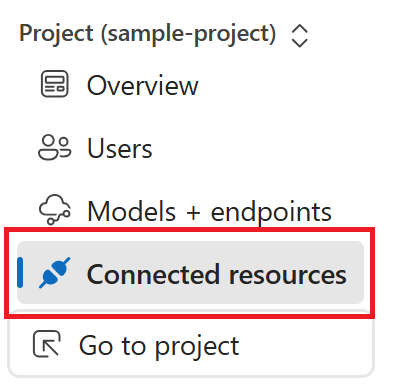
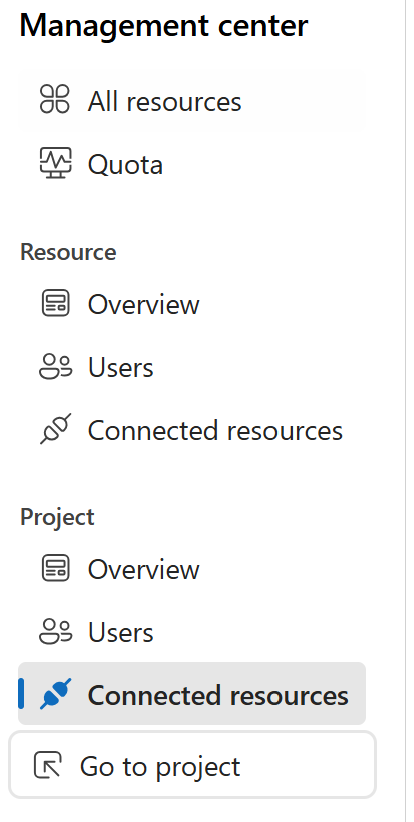
Navigate to Management Center → Connected Resources.
From the main window, select the + New connection button.
From the Add a connection to external assets window, under Other resource types, select Custom keys.

In the Connect a custom resource window, configure the connection as follows:
Authentication. Leave this field set to Custom (default).
Custom keys. Select + Add key value pairs and complete the two fields as follows:
First field. Complete this field with the following key name:
Ocp-Apim-Subscription-KeySecond field. Complete this field with the key value from your Azure portal Foundry or Language resource used to create your CQA knowledge base. Make sure to check the is secret box.
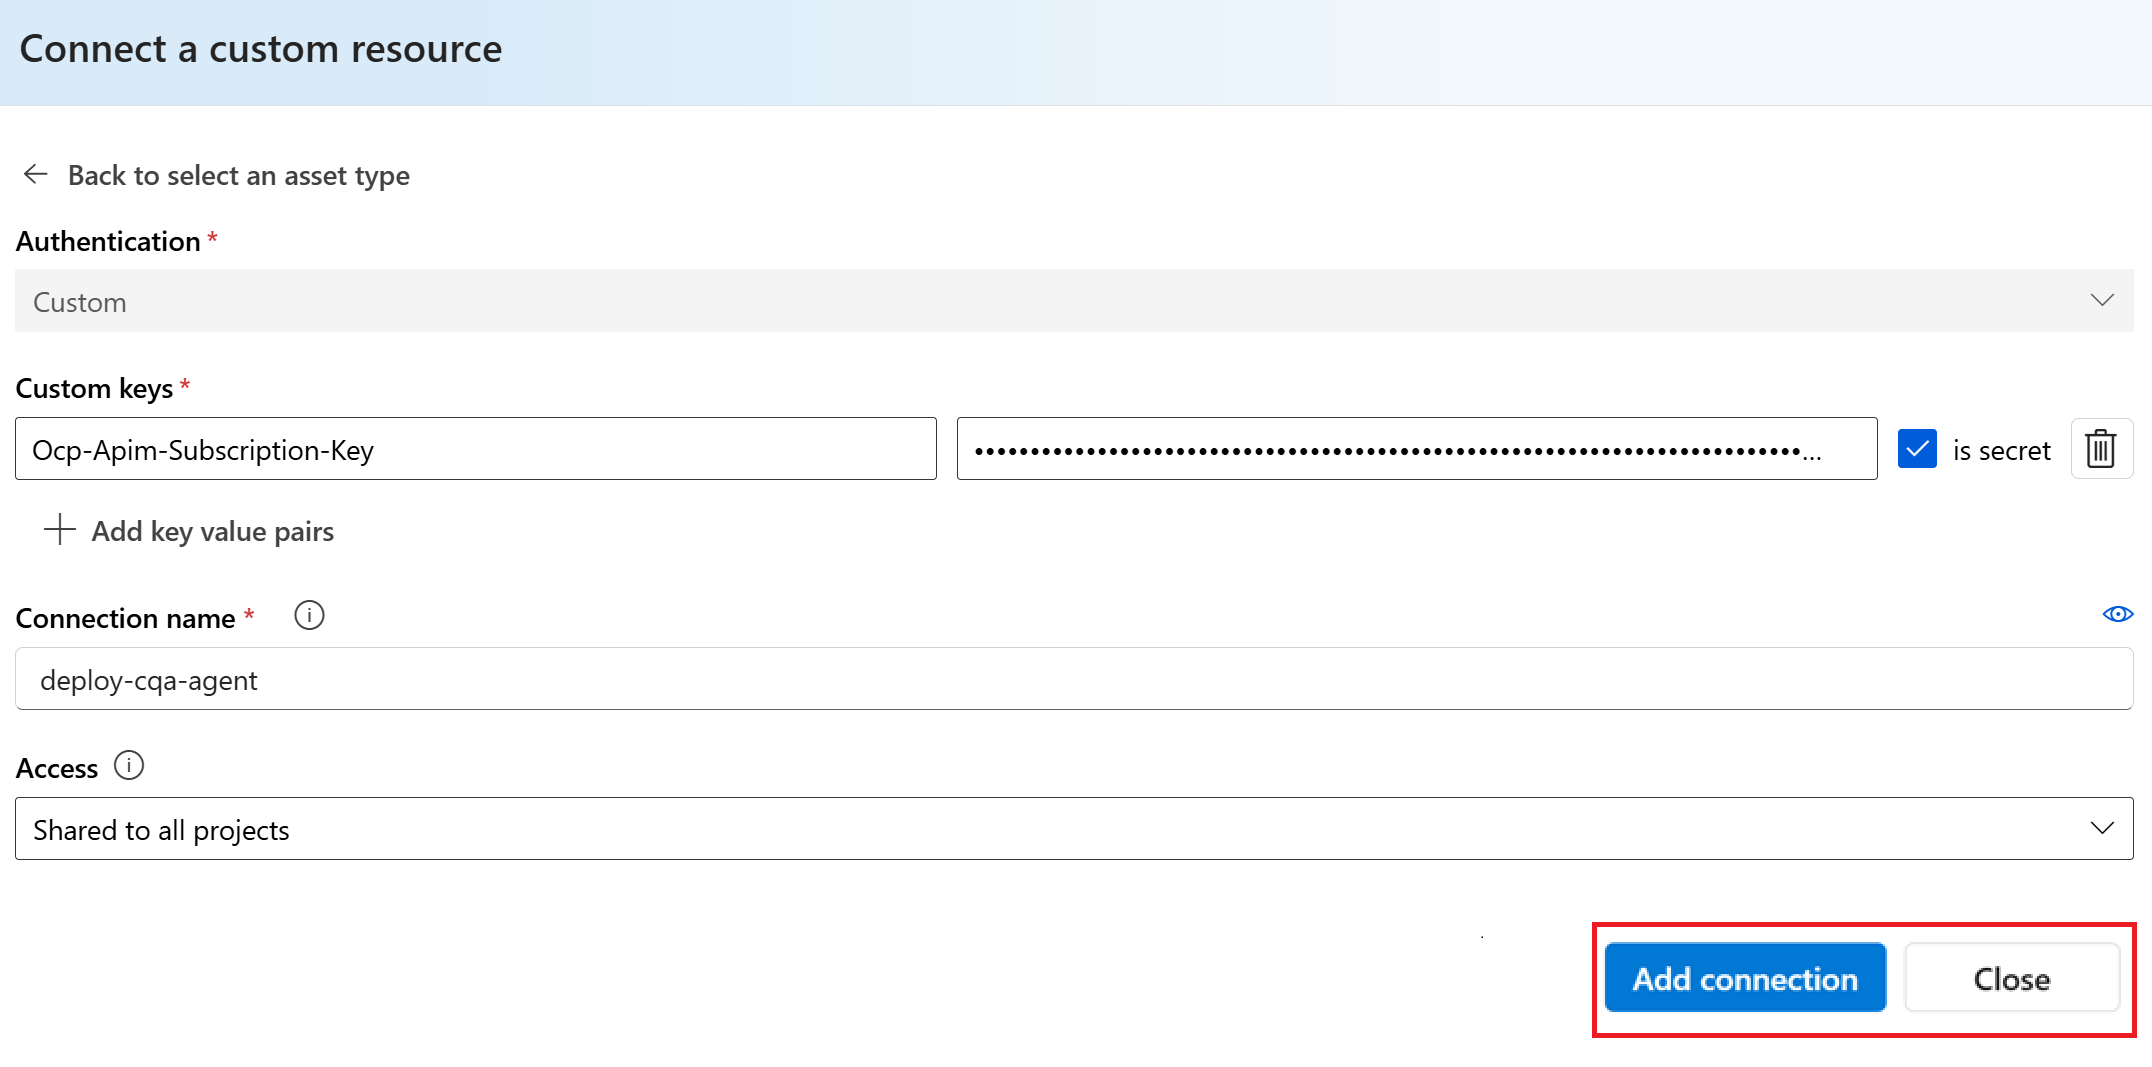
Next, add a Connection name.
Finally, select the Add connection button.
Your new Custom key connection is listed on the Manage connected resources in this project page.
We now provisioned all the necessary resources to create an agent. Select the Go to project button to return to your project with your deployed CQA knowledge base.
Step 4: Create an agent
With your OpenAI deployment and custom key in place, you're ready to begin building your agent, grounded in the knowledge base you chose for this project.
From your project's overview page, select Fine tuning from the left navigation menu.
In the main window, select the model name, created with your deployed CQA knowledge base, from the displayed list.
Select Deploy knowledge base from the Getting started menu.
Under next steps, select the Create an agent button.

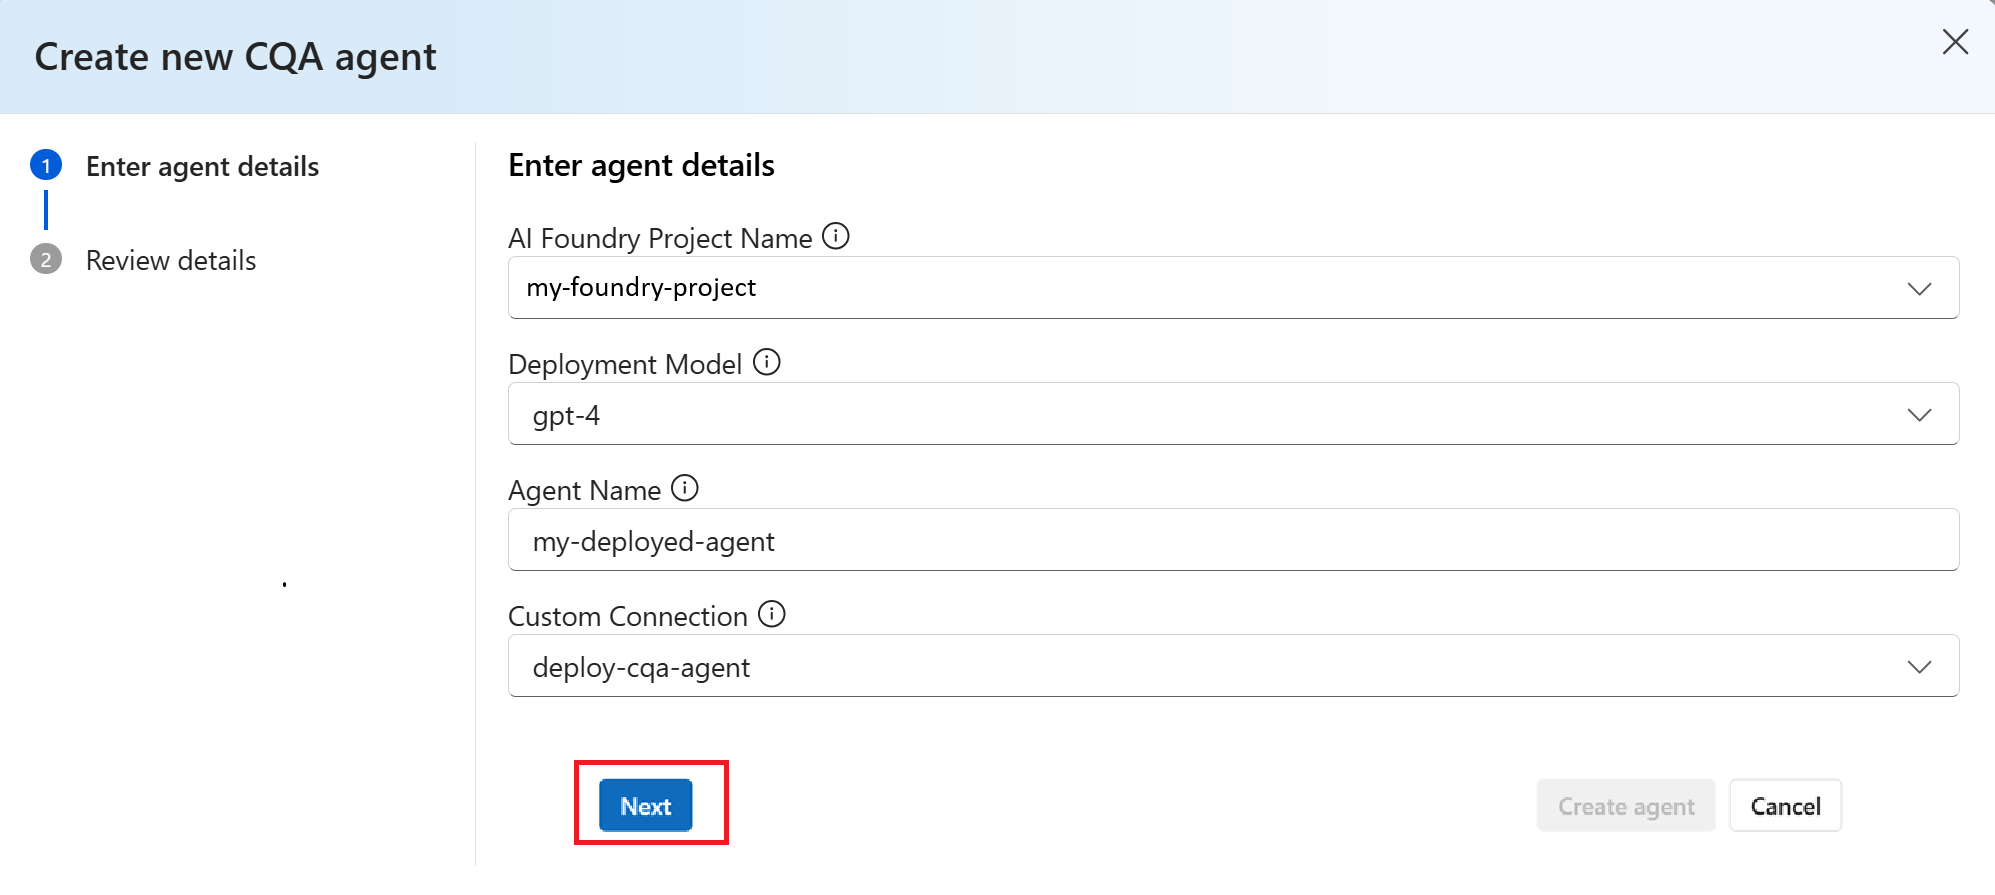
In the Create new CQA agent window, complete the fields as follows:
- Foundry Project Name. The name of your project should already appear in this field by default.
- Deployment Model. The name of the model that you deployed in Step 2 should already appear in this field by default.
- Agent Name. Name your agent (don't use dashes or underscores).
- Custom Connection. The name of the custom key that you connected in Step 3 should already appear in this field by default.
Select the Next button:
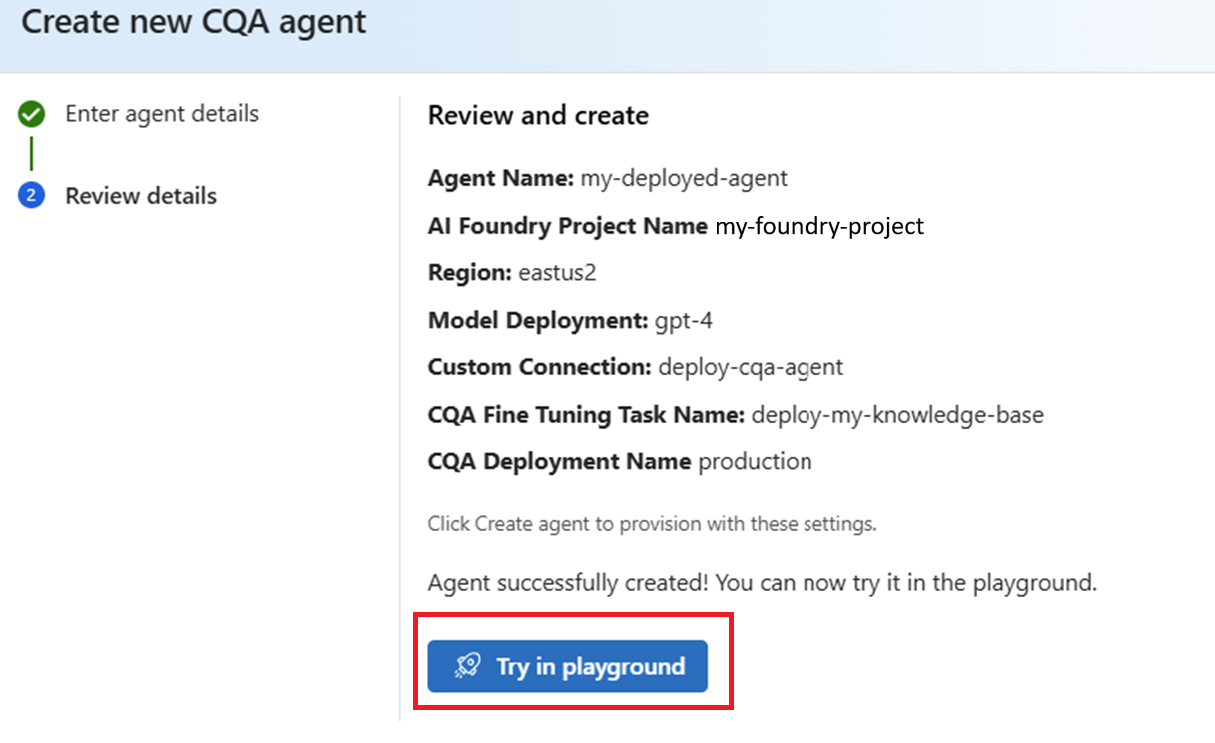
Review the details of your new agent, and then select the Create agent button.
Once your agent is successfully created, select the Try in playground button.
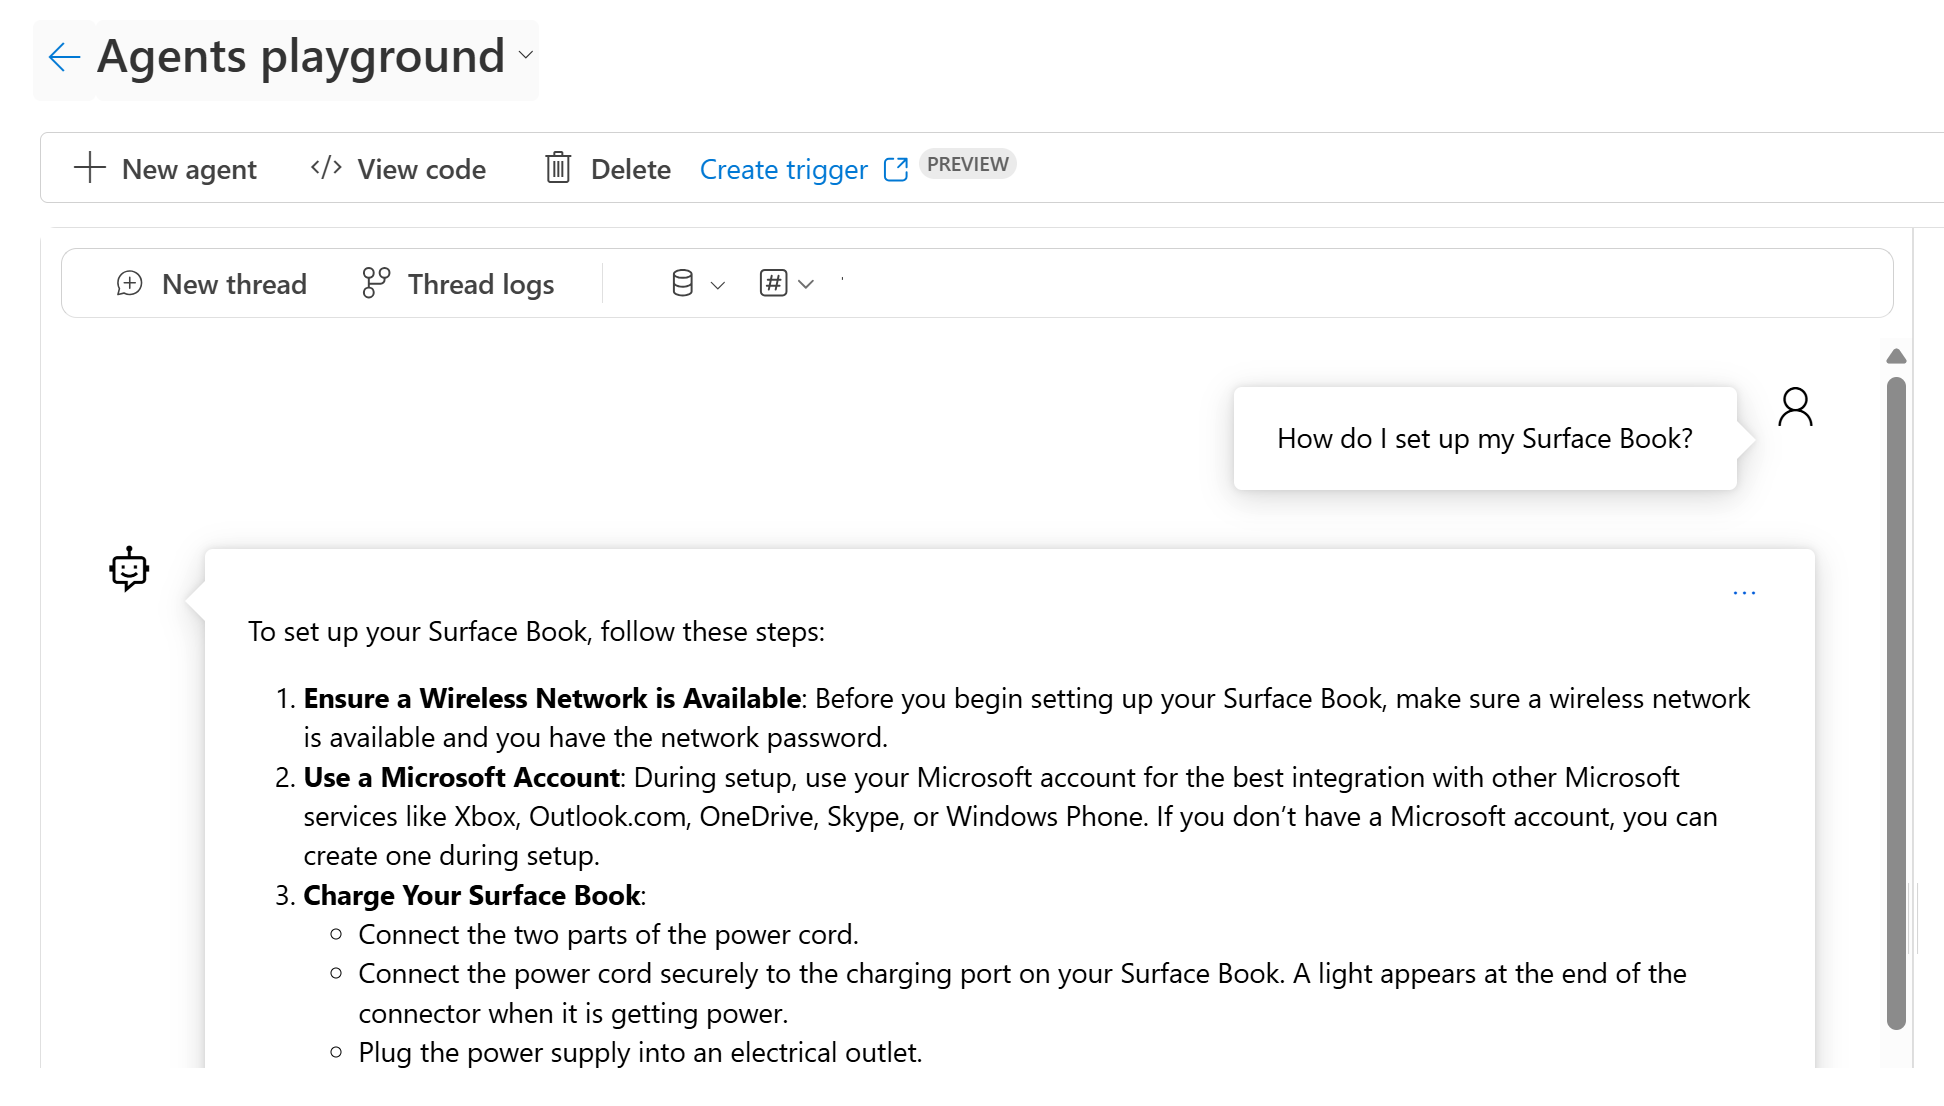
Step 5: Test in agents playground
The agents playground provides a sandbox to test and configure a deployed agent—adding knowledge and defining actions—before deploying it to production, all without writing code.
From the Create and debug your agents window select the Try in Playground button.

Once the agent is successfully uploaded to the playground, you can test it by sending test queries.
That's it! The agent creation and deployment processes are complete. You now know how to deploy a CQA agent using your own custom knowledge base.
Clean up resources
To clean up and remove an Azure AI resource, you can delete either the individual resource or the entire resource group. If you delete the resource group, all resources contained within are also deleted.