Note
Access to this page requires authorization. You can try signing in or changing directories.
Access to this page requires authorization. You can try changing directories.
Getting started with a custom text to speech avatar is a straightforward process. All it takes are a few video clips of your actor. If you'd like to train a custom voice for the same actor, you can do so separately.
Note
Custom avatar access is limited based on eligibility and usage criteria. Request access on the intake form.
Prerequisites
You need an Azure AI Foundry resource in one of the regions that supports custom avatar training. Custom avatar only supports standard (S0) AI Foundry or Speech resources.
You need a video recording of the talent reading a consent statement acknowledging the use of their image and voice. You upload this video when you set up the avatar talent. For more information, see Add avatar talent consent.
You need video recordings of your avatar talent as training data. You upload these videos when you prepare training data. For more information, see Add training data.
Step 1: Start fine-tuning
Tip
Don't mix data for different avatars in one fine-tuning workspace. Each avatar must have its own fine-tuning workspace.
To fine-tune a custom avatar, follow these steps:
Go to your Azure AI Foundry project in the Azure AI Foundry portal. If you need to create a project, see Create an Azure AI Foundry project.
Select Fine-tuning from the left pane.
Select AI Service fine-tuning > + Fine-tune.
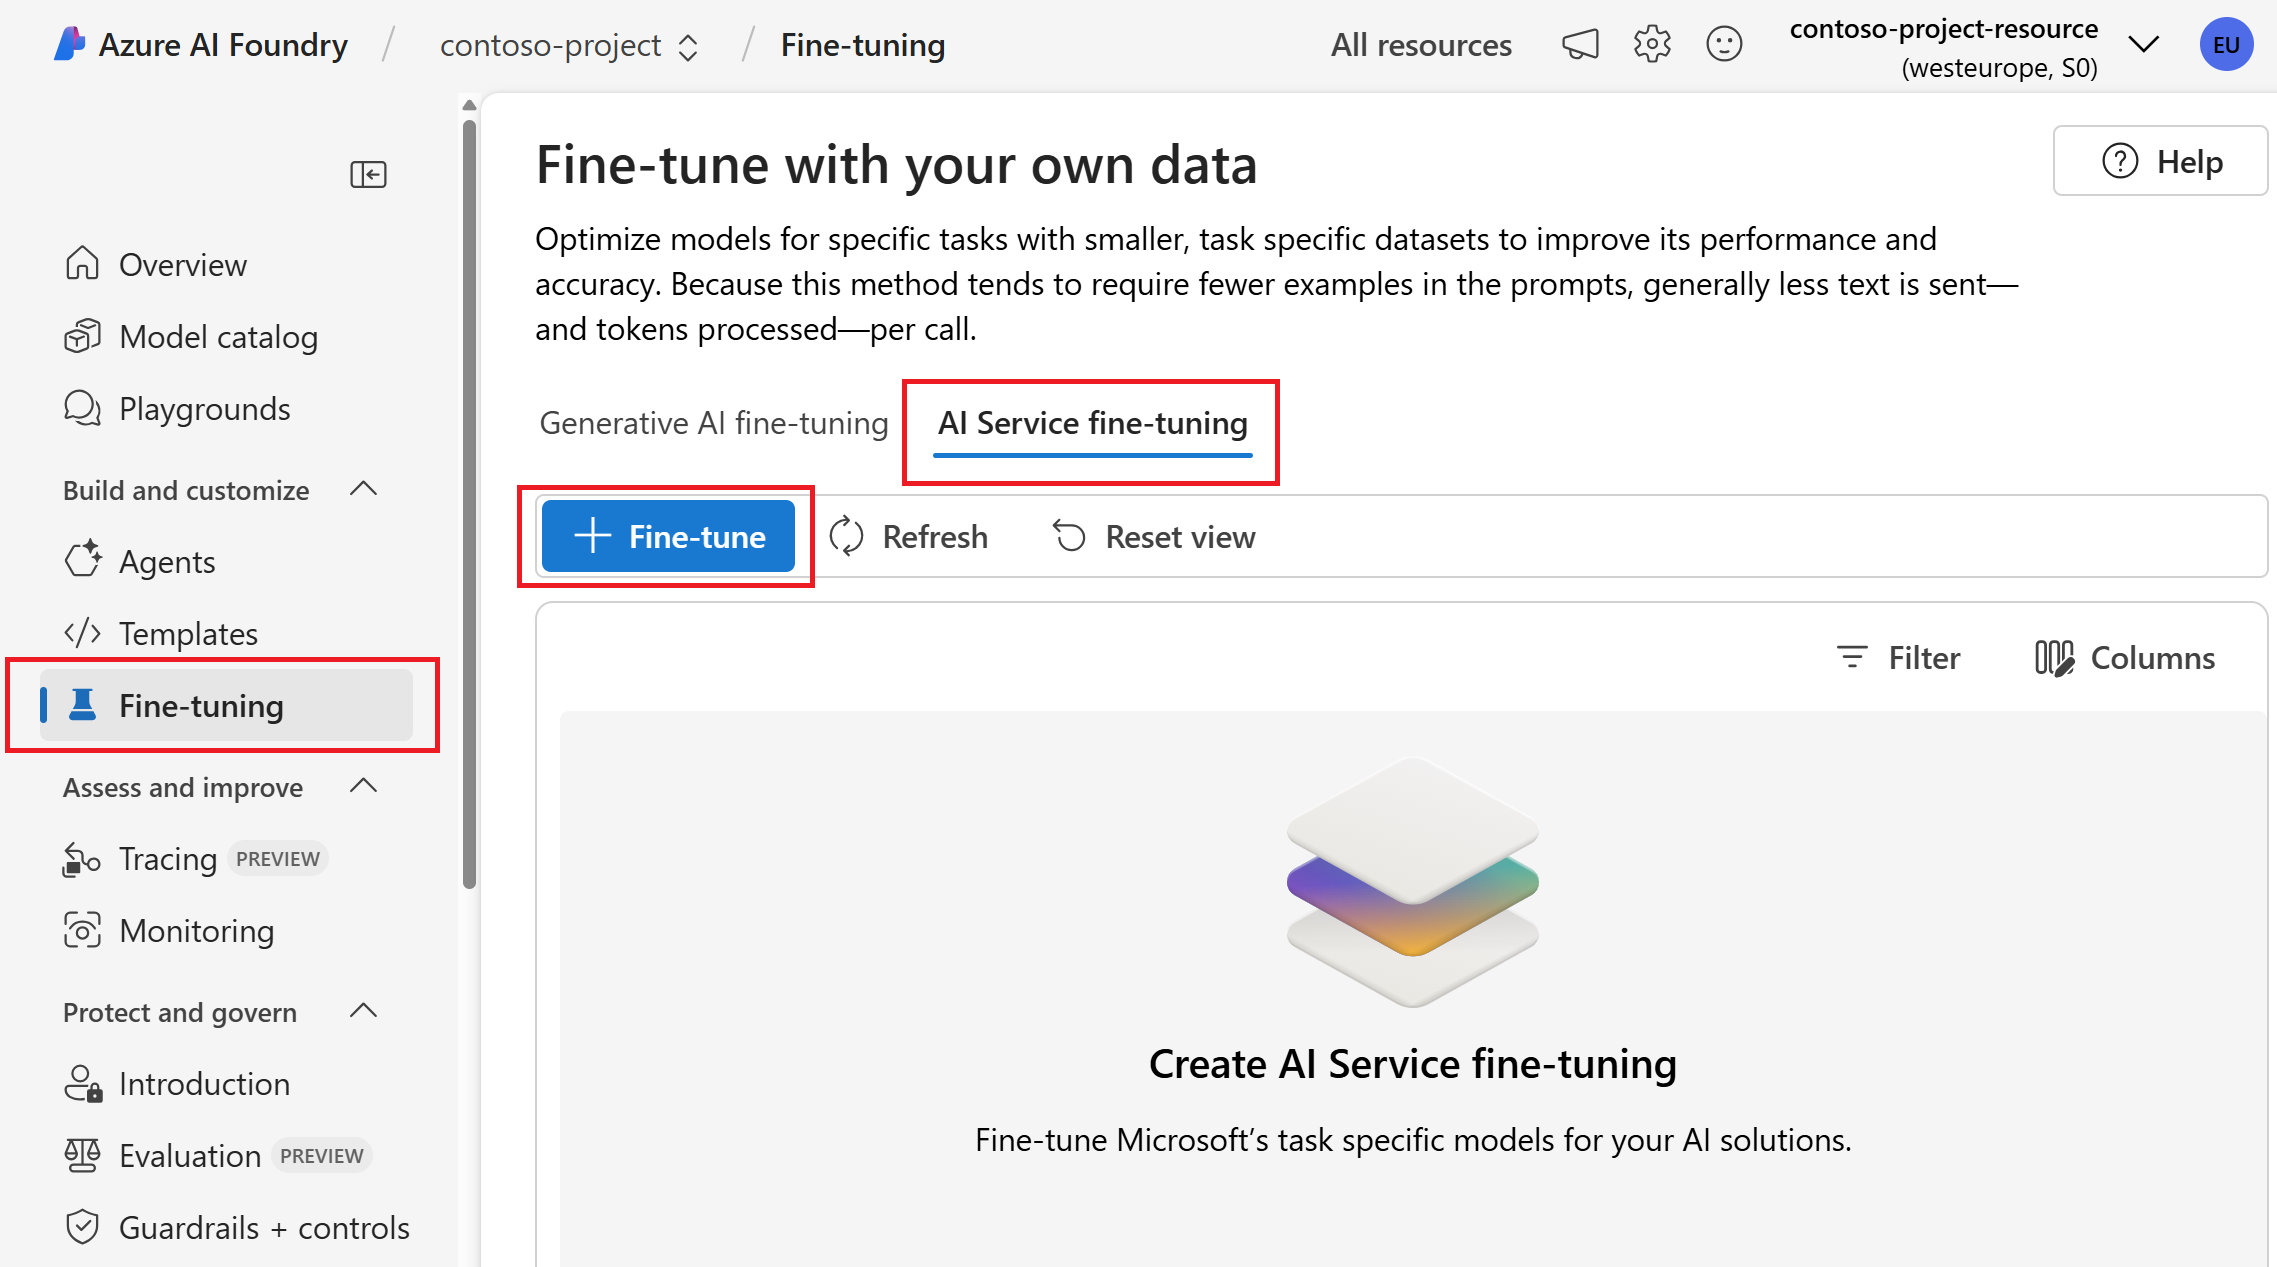
In the wizard, select Custom avatar (text to speech avatar fine-tuning).
Select Next.
Follow the instructions provided by the wizard to create your fine-tuning workspace.

Step 2: Add avatar talent consent
An avatar talent is an individual or target actor whose video of speaking is recorded and used to create neural avatar models. You must obtain sufficient consent under all relevant laws and regulations from the avatar talent to use their video to create the custom text to speech avatar.
You must provide a video file with a recorded statement from your avatar talent, acknowledging the use of their image and voice. Microsoft verifies that the content in the recording matches the predefined script provided by Microsoft. Microsoft compares the face of the avatar talent in the recorded video statement file with randomized videos from the training datasets to ensure that the avatar talent in video recordings and the avatar talent in the statement video file are from the same person.
- If you want to create a voice sync for avatar during avatar training, a custom voice resembling your avatar is created alongside the custom avatar. The voice is used exclusively with the specified avatar. Your consent statement must include both the custom avatar and the voice sync for avatar. For an example of the consent statement for custom avatar with voice sync, see the verbal-statement-voice-sync-for-avatar-all-locales.txt file in the Azure-Samples/cognitive-services-speech-sdk GitHub repository.
- If you don't create a voice sync for avatar, only the custom avatar is trained, and your consent statement must reflect this scope. For an example of the consent statement for custom avatar only, see the verbal-statement-all-locales.txt file in the Azure-Samples/cognitive-services-speech-sdk GitHub repository.
For more information about recording the consent video, see How to record video samples and Disclosure for avatar talent.
To add an avatar talent profile and upload their consent statement in your project, follow these steps:
Sign in to the Azure AI Foundry portal.
Select Fine-tuning from the left pane and then select AI Service fine-tuning.
Select the custom avatar fine-tuning task (by model name) that you started as described in the previous section.
Select Set up avatar talent > Upload consent video.
On the Upload consent video page, follow the instructions to upload the avatar talent consent video you recorded beforehand.
- Select the avatar type to build. Build a voice sync for avatar, which sounds like your avatar talent together with the avatar model, or build avatar without the voice sync for avatar. The option to build a voice sync for avatar is only available in the Southeast Asia, West Europe, and West US 2 regions.
- Select the speaking language of the verbal consent statement recorded by the avatar talent.
- Enter the avatar talent name and your company name in the same language as the recorded statement.
- The avatar talent name must be the name of the person who recorded the consent statement.
- The company name must match the company name that was spoken in the recorded statement.
- You can choose to upload your data from local files, or from a shared storage with Azure Blob.
Select local files from your computer or enter the Azure Blob storage URL where your data is stored.
Select Next.
Review the upload details, and select Upload.
After the avatar talent consent upload is successful, you can proceed to train your custom avatar model.
Step 3: Add training data
The Speech service uses your training data to create a unique avatar tuned to match the look of the person in the recordings. After you train the avatar model, you can start synthesizing avatar videos or use it for live chats in your applications.
All data you upload must meet the requirements for the data type that you choose. To ensure that the Speech service accurately processes your data, it's important to correctly format your data before upload. To confirm that your data is correctly formatted, see Data requirements.
Upload your data
When you're ready to upload your data, go to the Prepare training data tab to add your data.
To upload training data, follow these steps:
- Sign in to the Azure AI Foundry portal.
- Select Fine-tuning from the left pane and then select AI Service fine-tuning.
- Select the custom avatar fine-tuning task (by model name) that you started as described in the previous section.
- Select Prepare training data > Upload data.
- In the Upload data wizard, choose a data type and then select Next. For more information about the data types (including Naturally Speaking, Silent Status, Gesture, and Status 0 speaking), see what video clips to record.
- Select local files from your computer or enter the Azure Blob storage URL where your data is stored.
- Select Next.
- Review the upload details, and select Upload.
Data files are automatically validated when you select Upload. Data validation includes series of checks on the video files to verify their file format, size, and total volume. If there are any errors, fix them and submit again.
After you upload the data, you can check the data overview, which indicates whether you provided enough data to start training.
Step 4: Train your avatar model
Important
All the training data in the project is included in the training. The model quality is highly dependent on the data you provided, and you're responsible for the video quality. Make sure you record the training videos according to the how to record video samples guide.
To create a custom avatar in the Azure AI Foundry portal, follow these steps for one of the following methods:
Sign in to the Azure AI Foundry portal.
Select Fine-tuning from the left pane and then select AI Service fine-tuning.
Select the custom avatar fine-tuning task (by model name) that you started as described in the previous section.
Select Train model > + Train model.
Enter a Name to help you identify the model. Choose a name carefully. The model name is used as the avatar name in your synthesis request by the SDK and speech synthesis markup language (SSML) input. Only letters, numbers, hyphens, and underscores are allowed. Use a unique name for each model.
Important
The avatar model name must be unique within the same Speech or AI Services resource.
Select Train to start training the model.
Training duration varies depending on how much data you use. It normally takes 20-40 compute hours on average to train a custom avatar. Check the pricing note on how training is charged.
Copy your custom avatar model to another project (optional)
Custom avatar training is currently only available in some regions. After your avatar model is trained in a supported region, you can copy it to an AI Services resource for Speech in another region as needed. For more information, see footnotes in the regions table.
Note
You can only copy the voice sync for avatar model to the regions that support the voice sync for avatar feature, which are the same regions that support personal voice.
To copy your custom avatar model to another project:
- On the Train model tab, select an avatar model that you want to copy, and then select Copy to project.
- Select the subscription, region, AI Services resource for Speech, and project where you want to copy the model to. You must have an AI Services resource for Speech and project in the target region, otherwise you need to create them first.
- Select Submit to copy the model.
Once the model is copied, you see a notification in the Azure AI Foundry portal.
Navigate to the project where you copied the model to deploy the model copy.
Step 5: Deploy and use your avatar model
After you successfully created and trained your avatar model, you deploy it to your endpoint.
To deploy your avatar:
Sign in to the Azure AI Foundry portal.
Select Fine-tuning from the left pane and then select AI Service fine-tuning.
Select the custom avatar fine-tuning task (by model name) that you started as described in the previous section.
Select Deploy model > Deploy model.
Select a model that you want to deploy.
Select Deploy to start the deployment.
Important
When a model is deployed, you pay for continuous up time of the endpoint regardless of your interaction with that endpoint. Check the pricing note on how model deployment is charged. You can delete a deployment when the model isn't in use to reduce spending and conserve resources.
After you deploy your custom avatar, it's available to use in the Azure AI Foundry portal or via API:
- The avatar appears in the avatar list of text to speech avatar on Azure AI Foundry portal.
- The avatar appears in the avatar list of live chat avatars via Azure AI Foundry portal.
- You can call the avatar from the SDK and SSML input by specifying the avatar model name. For more information, see the avatar properties.
Remove a deployment
To remove your deployment, follow these steps:
- Sign in to the Azure AI Foundry portal.
- Select Fine-tuning from the left pane and then select AI Service fine-tuning.
- Select the custom avatar fine-tuning task (by model name) that you started as described in the previous section.
- Select the deployment on the Deploy model page. The model is actively hosted if the status is "Succeeded".
- You can select the Delete deployment button and confirm the deletion to remove the hosting.
Tip
Once a deployment is removed, you no longer pay for its hosting. Deleting a deployment doesn't cause any deletion of your model. If you want to use the model again, create a new deployment.
Getting started with a custom text to speech avatar is a straightforward process. All it takes are a few video clips of your actor. If you'd like to train a custom voice for the same actor, you can do so separately.
Note
Custom avatar access is limited based on eligibility and usage criteria. Request access on the intake form.
Prerequisites
You need an Azure AI Foundry resource in one of the regions that supports custom avatar training. Custom avatar only supports standard (S0) AI Foundry or Speech resources.
You need a video recording of the talent reading a consent statement acknowledging the use of their image and voice. You upload this video when you set up the avatar talent. For more information, see Add avatar talent consent.
You need video recordings of your avatar talent as training data. You upload these videos when you prepare training data. For more information, see Add training data.
Step 1: Create a custom avatar project
To create a custom avatar project, follow these steps:
Sign in to the Speech Studio and select your subscription and Speech resource.
Select Custom avatar (preview).
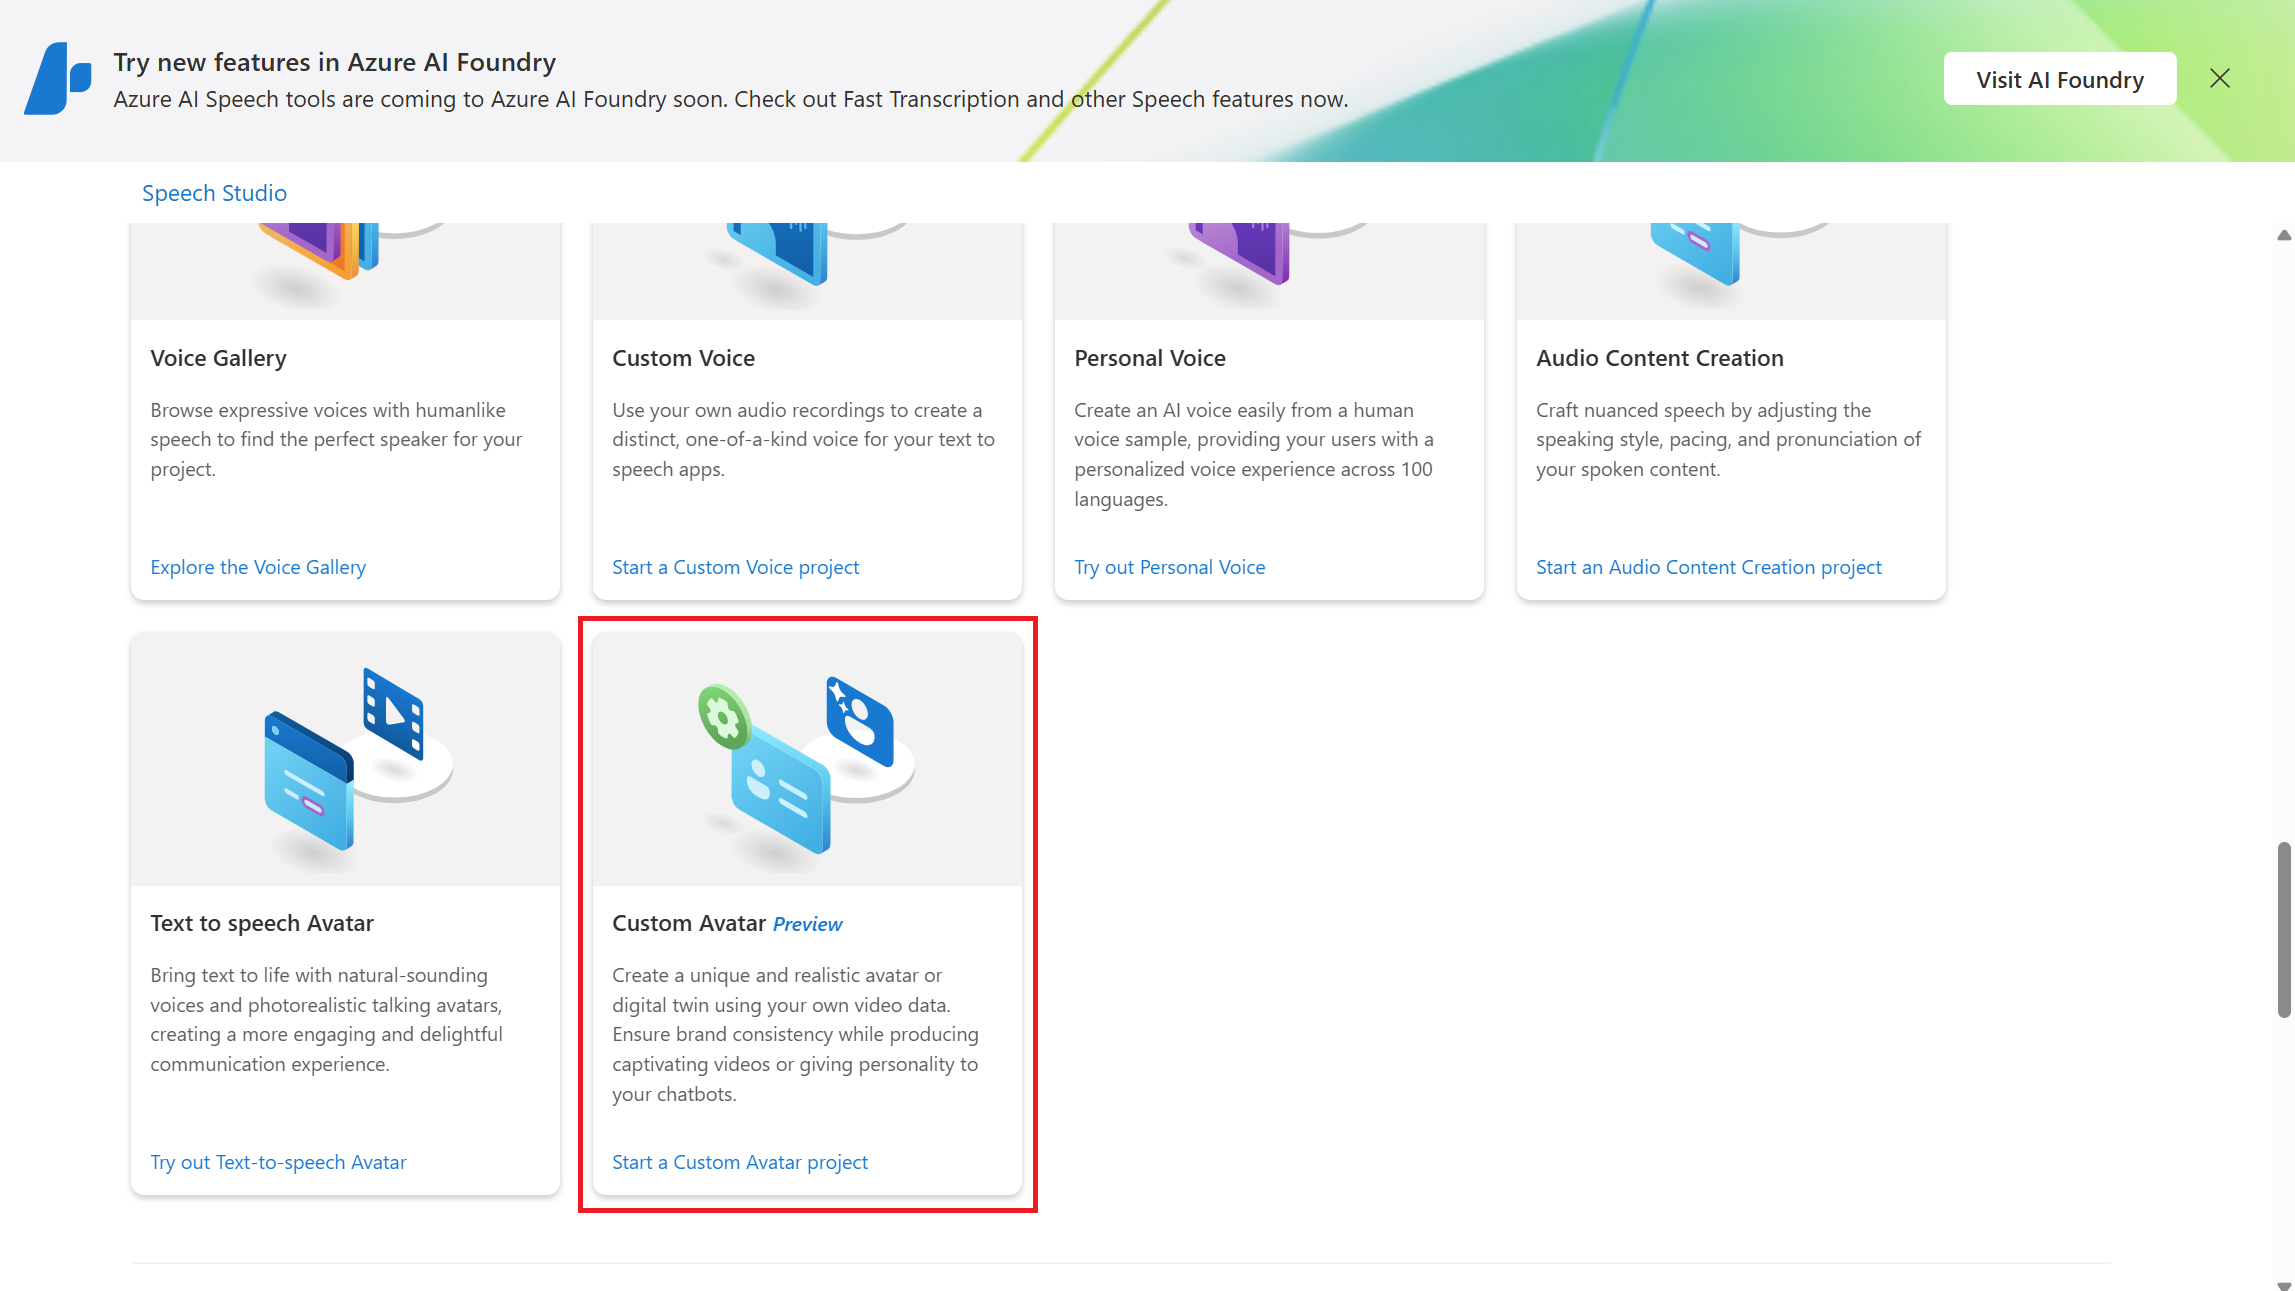
Select +Create a project.
Follow the instructions provided by the wizard to create your project.
Tip
Don't mix data for different avatars in one project. Always create a new project for a new avatar.
Select the new project by name. Then you see these menu items in the left panel: Set up avatar talent, Prepare training data, Train model, and Deploy model.


Step 2: Add avatar talent consent
An avatar talent is an individual or target actor whose video of speaking is recorded and used to create neural avatar models. You must obtain sufficient consent under all relevant laws and regulations from the avatar talent to use their video to create the custom text to speech avatar.
You must provide a video file with a recorded statement from your avatar talent, acknowledging the use of their image and voice. Microsoft verifies that the content in the recording matches the predefined script provided by Microsoft. Microsoft compares the face of the avatar talent in the recorded video statement file with randomized videos from the training datasets to ensure that the avatar talent in video recordings and the avatar talent in the statement video file are from the same person.
- If you want to create a voice sync for avatar during avatar training, a custom voice resembling your avatar is created alongside the custom avatar. The voice is used exclusively with the specified avatar. Your consent statement must include both the custom avatar and the voice sync for avatar.
- If you don't create a voice sync for avatar, only the custom avatar is trained, and your consent statement must reflect this scope.
You can find the verbal consent statement in multiple languages via the Azure-Samples/cognitive-services-speech-sdk GitHub repository. The language of the verbal statement must be the same as your recording. See also the Disclosure for voice talent.
For more information about recording the consent video, see How to record video samples.
To add an avatar talent profile and upload their consent statement in your project, follow these steps:
Sign in to the Speech Studio.
Select Custom avatar > Your project name > Set up avatar talent > Upload consent video.
On the Upload consent video page, follow the instructions to upload the avatar talent consent video you recorded beforehand.
- Select the avatar type to build. Build a voice sync for avatar, which sounds like your avatar talent together with the avatar model, or build avatar without the voice sync for avatar. The option to build a voice sync for avatar is only available in the Southeast Asia, West Europe, and West US 2 regions.
- Select the speaking language of the verbal consent statement recorded by the avatar talent.
- Enter the avatar talent name and your company name in the same language as the recorded statement.
- The avatar talent name must be the name of the person who recorded the consent statement.
- The company name must match the company name that was spoken in the recorded statement.
- You can choose to upload your data from local files, or from a shared storage with Azure Blob.

Select Upload.

After the avatar talent consent upload is successful, you can proceed to train your custom avatar model.
Step 3: Add training data
The Speech service uses your training data to create a unique avatar tuned to match the look of the person in the recordings. After you train the avatar model, you can start synthesizing avatar videos or use it for live chats in your applications.
All data you upload must meet the requirements for the data type that you choose. To ensure that the Speech service accurately processes your data, it's important to correctly format your data before upload. To confirm that your data is correctly formatted, see Data requirements.
Upload your data
When you're ready to upload your data, go to the Prepare training data tab to add your data.
To upload training data, follow these steps:
Sign in to the Speech Studio.
Select Custom avatar > Your project name > Prepare training data > Upload data.

In the Upload data wizard, choose a data type and then select Next. For more information about the data types (including Naturally speaking, Silent, Gesture, and Status 0 speaking), see what video clips to record.
Select local files from your computer or enter the Azure Blob storage URL where your data is stored.
Select Next.
Review the upload details, and select Submit.

Data files are automatically validated when you select Submit. Data validation includes series of checks on the video files to verify their file format, size, and total volume. If there are any errors, fix them and submit again.
After you upload the data, you can check the data overview, which indicates whether you provided enough data to start training. This screenshot shows an example of enough data added for training an avatar without other gestures.

Step 4: Train your avatar model
Important
All the training data in the project is included in the training. The model quality is highly dependent on the data you provided, and you're responsible for the video quality. Make sure you record the training videos according to the how to record video samples guide.
To create a custom avatar in Speech Studio, follow these steps for one of the following methods:
Sign in to the Speech Studio.
Select Custom avatar > Your project name > Train model > Train model.
Enter a Name to help you identify the model. Choose a name carefully. The model name is used as the avatar name in your synthesis request by the SDK and speech synthesis markup language (SSML) input. Only letters, numbers, hyphens, and underscores are allowed. Use a unique name for each model.
Important
The avatar model name must be unique within the same Speech or AI Services resource.
Select Train to start training the model.
Training duration varies depending on how much data you use. It normally takes 20-40 compute hours on average to train a custom avatar. Check the pricing note on how training is charged.
Copy your custom avatar model to another project (optional)
Custom avatar training is currently only available in some regions. After your avatar model is trained in a supported region, you can copy it to an AI Services resource for Speech in another region as needed. For more information, see footnotes in the regions table.
Note
You can only copy the voice sync for avatar model to the regions that support the voice sync for avatar feature, which are the same regions that support personal voice.
To copy your custom avatar model to another project:
- On the Train model tab, select an avatar model that you want to copy, and then select Copy to project.
- Select the subscription, region, AI Services resource for Speech, and project where you want to copy the model to. You must have an AI Services resource for Speech and project in the target region, otherwise you need to create them first.
- Select Submit to copy the model.
Once the model is copied, you see a notification in the Speech Studio.
Navigate to the project where you copied the model to deploy the model copy.
Step 5: Deploy and use your avatar model
After you successfully created and trained your avatar model, you deploy it to your endpoint.
To deploy your avatar:
- Sign in to the Speech Studio.
- Select Custom avatar > Your project name > Deploy model.
- Select Deploy model and select a model that you want to deploy.
- Select Deploy to start the deployment.
Important
When a model is deployed, you pay for continuous up time of the endpoint regardless of your interaction with that endpoint. Check the pricing note on how model deployment is charged. You can delete a deployment when the model isn't in use to reduce spending and conserve resources.
After you deploy your custom avatar, it's available to use in Speech Studio or via API:
- The avatar appears in the avatar list of text to speech avatar on Speech Studio.
- The avatar appears in the avatar list of live chat avatars via Speech Studio.
- You can call the avatar from the SDK and SSML input by specifying the avatar model name. For more information, see the avatar properties.
Remove a deployment
To remove your deployment, follow these steps:
- Sign in to the Speech Studio.
- Navigate to Custom Avatar > Your project name > Deploy model.
- Select the deployment on the Deploy model page. The model is actively hosted if the status is "Succeeded".
- You can select the Delete deployment button and confirm the deletion to remove the hosting.
Tip
Once a deployment is removed, you no longer pay for its hosting. Deleting a deployment doesn't cause any deletion of your model. If you want to use the model again, create a new deployment.