Note
Access to this page requires authorization. You can try signing in or changing directories.
Access to this page requires authorization. You can try changing directories.
Microsoft Entra ID is a cloud-based identity solution designed to manage user access and permissions for Microsoft services, resources, and applications. Organizations that subscribe to Microsoft's online business services, such as Microsoft Azure, have access to Microsoft Entra ID.
Microsoft Entra ID enables you to authenticate requests to your Azure AI resources without the need for passwords or keys. Instead, a robust layer of security is created by registering an identity application with the Microsoft Entra ID platform. This registration enables your identity application to make secure requests to your Azure AI resource API, thus establishing a trust relationship with the Microsoft identity platform.
This article guides you on how to create and utilize a Microsoft Entra ID identity application to authenticate requests to your Azure AI resources. Here are the steps:
- Set up prerequisites.
- Disable key-based (local) authentication
- Register an identity application with Microsoft Entra ID
- Add a client secret
- Assign an
RBAC(role-based access control) role to grant access permissions to your application. - Obtain an access token
- Make a request to the Azure AI Translator API
Prerequisites
Before you get started, you need an Azure account and an Azure AI services subscription.
An active Azure subscription. If you don't have an Azure subscription, you can create one for free.
An Azure AI Translator resource. Once you have your Azure subscription, create a Translator single-service global resource in the Azure portal.
Important
Regional endpoints don't support Microsoft Entra authentication.
cURL command-line tool installed.
PowerShell version 7.*+ (or a similar command-line application.):
To check your PowerShell version, type the following command relative to your operating system:
- Windows:
Get-Host | Select-Object Version - macOS or Linux:
$PSVersionTable
- Windows:
Disable key authentication
To use Microsoft Entra authentication, key-based (local) authentication must be turned off. Once key access is disabled, Microsoft Entra ID becomes the sole authorization method. Your organization can choose to deactivate local authentication and mandate Microsoft Entra for Azure AI resources. If not, you can disable key authentication for specific resources following these steps in PowerShell:
Connect to Azure
Connect-AzAccountVerify local authentication status
Get-AzCognitiveServicesAccountCheck that the property
DisableLocalAuthis set to$true(local authentication is disabled)Get-AzCognitiveServicesAccount -ResourceGroupName "my-resource-group" -Name "my-resource-name"If the
DisableLocalAuthis blank or set to False, you must set it to $true.Disable local authentication
Set-AzCognitiveServicesAccount -ResourceGroupName "my-resource-group" -Name "my-resource-name" -DisableLocalAuth $true
You can check once more to ensure that local authentication is disabled using the Get-AzCognitiveServicesAccount cmdlet. A value of True means local authentication is disabled.
Register an identity application with Microsoft Entra ID
Navigate to the Azure portal
Enter
Microsoft Entra IDin the search box at the top of the page.
Select the
Microsoft Entra IDservice from the drop-down menu.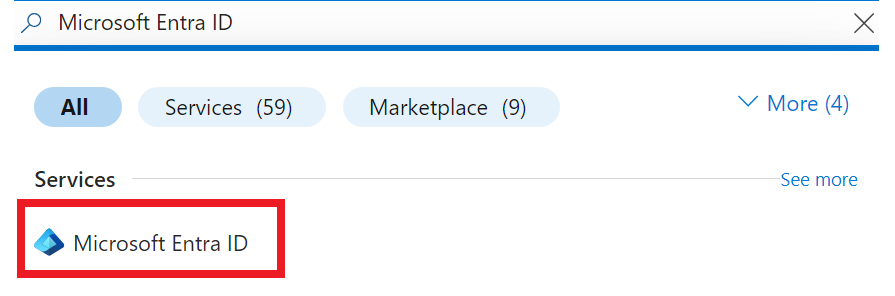
Selecting
Microsoft Entra IDopens your organization's overview page in the Azure portal.From the left rail menu
Managenode, selectApp registrations.
Select
New registrationfrom the menu at the top of the main window.
Complete the application registration fields:
- Name. Select a name for your application. In our case, let's use
azure-ai-auth-app. - Supported account types. Specify who can use the application.
- Redirect URI. This selection is optional. We're skipping it for this project.
- Register. Select the
Registerbutton and complete theApp registration.
For more information on registering an application, see Register an application
- Name. Select a name for your application. In our case, let's use
Once registration completes, The
App's registrationOverview pane is displayed. The Application (client) ID, also called theclient ID, value uniquely identifies your application in the Microsoft identity platform.
Before you leave the App registration overview page, copy and paste the following values in a secure and convenient ___location, such as Windows Notepad:
Application (client) IDDirectory (tenant) ID
You completed your App registration. Next we add a client secret to your application.
Add a client secret credential
Client applications utilize credentials to gain access to a web API. These credentials enable the application to authenticate independently, eliminating the need for user interaction, such as key entry, during runtime. Your application's client secret (application password) is a string that the application uses to prove its identity when requesting a token.
Select the Overview page from the left navigation menu.

Select
Add a certificate or secret.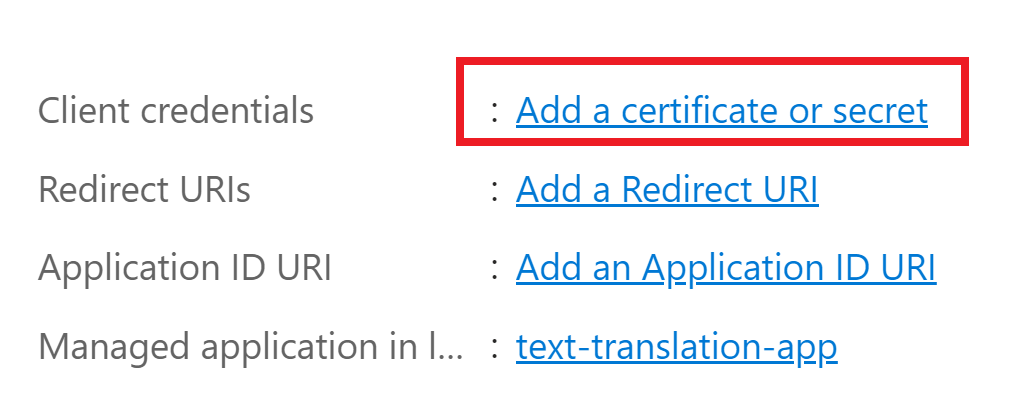
Next select
New client secret.
In the
Add a client secretwindow, add a description, set an expiry period, and then select theAddbutton.
Copy and paste the client secret
Valuein the same secure ___location as theApplication (client) IDandDirectory (tenant) ID, such as Windows Notepad. Client secret values can only be viewed immediately after creation. Be sure to save the secret before leaving the page.
Now that your application has the proper authentication credentials, we add permissions for your application to access Azure AI Foundry resources.
Add API permissions
Next, let's add a permission that allows the application to access the Azure AI Services (Cognitive Services) APIs, including Azure AI Translator, as a user.
In the left navigation menu, navigate to
API permissionsthen selectAdd a permissionfrom the main window.
From the new window that appears select
APIs my organization usesand then typeMicrosoft Cognitive Servicesin the search bar.
Select
Microsoft Cognitive Servicesfrom the search results.In the new window, under
Permissions, selectDelegated permissions.Mark the
Access Cognitive Services API as organization userscheckbox.Select
Add permissions.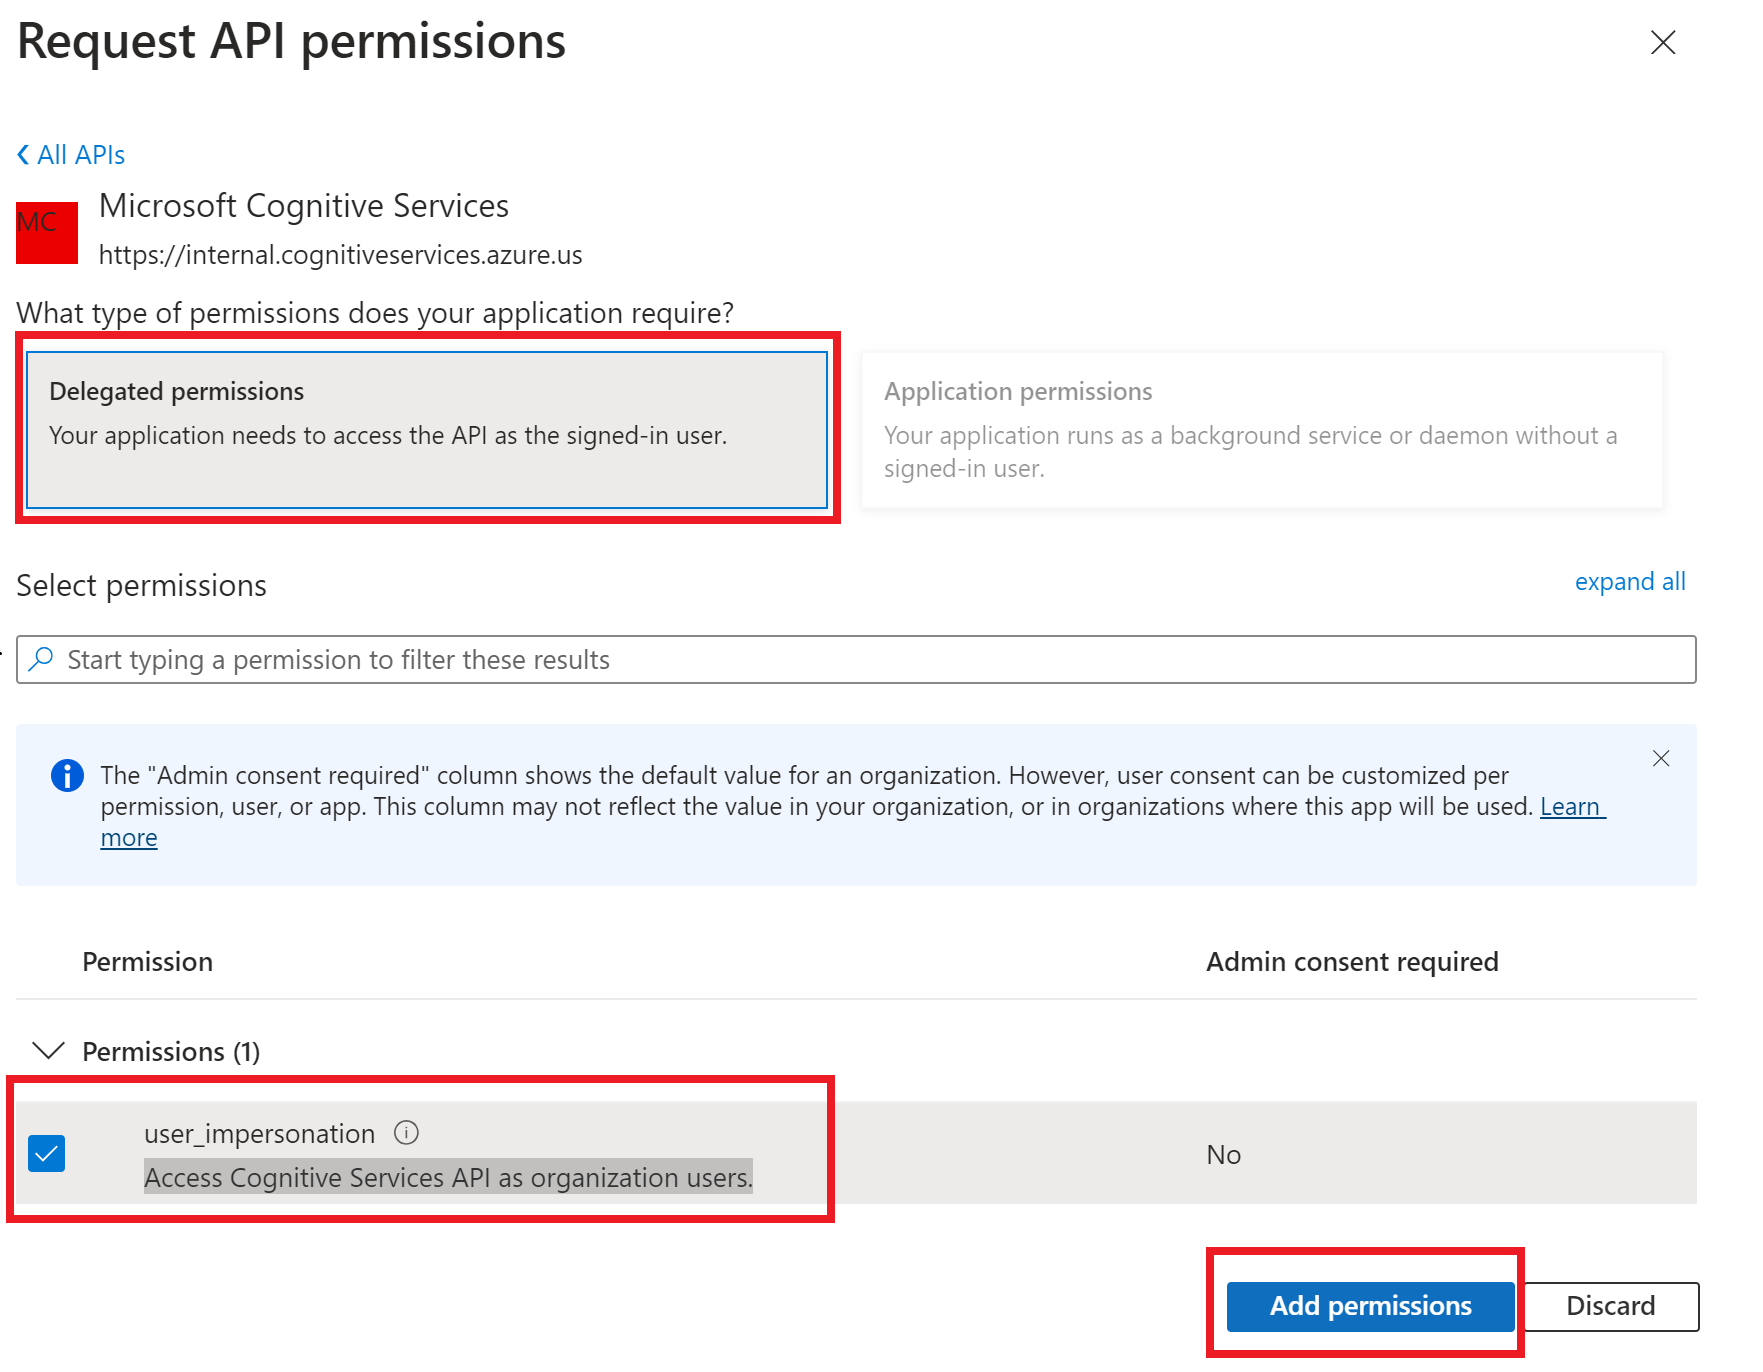
That's it! The setup for your Microsoft Entra ID application is complete. Next, your Translator resource needs to grant your application access by adding a role assignment to your application specifically for the Translator resource. For more information, see Azure role-based access control
Assign the Cognitive Services User role to Azure AI Translator resource
Role-based access control (Azure RBAC) is a security principal that enables you to control access to Azure resources. You can use RBAC to grant access to any resource that supports Microsoft Entra authentication, in our case, your Azure AI Translator instance. To grant your Microsoft Entra ID application access to your Translator resource, assign an Azure role using Azure role-based access control (Azure RBAC).
Staying in the Azure portal, navigate to your Azure AI Translator global resource.
In the left menu, select
Access control (IAM).Select
Add role assignmentfrom the main window.
In the left navigation name menu, select
Cognitive Services Userand select theNextbutton.On the
Add role assignment page, assign access toUser, group, or service principal.Choose
Select members.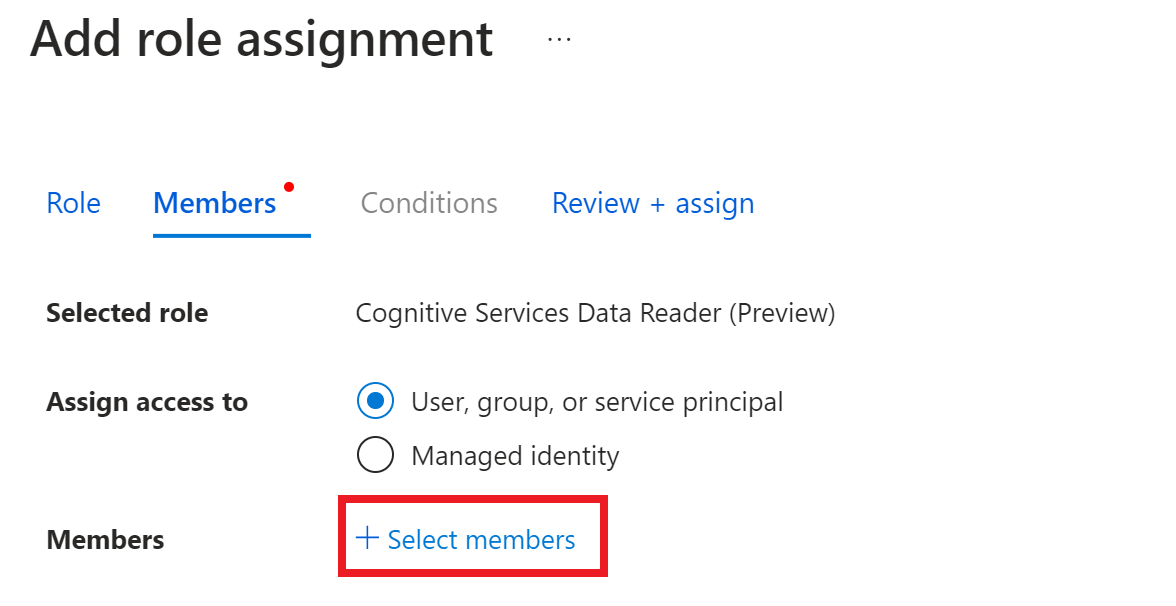
In the window that opens, type the name of your registered application in the search box (for example, text-translation-app). Select your application and choose the
Selectbutton.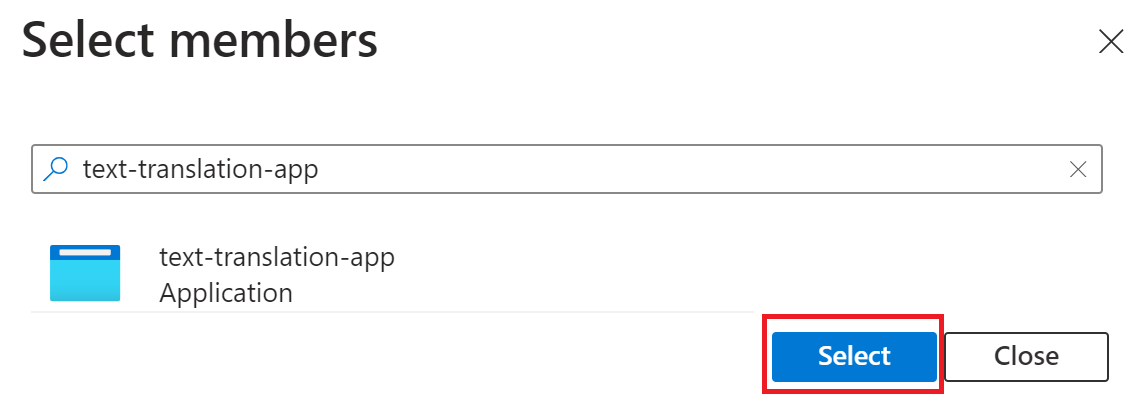
Complete the assignment process by selecting the
Review + assignbutton.
Now, we're ready to test out using your application to obtain a security token for REST API calls.
Obtain an access token with OAuth client credentials flow
Access tokens are a type of security token designed for authorization, granting access to specific resources on behalf on an authenticated user and enable clients to securely call protected web APIs. In our case, the access token grants your Microsoft Entra ID registered application authorization to access your Translator resource on your behalf.
Note
- The default lifespan of an access token isn't fixed.
- Upon issuance, the Microsoft identity platform assigns it a random duration ranging from 60 to 90 minutes, with an average of 75 minutes.
- When the token expires, repeat the request to the /token endpoint to acquire a fresh access token.
- Refresh tokens aren't issued with the client credentials flow. Since the
client_idandclient_secret(which are required to obtain a refresh token) are already used to obtain an access token eliminating the need for a refresh token in this context. For more information, see OAuth 2.0 client credentials flow
Prepare for the token request. You need the following values from your registered application:
- Application (client) ID. Located on your registered application's overview page. Copied and stored during the earlier register an identity application step.(#register-an-identity-application-with-microsoft-entra-id).
- Tenant ID. Located on your registered application's overview page. Copied and stored during the earlier register an identity application step.
- Client secret value. Copied and stored during the earlier Add a client secret credential step.
Let's use
cURLto make a token request. Here's the code:Linux or macOS
curl -X POST https://login.microsoftonline.com/{tenant-id}/oauth2/v2.0/token \
  -H "Content-Type: application/x-www-form-urlencoded" \
  -d "client_id={client-id}" \
  -d "scope= https://cognitiveservices.azure.com/.default" \
  -d "client_secret={client-secret}" \
  -d "grant_type=client_credentials" |json_pp
Windows
curl -X POST https://login.microsoftonline.com/{tenant-id}/oauth2/v2.0/token ^
  -H "Content-Type: application/x-www-form-urlencoded" ^
  -d "client_id={client-id}" ^
  -d "scope= https://cognitiveservices.azure.com/.default" ^
  -d "client_secret={client-secret}" ^
  -d "grant_type=client_credentials" |json
Replace {
tenant-id} in the request URL, {client-id}, and {client-secret} with your actual values.The
|json_pp(macOS) and|json(Windows) commands enable prettify Json with cURL.Your access token is received in the response.
Save the obtained access in a secure and convenient ___location, such as Windows Notepad.
Great! Now let's make an REST API call to the Azure Translator AI API.
Use access token authentication for a REST API request
To make a valid REST API request, the following values are required:
Identity of your Translator instance. You can provide that in two ways (choose one):
Use the global endpoint and pass
resourceIdas a request header.Use your custom endpoint as part of the POST request URL.
A Microsoft Entra ID access token acquired from your Microsoft Entra ID application.
Use the global endpoint
Navigate to your resource instant page in the Azure portal.
The global endpoint is found on under
Resource Management→Keys and Endpoint→Web API→Text translation.The
ResourceIDis found underResource Management→Properties.Resource ID format:
/subscriptions/<subscriptionId>/resourceGroups/<resourceGroupName>/providers/Microsoft.CognitiveServices/accounts/<resourceName>/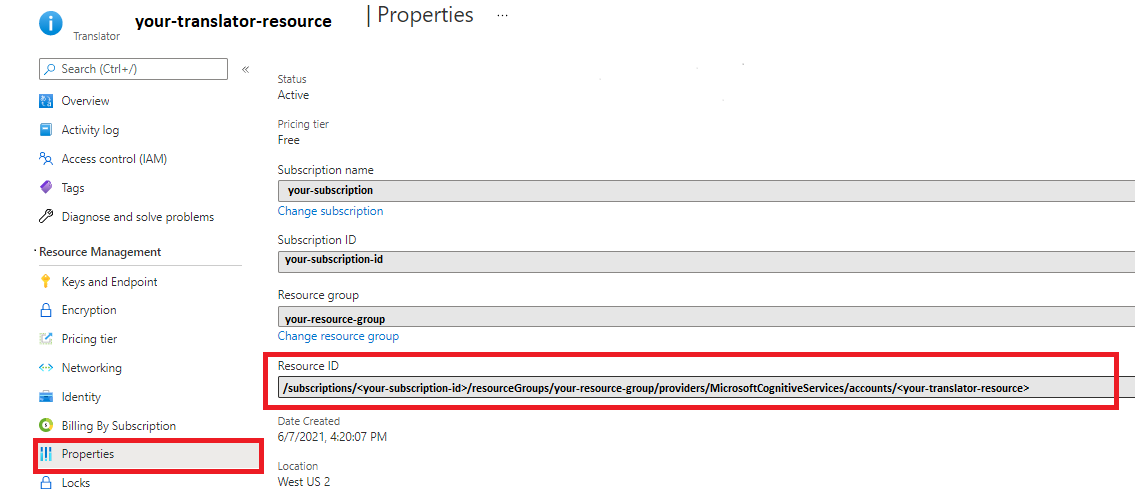
Replace {your-resource-ID} with the value from the Azure portal and {access-token} with the value obtained from the previous step: obtain an access token.
Linux or macOS
curl -X POST "https://api.cognitive.microsofttranslator.com/translate?api-version=3.0&to=en" \
     -H "Authorization: Bearer {access-token}"\
     -H "Ocp-Apim-ResourceId: {your-resource-ID}" \
     -H "Content-Type: application/json" \
     -d "[{'Text':'Hola'}]"
Windows
curl -X POST "https://api.cognitive.microsofttranslator.com/translate?api-version=3.0&to=en" ^
     -H "Authorization: Bearer {access-token}" ^
     -H "Ocp-Apim-ResourceId: {your-resource-id}" ^
     -H "Content-Type: application/json" ^
     -d "[{'Text':'Hola'}]"
Use your custom ___domain endpoint
Your custom ___domain endpoint is a URL formatted with your resource name and hostname and is available in the Azure portal. When you created your Translator resource, the value that you entered in the Name field is the custom ___domain name parameter for the endpoint. You can find your custom ___domain endpoint URL in the Document translation and Containers Text translation fields.
Linux or macOS
curl -X POST "https://{your-custom-___domain}.cognitiveservices.azure.com/translator/text/v3.0/translate?api-version=3.0&to=en" \
  -H "Authorization: Bearer {access-token}" \
  -H "Content-Type: application/json" \
  -d "[{'Text':'Hola'}]"
Windows
curl -X POST "https://{your-custom-___domain}.cognitiveservices.azure.com/translator/text/v3.0/translate?api-version=3.0&to=en" ^
  -H "Authorization: Bearer {access-token}" ^
  -H "Content-Type: application/json" ^
  -d "[{'Text':'Hola'}]"
Replace {your-custom-___domain} with the value form the Azure portal and {access-token} with the token obtained from the previous step, obtain an access token.
Here's an example of the JSON response:
[{"detectedLanguage":{"language":"es","score":1.0},"translations":[{"text":"Hello","to":"en"}]}]
Well done! You now know how to use Microsoft Entra ID to authenticate requests to your Azure AI resource.