Azure App Configuration provides feature management through feature flags, enabling teams to dynamically control application functionality without redeploying code. This allows for safe, targeted rollouts, faster experimentation, and reduced risk, giving developers flexible control over app behavior and the ability to respond quickly to changing business or customer needs.
The feature manager in the Azure portal provides a UI for creating and managing the feature flags that you use in your applications.
Prerequisites
Create a feature flag
Create a new feature flag in the Azure portal by following the steps below.
Open your Azure App Configuration store in the Azure portal. In the resource menu, under Operations, select Feature manager > Create.

Under What will you be using your feature flag for?, choose one of the following purposes:
- Switch – Toggle features on/off with a simple switch. Use for short-lived operational toggles and scenarios where a single on/off control is sufficient.
- Rollout – Gradually enable the feature for a percentage of users. Use for gradual feature releases to reduce risk, and for canary or staged rollouts across environments or user segments.
- Experiment – Run controlled experiments with traffic allocation to determine the best-performing variant. Use for A/B testing, multivariate experiments, or metric-driven feature evaluation,, and other scenarios requiring statistical comparison.
Use Switch to enable or disable functionality instantly for all users.
Configure Basics to set the core properties of your feature flag.
| Setting |
Example value |
Description |
| Enable feature flag |
Toggle on |
This option enables the feature flag upon creation. If you toggle this off, the new feature flag's configuration is saved but the new feature flag remains disabled. |
| Feature flag name |
Beta |
The feature flag name is what you use to reference the flag in your code. It must be unique within an application. |
| Key |
Beta |
You can use the key to filter feature flags that are loaded in your application. The key is generated from the feature flag name by default, but you can also add a prefix or a namespace to group your feature flags, for example, .appconfig.featureflag/Beta. |
| Label |
Leave empty |
You can use labels to create different feature flags for the same key and filter flags loaded in your application based on the label. By default, a feature flag has no label. |
| Description |
Leave empty |
Leave empty or enter a description for your feature flag. |

Configure Telemetry to collect evaluation events for this feature flag. When enabled, evaluation events are sent to the telemetry publisher you configure in your application. Before enabling telemetry, link an Application Insights resource to the App Configuration store in Telemetry > App Insights.
Select Review + create to see a summary of your new feature flag, and then select Create to finalize your operation. A notification indicates that the new feature flag was created successfully.
Use Rollout to progressively expose a feature to a percentage of users.
Configure Basics to set the core properties of your feature flag.
| Setting |
Example value |
Description |
| Enable feature flag |
Toggle on |
This option enables the feature flag upon creation. If you toggle this off, the new feature flag's configuration is saved but the new feature flag remains disabled. |
| Feature flag name |
Beta |
The feature flag name is what you use to reference the flag in your code. It must be unique within an application. |
| Key |
Beta |
You can use the key to filter feature flags that are loaded in your application. The key is generated from the feature flag name by default, but you can also add a prefix or a namespace to group your feature flags, for example, .appconfig.featureflag/myapp/Beta. |
| Label |
Leave empty |
You can use labels to create different feature flags for the same key and filter flags loaded in your application based on the label. By default, a feature flag has no label. |
| Description |
Leave empty |
Leave empty or enter a description for your feature flag. |

In the Audience tab, turn on a feature flag for a specified percentage, or explicitly include or exclude groups and users.
| Setting |
Example value |
Description |
| Default Percentage |
0–100 |
Enter a value between 0 and 100 to specify the percentage of users who receive the feature by default. |
| Override by Groups |
Off (unchecked) |
Select to enable group-based overrides. When enabled, you can: - Add groups to explicitly include in the rollout, and set the percentage of group members who should receive the feature.
- Add groups to exclude from the rollout.
|
| Override by Users |
Off (unchecked) |
Select to enable user-based targeting. When enabled, you can specify individual users to include or exclude. |
In the Configuration tab, configure values for your feature flag. Your application can retrieve the appropriate configuration by evaluating which value applies to each user.
| Setting |
Example value |
Description |
| Include configuration |
Box is checked |
Select to attach key-value settings to the feature flag. These settings let your application to adjust behavior dynamically without redeploying code. |
| Old Configuration |
{"color":"blue"} |
Shows the configuration values previously associated with the feature flag before this update. Use this to compare changes and track versions. |
| New Configuration |
{"color":"green"} |
Shows the updated configuration values you are applying now. These values will override the old configuration and define the new behavior when the feature flag is enabled. |
Configure Conditions to schedule changes and manage custom constraints for serving your features.
| Setting |
Example value |
Description |
| Add schedule |
Start: 2025-11-01
End: 2025-11-15
Time zone: (UTC-06:00) Central Time (US & Canada)
Recurrence: disabled |
Define a time-based rollout by specifying start and end dates. Optionally update the suggested time zone and enable recurrence for repeated activations. |
| Add custom condition |
User.Subscription == "Premium" |
Create conditions based on custom attributes (for example, region, device type, or subscription level). Conditions let you target precisely which users receive the feature. |
| Require all feature filters to be enabled |
On (checked) |
This option appears only after you enable both Add custom condition and Add schedule. When checked, all enabled feature filters must evaluate to true for the feature to be applied (logical AND). When unchecked, the filters are evaluated independently (logical OR). |
Configure Telemetry to collect evaluation events for this feature flag. When enabled, evaluation events are sent to the telemetry publisher you configure in your application. Before enabling telemetry, link an Application Insights resource to the App Configuration store in Telemetry > App Insights.
Select Review + create to see a summary of your new feature flag, and then select Create to finalize your operation. A notification indicates that the new feature flag was created successfully.
Use Experiment to run A/B tests and compare variants.
Configure Basics to set the core properties of your feature flag.
| Setting |
Example value |
Description |
| Enable feature flag |
Toggle on |
This option enables the feature flag upon creation. If you toggle this off, the new feature flag's configuration is saved but the new feature flag remains disabled. |
| Feature flag name |
Beta |
The feature flag name is what you use to reference the flag in your code. It must be unique within an application. |
| Key |
Beta |
You can use the key to filter feature flags that are loaded in your application. The key is generated from the feature flag name by default, but you can also add a prefix or a namespace to group your feature flags, for example, .appconfig.featureflag/myapp/Beta. |
| Label |
Leave empty |
You can use labels to create different feature flags for the same key and filter flags loaded in your application based on the label. By default, a feature flag has no label. |
| Description |
Leave empty |
Leave empty or enter a description for your feature flag. |

Configure Variants to compare behavior, allocate traffic, and run targeted tests.
| Setting |
Example value |
Description |
| Variant name |
Variant 1 |
Enter a unique name for each variant. |
| Value |
<your-variant-1-value> |
The value returned for the variant. It can be a string, number, boolean, or JSON object. Use Edit value in multiline for complex JSON configuration that your app reads when evaluating the flag. |
| Default variant |
Variant 1 (Default) |
Choose one variant as the stable fallback and baseline. This variant is returned when no specific assignment applies or when the feature flag is disabled; it's also the baseline used for targeted allocation and controlled tests. |
Configure Allocation to distribute traffic across variants and apply overrides for specific groups or users.
| Setting |
Example value |
Description |
| Traffic distribution across variants |
Default: 100%
Variant 1: 0%
Variant 2: 0% |
Specify the percentage of traffic allocated to each variant. The distribution for all variants must add up to 100%. Use this to control how the audience is exposed to different variants. |
| Allocation overrides |
Override by Groups / Override by Users |
Assign specific variants to selected groups or individual users regardless of percentage-based allocation. When both group and user overrides apply, user assignment takes precedence. |
| Distribution (seed) |
Use custom seed: 12345 |
By default the percentile distribution is randomized. Provide a fixed seed to produce deterministic (repeatable) allocations across feature flags that share the same seed value. |
Important
If feature evaluations occur in a client application (for example, a web browser), feature flag data — including user names specified here — may be exposed to end users. For more information, see Client applications in App Configuration.
Configure Conditions to limit exposure, schedule changes, and manage custom constraints for serving your features.
| Setting |
Example value |
Description |
| Limit exposure |
Box is checked |
When selected, additional options appear to control exposure by percentage, groups, and users. If unchecked, the feature flag applies globally without these constraints. |
| Default Percentage |
100 |
Visible only when Limit exposure is checked. Enter a value between 0 and 100 to specify the percentage of the entire user base that receives the feature by default. |
| Override by Groups |
Include: MarketingTeam (100%)
Exclude: TestGroup |
Visible only when Limit exposure is checked. Include groups to enable the feature for them even if they fall outside the default percentage. Exclude groups to disable the feature for them. |
| Override by Users |
Include: john@example.com
Exclude: jane@example.com |
Visible only when Limit exposure is checked. Include users to enable the feature for them even if they fall outside the default percentage. Exclude users to disable the feature for them. For a long list of users, we recommend using groups instead of users, as feature flags have a 10kb limit. |
| Add schedule |
Start: 2025-11-01
End: 2025-11-15
Time zone: (UTC-06:00) Central Time (US & Canada)
Recurrence: Weekly |
Define a time-based rollout by specifying start and end times. Optionally update the suggested time zone and enable recurrence for repeated activations (for example, weekly or monthly). |
| Add custom condition |
User.Region == "EU" |
Create conditions based on custom attributes (for example, region, device type, or subscription level). Conditions allow precise targeting so only users that match these criteria receive the feature. |
| Require all feature filters to be enabled |
On (checked) |
This option appears only after you enable multiple conditions. When checked, all enabled feature filters must evaluate to true for the feature flag to be applied (logical AND). When unchecked, the filters are evaluated independently (logical OR). |
Configure Telemetry to collect evaluation events for this feature flag. When enabled, evaluation events are sent to the telemetry publisher you configure in your application. Before enabling telemetry, link an Application Insights resource to the App Configuration store in Telemetry > App Insights.
Select Review + create to see a summary of your new feature flag, and then select Create to finalize your operation. A notification indicates that the new feature flag was created successfully.
Edit feature flags
To update a feature flag, follow these steps:
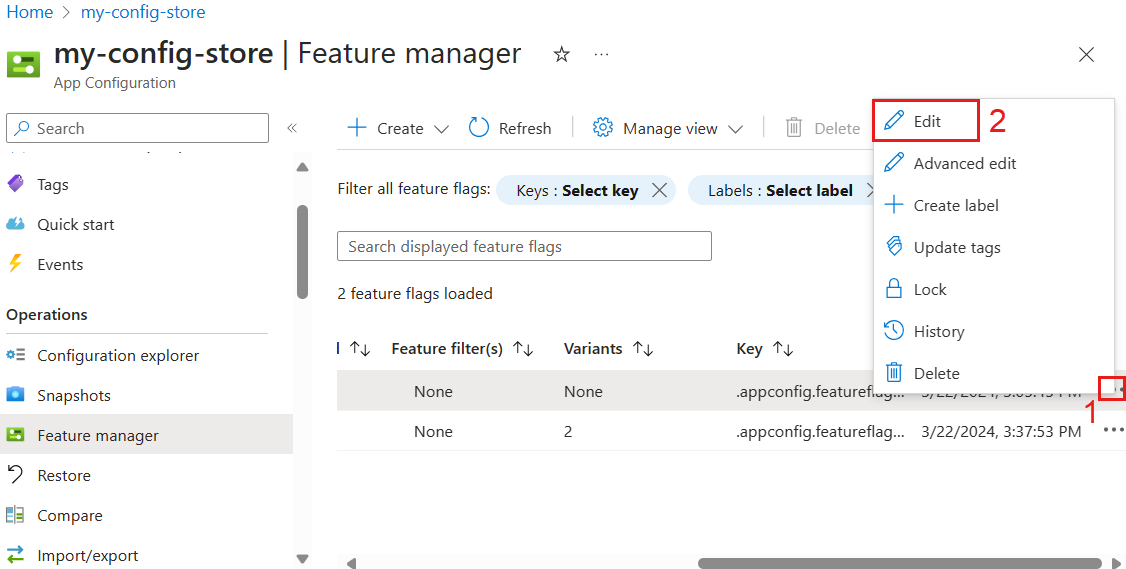
In the resource menu, go to Operations > Feature manager.
Move to the right end of the feature flag you want to modify and select the More actions ellipsis (...). From this menu, you can view feature flag details, edit the flag, lock or unlock it, create a label, update tags, review the history, or delete the flag.
Select Edit to make changes using the visual editor, or Advanced Edit to modify the flag's raw JSON directly.
Optionally change the state of the feature flag by turning on or turning off the Enabled toggle.
Manage view
The Feature manager menu displays the feature flags stored in Azure App Configuration. You can change the Feature manager display in the Azure portal by selecting Manage view.
Settings lets you choose how many feature flags are loaded per Load more action. Load more will only be visible if there are more than 200 feature flags.
Edit Columns lets you add or remove columns and change the column order.

Feature flags created with the Feature manager are stored as regular key-values. They're kept with the special prefix .appconfig.featureflag/ and content type application/vnd.microsoft.appconfig.ff+json;charset=utf-8.
To view the underlying key-values of feature flags in Configuration explorer, follow the steps below.
In the resource menu, select Operations > Configuration explorer, then select Manage view > Settings.
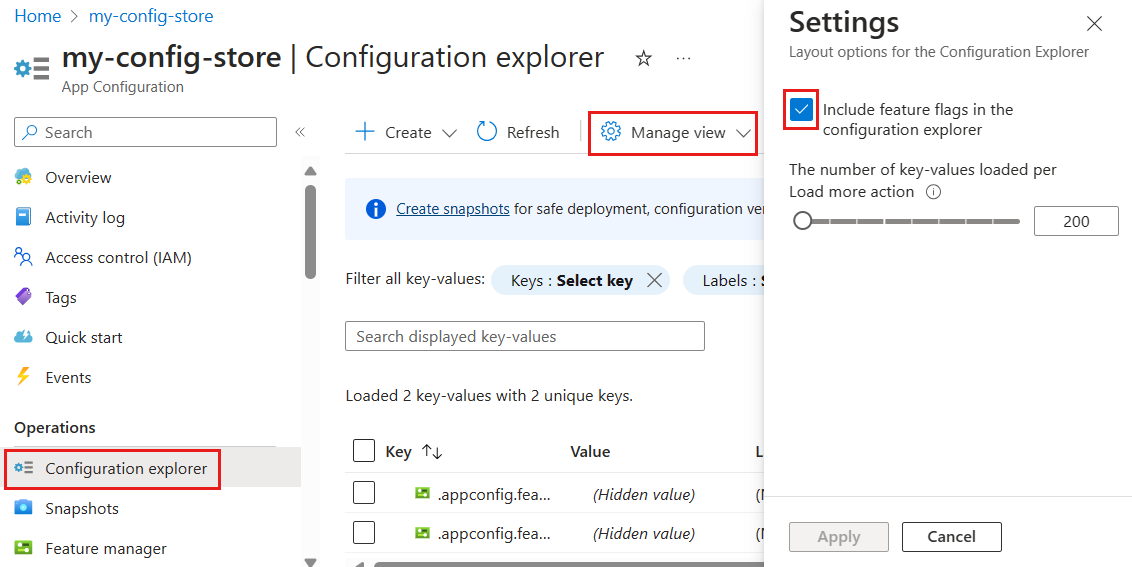
Select Include feature flags in the configuration explorer and Apply.
Related content
To start using feature flags with Azure App Configuration, continue to the following quickstarts specific to your application’s language or platform.