Note
Access to this page requires authorization. You can try signing in or changing directories.
Access to this page requires authorization. You can try changing directories.
Applies to: ![]() SQL Server on Azure VM
SQL Server on Azure VM
This quickstart steps through creating a SQL Server virtual machine (VM) in the Azure portal. Follow the article to deploy either a conventional SQL Server on Azure VM or SQL Server deployed to an Azure confidential VM.
Tip
- This quickstart provides a path for quickly provisioning and connecting to a SQL VM. For more information about other SQL VM provisioning choices, see the Provisioning guide for SQL Server on Windows VMs in the Azure portal.
- If you have questions about SQL Server virtual machines, see the Frequently Asked Questions.
Get an Azure subscription
If you don't have an Azure subscription, create a free account before you begin.
Select a SQL Server VM image
In the pane for SQL Server on Azure Virtual Machines, select Show options.

In the Select an image offer box, choose a SQL Server image (such as Free SQL Server License: SQL Server 2025 Enterprise Developer on Windows Server 2025).
For conventional SQL Server VMs, select one of the versions labeled Free SQL Server License... from the dropdown. For Confidential VMs, choose the
SQL Server 2022 Enterprise / Developer / Standard / Web on Windows Server 2022 - x64 Gen 2image from the drop-down list.Select Create virtual machine.

Provide basic details
The instructions for basic details vary between deploying a conventional SQL Server on Azure VM and SQL Server on an Azure confidential VM.
To deploy a conventional SQL Server on Azure VM, on the Basics tab, provide the following information:
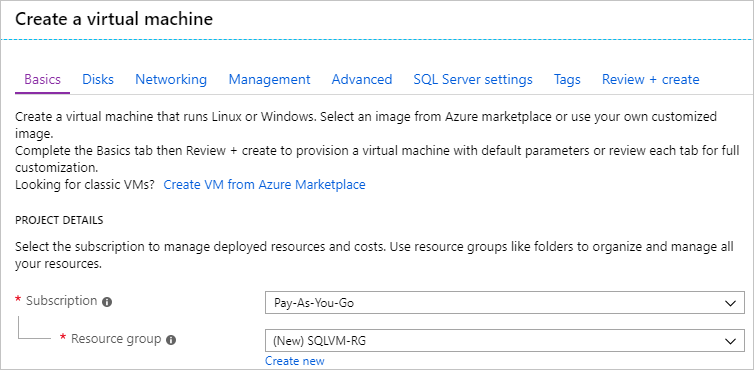
In the Project Details section, select your Azure subscription, and then select Create new to create a new resource group. Type SQLVM-RG for the name.
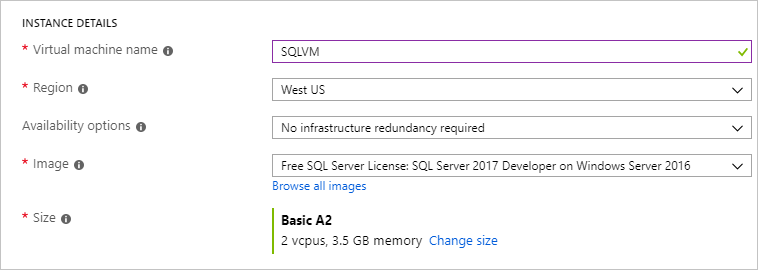
Under Instance details:
- Type SQLVM for the Virtual machine name.
- Choose a ___location for your Region.
- For the purpose of this quickstart, leave Availability options set to No infrastructure redundancy required. To find out more information about availability options, see Availability.
- In the Image list, select the image with the version of SQL Server and operating system you want. For example, you can use an image with a label that begins with Free SQL Server License.
- Choose to See all sizes for the Size of the virtual machine, and select the A2 Basic offering. Be sure to clean up your resources once you're done with them to prevent any unexpected charges.
Under Administrator account, provide a username such as azureuser and a password. The password must be at least 12 characters long and meet the defined complexity requirements.

Under Inbound port rules, choose Allow selected ports, and then select RDP (3389) from the dropdown.


SQL Server settings
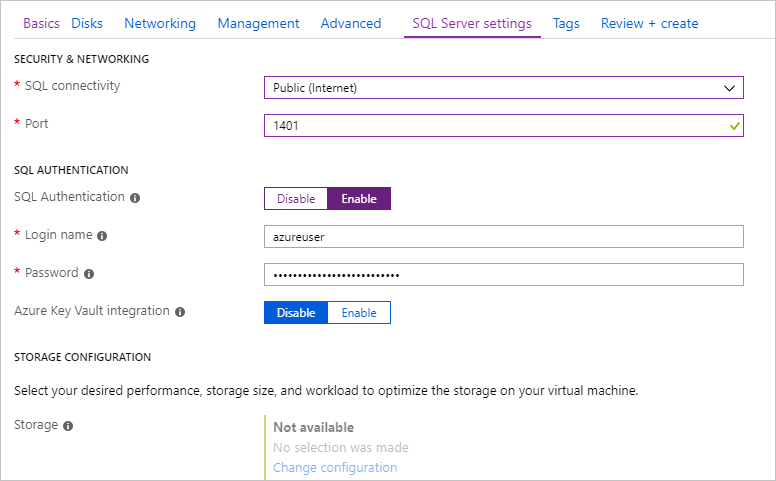
On the SQL Server settings tab, configure the following options:
Under Security & Networking, select Public (Internet) for SQL Connectivity, and change the port to
1401to avoid using a well-known port number in the public scenario.Under SQL Authentication, select Enable. The SQL login credentials are set to the same user name and password that you configured for the VM. Use the default setting for Azure Key Vault integration. Storage configuration isn't available for the basic SQL Server VM image, but you can find more information about available options for other images at storage configuration.
Change any other settings if needed, and then select Review + create.

Create the SQL Server VM
On the Review + create tab, review the summary, and select Create to create SQL Server, resource group, and resources specified for this VM.
You can monitor the deployment from the Azure portal. The Notifications button at the top of the screen shows basic status of the deployment. Deployment can take several minutes.
Connect to SQL Server
In the portal, find the Public IP address of your SQL Server VM in the Overview section of your virtual machine's properties.
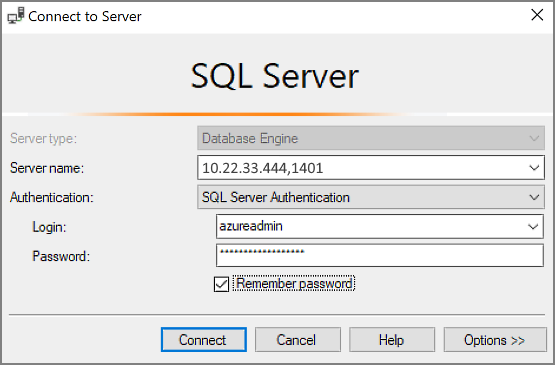
On a different computer connected to the Internet, open SQL Server Management Studio (SSMS).
In the Connect to Server or Connect to Database Engine dialog box, edit the Server name value. Enter your VM's public IP address. Then add a comma and add the custom port (1401) that you specified when you configured the new VM. For example,
11.22.33.444,1401.In the Authentication box, select SQL Server Authentication.
In the Login box, type the name of a valid SQL login.
In the Password box, type the password of the login.
Select Connect.
Log in to the VM remotely
Use the following steps to connect to the SQL Server virtual machine with Bastion:
After the Azure virtual machine is created and running, select Virtual machine, and then choose your new VM.
Select Connect and then choose Connect via Bastion from the drop-down to go to the Bastion page for your VM.

Select Deploy Bastion and wait for the process to finish.
After Bastion is deployed successfully, choose the authentication type, enter authentication details, and then select Connect:

You may need to disable the pop-up blocker in your browser to open the Bastion session in a new browser tab.
After you connect to the SQL Server virtual machine, you can launch SQL Server Management Studio and connect with Windows Authentication using your local administrator credentials. If you enabled SQL Server Authentication, you can also connect with SQL Authentication using the SQL login and password you configured during provisioning.
Access to the machine enables you to directly change machine and SQL Server settings based on your requirements. For example, you could configure the firewall settings or change SQL Server configuration settings.
Clean up resources
If you don't need your SQL VM to run continually, you can avoid unnecessary charges by stopping it when not in use. You can also permanently delete all resources associated with the virtual machine by deleting its associated resource group in the portal. This permanently deletes the virtual machine as well, so use this command with care. For more information, see Manage Azure resources through portal.