This article explains how to enable autoscale throughput on a database or container (collection, graph, or table) in Azure Cosmos DB for NoSQL. You can enable autoscale on a single container, or provision autoscale throughput on a database and share it among all the containers in the database.
If you're using a different API, see API for MongoDB, API for Cassandra, or API for Gremlin.
Azure portal
Create new database or container with autoscale
Sign in to the Azure portal or the Azure Cosmos DB explorer.
Navigate to your Azure Cosmos DB account and open the Data Explorer tab.
Select New Container. Enter a name for your database, container, and a partition key.
Under database or container throughput, select the Autoscale option, and set the maximum throughput (RU/s) that you want the database or container to scale to.

Select OK.
To provision autoscale on shared throughput database, select the Provision database throughput option when creating a new database.
Note
Setting throughput at the database level is only recommended for development/test or when workload across all containers in the shared throughput database is uniform. For best performance for large production workloads, it is recommended to set dedicated throughput (autoscale or manual) at the container level and not at the database level.
Enable autoscale on existing database or container
Sign in to the Azure portal or the Azure Cosmos DB explorer.
Navigate to your Azure Cosmos DB account and open the Data Explorer tab.
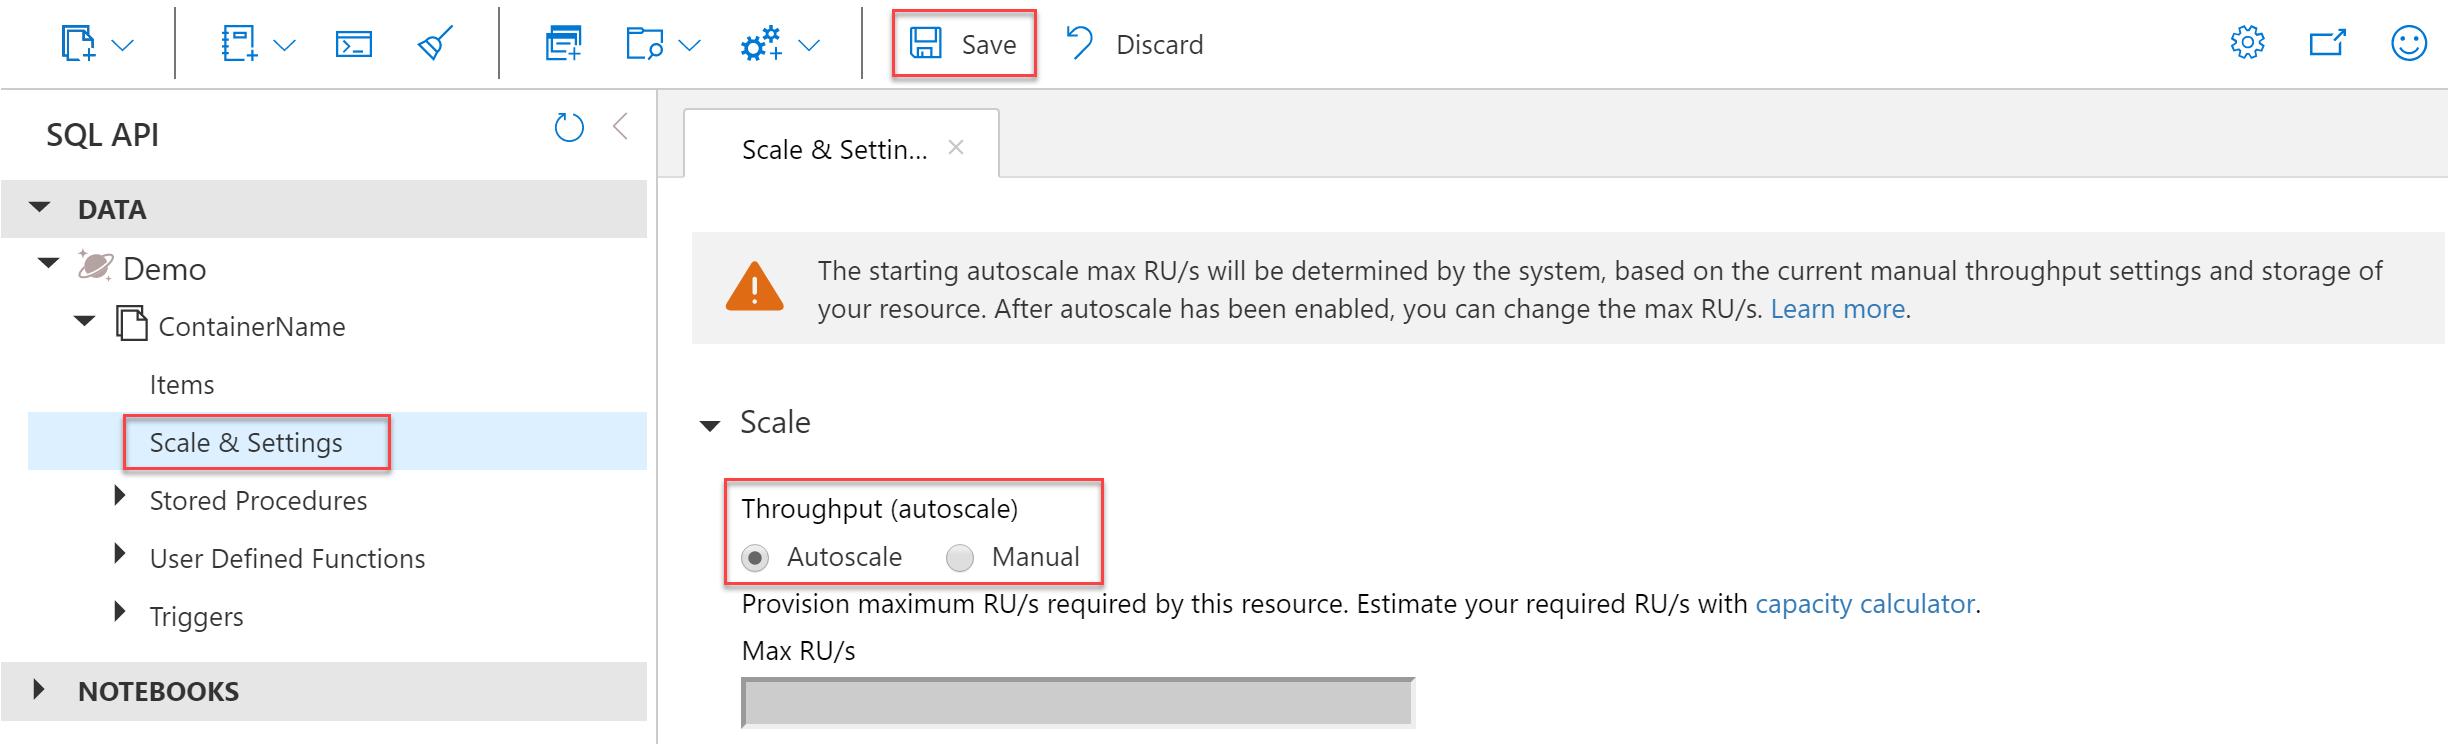
Select Scale and Settings for your container, or Scale for your database.
Under Scale, select the Autoscale option and Save.
Note
When you enable autoscale on an existing database or container, the starting value for max RU/s is determined by the system, based on your current manual provisioned throughput settings and storage. After the operation completes, you can change the max RU/s if needed. To learn more, see Frequently asked questions about autoscale provisioned throughput.
SDKs
Use the following SDKs to manage autoscale resources:
Create database with shared throughput
Note
Setting throughput at the database level is only recommended for development/test or when workload across all containers in the shared throughput database is uniform. For best performance for large production workloads, it is recommended to set dedicated throughput (autoscale or manual) at the container level and not at the database level.
Use version 3.9 or higher of the Azure Cosmos DB .NET SDK for API for NoSQL to manage autoscale resources.
Important
You can use the .NET SDK to create new autoscale resources. The SDK doesn't support migrating between autoscale and standard (manual) throughput. The migration scenario is currently supported in only the Azure portal, CLI, and PowerShell.
Note
When you enable autoscale on an existing database or container, the starting value for max RU/s is determined by the system, based on your current manual provisioned throughput settings and storage. After the operation completes, you can change the max RU/s if needed. To learn more, see Frequently asked questions about autoscale provisioned throughput.
// Create instance of CosmosClient
CosmosClient cosmosClient = new CosmosClient(Endpoint, PrimaryKey);

// Autoscale throughput settings
ThroughputProperties autoscaleThroughputProperties = ThroughputProperties.CreateAutoscaleThroughput(1000); //Set autoscale max RU/s

//Create the database with autoscale enabled
database = await cosmosClient.CreateDatabaseAsync(DatabaseName, throughputProperties: autoscaleThroughputProperties);
You can use version 4.0 or higher of the Azure Cosmos DB Java SDK for API for NoSQL to manage autoscale resources.
Important
You can use the Java SDK to create new autoscale resources. The SDK doesn't support migrating between autoscale and standard (manual) throughput. The migration scenario is currently supported in only the Azure portal, CLI, and PowerShell.
Note
When you enable autoscale on an existing database or container, the starting value for max RU/s is determined by the system, based on your current manual provisioned throughput settings and storage. After the operation completes, you can change the max RU/s if needed. To learn more, see Frequently asked questions about autoscale provisioned throughput.
Async
// Create instance of CosmosClient
CosmosAsyncClient client = new CosmosClientBuilder()
    .setEndpoint(HOST)
    .setKey(PRIMARYKEY)
    .setConnectionPolicy(CONNECTIONPOLICY)
    .buildAsyncClient();

// Autoscale throughput settings
ThroughputProperties autoscaleThroughputProperties = ThroughputProperties.createAutoscaledThroughput(1000); //Set autoscale max RU/s

//Create the database with autoscale enabled
CosmosAsyncDatabase database = client.createDatabase(databaseName, autoscaleThroughputProperties).block().getDatabase();
Sync
// Create instance of CosmosClient
CosmosClient client = new CosmosClientBuilder()
    .setEndpoint(HOST)
    .setKey(PRIMARYKEY)
    .setConnectionPolicy(CONNECTIONPOLICY)
    .buildClient();

// Autoscale throughput settings
ThroughputProperties autoscaleThroughputProperties = ThroughputProperties.createAutoscaledThroughput(1000); //Set autoscale max RU/s

//Create the database with autoscale enabled
CosmosDatabase database = client.createDatabase(databaseName, autoscaleThroughputProperties).getDatabase();
Important
You can use the Python SDK to create new autoscale resources. The SDK doesn't support migrating between autoscale and standard (manual) throughput. The migration scenario is currently supported in only the Azure portal, CLI, and PowerShell.
Note
When you enable autoscale on an existing database or container, the starting value for max RU/s is determined by the system, based on your current manual provisioned throughput settings and storage. After the operation completes, you can change the max RU/s if needed. To learn more, see Frequently asked questions about autoscale provisioned throughput.
Sync
from azure.cosmos import CosmosClient, ThroughputProperties

# Create your CosmosClient instance
client = CosmosClient(host, credential)

# Autoscale throughput settings
throughput_properties = ThroughputProperties(auto_scale_max_throughput=5000) #Set autoscale max RU/s

#Create the database with autoscale enabled
client.create_database(id=database_id, offer_throughput=throughput_properties)
Async
from azure.cosmos import ThroughputProperties
from azure.cosmos.aio import CosmosClient

# Create your CosmosClient instance
async with CosmosClient(host, credential) as client:
    # Autoscale throughput settings
    throughput_properties = ThroughputProperties(auto_scale_max_throughput=5000) #Set autoscale max RU/s

    #Create the database with autoscale enabled
    await client.create_database(id=database_id, offer_throughput=throughput_properties)
You can use ThroughputProperties on database and container resources.
Important
You can use the Go SDK to create new autoscale resources. The SDK doesn't support migrating between autoscale and standard (manual) throughput. The migration scenario is currently supported in only the Azure portal, CLI, and PowerShell.
Note
When you enable autoscale on an existing database or container, the starting value for max RU/s is determined by the system, based on your current manual provisioned throughput settings and storage. After the operation completes, you can change the max RU/s if needed. To learn more, see Frequently asked questions about autoscale provisioned throughput.
// autoscale throughput properties
db_throughput := azcosmos.NewAutoscaleThroughputProperties(4000)

_, err = client.CreateDatabase(context.Background(), azcosmos.DatabaseProperties{
	ID: "demo_db",
}, &azcosmos.CreateDatabaseOptions{
	ThroughputProperties: &db_throughput,
})
Create container with dedicated throughput
// Get reference to database that container will be created in
Database database = await cosmosClient.GetDatabase("DatabaseName");

// Container and autoscale throughput settings
ContainerProperties autoscaleContainerProperties = new ContainerProperties("ContainerName", "/partitionKey");
ThroughputProperties autoscaleThroughputProperties = ThroughputProperties.CreateAutoscaleThroughput(1000); //Set autoscale max RU/s

// Create the container with autoscale enabled
container = await database.CreateContainerAsync(autoscaleContainerProperties, autoscaleThroughputProperties);
Async
// Get reference to database that container will be created in
CosmosAsyncDatabase database = client.createDatabase("DatabaseName").block().getDatabase();

// Container and autoscale throughput settings
CosmosContainerProperties autoscaleContainerProperties = new CosmosContainerProperties("ContainerName", "/partitionKey");
ThroughputProperties autoscaleThroughputProperties = ThroughputProperties.createAutoscaledThroughput(1000); //Set autoscale max RU/s

// Create the container with autoscale enabled
CosmosAsyncContainer container = database.createContainer(autoscaleContainerProperties, autoscaleThroughputProperties, new CosmosContainerRequestOptions())
                                .block()
                                .getContainer();
Sync
// Get reference to database that container will be created in
CosmosDatabase database = client.createDatabase("DatabaseName").getDatabase();

// Container and autoscale throughput settings
CosmosContainerProperties autoscaleContainerProperties = new CosmosContainerProperties("ContainerName", "/partitionKey");
ThroughputProperties autoscaleThroughputProperties = ThroughputProperties.createAutoscaledThroughput(1000); //Set autoscale max RU/s

// Create the container with autoscale enabled
CosmosContainer container = database.createContainer(autoscaleContainerProperties, autoscaleThroughputProperties, new CosmosContainerRequestOptions())
                                .getContainer();
Sync
from azure.cosmos import CosmosClient, ThroughputProperties

# Create your CosmosClient instance
client = CosmosClient(host, credential)

# Get your DatabaseProxy object
database = client.get_database_client(database_id)

# Autoscale throughput settings
throughput_properties = ThroughputProperties(auto_scale_max_throughput=5000) #Set autoscale max RU/s

#Create the container with autoscale enabled
database.create_container(id=container_id, partition_key=partition_key, offer_throughput=throughput_properties)
Async
from azure.cosmos import ThroughputProperties
from azure.cosmos.aio import CosmosClient

# Create your CosmosClient instance
async with CosmosClient(host, credential) as client:
    # Get your DatabaseProxy object
    database = client.get_database_client(database_id)

    # Autoscale throughput settings
    throughput_properties = ThroughputProperties(auto_scale_max_throughput=5000) #Set autoscale max RU/s

    #Create the container with autoscale enabled
    await database.create_container(id=container_id, partition_key=partition_key, offer_throughput=throughput_properties)
pkDefinition := azcosmos.PartitionKeyDefinition{
	Paths: []string{"/state"},
	Kind:  azcosmos.PartitionKeyKindHash,
}

// autoscale throughput properties
throughput := azcosmos.NewAutoscaleThroughputProperties(4000)

db.CreateContainer(context.Background(), azcosmos.ContainerProperties{
	ID:                     "demo_container",
	PartitionKeyDefinition: pkDefinition,
}, &azcosmos.CreateContainerOptions{
	ThroughputProperties: &throughput,
})
Read the current throughput (RU/s)
// Get a reference to the resource
Container container = cosmosClient.GetDatabase("DatabaseName").GetContainer("ContainerName");

// Read the throughput on a resource
ThroughputProperties autoscaleContainerThroughput = await container.ReadThroughputAsync(requestOptions: null);

// The autoscale max throughput (RU/s) of the resource
int? autoscaleMaxThroughput = autoscaleContainerThroughput.AutoscaleMaxThroughput;

// The throughput (RU/s) the resource is currently scaled to
int? currentThroughput = autoscaleContainerThroughput.Throughput;
Async
// Get a reference to the resource
CosmosAsyncContainer container = client.getDatabase("DatabaseName").getContainer("ContainerName");

// Read the throughput on a resource
ThroughputProperties autoscaleContainerThroughput = container.readThroughput().block().getProperties();

// The autoscale max throughput (RU/s) of the resource
int autoscaleMaxThroughput = autoscaleContainerThroughput.getAutoscaleMaxThroughput();

// The throughput (RU/s) the resource is currently scaled to
int currentThroughput = autoscaleContainerThroughput.Throughput;
Sync
// Get a reference to the resource
CosmosContainer container = client.getDatabase("DatabaseName").getContainer("ContainerName");

// Read the throughput on a resource
ThroughputProperties autoscaleContainerThroughput = container.readThroughput().getProperties();

// The autoscale max throughput (RU/s) of the resource
int autoscaleMaxThroughput = autoscaleContainerThroughput.getAutoscaleMaxThroughput();

// The throughput (RU/s) the resource is currently scaled to
int currentThroughput = autoscaleContainerThroughput.Throughput;
Sync
from azure.cosmos import CosmosClient, ThroughputProperties

# Create your CosmosClient instance
client = CosmosClient(host, credential)

# Get your DatabaseProxy object
database = client.get_database_client(database_id)

# Get your ContainerProxy object
container = database.get_container_client(container_id)

# Get your throughput settings
throughput = container.get_throughput()

# Get the autoscale max throughput (RU/s) of the resource
auto_scale_throughput = throughput.auto_scale_max_throughput

# Get the throughput (RU/s) the resource is currently scaled to
current_throughput = throughput.offer_throughput
Async
from azure.cosmos import ThroughputProperties
from azure.cosmos.aio import CosmosClient

# Create your CosmosClient instance
async with CosmosClient(host, credential) as client:
    # Get your DatabaseProxy object
    database = client.get_database_client(database_id)

    # Get your ContainerProxy object
    container = database.get_container_client(container_id)

    # Get your throughput settings
    throughput = await container.get_throughput()

    # Get the autoscale max throughput (RU/s) of the resource
    auto_scale_throughput = throughput.auto_scale_max_throughput

    # Get the throughput (RU/s) the resource is currently scaled to
    current_throughput = throughput.offer_throughput
Change the autoscale max throughput (RU/s)
// Change the autoscale max throughput (RU/s)
await container.ReplaceThroughputAsync(ThroughputProperties.CreateAutoscaleThroughput(newAutoscaleMaxThroughput));
Async
// Change the autoscale max throughput (RU/s)
container.replaceThroughput(ThroughputProperties.createAutoscaledThroughput(newAutoscaleMaxThroughput)).block();
Sync
// Change the autoscale max throughput (RU/s)
container.replaceThroughput(ThroughputProperties.createAutoscaledThroughput(newAutoscaleMaxThroughput));
Sync
from azure.cosmos import ThroughputProperties

# Change the autoscale max throughput (RU/s)
container.replace_throughput(ThroughputProperties(auto_scale_max_throughput=8000))
Async
from azure.cosmos import ThroughputProperties

# Change the autoscale max throughput (RU/s)
await container.replace_throughput(ThroughputProperties(auto_scale_max_throughput=8000))
Azure Resource Manager
Azure Resource Manager templates can be used to provision autoscale throughput on a new database or container-level resource for all Azure Cosmos DB APIs. For samples, see Azure Resource Manager templates for Azure Cosmos DB.
By design, Azure Resource Manager templates can't be used to migrate between provisioned and autoscale throughput on an existing resource.
Azure CLI
Azure CLI can be used to provision autoscale throughput on a new database or container-level resource for all Azure Cosmos DB APIs, or to enable autoscale on an existing resource.
Azure PowerShell
Azure PowerShell can be used to provision autoscale throughput on a new database or container-level resource for all Azure Cosmos DB APIs, or to enable autoscale on an existing resource.
Next steps
