Note
Access to this page requires authorization. You can try signing in or changing directories.
Access to this page requires authorization. You can try changing directories.
Important
Databricks Asset Bundles in the workspace is in Public Preview.
To help you get started using Databricks Asset Bundles in the workspace, this tutorial walks you through creating a bundle with a job, deploying it, and running the job in the bundle - all from the workspace.
For requirements for using bundles in the workspace, see Databricks Asset Bundles in the workspace requirements.
For more information about bundles, see What are Databricks Asset Bundles?.
Create a bundle
First, create a bundle in the Databricks workspace:
Navigate to the Git folder where you want to create your bundle.
Click the Create button, then click Asset bundle. Alternatively, right click on the Git folder or its associated kebab in the workspace tree and click Create > Asset bundle:

In the Create an asset bundle dialog, give the asset bundle a name, such as totally-awesome-bundle. The bundle name can only contain letters, numbers, dashes, and underscores. Select Empty project.
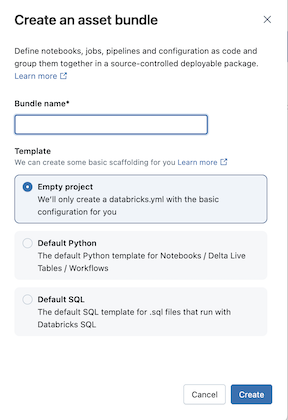
Click Create.

This creates an initial bundle in the Git folder, which includes a .gitignore Git configuration file and the required Databricks Asset Bundles databricks.yml file. The databricks.yml file contains the main configuration for the bundle. For details, see Databricks Asset Bundle configuration.
Define a job that runs a notebook
Next, add a job to your bundle that runs a notebook. The notebook in the following example prints “Hello World!”.
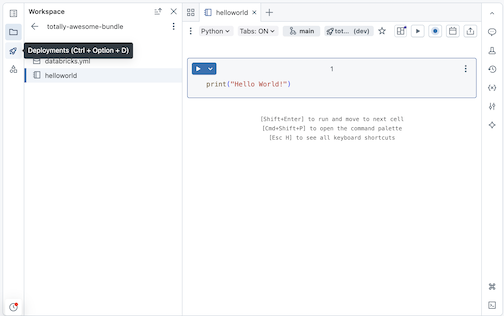
Click the Create notebook bundle project tile. Alternatively, click the kebab for the bundle in the table of contents, and then click Create > Notebook.
Rename the notebook to helloworld.
Set the language of the notebook to Python and paste the following into the cell of the notebook:
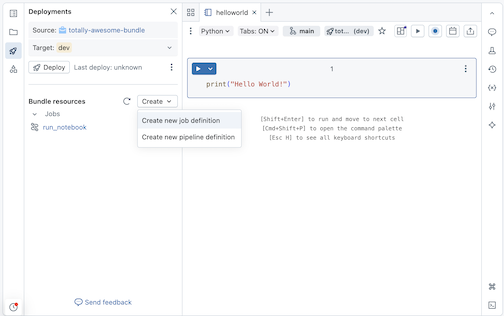
print("Hello World!")Click the deployment icon for the bundle to switch to the Deployments panel.
Under Bundle resources, click Create, then Create new job definition.
Type run-notebook into the Job name field of the Create job definition dialog. Click Create. A job definition file
run-notebook.job.ymlis created, with basic YAML for the job, and some additional commented-out example YAML for a job.Now add a notebook task to the job definition. Copy and paste the following YAML into the
run-notebook.job.ymlfile, replacing the basic YAML:resources: jobs: run_notebook: name: run-notebook queue: enabled: true tasks: - task_key: my-notebook-task notebook_task: notebook_path: ../helloworld.ipynb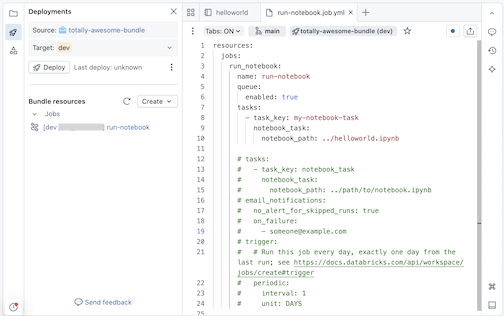
For details about defining a job in YAML, see job. For YAML syntax for other supported job task types, see Add tasks to jobs in Databricks Asset Bundles.
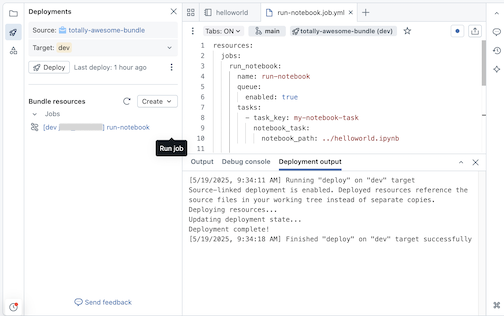
Deploy the bundle
Next, deploy the bundle and run the job that contains the helloworld notebook task.
In the Deployments pane for the bundle for Targets, click the dropdown to select the
devtarget workspace if it is not already selected. Target workspaces are defined in thetargetsmapping of the bundle’sdatabricks.yml. See Databricks Asset Bundle deployment modes.
Click the Deploy button. The bundle is validated and details of the validation appear in a dialog.
Review the deployment details in this Deploy to dev confirmation dialog, then click Deploy.

Important
Deploying bundles and running bundle resources executes code as the current user. Make sure that you trust the code in the bundle, including YAML, which can contain configuration settings that run commands.
The status of the deployment is output to the Project output window.
Run the job
Deployed bundle resources are listed under Bundle resources. Click the play icon associated with the job resource to run it.
Navigate to Workflows > Job runs to see the bundle run. The name of the bundle job run is prefixed, for example [dev someone] run-notebook.