Note
Access to this page requires authorization. You can try signing in or changing directories.
Access to this page requires authorization. You can try changing directories.
The Microsoft Defender for Cloud cost calculator is a helpful tool for estimating the potential costs associated with your cloud security needs. It allows you to configure different plans and environments, providing a detailed cost breakdown, including applicable discounts.
Access the cost calculator
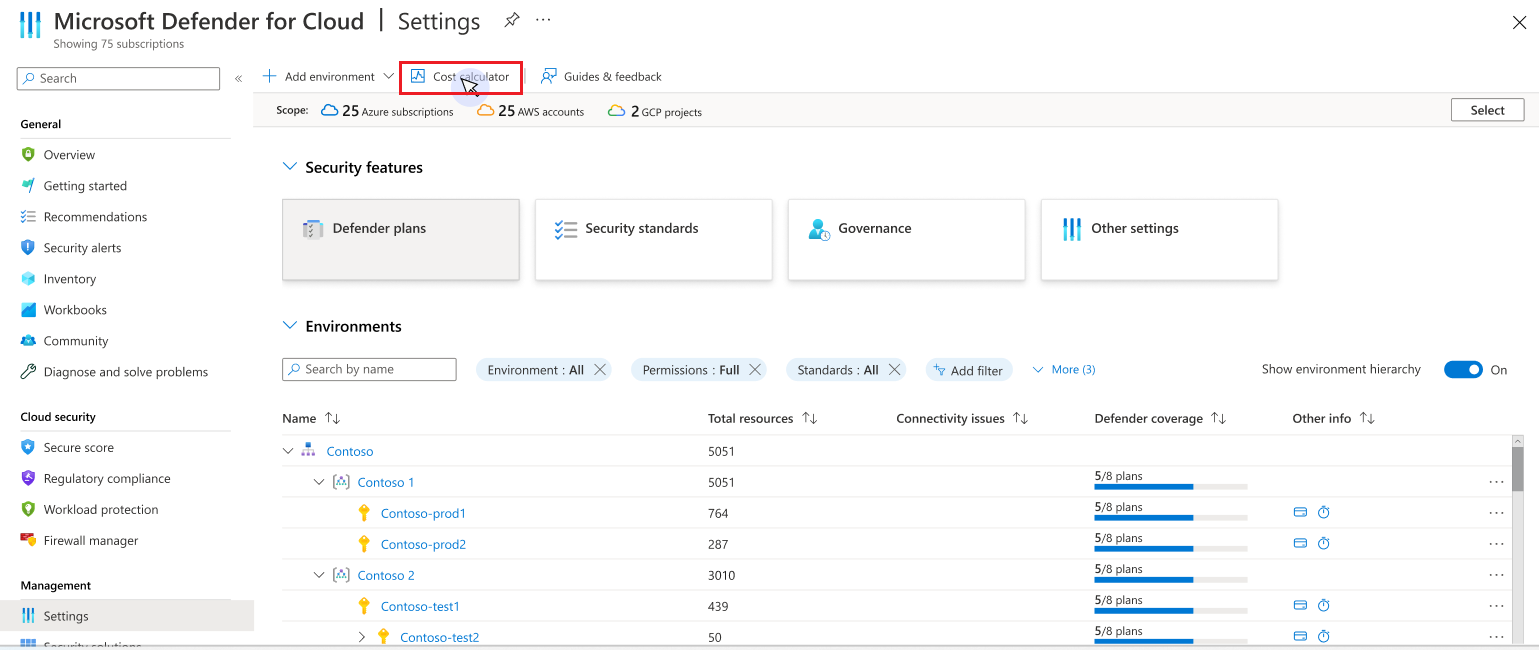
To use the Defender for Cloud Cost Calculator, go to the Environment Settings section of Microsoft Defender for Cloud. Select the Cost Calculator button located in the upper section of the interface.
Configure Defender for Cloud plans and environments
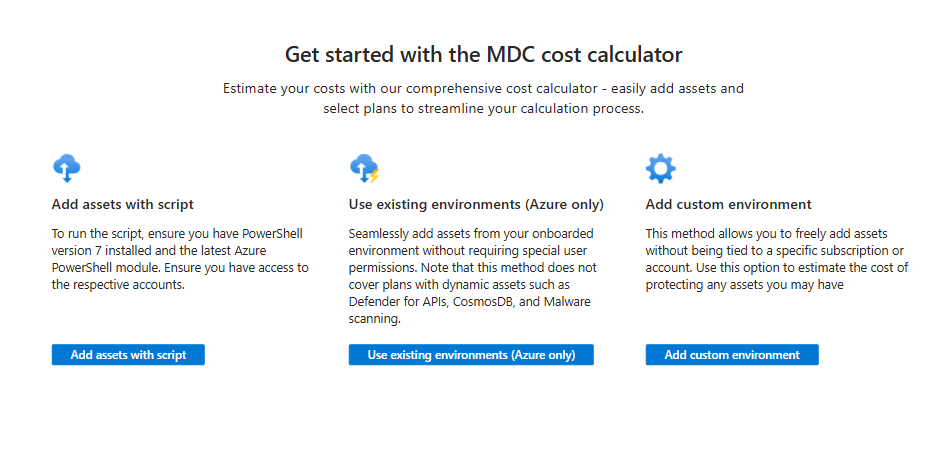
On the first page of the calculator, select the Add Assets button to start adding assets to your cost calculation. You have three methods to add assets:
- Add assets from onboarded environments: Recommended - Add assets from environments already onboarded to Defender for Cloud. This method covers all plans for Azure and works faster than the script option.
- Add assets with a script: Download and execute a script to automatically add existing assets. Recommended for environments (like AWS or GCP projects) that aren't yet onboarded to Azure.
- Add custom assets: Add assets manually without using automation.
Note
The cost calculator doesn't consider reservation plans for Defender for Cloud.
Add assets from onboarded environments
Tip
This method is recommended for Azure environments because it covers all plans and provides faster results than using scripts.
Select from the list of Azure environments already onboarded to Defender for Cloud to include in the cost calculation.
Note
The calculator discovers resources for which you have permissions.
Choose the plans. The calculator estimates the cost based on your selections and any existing discounts.
Add assets with a script
Note
This method is recommended for environments that aren't yet onboarded to Azure, such as AWS or GCP projects.
Choose the environment type (Azure, AWS, or GCP) and copy the script to a new *.ps1 file.
Note
The script only collects information that the user running it has access to.
Run the script in your PowerShell 7.X environment by using a privileged user account. The script collects information about your billable assets and creates a CSV file. It gathers information in two steps. First, it collects the current number of billable assets that usually stay constant. Second, it collects information about billable assets that can change a lot during the month. For these assets, it checks usage over the last 30 days to evaluate the cost. You can stop the script after the first step, which takes a few seconds. Or you can continue to collect the last 30 days of usage for dynamic assets, which might take longer for large accounts.
Upload this CSV file into the wizard where you downloaded the script.
Select the desired Defender for Cloud plans. The calculator estimates costs based on your selection and any existing discounts.
Note
- Reservation plans for Defender for Cloud aren't considered.
- For Defender for APIs: When calculating the cost based on the number of API calls in the last 30 days, we automatically select the best Defender for APIs plan for you. If there are no API calls in the last 30 days, we automatically disable the plan for calculation purposes.
Required permissions for scripts
This section provides an overview of the permissions required to run the scripts for each cloud provider.
Azure
To run this script successfully for each subscription, the account you use needs permissions that allow it to:
Discover and list resources (including virtual machines, storage accounts, APIM services, Cosmos DB accounts, and other resources).
Query Resource Graph (via Search-AzGraph).
Read Metrics (via Get-AzMetric and the Azure Monitor/Insights APIs).
Recommended built-in role:
In most cases, the Reader role at the subscription scope is sufficient. The Reader role provides the following key capabilities needed by this script:
- Read all resource types (so you can list and parse things like Storage Accounts, VMs, Cosmos DB, and APIM, etc.).
- Read metrics (Microsoft.Insights/metrics/read) so that calls to Get-AzMetric or direct Azure Monitor REST queries succeed.
- Resource Graph queries works as long as you have at least read access to those resources in the subscription.
Note
If you want to be certain you have the necessary metric permissions, you can also use Monitoring Reader role; however, the standard Reader role already includes read access to metrics and is usually all you need.
If you already have Contributor or Owner roles:
- Contributor or Owner on the subscription is more than enough (these roles are higher-privileged than Reader).
- The script doesn't perform resource creation or deletion. Therefore, granting high-level roles (like Contributor/Owner) for the sole purpose of data collection might be overkill from a least-privilege perspective.
Summary:
Granting your user or service principal the Reader role (or any higher-privileged role) on each subscription you want to query ensures the script can:
- Retrieve the list of subscriptions.
- Enumerate and read all relevant resource information (via REST or Az PowerShell).
- Fetch the necessary metrics (Requests for APIM, RU consumption for Cosmos DB, Storage Accounts ingress, etc.).
- Run Resource Graph queries without issue.
AWS
The AWS script supports two discovery flows:
- Single account discovery - Discovers resources within a single AWS account
- Organization discovery - Discovers resources across all member accounts in an AWS Organization
Single account discovery
For single account discovery, the following overview describes the permissions your AWS identity (user or role) needs to run this script successfully. The script enumerates resources (EC2, RDS, EKS, S3, and others) and fetches metadata for those resources. It doesn't create, modify, or delete resources, so read-only access is sufficient in most cases.
AWS managed policy: ReadOnlyAccess or ViewOnlyAccess:
The simplest approach is to attach one of AWS's built-in read-only policies to the IAM principal (user or role) that runs this script. Examples include:
arn:aws:iam::aws:policy/ReadOnlyAccessarn:aws:iam::aws:policy/job-function/ViewOnlyAccess
Either of these policies covers the describe and list permissions for most AWS services. If your environment's security policy allows it, ReadOnlyAccess is the easiest way to ensure the script works across all AWS resources it enumerates.
Key services and required permissions:
If you need a more granular approach with a custom IAM policy, the following services and permissions are required:
- EC2
- ec2:DescribeInstances
- ec2:DescribeRegions
- ec2:DescribeInstanceTypes (for retrieving vCPU/core info)
- RDS
- rds:DescribeDBInstances
- EKS
- eks:ListClusters
- eks:DescribeCluster
- eks:ListNodegroups
- eks:DescribeNodegroup
- Auto Scaling (for EKS node groups underlying instances)
- autoscaling:DescribeAutoScalingGroups
- S3
- s3:ListAllMyBuckets
- STS
- sts:GetCallerIdentity (to retrieve the AWS Account ID)
Additionally, if you need to list other resources not shown in the script or if you plan to expand the script's capabilities, ensure you grant the appropriate Describe*, List*, and Get* actions as needed.
Organization discovery
For organization-wide discovery, you need:
In the management account: Permission to list all accounts in the organization
organizations:ListAccounts
In all member accounts: A role with the same permissions as described for single account discovery (ReadOnlyAccess or the custom permissions listed above)
Setting up organization discovery:
- Create an IAM role in each member account with the required read permissions (as described in single account discovery)
- Configure the role to trust the principal that runs the discovery script
- Ensure the principal running the script has:
- Permission to assume the role in each member account
- The
organizations:ListAccountspermission in the management account
Note
The organization discovery flow automatically iterates through all member accounts where the configured role is accessible.
Summary:
- The simplest approach is to attach AWS's built-in ReadOnlyAccess policy, which already includes all the actions required to list and describe EC2, RDS, EKS, S3, Auto Scaling resources, and call STS to get your account info.
- To grant just enough privileges, create a custom read-only policy with the above Describe*, List*, and Get* actions for EC2, RDS, EKS, Auto Scaling, S3, and STS.
Either approach gives your script sufficient permissions to:
- List regions.
- Retrieve EC2 instance metadata.
- Retrieve RDS instances.
- List and describe EKS clusters and node groups (and the underlying Auto Scaling groups).
- List S3 buckets.
- Obtain your AWS account ID via STS.
This permission set ensures the script can discover resources and fetch the relevant metadata without creating, modifying, or deleting anything.
GCP
The following overview describes the permissions your GCP user or service account needs to run this script successfully. You can use the script to discover resources in a single project or across multiple projects, depending on your selection. To estimate costs for multiple projects, make sure your account has the required permissions in each project you want to include. The script lists and describes resources such as VM instances, Cloud SQL databases, GKE clusters, and GCS buckets in all selected projects.
Recommended built-in role: Project Viewer
The simplest approach to ensure read-only access across all these resources is granting your user or service account the roles/viewer role at the project level (the same project you select via gcloud config set project).
The roles/viewer role includes read-only access to most GCP services within that project, including the necessary permissions for:
- Compute Engine (list VM instances, instance templates, machine types, and more).
- Cloud SQL (list SQL instances).
- Kubernetes Engine (list clusters, node pools, and more).
- Cloud Storage (list buckets).
Granular permissions by service (if creating a custom role):
If you prefer a more granular approach, create a custom IAM role or set of roles that collectively grant just the needed read-list-describe actions for each service:
- Compute Engine (for VM Instances, Regions, Instance Templates, Instance Group Managers):
compute.instances.listcompute.regions.listcompute.machineTypes.listcompute.instanceTemplates.getcompute.instanceGroupManagers.getcompute.instanceGroups.get
- Cloud SQL:
cloudsql.instances.list
- Google Kubernetes Engine:
container.clusters.listcontainer.clusters.get(needed when describing clusters)container.nodePools.listcontainer.nodePools.get
- Cloud Storage:
storage.buckets.list
The script doesn't create or modify any resources, so it doesn't require update or delete permissions—only list, get, or describe type permissions.
Summary:
- Using roles/viewer at the project level is the fastest and most straightforward way to grant enough permissions for this script to succeed.
- For the strictest least-privilege approach, create or combine custom roles that only include the relevant list, describe, and get actions for Compute Engine, Cloud SQL, GKE, and Cloud Storage.
With these permissions, the script can:
- Authenticate (
gcloud auth login). - List VM instances, machine types, instance group managers, and similar resources.
- List Cloud SQL instances.
- List and describe GKE clusters and node pools.
- List GCS buckets.
This read-level access lets you enumerate resource counts and gather metadata without modifying or creating any resources.
Assign onboarded assets
Select from the list of Azure environments already onboarded to Defender for Cloud to include in the cost calculation.
Note
The calculator discovers resources for which you have permissions.
Choose the plans. The calculator estimates the cost based on your selections and any existing discounts.
Assign custom assets
- Choose a name for the custom environment.
- Specify the plans and the number of billable assets for each plan.
- Select the types of assets you want to include in the cost calculation.
- The calculator estimates costs based on your inputs and any existing discounts.
Note
The calculator doesn't consider reservation plans for Defender for Cloud.
Adjust your report
After generating the report, you can adjust the plans and the number of billable assets:
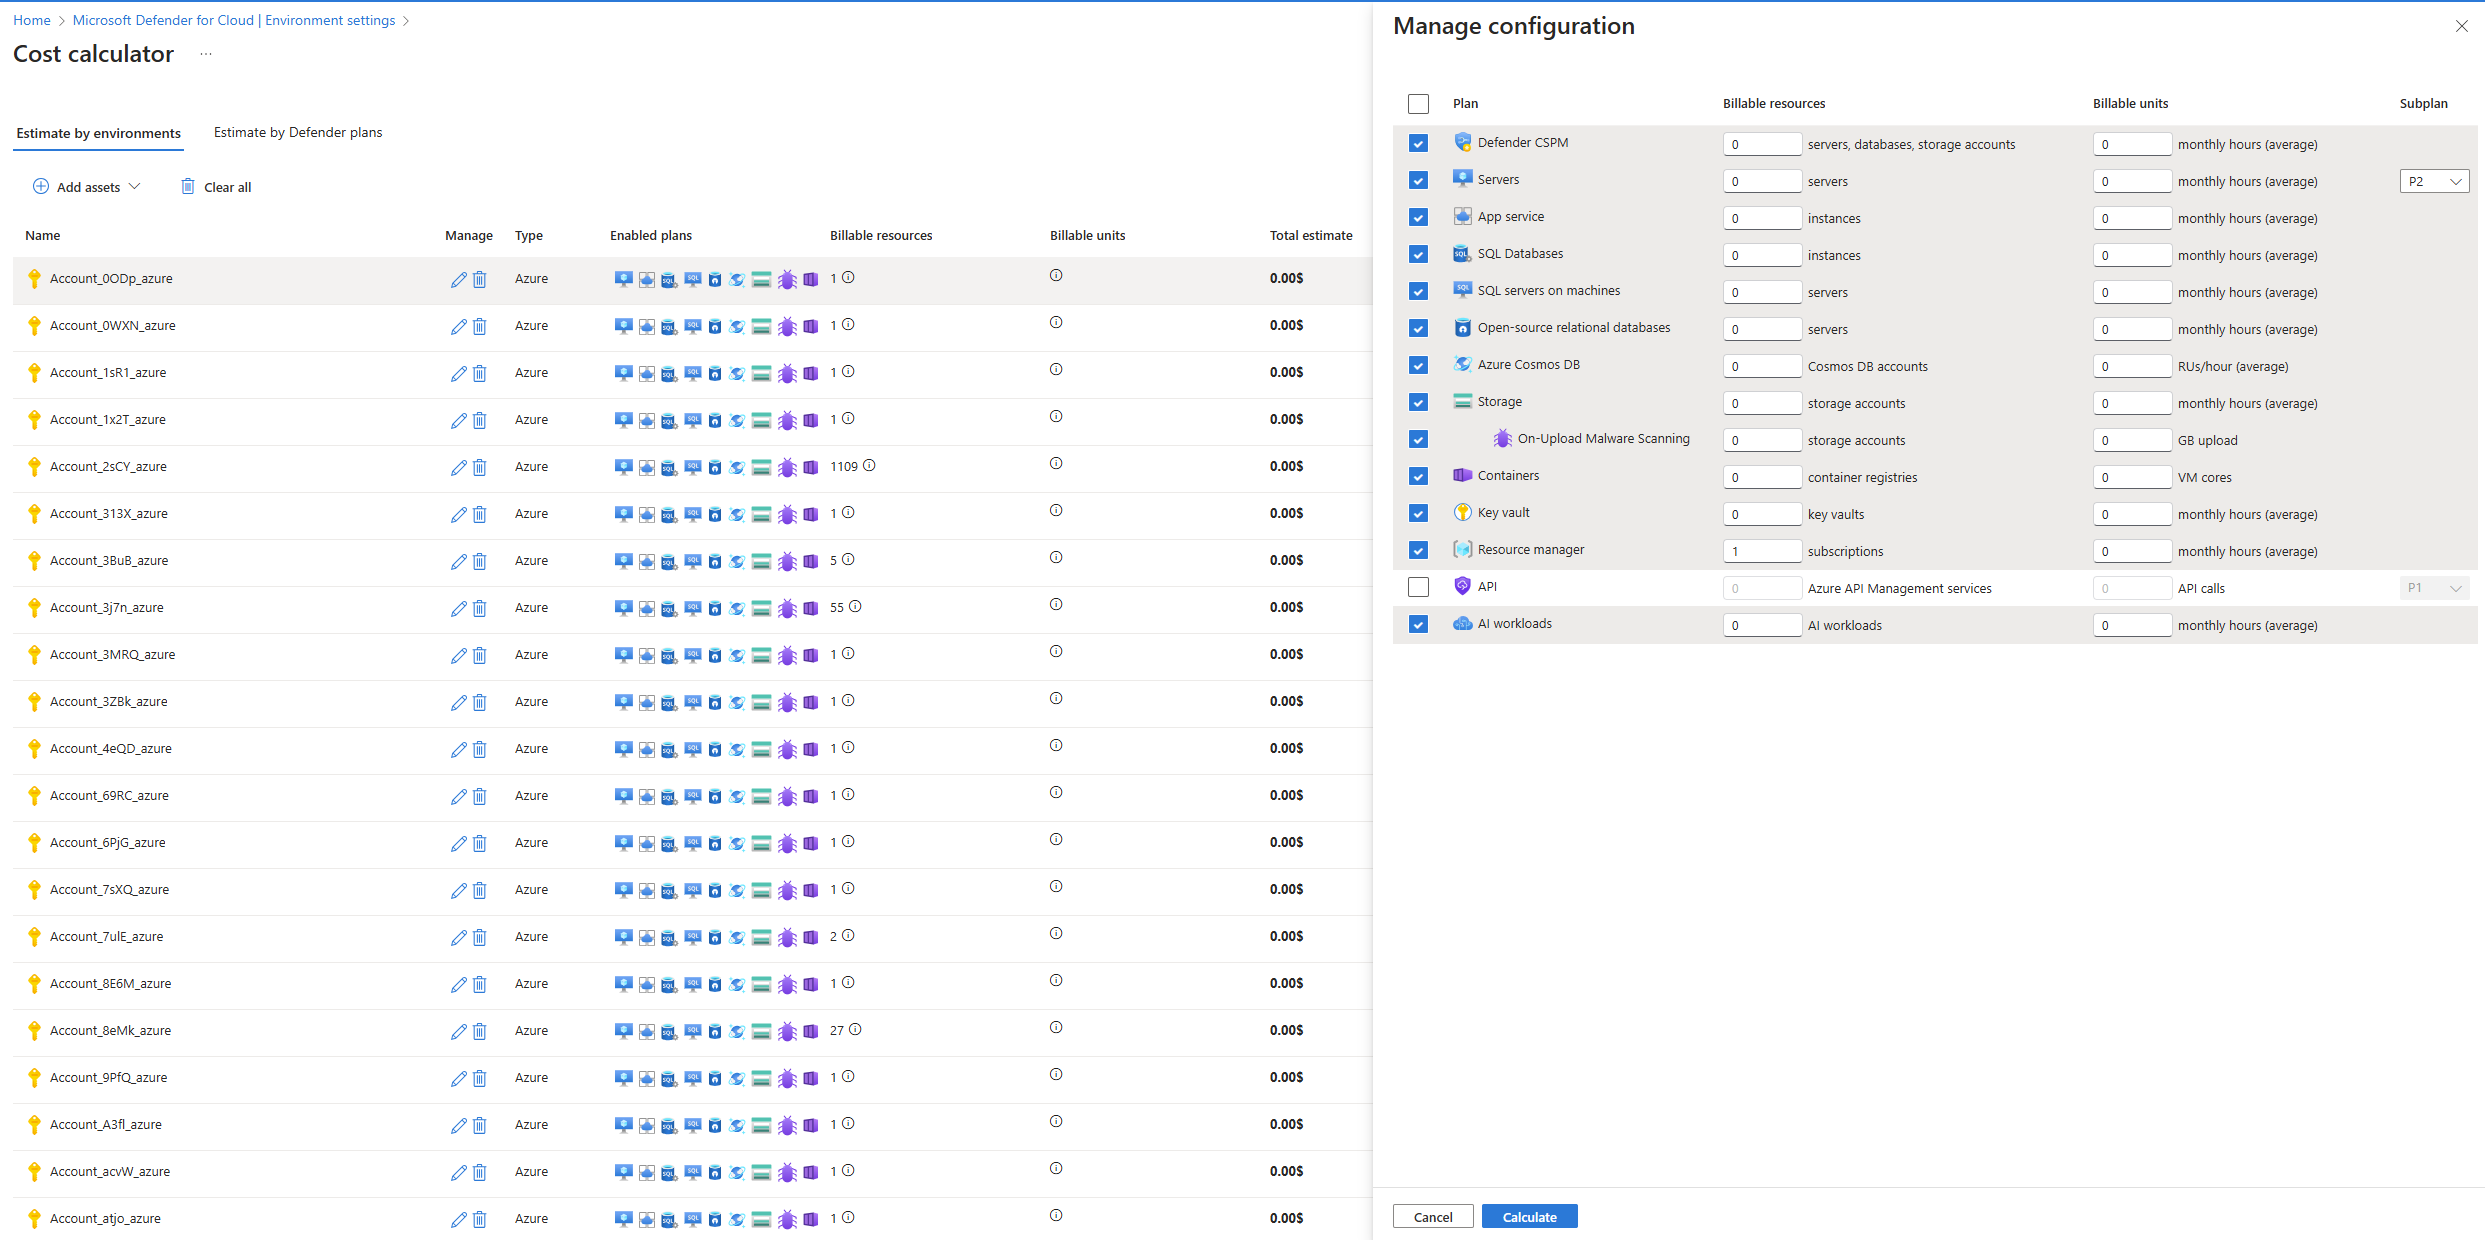
- Select the environment you want to modify by selecting the edit (pencil) icon.
- A configuration page appears, where you can adjust plans, the number of billable assets, and the average monthly hours.
- Select Recalculate to update the cost estimate.
Export the report
When you're satisfied with the report, you can export it as a CSV file:
- Select Export to CSV at the bottom of the Summary panel on the right.
- The cost information is downloaded as a CSV file.
Frequently asked questions
What is the cost calculator?
The cost calculator is a tool that simplifies estimating costs for your security protection needs. When you define the scope of your desired plans and environments, the calculator provides a detailed breakdown of potential expenses, including any applicable discounts.
How does the cost calculator work?
You select the environments and plans you want to enable. The calculator then performs a discovery process to automatically populate the number of billable units for each plan per environment. You can also manually adjust the unit quantities and discount levels.
What is the discovery process?
The discovery process generates a report of the selected environment, including the inventory of billable assets by the various Defender for Cloud plans. This process relies on user permissions and the environment state at the time of discovery. For large environments, this process might take approximately 30 to 60 minutes as it also samples dynamic assets.
Do I need to grant any special permission for the cost calculator to perform the discovery process?
The cost calculator uses your existing permissions to run the script and perform discovery automatically. It gathers the necessary data without requiring further access rights. To see what permissions you need to run the script, refer to the Required permissions for scripts section.
Do the estimations accurately predict my cost?
The calculator provides an estimate based on the information available when the script runs. Various factors might influence the final cost, so you should consider it an approximate calculation.
What are the billable units?
The cost of plans is based on the units they protect. Each plan charges for a different unit type, which you can find on the Microsoft Defender for Cloud Environment settings page.
Can I adjust the estimates manually?
Yes, the cost calculator supports both automatic data collection and manual adjustments. You can modify the unit quantity and discount levels to better reflect your specific needs and see how these changes affect your overall cost.
Does the calculator support multiple cloud providers?
Yes, it offers multicloud support, ensuring that you can obtain accurate cost estimations regardless of your cloud provider.
How can I share my cost estimate?
After you generate your cost estimate, you can easily export and share it for budget planning and approvals. This feature ensures that all stakeholders have access to the necessary information.
Where can I get help if I have questions?
Our support team is ready to assist you with any questions or concerns you might have. Feel free to reach out to us for assistance.
How can I try the cost calculator?
Try the new cost calculator and see its benefits. Access the tool and start defining the scope of your protection needs. To use the Defender for Cloud Cost Calculator, go to the Microsoft Defender for Cloud Environment settings and select the Cost Calculator button.


