Note
Access to this page requires authorization. You can try signing in or changing directories.
Access to this page requires authorization. You can try changing directories.
Get started with GitHub Copilot for Azure to streamline your development workflow and enhance your productivity on the Azure platform. This guide walks you through the prerequisites and installation of the GitHub Copilot for Azure in Visual Studio, so you can write your first prompt.
Prerequisites
To complete the steps in this article, make sure that you have:
An Azure account and access to an Azure subscription. For details on how to set them up, see the pricing page for Azure accounts.
A GitHub account and a GitHub Copilot subscription. For details on how to set them up, see Creating an account on GitHub and Quickstart for GitHub Copilot, respectively.
Visual Studio Code. For details on how to download and install it, see Setting up Visual Studio Code.
The GitHub Copilot extension and the GitHub Copilot Chat extension. For instructions on how to install these extensions, see Set up GitHub Copilot in VS Code and Getting started with GitHub Copilot Chat in VS Code, respectively.
Important
GitHub Copilot is a separate subscription managed by GitHub. For questions regarding GitHub Copilot subscriptions and Support, see Getting started with a GitHub Copilot plan.
By default, Copilot in Azure is available to all users in a tenant. However, Global Administrators can manage access to Copilot in Azure for their organization. Access can also be optionally granted to specific Microsoft Entra users or groups. For more information, see Manage access to Microsoft Copilot in Azure.
Install GitHub Copilot for Azure
- In Visual Studio Code, select the Extensions icon.
- In the Extensions Marketplace, search for GitHub Copilot for Azure. When the GitHub Copilot for Azure extension appears, select Install.
- If you're prompted, sign in to your Azure account.
Write your first prompt
Ensure that the extension is installed, that you're properly authenticated, and that the extension is working correctly.
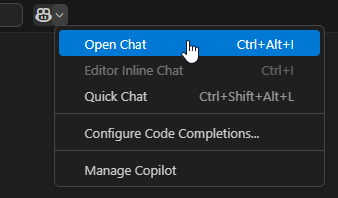
If the Chat window isn't already open, make sure it's open by either selecting the Toggle Chat button in the menu bar, or select the dropdown next to the Toggle Chat button and select Open Chat (Ctrl+Alt+I).
In the chat text area at the bottom of the chat pane, enter the following prompt:
@azure Do I have any resources currently running?
By default, GitHub Copilot uses ask mode. Ask mode provides answers to your prompts in the chat pane. Agent mode enables GitHub Copilot to take action in your workspace.
In ask mode, the @azure part indicates that you want to include the Azure chat participant in the conversation. It scopes your prompt to a specific ___domain, namely, your Azure account.
The answer to your question depends on what's currently running in Azure in your subscription.
Agent mode
Beginning in Visual Studio Code version 1.99, GitHub Copilot introduced agent mode, an agentic experience that can perform tasks across your entire Visual Studio Code workspace, making edits, executing terminal commands, and so on.
GitHub Copilot for Azure provides "tools" to GitHub copilot to enhance the agentic experience through deep integration with Azure.
In agent mode, you don't need to instruct GitHub Copilot to use GitHub Copilot for Azure with the @azure prefix.
Enable agent mode
You might need to enable agent mode.
In Visual Studio Code, open Settings using the Manage icon (gear).
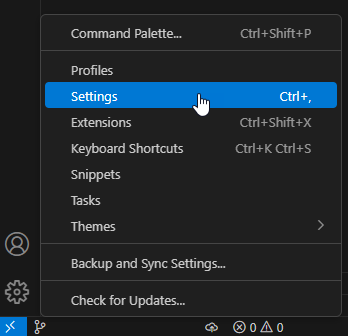
In the Settings' Search bar, search for
chat.agent.enabled.Check the box next to Chat > Agent: Enabled.

Use agent mode
There are three modes: ask (default), edit and agent. To use agent mode, you must select it in the chat pane.
In the chat pane, in the chat prompt, select the mode dropdown and choose Agent.

The chat pane confirms that you're currently in agent mode.

To see agent mode working, use the following prompt:
What are your tools?The completion response displays a list of GitHub Copilot for Azure specific tools available to GitHub Copilot. The response provides a good overview of the kinds of functionality now available to you:
I can assist you with various tasks using a range of tools. Here are the main tools I have available:

1. Search and Navigation
  Semantic search for code or documentation
  File search using glob patterns
  Text search (grep)
  List directory contents
  Read file contents
  List code usages/references

2. Code Editing and Analysis
  Insert edits into files
  Get errors in code files
  Test search (find test files)

3. Terminal and Git Operations
  Run commands in terminal
  Get terminal output
  Get Git diffs and changed files

4. Project Creation
  Create new workspaces
  Get project setup information
  Install VS Code extensions
  Create new Jupyter Notebooks

5. Web and API Tools
  Fetch webpage content
  Get VS Code API references

6. Azure Tools
  Azure development best practices
  Microsoft Learn documentation
  Azure resource management
  Azure authentication tools
  AI model deployment and management
  Azure Bicep schemas
  Service configuration and deployment
  Azure Developer CLI tools

Would you like me to explain any specific tool in more detail or help you with a particular task?
The last entry,
Azure Developer CLI tools, could be employed with the following prompt:What is the az command to list all my storage accounts ordered by ___location?The completion to that prompt might generate:
I'll help you generate the Azure CLI command to list all your storage accounts ordered by ___location. Let me use the Azure CLI generator tool to get the correct syntax for this command.

To list all your storage accounts ordered by ___location in Azure, you can use the following Azure CLI command:

az storage account list --query "sort_by(@, &___location)"

This command will:

1. Retrieve all storage accounts you have access to in your Azure subscription
2. Sort the results based on the ___location (Azure region) of each storage account
3. Display the full details of each storage account in the sorted order

If you'd prefer a more concise output focusing on specific fields, you could modify the query. For example, to show only the name and ___location in a table format:

az storage account list --query "sort_by(@, &___location)[].[name,___location]" -o table

Make sure you're logged into the Azure CLI before running this command. If you're not logged in yet, you can do so with az login.
Enable and disable tools in agent mode
You might want to disable or re-enable certain tools available by GitHub Copilot for Azure.
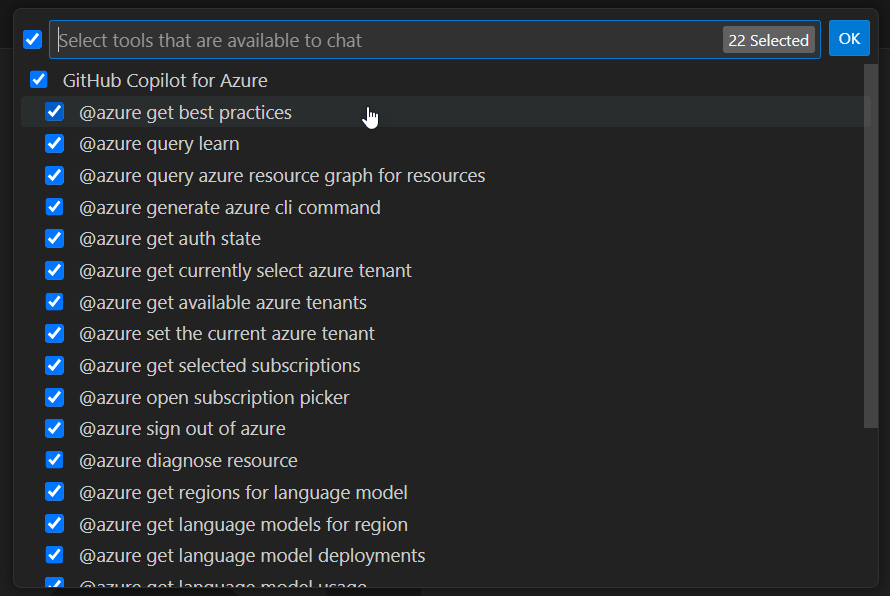
Select the tool icon in the chat pane.

Use the checkbox next to the list of tools to enable / disable tools (or groups of tools).
Best practices for working in agent mode
To get better agentic results, consider the following best practices.
When prompted, add the
copilot-instructions.mdfile to your workspace.
Keep your prompts as granular as possible. Instead of a prompt like
Generate a Python web application and deploy it to Azure, you should break that up into a few prompts each with a smaller scope of responsibility.Allow GitHub Copilot to do work (instead of doing it yourself). Occasionally, GitHub Copilot asks for permission to perform a task with a "Continue" button. While it's possible for you to perform that task outside of the Chat window, you should allow GitHub Copilot to perform the task instead. This allows GitHub Copilot to retain the context of the current state of its larger plan.
Allow GitHub Copilot to repeat itself. Occasionally, GitHub Copilot asks for permission to perform a task repeatedly. It does this to better understand the state of the project files and what it should do next. You should allow GitHub Copilot to repeat tasks it needs to perform.
Express your preferences. If GitHub Copilot wants to perform an action but you would prefer it to take a different action, you can instruct it to do it your preferred way. For example, if it wants to create a folder to contain bicep files called
\.azure, you could intervene and ask it to use a different folder with a prompt such as:Instead of naming the folder `.azure`, please name it `infra`
Optional: Set your default tenant
If you have multiple Microsoft Entra ID tenants, You can set a default tenant using the following prompt:
@azure /changeTenant
Select from a list of your available tenants in the top center drop-down.
You can also set the default tenant in the extension settings:
In Visual Studio Code, on the Activity Bar, select Extensions. Then scroll down to GitHub Copilot for Azure.

Select the gear icon in the corner of the extension's entry, and then select Settings from the pop-up menu.

On the Settings tab, set the Azure Resource Graph tenant to your Microsoft Entra tenant ID. You can find your Microsoft Entra tenant ID in the Azure portal.

Prerequisites
An Azure account and access to an Azure subscription. For details on how to set them up, see the pricing page for Azure accounts.
A GitHub account and a GitHub Copilot subscription. For details on how to set them up, see Creating an account on GitHub and Quickstart for GitHub Copilot, respectively.
Visual Studio 2022 (Any edition). For details on how to download and install it, see Install Visual Studio.
Important
GitHub Copilot is a separate subscription managed by GitHub. For questions regarding GitHub Copilot subscriptions and Support, see Getting started with a GitHub Copilot plan.
Install GitHub Copilot for Azure
- In Visual Studio 2022, in the Extensions menu, select Manage Extensions.
- In the Extension Manager search for and select GitHub Copilot for Azure (VS 2022). Select the Install button.
- After a moment, you'll see a banner: "Your changes are scheduled. The modifications will begin when Microsoft Visual Studio is closed." Shut down Visual Studio.
- The VSIX Installer dialog opens confirming the installation. Select the Modify button.
- After a few moments, you should see "Modifications Complete". Select the Close button.
- Reopen Visual Studio 2022.
- Select the "GitHub Copilot" button in upper-right of window on the toolbar. Select Open Chat Window.
- When the GitHub Copilot Chat window appears, in the chat area at the bottom, select Agent mode, then select the Select tools button (two wrenches).
- In the Select tools dialog, you should see "Azure MCP Server". To the right, you see "0/153" if no tools are selected (which is currently the default). Select the parent node to choose all of the tools.
Important
If you do not see "Azure MCP Server" in the list of tools, you may need to uninstall and re-install the extension.
Write your first prompt
If the Chat window isn't already open, make sure it's open by selecting the View > GitHub Copilot Chat menu option. You should see chat window docked to the right side by default.

In the chat text area at the bottom of the chat pane, enter the following prompt:
Do I have any resources currently running?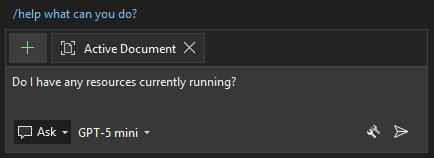
By default, GitHub Copilot uses ask mode. Ask mode provides answers to your prompts in the chat pane. Agent mode enables GitHub Copilot to take action in your workspace.
The answer to your question depends on what's currently running in Azure in your subscription.
Agent mode
In Agent mode, GitHub Copilot can perform tasks across your entire Visual Studio workspace, making edits, executing terminal commands, and so on.
GitHub Copilot for Azure provides "tools" to GitHub Copilot to enhance the agentic experience through deep integration with Azure.
To switch, between ask and agent mode, select the down chevron next to the Ask option in the chat area and select the desired mode.

Enable and disable tools in agent mode
You might want to disable or re-enable certain tools available by GitHub Copilot for Azure.
Select the "Select tools" icon in the chat pane.

Use the checkbox next to the list of tools to enable / disable tools (or groups of tools).
Prerequisites
An Azure account and access to an Azure subscription. For details on how to set them up, see the pricing page for Azure accounts.
A GitHub account and a GitHub Copilot subscription. For details on how to set them up, see Creating an account on GitHub and Quickstart for GitHub Copilot, respectively.
Visual Studio 2026 (Any edition). For details on how to download and install it, see Install Visual Studio.
Important
GitHub Copilot is a separate subscription managed by GitHub. For questions regarding GitHub Copilot subscriptions and Support, see Getting started with a GitHub Copilot plan.
Install GitHub Copilot for Azure
If you already installed Visual Studio 2026 and want to add GitHub Copilot for Azure after initial install, open Visual Studio Installer and select the Modify button, which displays the available workloads.

If you're installing Visual Studio 2026 for the first time, the Visual Studio Installer automatically displays the available workloads.
On the Workloads tab, make sure "Azure AI development" is selected.

Select the Install button to complete the installation.
Launch Visual Studio 2026 and create or load a project.
Open GitHub Copilot Chat.
If prompted, sign in to your GitHub account.
If prompted, sign in to your Azure account.
In the chat area, select the Select tools button (two wrenches icon) to display a list of available tools. Enable all Azure tools by checking the top nodes for Azure.
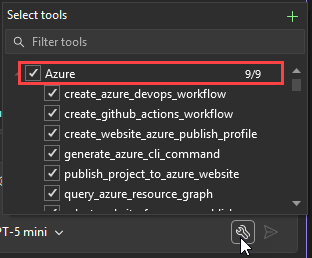
Also select the top node for Azure MCP Server.

Write your first prompt
If the Chat window isn't already open, make sure it's open by selecting the View > GitHub Copilot Chat menu option. You should see chat window docked to the right side by default.

In the chat text area at the bottom of the chat pane, enter the following prompt:
Do I have any resources currently running?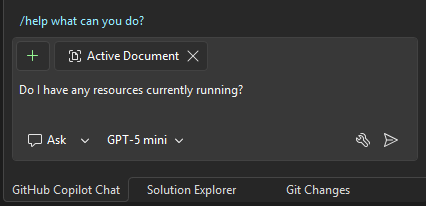
By default, GitHub Copilot uses ask mode. Ask mode provides answers to your prompts in the chat pane. Agent mode enables GitHub Copilot to take action in your workspace.
The answer to your question depends on what's currently running in Azure in your subscription.
Agent mode
In Agent mode, GitHub Copilot can perform tasks across your entire Visual Studio workspace, making edits, executing terminal commands, and so on.
GitHub Copilot for Azure provides "tools" to GitHub Copilot to enhance the agentic experience through deep integration with Azure.
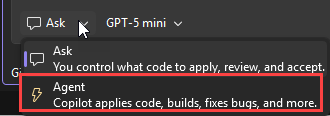
To switch, between ask and agent mode, select the down chevron next to the Ask option in the chat area and select the desired mode.
Enable and disable tools in agent mode
You might want to disable or re-enable certain tools available by GitHub Copilot for Azure.
Select the "Select tools" icon in the chat pane.
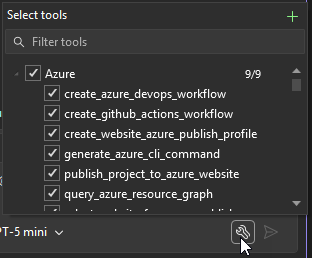
Use the checkbox next to the list of tools to enable / disable tools (or groups of tools).
Related content
- Understand what GitHub Copilot for Azure is and how it works.
- Follow the quickstart to understand how to include GitHub Copilot for Azure in your software development workflow. The quickstart describes how to deploy services to Azure, monitor their status, and troubleshoot problems.
- See example prompts for learning more about Azure and understanding your Azure account, subscription, and resources.
- See example prompts for designing and developing applications for Azure.
- See example prompts for deploying your application to Azure.
- See example prompts for optimizing your applications in Azure.
- See example prompts for troubleshooting your Azure resources.