Note
Access to this page requires authorization. You can try signing in or changing directories.
Access to this page requires authorization. You can try changing directories.
Azure DevOps Services | Azure DevOps Server 2022 - Azure DevOps Server 2019
This article shows how you can save time with Microsoft Excel when you need to add or modify many work items, add links and attachments to multiple work items, and more. You can also use native Excel features to perform actions such as summing a column, copying and pasting rows, or filling down data into cells.
Tip
To import or update work items in bulk, use the web portal or the CSV import feature (recommended).
For information about connecting to Excel, see Connect Azure Boards to an Office client. For answers to specific questions about the integration of Excel and Azure DevOps, see FAQs: Work in Excel connected to Azure Boards.
Prerequisites
| Category | Requirements |
|---|---|
| Project access | - Project member. |
| Access levels | - At least Stakeholder access. |
| Permissions | - Member of the Contributors group. - View work items in this node and Edit work items in this node permissions set to Allow. By default, the Contributors group has this permission. For more information, see Set permissions and access for work tracking. |
| Tools | - Microsoft Excel 2010 or later, including Microsoft Office Excel 365. - Azure DevOps Office Integration 2019. To download, scroll to All Downloads, select Other Tools, Frameworks, and Redistributables, and then select Download next to Azure DevOps Office Integration 2019. Alternatively, you can get the plug-in by installing one of the latest editions of Visual Studio. The plug-in supports connection to Azure Boards and Azure DevOps Server from Excel. - Visual Studio 2015.1 or later or Team Foundation Server Office Integration 2015 Update 2 or later. - To use the Select User feature, download the free version of Visual Studio Community. This feature helps avoid data validation errors caused by misspelled user names and is useful when assigning user names from a large group of user accounts. |
| Category | Requirements |
|---|---|
| Project access | - Project member. |
| Access levels | - At least Stakeholder access. |
| Permissions | - Member of the Contributors group. - View work items in this node and Edit work items in this node permissions set to Allow. By default, the Contributors group has this permission. For more information, see Set permissions and access for work tracking. |
| Tools | - Microsoft Excel 2010 or later, including Microsoft Office Excel 365. - Azure DevOps Office Integration 2019. To download, scroll to All Downloads, select Other Tools, Frameworks, and Redistributables, and then select Download next to Azure DevOps Office Integration 2019. Alternatively, you can get the plug-in by installing one of the latest editions of Visual Studio. The plug-in supports connection to Azure Boards and Azure DevOps Server from Excel. - To use the Select User feature, install Visual Studio 2015.1 or later or Azure DevOps Office Integration 2019 or later. You can download the free version of Visual Studio Community. This feature helps avoid data validation errors caused by misspelled user names and is useful when assigning user names from a large group of user accounts. |
For more information, see Client compatibility with Azure DevOps Server.
Limitations
- macOS isn't supported. Even with Visual Studio for Mac installed, connecting to Azure DevOps from Excel isn't supported.
Use list and query types
You can add, modify, publish, and refresh work items by using any query type and list type.
- Use a flat list to bulk add or modify several types of work items at the same time, such as backlog items, tasks, bugs, or issues.
- Use a tree list to bulk add or modify work items and their tree-topology links.
Follow these best practices:
- Input list, flat list: Import a list of work items or create new work items without hierarchy.
- Input list, tree list: Complete top-down planning and import hierarchically linked work items.
- Query list, tree list: View and modify the hierarchy of link relationships of many existing work items.
- Query list, flat list: Bulk update a list of work items or create new work items without hierarchy.
- Input list, flat list: Import a list of work items or create new work items without hierarchy.
- Input list, tree list: Complete top-down planning and publish parent-child linked work items.
- Query list, flat list: Create an Excel report based on the query of work items. To create an Excel report, your project collection must be configured to support Analytics reporting. For more information, see Create Excel reports from a work item query.
- Query list, tree list: View and modify the hierarchy and parent-child link relationships of many existing work items.
Query types
The following query types are available with Excel:
- None: Indicates an input list.
- Query title: Indicates the list of work items is tied to the specified query.
Azure Boards supports three query types, indicated by icons next to each query:
- Flat list of work items: Imported as a flat list query.
- Work items and direct links: Imported as a flat list query.
- Tree of work items: Imported as a tree list.

Direct links queries are imported as a flat list into Excel because Excel doesn't support modifying multiple types of links.
Tree lists
You can bulk add a nested list of work items, such as a work breakdown structure or hierarchical user stories. For example, you can add a nested list of tasks, subtasks, and bugs, or link tasks to product backlog items.
The following list types are available with Excel:
- Flat list: A simple list of work items with a single Title column. No link management is supported.
- Tree list: A hierarchical list of work items that supports creating and updating tree topology links, such as parent-child links, between work items. These lists include two or more Title columns.
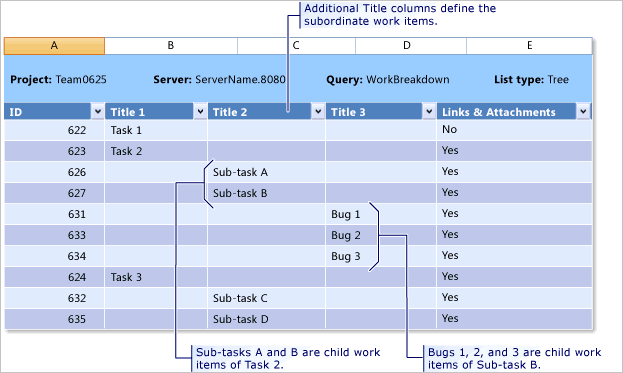
Parent-child links or other tree topology link types support creating a hierarchical backlog structure. The work item types that participate in the hierarchy differ with other processes and are shown in the subsequent images.
Tree list hierarchies
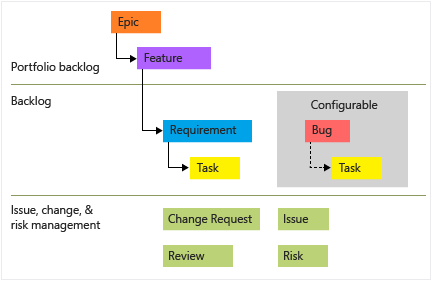
The following image shows the hierarchy for the Agile process backlog work item:

- User Stories and tasks are used to track work.
- Bugs track code defects.
- Epics and features are used to group work under larger scenarios.
Each team can configure how they manage Bug work items at the same level as User Story or Task work items. Use the Working with bugs setting. For more information about using these work item types, see Agile process.

To import a hierarchical list, see Add or import a hierarchical list of work items as a tree list later in this article.
My queries versus shared queries
You can open any query you defined in Azure Boards in Excel, including queries under My Queries and Shared Queries. However, if you plan to share the workbook with other team members, use a Shared Query. Other team members can't access workbooks or worksheets based on personal queries stored under your My Queries folder.
Use Excel features
You can use most Excel features when you work with a list of work items.
- Format a cell or apply conditional formatting to a cell or column
- Cut and paste from one cell to other cells
- Cut and paste a single row
- Sum a column or add other formulas
- Fill down cells
- Filter
- Add multiple worksheets to your workbook
Each worksheet in Excel can contain a different input list or query. However, all worksheets within the workbook must connect to the same project within an organization or project collection.
The following features behave differently when you use a worksheet connected to Azure Boards.
- Each cell or column of cells corresponds to a work item field. Each field is associated with a data type. You can't enter data into an Excel cell that doesn't meet the data type and requirements for that field.
- You can only insert a single row at a time within the worksheet.
- You can copy and paste multiple rows within the worksheet.
- To move a work item within a hierarchy, cut the entire row and paste it under the work item you want as its parent.
- Use Outdent and Indent to change the ___location of a work item within the tree.
- The Undo (Ctrl + Z) action might not work. To revert an action, refresh the worksheet.
We recommend you publish and refresh your worksheet often to make sure your local work remains in sync with Azure Boards data store. For more information about Excel, see Basic Excel tasks.
Sort work items
You can sort work item flat lists by using the Excel sort feature. But, if you're working from a tree list, you don't want to do any type of sort. Doing so changes the tree structure and as such, the links between work items.
If you want to use Excel to manage the order of your work items as they appear in a team backlog, you can use the Stack Rank or Backlog Priority field (Agile or Scrum process). You can set values in these fields, publish your worksheet, and refresh your backlog. Your backlog items should appear reordered based on lowest to highest number. However, the next time the backlog is reordered from the backlog, the values you entered are subject to change.
To maintain a specific order of work items, consider adding a custom field to manage the sort order. You can then use this field within Excel to sort your flat list of work items. This option doesn't change the order in which work items appear in your backlog.
Complete tasks in an Excel worksheet
The following tasks are available when you work in an Excel worksheet:
- Add tags and bulk update work items with tags as described in Categorize and filter lists and boards with work item tags. Add the Tags field to your worksheet. Add multiple tags separated by a semicolon (;).
- Add simple text to a rich-text field. Keep in mind that if you update several work items in bulk, you might lose formatting in existing work items.
- Work offline and then reconnect and publish your changes. For more information, see Connect Azure Boards to an Office client, Work offline, and reconnect.
Unsupported tasks
The following tasks aren't supported when you work in an Excel worksheet:
- Delete work items
- Change the work item type of an existing work item
- Move work items to another project
- Import or update test case steps or other test artifacts
- Add work items in any other State than the new State
- Add to a work item discussion thread
- Link to a remote work item
- Delete work items
- Change the work item type of an existing work item
- Move work items to another project
- Import or update test case steps or other test artifacts
- Add work items in any other State than the new State
- Add to a work item discussion thread
Import work items as a flat list
Use the following procedure to import work items as a flat list:
Open Excel and connect to your Azure Boards project. Use one of the four methods provided in Connect Azure DevOps project to Excel.
Note
When you connect to Azure Boards in the cloud, the Team Project Collection is automatically selected as there's only one collection associated with your Azure DevOps Services organization. When you connect to Azure Boards in an on-premises server, choose the Team Project Collection before you choose the project.
In Excel, start with a blank worksheet. If you don't see the Team ribbon (or the Team menu if you use Excel 2007), ensure that you installed the Azure DevOps Office Integration 2019 tool. For more information, see Azure DevOps Office integration issues.
Place the cursor in the first table cell. In the Team ribbon, select New List:

In the New List dialog, select Input list, and select OK:

Your worksheet is now bound to your project as an input list (
Query[None]), flat list:
Enter Title values for the work items you want to add, and select the Work item type values:
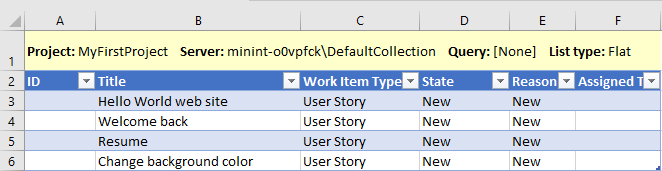
The State and Reason fields automatically populate with default values after you select the work item type.
Place the cursor in any table cell that has data. In the Team ribbon, select Publish:
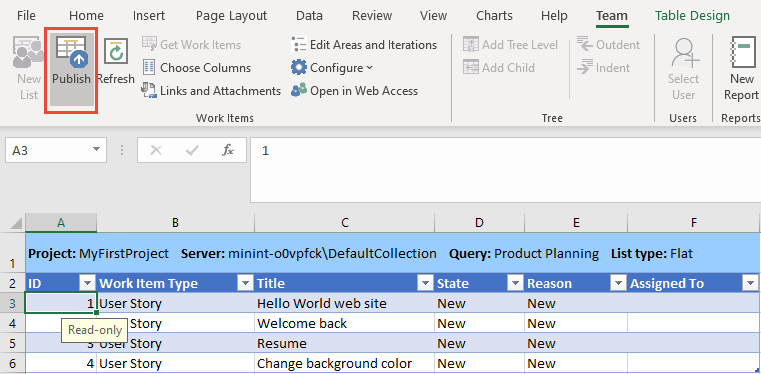
After the worksheet publishes successfully, the work items in the table are assigned ID numbers:

To assign values to other fields, select Choose Columns in the Team ribbon. Add the fields, make the assignments, and publish your changes.
Tip
When you add work items to a team backlog, ensure you specify the team's Area Path and Iteration Path. If you need to add Area Paths or Iteration Paths, select Edit Areas and Iterations. This link opens the Project settings page in a web browser. For more information, see Define Area Paths and assign to a team and Define Iteration Paths and configure team iterations.
You can add more information to a work item in the list by opening the item in the web portal from Excel.
First, publish any unsaved changes to the list. Select the work item and then select Open in Web Access in the Team ribbon:
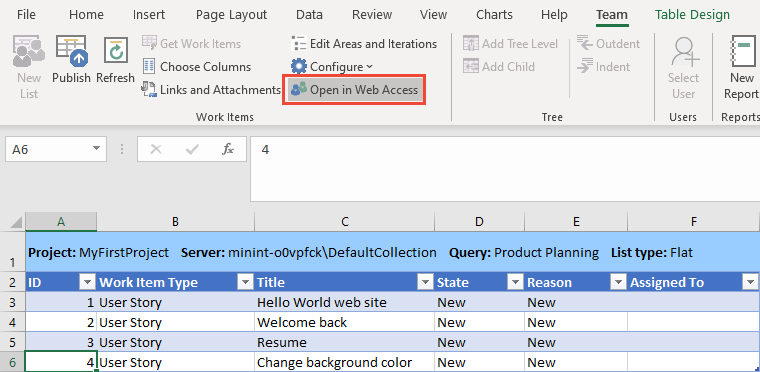
A web browser opens and displays the work item.
If you make changes to the work item, immediately refresh your worksheet to capture the changes.
Import work items as a tree list
You can add a hierarchy of work items linked by using parent-child links or other tree topology link type.
Important
Avoid sorting a tree list, as it can alter the hierarchical link relationships.
Start from the step in the previous procedure where you bound your worksheet to your project.
Convert the flat input list worksheet into a tree list. Select a cell within the list and then select Add Tree Level in the Team ribbon:
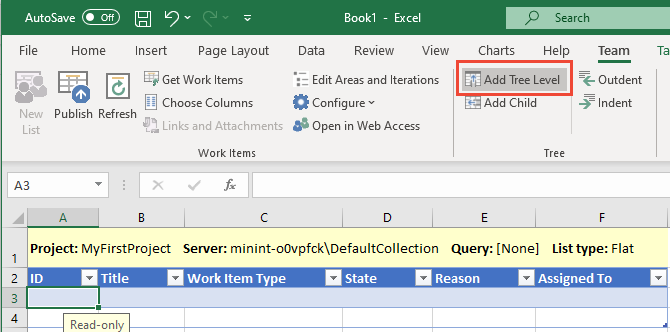
If the Add Tree Level option isn't available, your list is a query list. To convert your list to a tree list, you must first reconfigure your list to an input list.
In the Convert to Tree List dialog, select the link type to use when you add work items to a hierarchy, and then select Convert. The most common choice is Parent-Child. You can only select from tree topology link types. For more information, see Link type topologies and restrictions.

The List type changes to Tree, and another Title column appears. The initial Title column is labeled Title 1 and the new Title column is labeled Title 2:

To add more levels to the hierarchy, select Add Tree Level again. For example, if you plan to add a hierarchy of Epics, Features, and User Stories, you need three Title columns.
If you want to add tasks, add another tree level to have four Title columns. To remove a column, see Remove a tree level.
Save your Excel file.
Enter the Work Item Type and Titles for the hierarchy you want to import. The State fields automatically fill in with default values after you select the work item type.

Place the cursor in any table cell that has data. In the Team ribbon, select Publish.
After the worksheet publishes successfully, the work items in the table are assigned ID numbers.
In the background, the link type you selected is used to link each work item in the hierarchy. Epics are linked to Features. Features are linked to User Stories.
To check the links, select a work item and select Links and Attachments in the Team ribbon. The following example shows the child and parent links created for an imported Feature:

To add a child to a work item in a new table row, select the work item, and then select Add Child in the Team ribbon:

To assign values to other fields, select Choose Columns in the Team ribbon. Add the fields, make the assignments, and publish your changes.
To modify the tree hierarchy, cut the entire row for a work item and then paste the row under the new parent in the tree. When you publish the change, old hierarchical links are deleted and new hierarchical links are created.
You can use the
 Indent item in tree and
  Outdent item in tree actions to demote or promote a work item within the tree hierarchy. These actions are available to content in any column labeled as Title <Number>. If you want to work with data in a column that doesn't have the Title <Number> label, add a tree level for the column.
Remove a tree level
To remove a level within a tree hierarchy, follow these steps:
Publish any changes that you made to work items before you attempt to remove a tree level.
Removing a tree level requires a refresh, which overwrites data in the work item list. Any unpublished data is lost.
Delete any content under the tree-level Title <Number> column you want to remove. This column should be the highest numbered Title column in the tree.
Refresh your worksheet. The column containing empty values for the Title is removed.
If you attempt to manually delete the column, you get an error message.
Tips for working with a tree list
Excel uses the data in the Title columns to determine the pattern of links between work items. When you publish changes, the following conditions can cause an error, an invalid link, or creation of a tree link between incorrect work items:
- A row between the work items is blank within the hierarchy.
- The title of a work item is in the wrong column. Ensure you enter a title for each child work item.
- Multiple Title columns contain data within a row. Enter text in only one of the Title <Number> columns per row.
- The list was sorted. Avoid sorting a tree list, as it can change the hierarchical link relationships. If you do sort a tree list, recover the original list by immediately refreshing.
To resolve an error, see FAQ - Resolve invalid links in tree lists.
Additionally, a parent-child linked work item can only have one parent. You can't add the same work item task to two backlog items. Instead, define distinct work item tasks.
Update work items in bulk with a query list
The easiest way to bulk update multiple work items is to create a query for the work items you want to update, and then open that query in Excel.
Tip
Keep your work in sync with these tips:
- Use
 Refresh when you first open a saved worksheet to download the latest data from the data store.
 - Add columns to the worksheet with the
 Choose Columns function to enter data for more fields.
 - Publish your additions and modifications often to avoid data conflicts.
- Save your workbook periodically to prevent data loss before you publish or refresh.
From the web portal or Visual Studio, create a query that contains the work items you want to update. For more information, see Create and save managed queries with the query editor.
Open Excel and connect to your Azure Boards project. Use one of the four methods provided in Connect Azure DevOps project to Excel.
Update your work items:
Web portal or Visual Studio: If you opened your query in the web portal or Visual Studio, you're ready to make updates.
Select Choose Columns in the Team ribbon.
Make updates, and publish your changes.
From Excel: If you started from Excel, you need to prepare a worksheet with the items to update:
Open a blank worksheet. You can add a worksheet to an existing workbook, as long as you choose a query from the same project to which the workbook is bound.
Place the cursor in the first table cell. In the Team ribbon, select New List:
In the New List dialog, select Query list, and use the dropdown list to select the query to use:
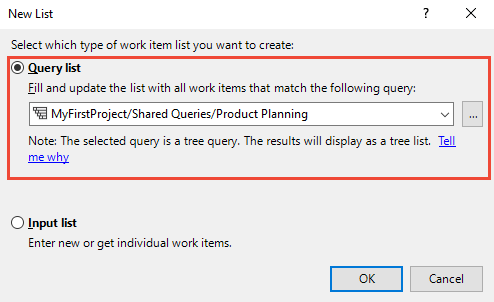
The icon next to each query indicates the query type, as described in Query types.
Select OK.
Your worksheet is now bound to your project with a query:

With the work items imported to Excel, make the modifications you want, and publish your changes.
If you're working with a tree list, review the guidance in Import a hierarchical list of work items, earlier in this article.
Enable Tree commands
If the Tree commands (Add Child, Indent, and so on) aren't available in the Team ribbon, then your worksheet is currently configured as a flat or query list:

To enable the Tree commands, convert the list to either an input list or a list based on a tree query. For more information, see the next section, Change your list type or query.
Change your list type or query
Modify the work items listed in your worksheet by applying a different list type or changing the connected query:
- Change a flat list to a tree list
- Change from a query list to an input list
- Change from an input list to a query list
- Change the query your worksheet references
If you want to change a query, flat list to a tree list, you must first reconfigure the input. When the Tree commands (Add Child, Indent, and so on) aren't available in the Team ribbon, your worksheet is configured as a flat or query list.
To convert your query list to an input list, follow these steps:
Select Publish to make sure all changes in your worksheet are saved.
On the Team ribbon, select Configure > List:

In the Configure List Properties dialog, select Refresh work items only, and then select Apply:

This action changes the query list to an input list.
You can use this same approach to convert an input list to a query list:
In the Configure List Properties dialog, select Refresh from query.
Select the query to populate the worksheet, and then select Apply:

Add existing work items to your worksheet
If you're working from a query, modify your query to contain the work items you want. Then refresh your list. The other work items appear in your list.
If you're working with an input list, complete the following steps:
In the Team ribbon, select Get Work Items:

In the Get Work Items dialog, select the method to get the work items:

If the work items are defined in another project, first select the Project. Then, make your selection:
Saved Query: Use this method when you defined a query that contains the set or superset of work items you want.
IDs: Use this method when you know the IDs of the work items that you want to link to.
- In the IDs box, enter the IDs of the work items that you want to find, separated by commas or spaces.
Title contains: Use this method to find work items that have a common word or phrase in the Title field. In the and type list, select the type of work item that you want to retrieve.
Tip
To minimize the time required to run the query, narrow the filter criteria of the search.
Select Find.
- Only those work items defined for the selected project and specified work item type are listed.
- The
 checkmark indicates a work item that's already present in the current worksheet view.
 - To sort on a column field, select the column label. You can also adjust the column widths to see more details.
In the list of returned work items, select the
checkbox for each work item you want to add.Select each work item that should link to the current work item, including any child nodes.
Use the Shift + Select keyboard shortcut to select a range of work items, and Ctrl + Select to add or remove work items from the selected group.
Use Select All to select all work items in the list.
Select OK. The worksheet list updates to show your changes.
Add or remove column fields
When you create a worksheet with the New List action in the Team ribbon, the process produces a set of default field columns, such as Work Item Type, ID, and State. If you create your worksheet from an existing query, the column fields in the worksheet correspond to the fields defined in the query.
In both scenarios, you can add and modify columns by using the Choose Columns action in the Team ribbon. Keep in mind that if your worksheet is created from a query, your column changes don't modify the underlying query.
To assign values to other fields, select Column Options to add the fields of interest:
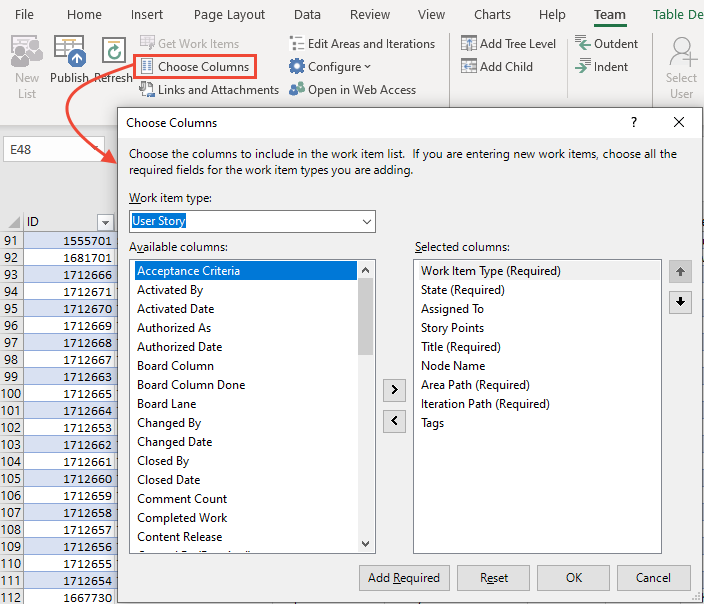
To filter the fields based on work item type, select the Work item type.
To add a field to the worksheet set, select the field in the Available columns list, and then select the
 right arrow.
To remove a field from the worksheet set, select the field in the Selected columns list, and then select the
 left arrow.
To change the position of a field in the column sequence, select the field and reposition it by using the
 up arrow and the
  down arrow. The up arrow moves the selected column toward the left in the set of table column headers. The down arrow moves the column toward the right in the set of table column headers.
You can add rich-text fields like Description. Keep in mind that some rich formatting might be lost in the published worksheet.
Select OK to apply the column changes.
After the fields appear in the worksheet, assign values and publish your updates. When you work with identity fields that accept user accounts, follow the guidance in the next section, Select user accounts.
Save your worksheet.
Select user accounts
Use the Select User feature to find user accounts and assign values to person-named fields. This feature also provides access to the most recently used (MRU) values. If your team has hundreds or thousands of user accounts, this feature is especially useful.
Note
Without the Select User feature, you need to enter user names exactly as they appear in the database; otherwise, you receive data validation errors when you try to publish.
To use the Select User feature, confirm you have Visual Studio 2015.1 or later installed. If you need a more recent version for your configuration, download and install the version.
Open your worksheet, and select an identity or person-named field. The selection makes the Select User feature available in the Team ribbon:

An identity or person-named field contains a user identity. These fields are typically synchronized with a user account database, such as Microsoft Entra ID, Windows Server Active Directory, or a Workgroup.
In the Assign User dialog, enter the name of the user account. As you type, the text box automatically filters the results until you can select the account of interest.

Enter a letter to jump to names starting with that letter. Only user names are recognized, not account aliases.
As you select user names, Excel remembers your recent selections, allowing you to choose user accounts directly from the field.

Link work items
You can complete many actions from the Links tab of the Links and Attachments dialog:
- Review the existing links defined for the selected work item
- Add links that target selected work items to one or more work items or selected objects
- Delete links
- Open a linked work item (opens in the web portal)
- Edit the link type of an existing link
- Add columns to the list on the Links tab and sort on that list
For more information on linking work items, see Link user stories, issues, bugs, and other work items.
View and add links
The Links and Attachments dialog doesn't support bulk updates to work item links. If you want to bulk update tree-topology link types, use a tree list.
The following procedure shows how to link a work item to other work items:
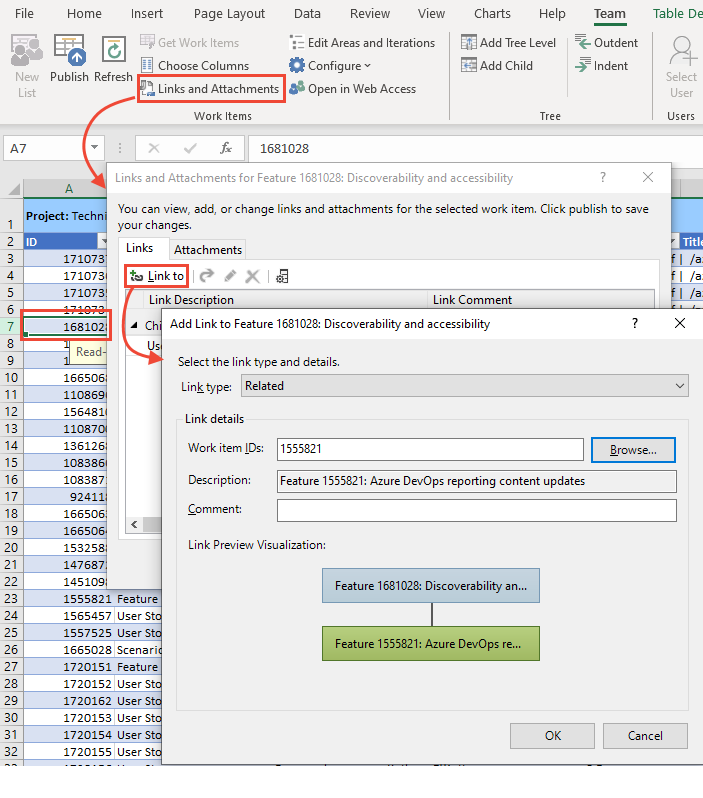
Select the work item to update in the worksheet, and then select Links and Attachments in the Team ribbon.
In the Links and Attachments dialog, select the Links tab, and then select Link to.
In the Add link to <Work Item> dialog, identify the work items that you want to link to:
Select the Link Type for the work items to link to. This process requires the same link type for all of the work items you identify.
Select the identifiers (Work item IDs) for all work items to link to. For more information, see the next section, Find work items to link.
Select OK.
Select Publish in the Team ribbon and close the dialog.
You can use this same process to link the identified work items to multiple work items in the worksheet.
Select a range of work items in the worksheet by using the Shift + Select keyboard shortcut. Use Ctrl + Select to add or remove work items from the selected group.
Follow the procedure for the Links and Attachments and Add link to <Work Item> dialogs to identify the work items to link to.
When you Publish your changes, the identified work items are linked to all the work items you selected in the worksheet.
Find work items to link
In the Add link to <Work Item> dialog, you can open the Choose Linked Work Items dialog to select one or more work items to link to. If you plan to find and list work items by using a saved query, first define the query.
In the Add link to <Work Item> dialog, select Browse (Visual Studio):

In the Choose Linked Work Items dialog, select the method to get the work items to link to:
You configure the fields on this dialog in the same way as the Get Work Items dialog. For more information, see Add existing work items to your worksheet.
Add columns to the Links list
You can modify the visible columns for the Links list:
Select a work item in the worksheet, and then select Links and Attachments in the Team ribbon.
In the Links and Attachments dialog, select the Links tab, and then select
 Column Options.
In the Column Options dialog, select the fields you want to display:
To add fields, select one or more fields in the Available columns list, and then select the
Add selected column arrow.To remove fields, select one or more fields in the Selected columns list, and then select the
Remove selected columns arrow.
You configure the fields on this dialog in the same way as the Get Work Items dialog. For more information, see Add existing work items to your worksheet.
To reorder the list of links in the Links and Attachments dialog, select a column to sort the list on that field:

Open a linked work item
You can open a linked work item from the Links and Attachments dialog,
In the Links tab, right-select a linked work item, and select Open Linked Item:

The linked work item opens in your web portal.
Edit the link and change the link type
You can edit any listed link, including changing the link type and the linked work items.
In the Links and Attachments dialog, Links tab, select the link to update and then select
 Edit Link.
In the Edit Link dialog, change the link type as needed:

To change the linked work item, enter the ID of the work item, or select Browse to locate the work item.
You work with the fields in this dialog in the same way as the Get Work Items dialog. For more information, see Add existing work items to your worksheet.
Add attachments
Follow these steps to add attachments to your work items:
Select the work item, and then select Links and Attachments.
In the Links and Attachments for <Work Item> dialog, select the Attachments tab.
Select
 Add, and then select the file you want to attach:
Select OK.
Select Publish, and the close the dialog.
You can use this same process to add the same attachments to several work items at the same time. In the worksheet, use the Shift + Select keyboard shortcut to select a range of work items, and Ctrl + Select to add or remove work items from the selected group. After you select the attachments, the Publish process applies the files to all selected work items.
Create a report
You can create a report or chart from the web portal for flat list queries. For more information, see Track progress by creating status and trend query-based charts.
Important
You can create an Excel report by using the New Report option from an on-premises Azure DevOps Server only. These reports require your project's collection to be configured to support SQL Server Analytics Server.
To create the report, select New Report:

For more information, see Create Excel reports from a work item query.
Resolve publishing errors
The following articles provide troubleshooting guidance for resolve publishing errors that might occur when you work in Excel:
Resolve data conflicts: A data conflict occurs when a field value is changed in Azure Boards since the last time you published from Excel.
Resolve data validation errors: A data validation error occurs when a field value violates the rules for that field and work item type.
Resolve invalid links in a tree hierarchy: An invalid link happens when a work item in a hierarchy or tree list is moved or sorted, which causes the dependencies between work items to break. To resolve the error, review the error message and reposition the work items to restore the correct structure.
Address Error TF208104: Hierarchical Link Relationship Is Locked: If you receive error TF208104, your changes to the fields are published, but changes to the link hierarchy aren't published. This error occurs because another process locks at least one of the link relationships for the work item, such as Project Server integration.