Note
Access to this page requires authorization. You can try signing in or changing directories.
Access to this page requires authorization. You can try changing directories.
In this article, you learn how to use an Azure Redis cache with the Python language and connect using Microsoft Entra ID.
Prerequisites
- Azure subscription - create one for free
- Install Python 3.7+ language environment
- Add these imports from to your project and to your development environment
redis- The Redis Python clientredis-entraid- Redis Microsoft Entra ID authentication extensionazure-identity- Azure authentication library
Create an Azure Managed Redis instance
First, create a cache. You can create a cache using Azure Managed Redis or Azure Cache for Redis using the Azure portal. In this Quickstart, we use Azure Managed Redis.
When you create the cache, Microsoft Entra ID is enabled by default making it secure from the start. Your cache must also use a public endpoint for this QuickStart.
To create a cache with the portal, follow one of these procedures:
Optionally, you can create a cache using Azure CLI, PowerShell, whichever you prefer.
Code to connect to a Redis cache
In the first part of the code sample, set your connection to the cache.
- Ports for Azure Managed Redis and Enterprise caches: 10000
- Ports for Azure Cache for Redis instances: 6380
import redis
from azure.identity import DefaultAzureCredential
from redis_entraid.cred_provider import create_from_default_azure_credential

# Connection details for your cache
# Get the connection details for the Redis instance
redis_host = "contosob116.westus3.redis.azure.net"
redis_port = 10000  #For an Azure

print("🚀 Starting Azure Redis Cache connection test...")
print(f"📡 Connecting to: {redis_host}:{redis_port}")

# Validate configuration
if not redis_host or not redis_port:
    print("❌ Error: Redis host and port must be configured")
    exit(1)

print()  # Add a new line

try:
    # Create credential provider using DefaultAzureCredential for Azure Entra ID authentication
    credential_provider = create_from_default_azure_credential(
         ("https://redis.azure.com/.default",),)

    # Create a Redis client with Azure Entra ID authentication
    r = redis.Redis(host=redis_host,
                    port=redis_port,
                    ssl=True,
                    decode_responses=True,
                    credential_provider=credential_provider,
                    socket_timeout=10,
                    socket_connect_timeout=10
                    )
Code to test a connection
In the next section, test the connection using the Redis command ping that returns the True value.
# Ping the Redis server to test the connection
result = r.ping()
if result:
    print("Ping returned: ", result)
Code set a key, get a key
In this section, use a basic set and get sequence to start using the Redis cache in the simplest way to get started.
    # Create a simple set and get operation
    result = r.set("Message", "Hello, The cache is working with Python!")
    print("✅ SET Message succeeded: " + str(result))
    print()  # Add a new line

    value = r.get("Message")

    if value is not None:
        print("✅ GET Message returned : " + str(value))
        print()  # Add a new line
    else:
        print("⚠️  GET Message returned None")
        print()  # Add a new line

    print("🎉 All Redis operations completed successfully!")
    print()  # Add a new line
Before you can run this code, you must add yourself as a Redis user to the cache.
You must also authorize your connection to Azure from the command line using the Azure command line or Azure developer command line (azd).
You should also add users or a System principal to your cache. Add anyone who might run the program as a user on the Redis cache.
The result looks like this:
C:\utils\python-quickstart>python quickstart-amr.py
🚀 Starting Azure Redis Cache connection test...
📡 Connecting to: contosob116.westus3.redis.azure.net:10000

✅ Ping returned : True

✅ SET Message succeeded: True

✅ GET Message returned : Hello, The cache is working with Python!

🎉 All Redis operations completed successfully!

🔐 Redis connection closed
Here, you can see this code sample in its entirety. The code contains some error checking omitted from the earlier code explanations for simplicity. The final step is closing the connection to the cache.
# Python Quickstart using Azure Entra ID authentication
# Azure Managed Redis cache that you created using the Azure portal, or CLI
# This script demonstrates secure connection using Microsoft Entra ID authentication
# This script demonstrates secure connection using the default Azure credential provider
# You should be a user on the cache and logged in to Azure CLI with the same account using `az login`

import redis
from azure.identity import DefaultAzureCredential
from redis_entraid.cred_provider import create_from_default_azure_credential

# Connection details for your cache
# Get the connection details for the Redis instance
redis_host = "<host-url>"  # Replace with your cache info
redis_port = <port number>  # Replace with your cache info

print("🚀 Starting Azure Redis Cache connection test...")
print(f"📡 Connecting to: {redis_host}:{redis_port}")

# Validate configuration
if not redis_host or not redis_port:
    print("❌ Error: Redis host and port must be configured")
    exit(1)

print()  # Add a new line

try:
    # Create credential provider using DefaultAzureCredential for Azure Entra ID authentication
    credential_provider = create_from_default_azure_credential(
         ("https://redis.azure.com/.default",),)

    # Create a Redis client with Azure Entra ID authentication
    r = redis.Redis(host=redis_host,
                    port=redis_port,
                    ssl=True,
                    decode_responses=True,
                    credential_provider=credential_provider,
                    socket_timeout=10,
                    socket_connect_timeout=10
                    )

    # Test connection
    result = r.ping()
    print("✅ Ping returned : " + str(result))
    print()  # Add a new line

    # Create a simple set and get operation
    result = r.set("Message", "Hello, The cache is working with Python!")
    print("✅ SET Message succeeded: " + str(result))
    print()  # Add a new line

    value = r.get("Message")

    if value is not None:
        print("✅ GET Message returned : " + str(value))
        print()  # Add a new line
    else:
        print("⚠️  GET Message returned None")
        print()  # Add a new line

    print("🎉 All Redis operations completed successfully!")
    print()  # Add a new line

except redis.ConnectionError as e:
    print(f"❌ Connection error: {e}")
    print("💡 Check if Redis host and port are correct, and ensure network connectivity")
    print()  # Add a new line
except redis.AuthenticationError as e:
    print(f"❌ Authentication error: {e}")
    print("💡 Check if Azure Entra ID authentication is properly configured")
    print()  # Add a new line
except redis.TimeoutError as e:
    print(f"❌ Timeout error: {e}")
    print("💡 Check network latency and Redis server performance")
    print()  # Add a new line
except Exception as e:
    print(f"❌ Unexpected error: {e}")
    if "999" in str(e):
        print("💡 Error 999 typically indicates a network connectivity issue or firewall restriction")
        print("   - Verify the Redis hostname is correct")
        print("   - Verify that you have logged in with Az CLI")
        print("   - Ensure the Redis cache is running and accessible")
    print()  # Add a new line
finally:
    # Clean up connection if it exists
    if 'r' in locals():
        try:
            r.close()
            print("🔐 Redis connection closed")
        except Exception as e:
            print(f"❌ Error closing connection: {e}")
Clean up resources
If you want to continue to use the resources you created in this article, keep the resource group.
Otherwise, if you're finished with the resources, you can delete the Azure resource group that you created to avoid charges.
Important
Deleting a resource group is irreversible. When you delete a resource group, all the resources in it are permanently deleted. Make sure that you do not accidentally delete the wrong resource group or resources. If you created the resources inside an existing resource group that contains resources you want to keep, you can delete each resource individually instead of deleting the resource group.
To delete a resource group
Sign in to the Azure portal, and then select Resource groups.
Select the resource group you want to delete.
If there are many resource groups, use the Filter for any field... box, type the name of your resource group you created for this article. Select the resource group in the results list.

Select Delete resource group.
You're asked to confirm the deletion of the resource group. Type the name of your resource group to confirm, and then select Delete.
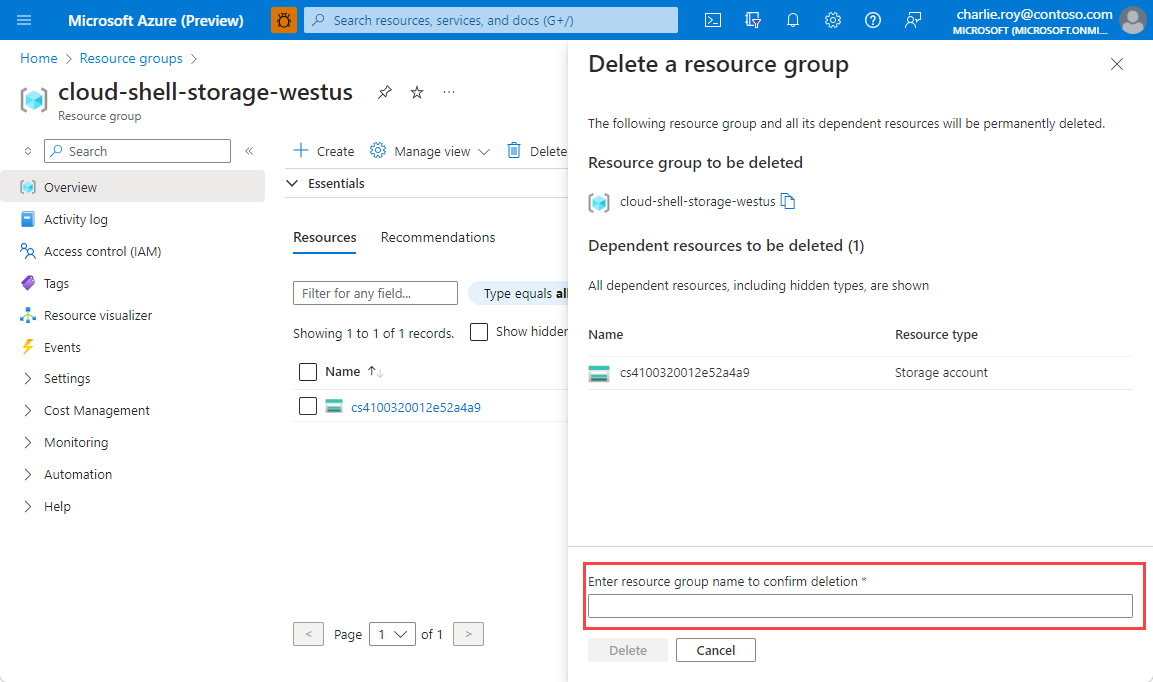
After a few moments, the resource group and all of its resources are deleted.