Note
Access to this page requires authorization. You can try signing in or changing directories.
Access to this page requires authorization. You can try changing directories.
This quickstart shows you how to create an Azure Route Server and configure BGP peering with a network virtual appliance (NVA) using the Azure portal. Azure Route Server enables dynamic routing between your virtual network and network virtual appliances, automatically exchanging routes through BGP protocols.
By completing this quickstart, you have a functioning Route Server that can facilitate dynamic route exchange with network virtual appliances in your Azure virtual network.
If you don't have an Azure subscription, create a free account before you begin.
Important
Route servers created before November 1, 2021, without an associated public IP address, were deployed with the public preview offering. The public preview offering doesn't include General Availability SLA and support. To deploy a route server with the General Availability offering and qualify for the General Availability SLA and support, delete and recreate your route server.
Prerequisites
Before you begin, ensure you have the following requirements:
- An Azure account with an active subscription. Create an account for free.
- Familiarity with Azure Route Server service limits.
Create a Route Server
This section walks you through creating Azure Route Server using the Azure portal, including the required virtual network infrastructure.
Sign in to the Azure portal.
In the search box at the top of the portal, enter route server, and select Route Server from the search results.

On the Route Servers page, select + Create.
On the Basics tab of Create a Route Server, enter, or select the following information:
Settings Value Project details Subscription Select the Azure subscription that you want to use to deploy the Route Server. Resource group Select Create new.
In Name, enter myResourceGroup.
Select OK.Instance details Name Enter myRouteServer. Region Select East US or any region you prefer to create the Route Server in. Routing Preference Select ExpressRoute. Other available options: VPN and ASPath. Configure virtual networks Virtual network Select Create new.
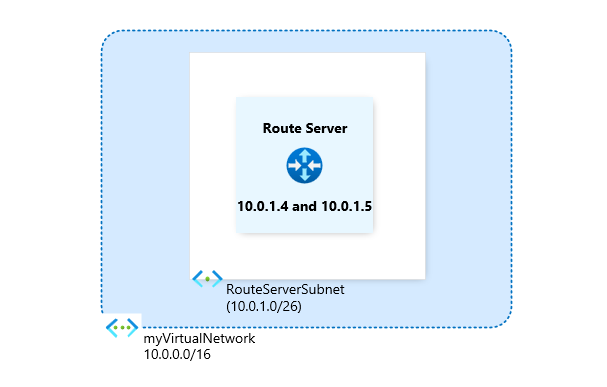
In Name, enter myVirtualNetwork.
In Address range, enter 10.0.0.0/16.
In Subnet name and Address range, enter RouteServerSubnet and 10.0.1.0/26 respectively.
Select OK.Subnet Once you created the virtual network and subnet, the RouteServerSubnet populates.
- The subnet must be named RouteServerSubnet.
- The subnet must be a minimum of /26 or larger.Public IP address Public IP address Select Create new or select an existing Standard public IP resource to assign to the Route Server. A public IP address is required to ensure connectivity to the backend service that manages the Route Server configuration. Public IP address name Enter myVirtualNetwork-ip. A Standard public IP address is required to ensure connectivity to the backend service that manages the Route Server. 
Select Review + create and then select Create after the validation passes.
Note
The deployment of the Route Server can take up to 30 minutes.


Configure BGP peering with network virtual appliance
After creating the Route Server, configure BGP peering with your network virtual appliance to enable dynamic route exchange.
Once the deployment is complete, select Go to resource to navigate to myRouteServer.
Under Settings, select Peers.
Select + Add to add a BGP peer.
On the Add Peer page, enter the following information:
Setting Value Name A name to identify the BGP peer. This doesn't need to match the actual NVA name. ASN The Autonomous System Number (ASN) of the NVA. For more information, see What Autonomous System Numbers (ASNs) can I use? IPv4 Address The private IP address of the NVA that myRouteServer will communicate with to establish BGP. Select Add to create the BGP peering.


Complete the configuration on the NVA
To complete the BGP peering setup, you must configure the NVA to establish a BGP session with the Route Server using its IP addresses and ASN. You can find the Route Server's IP addresses and ASN on the Overview page:

Use these values to configure BGP on your NVA:
- ASN: The virtualRouterAsn value (typically 65515)
- Peer IP addresses: The virtualRouterIps values shown in the overview
Important
Peer the NVA with both route server instance IPs to ensure virtual network routes are advertised over the NVA connections and achieve high availability.
Clean up resources
When you no longer need the Route Server and associated resources, delete the resource group:
In the search box at the top of the portal, enter myResourceGroup. Select myResourceGroup from the search results.
Select Delete resource group.
In Delete a resource group, enter myResourceGroup, and then select Delete.
Select Delete to confirm the deletion of the resource group and all its resources.
Next step
Now that you've created a Route Server and established BGP peering, learn more about Route Server capabilities: