VM Application is a resource type in Azure Compute Gallery that simplifies management, sharing, and global distribution of applications for your virtual machines. Learn more about VM Application
To create and deploy applications on Azure VM, first package and upload your application to Azure Storage Account as a storage blob. Then create Azure VM application resource and VM application version resource referencing these storage blobs. Finally, deploy the application on any VM or Virtual Machine Scale Set by passing application reference in applicationProfile.
Prerequisites
- Create Azure storage account and storage container. This container is used to upload your application files. It's recommended to use storage account with anonymous access disabled for added security.
- Create Azure Compute Gallery for storing and sharing application resources.
Package the application

1. Package the application files
- If your application installation requires a single file (.exe, .msi, .sh, .ps, etc.) then you can use it as is.
- If your application installation requires multiple files (Executable file with configuration file, dependencies, manifest files, scripts, etc.), then you must archive it (using .zip, .tar, .tar.gz, etc.) into a single file.
- For microservice application, you can package and publish each microservice as a separate Azure VM Application. This facilitates application reusability, cross-team development, and sequential installation of microservices using
order property in the applicationProfile.
2. (Optional) Package the application configuration file
- You can optionally provide the configuration file separately. This reduces the overhead of archiving and unarchiving application packages. Configuration files can also be passed during app deployment enabling customized installation per VM.
3. Create the install script
After the application and configuration blob is downloaded on the VM, Azure executes the provided install script to install the application. The install script is provided as a string and has a maximum character limit of 4,096 chars. The install commands should be written assuming the application package and the configuration file are in the current directory.
There may be few operations required to be performed in the install script
(Optional) Use the right command interpreter
The default command interpreter used by Azure are /bin/bash on Linux OS and cmd.exe on Windows OS. It's possible to use a different interpreter like Chocolatey or PowerShell, if its installed on the machine. Call the executable and pass the commands to it. E.g., powershell.exe -command '<powershell command>'. If you're using PowerShell, you need to be using version 3.11.0 of the Az.Storage module.
(Optional) Rename application blob and configuration blob
Azure can't retain the original file name and the file extensions. Therefore, the downloaded application file and the configuration file have a default name as "MyVMApp" and "MyVMApp-config" without a file extension. You can rename the file with the file extension using the install script or you can also pass the names in packageFileName and configFileName properties of the publishingProfile of VM Application version resource. Azure will then use these names instead of default names while downloading the files.
(Optional) Move application and configuration blob to appropriate ___location
Azure downloads the application blob and configuration blob to following locations. The install script must move the files to appropriate locations when necessary.
Linux: /var/lib/waagent/Microsoft.CPlat.Core.VMApplicationManagerLinux/<application name>/<application version>
Windows: C:\Packages\Plugins\Microsoft.CPlat.Core.VMApplicationManagerWindows\1.0.16\Downloads\<application name>\<application version>
Unarchive application blob
For archived application packages, it needs to be unarchived before installing the application. It's recommended to use .zip or .tar since most OS has built-in support for unarchiving these formats. For other formats, make sure the Guest OS provides support.
(Optional) Set right execution policy and permissions
After unarchiving, file permissions could be reset. It's a good practice to set the right permissions before executing the files.
Convert the script to string
The install script is passed as a string for the install property in the publishingProfile of Azure VM Application version resource.
Here are sample install scripts based on the file extension of the application blob
#!/bin/bash

# Rename blobs
mv MyVMApp app.tar
mv MyVMApp-config app-config.yaml

# Unarchive application
mkdir -p app
tar -xf app.tar -C app

# Set permissions
chmod -R +x app
chmod -R +r app

# Install the script (example: install.sh with config)
bash ./app/install.sh --config app-config.yaml

# OR Install the .deb package (example: install.deb without config)
# sudo dpkg -i ./app/install.deb

# OR Install the .rpm package (example: install.rpm without config)
# sudo rpm -ivh ./app/install.rpm
Script as string:
"#!/bin/bash\nmv MyVMApp app.tar\nmv MyVMApp-config app-config.yaml\nmkdir -p app\ntar -xf app.tar -C app\nchmod -R +x app\nchmod -R +r app\nbash ./app/install.sh --config app-config.yaml\n# sudo dpkg -i ./app/install.deb\n# sudo rpm -ivh ./app/install.rpm"
:: Rename blobs
rename MyVMApp app.zip
rename MyVMApp-config app-config.json

:: Unzip using built-in tar (available on Windows 10+)
mkdir app
tar -xf app.zip -C app

:: Install .exe application (example: setup.exe with config)
app\setup.exe /config app-config.json

:: install .msi application (example: setup.exe without config)
:: msiexec /i app\setup.msi /qn /l*v install.log

:: Install JavaScript (example: setup.js with config)
:: cscript //nologo app\setup.js app-config.json

:: Install python script (example: install.py with config) - Needs python pre-installed
:: python app\install.py app-config.json

:: Install ruby application  (example: install.rb with config) - Needs Ruby pre-installed
:: ruby app\install.rb app-config.json
Script as string:
"rename MyVMApp app.zip\r\nrename MyVMApp-config app-config.json\r\nmkdir app\r\ntar -xf app.zip -C app\r\napp\\setup.exe /config app-config.json\r\n:: msiexec /i app\\setup.msi /qn /l*v install.log\r\n:: cscript //nologo app\\setup.js app-config.json\r\n:: python app\\install.py app-config.json\r\n:: ruby app\\install.rb app-config.json"
powershell.exe -command "
# Rename blobs
Rename-Item -Path '.\MyVMApp' -NewName 'app.zip'
Rename-Item -Path '.\MyVMApp-config' -NewName 'app-config.json'

# Unzip application package
Expand-Archive -Path '.\app.zip' -DestinationPath '.\app'

# Set execution policy
Set-ExecutionPolicy -ExecutionPolicy RemoteSigned -Scope Process -Force

# Install the .exe application (example: setup.exe with config)
Start-Process -FilePath '.\app\setup.exe' -ArgumentList '/config app-config.json' -Wait

# Install PowerShell script (example: setup.ps1 with config)
# powershell.exe -ExecutionPolicy Bypass -File '.\app\setup.ps1' -ConfigFile 'app-config.json'

# Install .msi application (example: setup.msi without config)
# Start-Process -FilePath 'msiexec.exe' -ArgumentList '/i .\app\setup.msi /qn /l*v install.log' -Wait
"
Script as string:
"powershell.exe -command \"Rename-Item -Path '.\\MyVMApp' -NewName 'app.zip'; Rename-Item -Path '.\\MyVMApp-config' -NewName 'app-config.json'; Expand-Archive -Path '.\\app.zip' -DestinationPath '.\\app'; Set-ExecutionPolicy -ExecutionPolicy RemoteSigned -Scope Process -Force; Start-Process -FilePath '.\\app\\setup.exe' -ArgumentList '/config app-config.json' -Wait; # powershell.exe -ExecutionPolicy Bypass -File '.\\app\\setup.ps1' -ConfigFile 'app-config.json'; # Start-Process -FilePath 'msiexec.exe' -ArgumentList '/i .\\app\\setup.msi /qn /l*v install.log' -Wait\""
:: Rename blobs
rename MyVMApp app.exe
rename MyVMApp-config app-config.json

:: Run the installer with config
app.exe /config app-config.json
Script as string:
"rename MyVMApp app.exe\r\nrename MyVMApp-config app-config.json\r\napp.exe /config app-config.json"
powershell.exe -command "
# Rename blobs
Rename-Item -Path '.\MyVMApp' -NewName 'app.exe'
Rename-Item -Path '.\MyVMApp-config' -NewName 'app-config.json'

# Set execution policy
Set-ExecutionPolicy -ExecutionPolicy RemoteSigned -Scope Process -Force

# Install the .exe application (example: setup.exe with config)
Start-Process -FilePath '.\app.exe' -ArgumentList '/config app-config.json' -Wait
"
Script as string:
"powershell.exe -command \"Rename-Item -Path '.\\MyVMApp' -NewName 'app.exe'; Rename-Item -Path '.\\MyVMApp-config' -NewName 'app-config.json'; Set-ExecutionPolicy -ExecutionPolicy RemoteSigned -Scope Process -Force; Start-Process -FilePath '.\\app.exe' -ArgumentList '/config app-config.json' -Wait\""
:: Rename blobs
rename MyVMApp app.msi
rename MyVMApp-config app-config.json

:: install .msi application (example: setup.exe without config)
msiexec /i app.msi /qn /l*v install.log
Script as string:
"rename MyVMApp app.msi\r\nrename MyVMApp-config app-config.json\r\nmsiexec /i app.msi /qn /l*v install.log"
powershell.exe -command "
# Rename blobs
Rename-Item -Path '.\MyVMApp' -NewName 'app.zip'
Rename-Item -Path '.\MyVMApp-config' -NewName 'app-config.json'

# Set execution policy
Set-ExecutionPolicy -ExecutionPolicy RemoteSigned -Scope Process -Force

# Install .msi application (example: setup.msi without config)
Start-Process -FilePath 'msiexec.exe' -ArgumentList '/i .\app\setup.msi /qn /l*v install.log' -Wait
"
Script as string:
"powershell.exe -command \"Rename-Item -Path '.\\MyVMApp' -NewName 'app.zip'; Rename-Item -Path '.\\MyVMApp-config' -NewName 'app-config.json'; Set-ExecutionPolicy -ExecutionPolicy RemoteSigned -Scope Process -Force; Start-Process -FilePath 'msiexec.exe' -ArgumentList '/i .\\app\\setup.msi /qn /l*v install.log' -Wait\""
#!/bin/bash

# Rename blobs
mv MyVMApp app.deb
mv MyVMApp-config app-config.yaml

# Set permissions
chmod -R +x app.deb
chmod -R +r app.deb

# Install .deb package (example: install.deb without config)
# sudo dpkg -i ./app.deb
Script as string:
"#!/bin/bash\nmv MyVMApp app.deb\nmv MyVMApp-config app-config.yaml\nchmod -R +x app.deb\nchmod -R +r app.deb\n# sudo dpkg -i ./app.deb"
#!/bin/bash

# Rename blobs
mv MyVMApp app.rpm
mv MyVMApp-config app-config.yaml

# Set permissions
chmod -R +x app.rpm
chmod -R +r app.rpm

# Install .rpm package (example: install.rpm without config)
sudo rpm -ivh ./app.rpm
Script as string:
"#!/bin/bash\nmv MyVMApp app.rpm\nmv MyVMApp-config app-config.yaml\nchmod -R +x app.rpm\nchmod -R +r app.rpm\nsudo rpm -ivh ./app.rpm"
#!/bin/bash

# Rename blobs
mv MyVMApp app.sh
mv MyVMApp-config app-config.yaml

# Set permissions
chmod -R +x app.sh
chmod -R +r app.sh

# Install the script (example: install.sh with config)
bash ./app.sh --config app-config.yaml
Script as string:
"#!/bin/bash\nmv MyVMApp app.sh\nmv MyVMApp-config app-config.yaml\nchmod -R +x app.sh\nchmod -R +r app.sh\nbash ./app.sh --config app-config.yaml"
powershell.exe -command "
# Rename blobs
Rename-Item -Path '.\MyVMApp' -NewName 'app.ps1'
Rename-Item -Path '.\MyVMApp-config' -NewName 'app-config.json'

# Set execution policy
Set-ExecutionPolicy -ExecutionPolicy RemoteSigned -Scope Process -Force

# Install PowerShell script (example: setup.ps1 with config)
powershell.exe -ExecutionPolicy Bypass -File '.\app.ps1' -ConfigFile 'app-config.json'
"
Script as string:
"powershell.exe -command \"Rename-Item -Path '.\\MyVMApp' -NewName 'app.ps1'; Rename-Item -Path '.\\MyVMApp-config' -NewName 'app-config.json'; Set-ExecutionPolicy -ExecutionPolicy RemoteSigned -Scope Process -Force; powershell.exe -ExecutionPolicy Bypass -File '.\\app.ps1' -ConfigFile 'app-config.json'\""
4. Create the delete script
The delete script enables you to define the delete operations for the application. The delete script is provided as a string and has a maximum character limit of 4,096 characters. Write the delete commands assuming the application package and the configuration file are in the current directory.
There may be few operations that delete script must perform.
Uninstall application:
Properly uninstall the application from the VM. For example, execute uninstall.exe on Windows or sudo apt remove app on Linux.
Remove residual files:
Delete residual applications files from the VM. For example, execute Remove-Item -Path "$PWD\*" -Recurse -Force -ErrorAction SilentlyContinue on Windows or sudo rm -rf ./* ./.??* on Linux.
Upload the application files to Azure storage account
Your application can be stored in a block or page blob. If you choose to use a page blob, you need to byte align the files before you upload them. Use the following sample to byte align your file.
inputFile="<the file you want to pad>"

# Get the file size
fileSize=$(stat -c %s "$inputFile")

# Calculate the remainder when divided by 512
remainder=$((fileSize % 512))

if [ "$remainder" -ne 0 ]; then
    # Calculate how many bytes to pad
    difference=$((512 - remainder))

    # Create padding (empty bytes)
    dd if=/dev/zero bs=1 count=$difference >> "$inputFile"
fi
$inputFile = <the file you want to pad>

$fileInfo = Get-Item -Path $inputFile

$remainder = $fileInfo.Length % 512

if ($remainder -ne 0){

    $difference = 512 - $remainder

    $bytesToPad = [System.Byte[]]::CreateInstance([System.Byte], $difference)

    Add-Content -Path $inputFile -Value $bytesToPad -Encoding Byte
    }
2. Generate SAS URL for the application package and the configuration file
Once the application and configuration files are uploaded to the storage account, you need to generate a SAS URL with read privilege for these blobs. These SAS URLs are then provided as reference while creating the VM Application version resource. For Storage accounts enabled for anonymous access, blob URL can also be used. However, it's recommended to use SAS URL for improved security. You can use Storage Explorer to quickly create a SAS URI if you don't already have one.
#!/bin/bash

# === CONFIGURATION ===
STORAGE_ACCOUNT="yourstorageaccount"
CONTAINER_NAME="yourcontainer"
LOCAL_FOLDER="./your-local-folder"
SAS_EXPIRY_HOURS=24

# === LOGIN (if not already logged in) ===
az login --only-show-errors

# === CREATE CONTAINER IF NOT EXISTS ===
az storage container create \
  --name $CONTAINER_NAME \
  --account-name $STORAGE_ACCOUNT \
  --auth-mode login \
  --only-show-errors

# === UPLOAD FILES ===
az storage blob upload-batch \
  --account-name $STORAGE_ACCOUNT \
  --destination $CONTAINER_NAME \
  --source $LOCAL_FOLDER \
  --auth-mode login \
  --only-show-errors

# === GENERATE SAS URLs ===
echo "Generating SAS URLs..."
FILES=$(find $LOCAL_FOLDER -type f)

for FILE in $FILES; do
  BLOB_NAME="${FILE#$LOCAL_FOLDER/}"
  EXPIRY=$(date -u -d "+$SAS_EXPIRY_HOURS hours" '+%Y-%m-%dT%H:%MZ')

  SAS_TOKEN=$(az storage blob generate-sas \
    --account-name $STORAGE_ACCOUNT \
    --container-name $CONTAINER_NAME \
    --name "$BLOB_NAME" \
    --permissions r \
    --expiry $EXPIRY \
    --auth-mode login \
    -o tsv)

  SAS_URL="https://${STORAGE_ACCOUNT}.blob.core.windows.net/${CONTAINER_NAME}/${BLOB_NAME}?${SAS_TOKEN}"
  echo "$BLOB_NAME: $SAS_URL"
done
# === CONFIGURATION ===
$storageAccount = "yourstorageaccount"
$containerName = "yourcontainer"
$localFolder = "C:\path\to\your\local\folder"
$sasExpiryHours = 24

# === LOGIN (if not already logged in) ===
az login | Out-Null

# === CREATE CONTAINER IF NOT EXISTS ===
az storage container create `
    --name $containerName `
    --account-name $storageAccount `
    --auth-mode login `
    --only-show-errors | Out-Null

# === UPLOAD FILES ===
az storage blob upload-batch `
    --account-name $storageAccount `
    --destination $containerName `
    --source $localFolder `
    --auth-mode login `
    --only-show-errors

# === GENERATE SAS URLs ===
Write-Host "`nGenerating SAS URLs..."
$files = Get-ChildItem -Recurse -File -Path $localFolder

foreach ($file in $files) {
    $relativePath = $file.FullName.Substring($localFolder.Length + 1).Replace("\", "/")
    $expiry = (Get-Date).ToUniversalTime().AddHours($sasExpiryHours).ToString("yyyy-MM-ddTHH:mmZ")

    $sasToken = az storage blob generate-sas `
        --account-name $storageAccount `
        --container-name $containerName `
        --name $relativePath `
        --permissions r `
        --expiry $expiry `
        --auth-mode login `
        -o tsv

    $sasUrl = "https://$storageAccount.blob.core.windows.net/$containerName/$relativePath`?$sasToken"
    Write-Host "$relativePath:`n$sasUrl`n"
}
Create the VM Application
To create the VM Application, first create the VM Application resource, which describes the application. Then create a VM Application Version resource within it, which contains the VM application payload and scripts to install, update, and delete the application. Payload is supplied using SAS URL to the blob container in Azure Storage Account.
Refer schema for VM Application and VM Application version resource to learn more about each property.
Create the VM Application definition using the 'create gallery application API'
PUT
/subscriptions/{subscriptionId}/resourceGroups/{resourceGroupName}/providers/Microsoft.Compute/galleries/{galleryName}/applications/{applicationName}?api-version=2024-03-03

{
    "___location": "West US",
    "name": "myApp",
    "properties": {
        "supportedOSType": "Windows | Linux",
        "endOfLifeDate": "2020-01-01",
	"description": "Description of the App",
	"eula": "Link to End-User License Agreement (EULA)",
	"privacyStatementUri": "Link to privacy statement for the application",
	"releaseNoteUri": "Link to release notes for the application"
    }
}
Create a VM application version using the 'create gallery application version API'.
PUT
/subscriptions/{subscriptionId}/resourceGroups/{resourceGroupName}/providers/Microsoft.Compute/galleries/{galleryName}/applications/{applicationName}/versions/{versionName}?api-version=2024-03-03

{
  "___location": "$___location",
  "properties": {
    "publishingProfile": {
      "source": {
        "mediaLink": "$mediaLink",
        "defaultConfigurationLink": "$configLink"
      },
      "manageActions": {
        "install": "echo installed",
        "remove": "echo removed",
        "update": "echo update"
      },
      "targetRegions": [
        {
          "name": "West US",
          "regionalReplicaCount": 1
        },
	{
	  "name": "East US"
	}
      ]
      "endofLifeDate": "datetime",
      "replicaCount": 1,
      "excludeFromLatest": false,
      "storageAccountType": "PremiumV2_LRS | Premium_LRS | Standard_LRS | Standard_ZRS"
      "safetyProfile": {
	"allowDeletionOfReplicatedLocations": false
      }
      "settings": {
	"scriptBehaviorAfterReboot": "None | Rerun",
	"configFileName": "$appConfigFileName",
	"packageFileName": "$appPackageFileName"
      }
   }
}
VM applications require Azure CLI version 2.30.0 or later.
Create the VM application definition using 'az sig gallery-application create'. In this example, we're creating a VM application definition named myApp for Linux-based VMs.
az sig gallery-application create \
    --application-name myApp \
    --gallery-name myGallery \
    --resource-group myResourceGroup \
    --os-type Linux \
    --___location "East US"
Create a VM application version using 'az sig gallery-application version create'. Allowed characters for version are numbers and periods. Numbers must be within the range of a 32-bit integer. Format: MajorVersion.MinorVersion.Patch.
Replace the values of the parameters with your own.
az sig gallery-application version create \
   --version-name 1.0.0 \
   --application-name myApp \
   --gallery-name myGallery \
   --___location "East US" \
   --resource-group myResourceGroup \
   --package-file-link "https://<storage account name>.blob.core.windows.net/<container name>/<filename>" \
   --install-command "mv myApp .\myApp\myApp" \
   --remove-command "rm .\myApp\myApp" \
   --update-command  "mv myApp .\myApp\myApp" \
   --default-configuration-file-link "https://<storage account name>.blob.core.windows.net/<container name>/<filename>"\
Create the VM Application definition using New-AzGalleryApplication. In this example, we're creating a Linux app named myApp in the myGallery Azure Compute Gallery and in the myGallery resource group. Replace the values for variables as needed.
$galleryName = "myGallery"
$rgName = "myResourceGroup"
$applicationName = "myApp"
$description = "Backend Linux application for finance."
New-AzGalleryApplication `
  -ResourceGroupName $rgName `
  -GalleryName $galleryName `
  -Location "East US" `
  -Name $applicationName `
  -SupportedOSType Linux `
  -Description $description
Create a version of your VM Application using New-AzGalleryApplicationVersion. Allowed characters for version are numbers and periods. Numbers must be within the range of a 32-bit integer. Format: MajorVersion.MinorVersion.Patch.
In this example, we're creating version number 1.0.0. Replace the values of the variables as needed.
$galleryName = "myGallery"
$rgName = "myResourceGroup"
$applicationName = "myApp"
$version = "1.0.0"
New-AzGalleryApplicationVersion `
   -ResourceGroupName $rgName `
   -GalleryName $galleryName `
   -GalleryApplicationName $applicationName `
   -Name $version `
   -PackageFileLink "https://<storage account name>.blob.core.windows.net/<container name>/<filename>" `
   -DefaultConfigFileLink "https://<storage account name>.blob.core.windows.net/<container name>/<filename>" `
   -Location "East US" `
   -Install "mv myApp .\myApp\myApp" `
   -Remove "rm .\myApp\myApp" `
- Go to the Azure portal, then search for and select Azure Compute Gallery.
- Select the gallery you want to use from the list.
- On the page for your gallery, select Add from the top of the page and then select VM application definition from the drop-down. The Create a VM application definition page opens.
- In the Basics tab, enter a name for your application and choose whether the application is for VMs running Linux or Windows.
- Select the Publishing options tab if you want to specify any of the following optional settings for your VM Application definition:
- A description of the VM Application definition.
- End of life date
- Link to an End User License Agreement (EULA)
- URI of a privacy statement
- URI for release notes
- When you're done, select Review + create.
- When validation completes, select Create to have the definition deployed.
- Once the deployment is complete, select Go to resource.
- On the page for the application, select Create a VM application version. The Create a VM Application Version page opens.
- Enter a version number like 1.0.0.
- Select the region where your application packages are uploaded.
- Under Source application package, select Browse. Select the storage account, then the container where your package is located. Select the package from the list and then select Select when you're done. Alternatively, you can paste the SAS URI in this field if preferred.
- Provide the 'Install script'. You can also provide the 'Uninstall script' and the 'Update script'. See the Overview for information on how to create the scripts.
- If you have a default configuration file uploaded to a storage account, you can select it in Default configuration.
- Select Exclude from latest if you don't want this version to appear as the latest version when you create a VM.
- For End of life date, choose a date in the future to track when this version should be retired. It isn't deleted or removed automatically, it's only for your own tracking.
- To replicate this version to other regions, select the Replication tab, add more regions, and make changes to the number of replicas per region. The original region where your version was created must be in the list and can't be removed.
- When you're done making changes, select Review + create at the bottom of the page.
- When validation shows as passed, select Create to deploy your VM application version.
name: Deploy Azure VM Application

on:
  push:
    branches:
      - main

env:
  # Customize your app and config filenames here
  APP_FILE: app.exe
  CONFIG_FILE: app-config.json

  AZURE_RESOURCE_GROUP: ${{ secrets.AZURE_RESOURCE_GROUP }}
  AZURE_LOCATION: ${{ secrets.AZURE_LOCATION }}
  AZURE_STORAGE_ACCOUNT: ${{ secrets.AZURE_STORAGE_ACCOUNT }}
  AZURE_CONTAINER_NAME: ${{ secrets.AZURE_CONTAINER_NAME }}
  GALLERY_NAME: ${{ secrets.GALLERY_NAME }}
  APPLICATION_NAME: ${{ secrets.AZURE_VM_APPLICATION_NAME }}

jobs:
  deploy:
    runs-on: ubuntu-latest

    permissions:
      id-token: write
      contents: read

    steps:
    # Step 1: Checkout repo
    - name: Checkout
      uses: actions/checkout@v4

    # Step 2: Login to Azure using OIDC
    - name: Azure Login
      uses: azure/login@v2
      with:
        client-id: ${{ secrets.AZURE_CLIENT_ID }}
        tenant-id: ${{ secrets.AZURE_TENANT_ID }}
        subscription-id: ${{ secrets.AZURE_SUBSCRIPTION_ID }}

    # Step 3: Upload app and config files to Azure Blob
    - name: Upload files to Azure Blob Storage
      run: |
        set -euo pipefail

        echo "Creating container if missing..."
        az storage container create \
          --name "$AZURE_CONTAINER_NAME" \
          --account-name "$AZURE_STORAGE_ACCOUNT" \
          --auth-mode login \
          --only-show-errors

	echo "Uploading files..."
        az storage blob upload \
          --account-name "$AZURE_STORAGE_ACCOUNT" \
          --container-name "$AZURE_CONTAINER_NAME" \
          --name "$APP_FILE" \
          --file "$APP_FILE" \
          --auth-mode login \
          --only-show-errors

        az storage blob upload \
          --account-name "$AZURE_STORAGE_ACCOUNT" \
          --container-name "$AZURE_CONTAINER_NAME" \
          --name "$CONFIG_FILE" \
          --file "$CONFIG_FILE" \
          --auth-mode login \
          --only-show-errors

    # Step 4: Create VM Application (if missing)
    - name: Create VM Application if missing
      run: |
        set -euo pipefail

	echo "Checking for existing VM Application..."
        if ! az sig gallery-application show \
          --resource-group "$AZURE_RESOURCE_GROUP" \
          --gallery-name "$GALLERY_NAME" \
          --name "$APPLICATION_NAME" &>/dev/null; then

          az sig gallery-application create \
            --resource-group "$AZURE_RESOURCE_GROUP" \
            --gallery-name "$GALLERY_NAME" \
            --name "$APPLICATION_NAME" \
            --___location "$AZURE_LOCATION" \
            --os-type Windows
        fi

    # Step 5: Generate SAS URLs
    - name: Generate SAS URLs
      id: sas
      run: |
        set -euo pipefail

	echo "Generating SAS URLs valid for 24 hours..."
        EXPIRY=$(date -u -d "+1 day" '+%Y-%m-%dT%H:%MZ')

        APP_SAS=$(az storage blob generate-sas \
          --account-name "$AZURE_STORAGE_ACCOUNT" \
          --container-name "$AZURE_CONTAINER_NAME" \
          --name "$APP_FILE" \
          --permissions r \
          --expiry "$EXPIRY" \
          --auth-mode login -o tsv)

        CONFIG_SAS=$(az storage blob generate-sas \
          --account-name "$AZURE_STORAGE_ACCOUNT" \
          --container-name "$AZURE_CONTAINER_NAME" \
          --name "$CONFIG_FILE" \
          --permissions r \
          --expiry "$EXPIRY" \
          --auth-mode login -o tsv)

        echo "APP_SAS=$APP_SAS" >> $GITHUB_ENV
        echo "CONFIG_SAS=$CONFIG_SAS" >> $GITHUB_ENV

    # Step 6: Create Application Version using semantic versioning
    - name: Create VM Application Version
      run: |
        set -euo pipefail

	# Generate a unique version name
	MAJOR=1
	MINOR=0
	PATCH=$(date +%Y%m%d)
	VERSION="$MAJOR.$MINOR.$PATCH"

	# Load install/uninstall commands from .txt files as strings
        INSTALL_CMD=$(jq -Rs '.' < install-script-as-string.txt)
        REMOVE_CMD=$(jq -Rs '.' < uninstall-script-as-string.txt)

        PACKAGE_URL="https://${AZURE_STORAGE_ACCOUNT}.blob.core.windows.net/${AZURE_CONTAINER_NAME}/${APP_FILE}?${APP_SAS}"
        CONFIG_URL="https://${AZURE_STORAGE_ACCOUNT}.blob.core.windows.net/${AZURE_CONTAINER_NAME}/${CONFIG_FILE}?${CONFIG_SAS}"

	# Create the version
        az sig gallery-application version create \
          --resource-group "$AZURE_RESOURCE_GROUP" \
          --gallery-name "$GALLERY_NAME" \
          --gallery-application-name "$APPLICATION_NAME" \
          --gallery-application-version-name "$VERSION" \
          --version-name "$VERSION" \
          --___location "$AZURE_LOCATION" \
          --package-file-link "$PACKAGE_URL" \
          --default-file-link "$CONFIG_URL" \
          --install-command "$INSTALL_CMD" \
          --remove-command "$REMOVE_CMD" \
          --only-show-errors
trigger:
  branches:
    include: [ main ]

variables:
  # Customize filenames below
  APP_FILE: app.exe
  CONFIG_FILE: app-config.json

  AZURE_RESOURCE_GROUP: $(AZURE_RESOURCE_GROUP)
  AZURE_LOCATION: $(AZURE_LOCATION)
  AZURE_STORAGE_ACCOUNT: $(AZURE_STORAGE_ACCOUNT)
  AZURE_CONTAINER_NAME: $(AZURE_CONTAINER_NAME)
  GALLERY_NAME: $(GALLERY_NAME)
  APPLICATION_NAME: $(AZURE_VM_APPLICATION_NAME)

stages:
  - stage: DeployVMApp
    displayName: Upload files and deploy Azure VM Application
    jobs:
      - job: Deploy
        pool:
          vmImage: 'ubuntu-latest'
        steps:
          - checkout: self

          # Step 1: Upload files to Blob
          - task: AzureCLI@2
            displayName: Upload app (exe, zip, etc) + config to Blob
            inputs:
              azureSubscription: 'AzureServiceConnection'
              scriptType: bash
              scriptLocation: inlineScript
              inlineScript: |
                set -euo pipefail

                echo "Creating container if it doesn't exist..."
                az storage container create \
                  --name "$AZURE_CONTAINER_NAME" \
                  --account-name "$AZURE_STORAGE_ACCOUNT" \
                  --auth-mode login \
                  --only-show-errors

                echo "Uploading files..."
		az storage blob upload \
		  --account-name "$AZURE_STORAGE_ACCOUNT" \
		  --container-name "$AZURE_CONTAINER_NAME" \
		  --name "$APP_FILE" \
		  --file "$APP_FILE" \
		  --auth-mode login \
		  --only-show-errors

		az storage blob upload \
		  --account-name "$AZURE_STORAGE_ACCOUNT" \
            	  --container-name "$AZURE_CONTAINER_NAME" \
            	  --name "$CONFIG_FILE" \
            	  --file "$CONFIG_FILE" \
            	  --auth-mode login --only-show-errors

          # Step 2: Create VM Application Definition (if not exists)
          - task: AzureCLI@2
            displayName: Create VM Application Definition
            inputs:
              azureSubscription: 'AzureServiceConnection'
              scriptType: bash
              scriptLocation: inlineScript
              inlineScript: |
                set -euo pipefail

                echo "Checking for existing VM Application..."
                if ! az sig gallery-application show \
                    --resource-group "$AZURE_RESOURCE_GROUP" \
                    --gallery-name "$GALLERY_NAME" \
                    --name "$APPLICATION_NAME" &>/dev/null; then
                  echo "Creating new VM Application..."
                  az sig gallery-application create \
                    --resource-group "$AZURE_RESOURCE_GROUP" \
                    --gallery-name "$GALLERY_NAME" \
                    --application-name "$APPLICATION_NAME" \
                    --___location "$AZURE_LOCATION" \
                    --os-type Windows
                else
                  echo "VM Application definition already exists."
                fi

          # Step 3: Generate SAS URLs
          - task: AzureCLI@2
            displayName: Generate SAS URLs
            inputs:
              azureSubscription: 'AzureServiceConnection'
              scriptType: bash
              scriptLocation: inlineScript
              inlineScript: |
                set -euo pipefail

                echo "Generating SAS URLs valid for 24 hours..."
                EXPIRY=$(date -u -d "+1 day" '+%Y-%m-%dT%H:%MZ')

                APP_SAS=$(az storage blob generate-sas \
		  --account-name "$AZURE_STORAGE_ACCOUNT" \
	          --container-name "$AZURE_CONTAINER_NAME" \
	          --name "$APP_FILE" \
	          --permissions r \
	          --expiry "$EXPIRY" \
	          --auth-mode login -o tsv)

		CONFIG_SAS=$(az storage blob generate-sas \
	          --account-name "$AZURE_STORAGE_ACCOUNT" \
	          --container-name "$AZURE_CONTAINER_NAME" \
	          --name "$CONFIG_FILE" \
	          --permissions r \
	          --expiry "$EXPIRY" \
	          --auth-mode login -o tsv)

		echo "##vso[task.setvariable variable=APP_SAS]$APP_SAS"
	        echo "##vso[task.setvariable variable=CONFIG_SAS]$CONFIG_SAS"

          # Step 4: Create VM Application Version
          - task: AzureCLI@2
            displayName: Create VM Application Version
            inputs:
              azureSubscription: 'AzureServiceConnection'
              scriptType: bash
              scriptLocation: inlineScript
              inlineScript: |
                set -euo pipefail

	       	# Generate a unique version name
                MAJOR=1
      		MINOR=0
		PATCH=$(date +%Y%m%d)
		VERSION="$MAJOR.$MINOR.$PATCH"

                # Load install/uninstall commands from .txt files as strings
                INSTALL_CMD=$(jq -Rs '.' < install-script-as-string.txt)
                REMOVE_CMD=$(jq -Rs '.' < uninstall-script-as-string.txt)

		# Load SAS URL for Application and config file
		PACKAGE_URL="https://${AZURE_STORAGE_ACCOUNT}.blob.core.windows.net/${AZURE_CONTAINER_NAME}/${APP_FILE}?${APP_SAS}"
          	CONFIG_URL="https://${AZURE_STORAGE_ACCOUNT}.blob.core.windows.net/${AZURE_CONTAINER_NAME}/${CONFIG_FILE}?${CONFIG_SAS}"

                # Create the version
                az sig gallery-application version create \
                  --resource-group "$AZURE_RESOURCE_GROUP" \
                  --gallery-name "$GALLERY_NAME" \
                  --application-name "$APPLICATION_NAME" \
                  --name "$VERSION" \
                  --___location "$AZURE_LOCATION" \
                  --package-file-link "$PACKAGE_URL" \
                  --default-configuration-file-link "$CONFIG_URL" \
                  --install-command "$INSTALL_CMD" \
                  --remove-command "$REMOVE_CMD" \
                  --version-name $VERSION
stages:
  - deploy

variables:
  # Customize your filenames here
  APP_FILE: "app.exe"
  CONFIG_FILE: "app-config.json"

  AZURE_RESOURCE_GROUP: "$AZURE_RESOURCE_GROUP"
  AZURE_LOCATION: "$AZURE_LOCATION"
  AZURE_STORAGE_ACCOUNT: "$AZURE_STORAGE_ACCOUNT"
  AZURE_CONTAINER_NAME: "$AZURE_CONTAINER_NAME"
  GALLERY_NAME: "$GALLERY_NAME"
  APPLICATION_NAME: "$AZURE_VM_APPLICATION_NAME"

deploy_vm_app:
  image: mcr.microsoft.com/azure-cli
  stage: deploy
  only:
    - main
  script:
    # Login to Azure using service principal
    - az login --service-principal -u "$AZURE_CLIENT_ID" -p "$AZURE_CLIENT_SECRET" --tenant "$AZURE_TENANT_ID"
    - az account set --subscription "$AZURE_SUBSCRIPTION_ID"

    # Step 1: Upload app and config files to Blob Storage
    - |
      echo "Uploading $APP_FILE and $CONFIG_FILE to blob..."
      az storage container create \
        --name "$AZURE_CONTAINER_NAME" \
        --account-name "$AZURE_STORAGE_ACCOUNT" \
        --auth-mode login \
        --only-show-errors

      az storage blob upload \
        --account-name "$AZURE_STORAGE_ACCOUNT" \
        --container-name "$AZURE_CONTAINER_NAME" \
        --name "$APP_FILE" \
        --file "$APP_FILE" \
        --auth-mode login \
        --only-show-errors

      az storage blob upload \
        --account-name "$AZURE_STORAGE_ACCOUNT" \
        --container-name "$AZURE_CONTAINER_NAME" \
        --name "$CONFIG_FILE" \
        --file "$CONFIG_FILE" \
        --auth-mode login \
        --only-show-errors

    # Step 2: Create VM Application Definition if missing
    - |
      echo "Checking for existing VM Application..."
      if ! az sig gallery-application show \
          --resource-group "$AZURE_RESOURCE_GROUP" \
          --gallery-name "$GALLERY_NAME" \
          --application-name "$APPLICATION_NAME" &>/dev/null; then
        echo "Creating VM Application definition..."
        az sig gallery-application create \
          --resource-group "$AZURE_RESOURCE_GROUP" \
          --gallery-name "$GALLERY_NAME" \
          --application-name "$APPLICATION_NAME" \
          --___location "$AZURE_LOCATION" \
          --os-type Windows \
          --only-show-errors
      else
        echo "VM Application already exists."
      fi

    # Step 3: Generate SAS URLs
    - |
      EXPIRY=$(date -u -d "+1 day" '+%Y-%m-%dT%H:%MZ')
      APP_SAS=$(az storage blob generate-sas \
        --account-name "$AZURE_STORAGE_ACCOUNT" \
        --container-name "$AZURE_CONTAINER_NAME" \
        --name "$APP_FILE" \
        --permissions r \
        --expiry "$EXPIRY" \
        --auth-mode login -o tsv)

      CONFIG_SAS=$(az storage blob generate-sas \
        --account-name "$AZURE_STORAGE_ACCOUNT" \
        --container-name "$AZURE_CONTAINER_NAME" \
        --name "$CONFIG_FILE" \
        --permissions r \
        --expiry "$EXPIRY" \
        --auth-mode login -o tsv)

    # Step 4: Create VM Application Version (semantic version: 1.0.YYYYMMDD)
    - |
      MAJOR=1
      MINOR=0
      PATCH=$(date +%Y%m%d)
      VERSION="$MAJOR.$MINOR.$PATCH"
      echo "Creating VM Application Version: $VERSION"

      INSTALL_CMD=$(jq -Rs '.' < install-script-as-string.txt)
      REMOVE_CMD=$(jq -Rs '.' < uninstall-script-as-string.txt)

      az sig gallery-application version create \
        --resource-group "$AZURE_RESOURCE_GROUP" \
        --gallery-name "$GALLERY_NAME" \
        --application-name "$APPLICATION_NAME" \
        --gallery-application-version-name "$VERSION" \
        --version-name "$VERSION" \
        --___location "$AZURE_LOCATION" \
        --package-file-link "https://${AZURE_STORAGE_ACCOUNT}.blob.core.windows.net/${AZURE_CONTAINER_NAME}/${APP_FILE}?${APP_SAS}" \
        --default-configuration-file-link "https://${AZURE_STORAGE_ACCOUNT}.blob.core.windows.net/${AZURE_CONTAINER_NAME}/${CONFIG_FILE}?${CONFIG_SAS}" \
        --install-command "$INSTALL_CMD" \
        --remove-command "$REMOVE_CMD" \
        --only-show-errors
pipeline {
  agent any

  environment {
    APP_FILE = 'app.exe'
    CONFIG_FILE = 'app-config.json'

    AZURE_RESOURCE_GROUP = credentials('AZURE_RESOURCE_GROUP')
    AZURE_LOCATION = credentials('AZURE_LOCATION')
    AZURE_STORAGE_ACCOUNT = credentials('AZURE_STORAGE_ACCOUNT')
    AZURE_CONTAINER_NAME = credentials('AZURE_CONTAINER_NAME')
    GALLERY_NAME = credentials('GALLERY_NAME')
    APPLICATION_NAME = credentials('AZURE_VM_APPLICATION_NAME')

    AZURE_CLIENT_ID = credentials('AZURE_CLIENT_ID')
    AZURE_CLIENT_SECRET = credentials('AZURE_CLIENT_SECRET')
    AZURE_TENANT_ID = credentials('AZURE_TENANT_ID')
    AZURE_SUBSCRIPTION_ID = credentials('AZURE_SUBSCRIPTION_ID')
  }

  stages {
    stage('Login to Azure') {
      steps {
        sh '''
          az login --service-principal \
            --username "$AZURE_CLIENT_ID" \
            --password "$AZURE_CLIENT_SECRET" \
            --tenant "$AZURE_TENANT_ID"
          az account set --subscription "$AZURE_SUBSCRIPTION_ID"
        '''
      }
    }

    stage('Upload to Blob Storage') {
      steps {
        sh '''
          az storage container create \
            --name "$AZURE_CONTAINER_NAME" \
            --account-name "$AZURE_STORAGE_ACCOUNT" \
            --auth-mode login --only-show-errors

          az storage blob upload \
            --account-name "$AZURE_STORAGE_ACCOUNT" \
            --container-name "$AZURE_CONTAINER_NAME" \
            --name "$APP_FILE" \
            --file "$APP_FILE" \
            --auth-mode login --only-show-errors

          az storage blob upload \
            --account-name "$AZURE_STORAGE_ACCOUNT" \
            --container-name "$AZURE_CONTAINER_NAME" \
            --name "$CONFIG_FILE" \
            --file "$CONFIG_FILE" \
            --auth-mode login --only-show-errors
        '''
      }
    }

    stage('Create VM Application if Needed') {
      steps {
        sh '''
          if ! az sig gallery-application show \
            --resource-group "$AZURE_RESOURCE_GROUP" \
            --gallery-name "$GALLERY_NAME" \
            --application-name "$APPLICATION_NAME" &>/dev/null; then
            az sig gallery-application create \
              --resource-group "$AZURE_RESOURCE_GROUP" \
              --gallery-name "$GALLERY_NAME" \
              --application-name "$APPLICATION_NAME" \
              --___location "$AZURE_LOCATION" \
              --os-type Windows
          fi
        '''
      }
    }

    stage('Generate SAS URLs') {
      steps {
        sh '''
          export EXPIRY=$(date -u -d "+1 day" '+%Y-%m-%dT%H:%MZ')
          export APP_SAS=$(az storage blob generate-sas \
            --account-name "$AZURE_STORAGE_ACCOUNT" \
            --container-name "$AZURE_CONTAINER_NAME" \
            --name "$APP_FILE" \
            --permissions r \
            --expiry "$EXPIRY" \
            --auth-mode login -o tsv)

          export CONFIG_SAS=$(az storage blob generate-sas \
            --account-name "$AZURE_STORAGE_ACCOUNT" \
            --container-name "$AZURE_CONTAINER_NAME" \
            --name "$CONFIG_FILE" \
            --permissions r \
            --expiry "$EXPIRY" \
            --auth-mode login -o tsv)

          echo "APP_SAS=$APP_SAS" > sas.env
          echo "CONFIG_SAS=$CONFIG_SAS" >> sas.env
        '''
      }
    }

    stage('Create Application Version') {
      steps {
        sh '''
          source sas.env

          MAJOR=1
          MINOR=0
          PATCH=$(date +%Y%m%d)
          VERSION="$MAJOR.$MINOR.$PATCH"

          INSTALL_CMD=$(jq -Rs '.' < install-script-as-string.txt)
          REMOVE_CMD=$(jq -Rs '.' < uninstall-script-as-string.txt)

          az sig gallery-application version create \
            --resource-group "$AZURE_RESOURCE_GROUP" \
            --gallery-name "$GALLERY_NAME" \
            --application-name "$APPLICATION_NAME" \
            --gallery-application-version-name "$VERSION" \
            --version-name "$VERSION" \
            --___location "$AZURE_LOCATION" \
            --package-file-link "https://${AZURE_STORAGE_ACCOUNT}.blob.core.windows.net/${AZURE_CONTAINER_NAME}/${APP_FILE}?$APP_SAS" \
            --default-configuration-file-link "https://${AZURE_STORAGE_ACCOUNT}.blob.core.windows.net/${AZURE_CONTAINER_NAME}/${CONFIG_FILE}?$CONFIG_SAS" \
            --install-command "$INSTALL_CMD" \
            --remove-command "$REMOVE_CMD" \
            --only-show-errors
        '''
      }
    }
  }
}
Deploy the VM Apps
One or more VM Applications can now be referenced in the applicationProfile of Azure VM or Azure Virtual Machine Scale Sets. Azure then pulls the payload of the VM Application and installs it on each VM using the provided install script. The order property defines the sequential order in which the VM Applications are installed on the VM.
Refer schema of applicationProfile of the VM / Virtual Machine Scale Set to learn more about each property.
To add a VM application version to a VM, perform a PUT on the VM.
PUT
/subscriptions/{subscriptionId}/resourceGroups/{resourceGroupName}/providers/Microsoft.Compute/virtualMachines/{VMName}?api-version=2024-03-03

{
  "properties": {
    "applicationProfile": {
      "galleryApplications": [
        {
          "order": 1,
          "packageReferenceId": "/subscriptions/{subscriptionId}/resourceGroups/<resource group>/providers/Microsoft.Compute/galleries/{gallery name}/applications/{application name}/versions/{version | latest}",
          "configurationReference": "{path to configuration storage blob}",
          "treatFailureAsDeploymentFailure": false
        }
      ]
    }
  },
  "name": "{vm name}",
  "id": "/subscriptions/{subscriptionId}/resourceGroups/{resource group}/providers/Microsoft.Compute/virtualMachines/{vm name}",
  "___location": "{vm ___location}"
}
To apply the VM application to a uniform scale set:
PUT
/subscriptions/{subscriptionId}/resourceGroups/{resourceGroupName}/providers/Microsoft.Compute/virtualMachineScaleSets/{VMSSName}?api-version=2024-03-03

{
  "properties": {
    "virtualMachineProfile": {
      "applicationProfile": {
        "galleryApplications": [
          {
            "order": 1,
            "packageReferenceId": "/subscriptions/{subscriptionId}/resourceGroups/<resource group>/providers/Microsoft.Compute/galleries/{gallery name}/applications/{application name}/versions/{version | latest}",
            "configurationReference": "{path to configuration storage blob}",
            "treatFailureAsDeploymentFailure": false
          }
        ]
      }
    }
  },
  "name": "{vm name}",
  "id": "/subscriptions/{subscriptionId}/resourceGroups/{resource group}/providers/Microsoft.Compute/virtualMachines/{vm name}",
  "___location": "{vm ___location}"
}
The response includes the full VM model. The following are the
relevant parts.
{
  "name": "{vm name}",
  "id": "{vm id}",
  "type": "Microsoft.Compute/virtualMachines",
  "___location": "{vm ___location}",
  "properties": {
    "applicationProfile": {
      "galleryApplications": ""
    },
    "provisioningState": "Updating"
  },
  "resources": [
    {
      "name": "VMAppExtension",
      "id": "{extension id}",
      "type": "Microsoft.Compute/virtualMachines/extensions",
      "___location": "centraluseuap",
      "properties": "@{autoUpgradeMinorVersion=True; forceUpdateTag=7c4223fc-f4ea-4179-ada8-c8a85a1399f5; provisioningState=Creating; publisher=Microsoft.CPlat.Core; type=VMApplicationManagerLinux; typeHandlerVersion=1.0; settings=}"
    }
  ]
}
Set a VM application to an existing VM using 'az vm application set' and replace the values of the parameters with your own.
az vm application set \
	--resource-group myResourceGroup \
	--name myVM \
  	--app-version-ids /subscriptions/{subID}/resourceGroups/MyResourceGroup/providers/Microsoft.Compute/galleries/myGallery/applications/myApp/versions/1.0.0 \
  	--treat-deployment-as-failure true
For setting multiple applications on a VM:
az vm application set \
	--resource-group myResourceGroup \
	--name myVM \
	--app-version-ids /subscriptions/{subId}/resourceGroups/myResourceGroup/providers/Microsoft.Compute/galleries/myGallery/applications/myApp/versions/1.0.0 /subscriptions/{subId}/resourceGroups/myResourceGroup/providers/Microsoft.Compute/galleries/myGallery/applications/myApp2/versions/1.0.1 \
	--treat-deployment-as-failure true true
To add an application to a Virtual Machine Scale Set, use 'az vmss application set':
az vmss application set \
	--resource-group myResourceGroup \
	--name myVmss \
	--app-version-ids /subscriptions/{subId}/resourceGroups/myResourceGroup/providers/Microsoft.Compute/galleries/myGallery/applications/myApp/versions/1.0.0 \
	--treat-deployment-as-failure true
To add multiple applications to a Virtual Machine Scale Set:
az vmss application set \
	--resource-group myResourceGroup \
	--name myVmss
	--app-version-ids /subscriptions/{subId}/resourceGroups/myResourceGroup/providers/Microsoft.Compute/galleries/myGallery/applications/myApp/versions/1.0.0 /subscriptions/{subId}/resourceGroups/myResourceGroup/providers/Microsoft.Compute/galleries/myGallery/applications/myApp2/versions/1.0.0 \
	--treat-deployment-as-failure true
To add the application to an existing VM, get the application version and use that to get the VM application version ID. Use the ID to add the application to the VM configuration.
$galleryName = "myGallery"
$rgName = "myResourceGroup"
$applicationName = "myApp"
$version = "1.0.0"
$vmName = "myVM"
$vm = Get-AzVM -ResourceGroupName $rgname -Name $vmName
$appVersion = Get-AzGalleryApplicationVersion `
   -GalleryApplicationName $applicationName `
   -GalleryName $galleryName `
   -Name $version `
   -ResourceGroupName $rgName
$packageId = $appVersion.Id
$app = New-AzVmGalleryApplication -PackageReferenceId $packageId
Add-AzVmGalleryApplication -VM $vm -GalleryApplication $app -TreatFailureAsDeploymentFailure true
Update-AzVM -ResourceGroupName $rgName -VM $vm
To add the application to a Virtual Machine Scale Set:
$vmss = Get-AzVmss -ResourceGroupName $rgname -Name $vmssName
$appVersion = Get-AzGalleryApplicationVersion `
   -GalleryApplicationName $applicationName `
   -GalleryName $galleryName `
   -Name $version `
   -ResourceGroupName $rgName
$packageId = $appVersion.Id
$app = New-AzVmssGalleryApplication -PackageReferenceId $packageId
Add-AzVmssGalleryApplication -VirtualMachineScaleSetVM $vmss.VirtualMachineProfile -GalleryApplication $app
Update-AzVmss -ResourceGroupName $rgName -VirtualMachineScaleSet $vmss -VMScaleSetName $vmssName
Now you can create a VM and deploy the VM application to it using the portal. Just create the VM as usual, and under the Advanced tab, choose Select a VM application to install.

Select the VM application from the list and then select Save at the bottom of the page.

If you have more than one VM application to install, you can set the install order for each VM application back on the Advanced tab.
You can also deploy the VM application to currently running VMs. Select the Extensions + applications option under Settings in the left menu when viewing the VM details in the portal.
Choose VM applications and then select Add application to add your VM application.
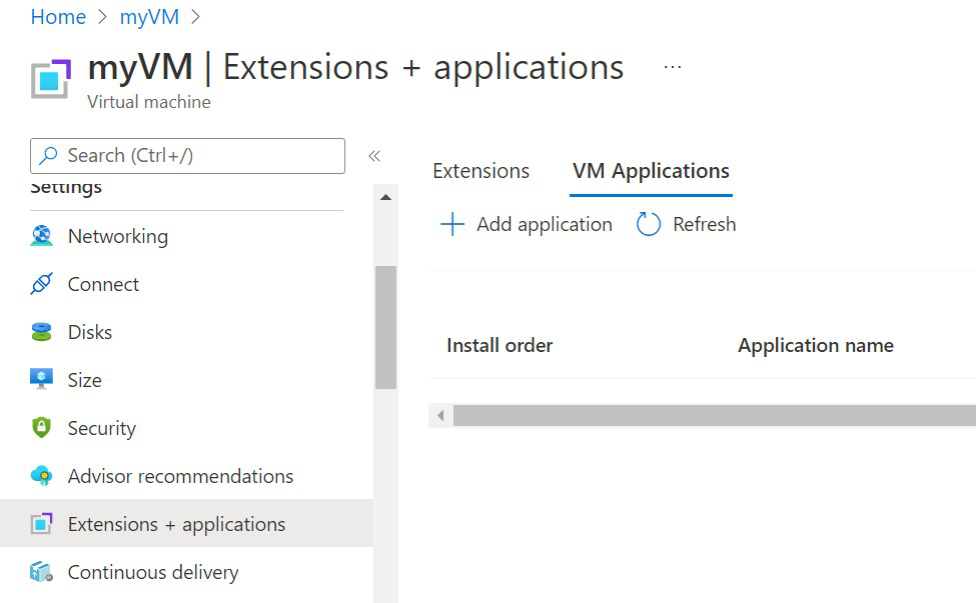
Select the VM application from the list and then select Save at the bottom of the page.
Next steps
Learn more about Azure VM Applications.
Learn to manage, update or delete Azure VM Applications.