Note
Access to this page requires authorization. You can try signing in or changing directories.
Access to this page requires authorization. You can try changing directories.
The following article shows you how to reimage Network Virtual Appliances (NVAs) deployed in the Virtual WAN hub. This article doesn't apply to NVAs deployed as Virtual Machines or Virtual Machine Scale Sets in a Virtual Network connected to Virtual WAN hubs. This article also doesn't apply to SaaS solutions deployed in the Virtual WAN hub.
Important
This document applies to Integrated Network Virtual Appliances deployed in the Virtual WAN hub and does not apply to software-as-a-service (SaaS) solutions. See third-party integrations for more information on the differences between Integrated Network Virtual Appliances and SaaS solutions. Reference your SaaS provider's documentation for information related to infrastructure operations available for SaaS solutions.
Operation overview
Reimage is an option is executed on Virtual WAN NVA Virtual Machine (VM) instances. The reimage operation incurs downtime. As part of the operation, Azure restarts the VM instance and removes the existing operating system (OS) disk associated with an NVA VM and replaces it with a new OS disk. The new OS disk is deployed from Azure Marketplace and runs the same initial software version that the NVA was deployed with. For example, if your NVA device was deployed with NVA OS version 10, and you subsequently upgraded the NVA version to version 12 as part of an out-of-band upgrade workflow initiated from the command line or NVA orchestration software, Azure Virtual WAN reimages your NVA instance to version 10 and not version 12. As a result, you may have to manually execute an OS software version upgrade after performing the reimage operation.
A reimage operation is targeted to one NVA instance and does not impact other NVA VM instances in the same deployment. The operation removes any existing NVA configurations stored on the OS disk and re-runs the cloudinit script that was specified when the NVA was initially deployed.
Use cases
Reimage is a fast, self-serve way to restore access without going through Azure Support for access to your NVA instance's serial console. You may find the reimage operation useful under the following circumstances:
- Restarting the NVA does not restore an NVA instance to a working state.
- Network connectivity to the NVA is lost due to an issue with the NVA operating system or a misconfiguration.
- Ongoing NVA operating system upgrade renders the NVA unresponsive or unusable. Reimage can be used to apply a fresh OS disk.
Prerequisites
Verify that your deployment meets the following prerequisites before attempting to reimage the NVA instances:
- A Network Virtual Appliance is deployed in a Virtual WAN hub. For more information on NVAs deployed in the Virtual WAN hub, see Integrated NVA documentation.
- The Network Virtual Appliance's provisioning state is "Succeeded."
Considerations
- Only one instance of a Virtual WAN NVA can be reimaged at a time from Azure portal. If you need to reimage multiple NVA instances, wait for an NVA instance to finish reimaging before proceeding to the next instance.
- You can only reimage an NVA if the provisioning state of the NVA is succeeded. Wait for any ongoing operations to finish before reimaging an NVA instance.
- You can't select the OS version Azure platform reimages your NVA.
- IP addresses for NVA instances are preserved during reimage operations.
Reimage the NVA
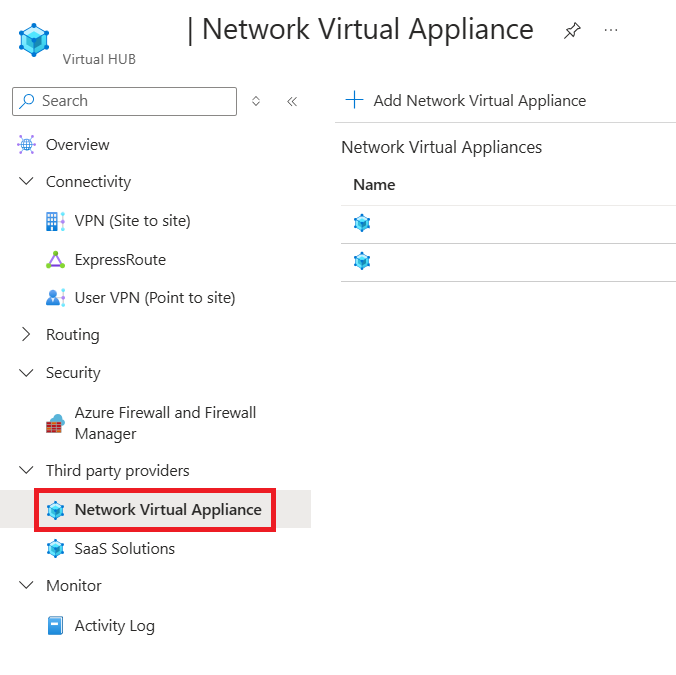
Navigate to your Virtual WAN hub and select Network Virtual Appliances under Third-party providers.
Select Manage configurations for the NVA you want to reimage.

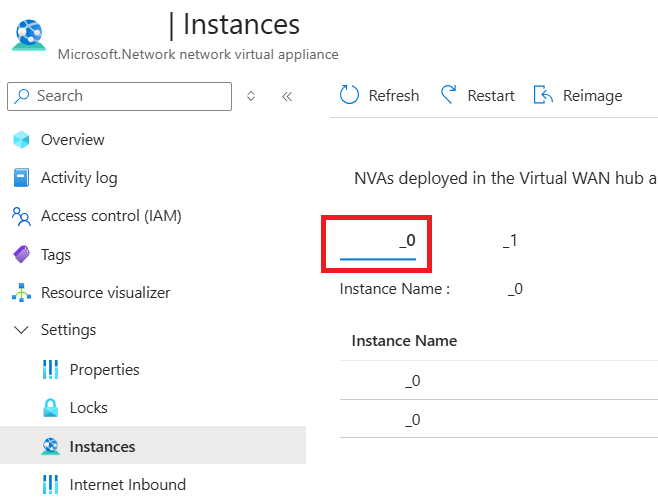
In the left pane, select Instances .
Select the instance of the NVA you want to reimage.
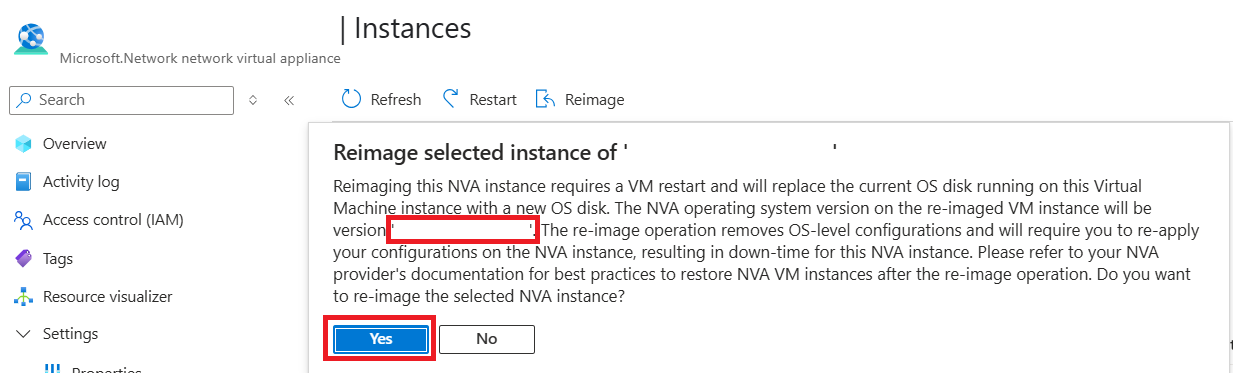
Select Reimage and read the disclosure on the screen and note the OS software version that the post-reimage NVA instance will be running. Confirm the reimage by selecting Yes.


Troubleshooting
The following section describes common issues associated with reimaging an NVA instance.
- NVA provisioning state needs to be successful: If the NVA is in an "Updating" or "Failed" state, you can't execute reimage operations on the NVA. Wait for any existing operation on the NVA to finish before trying to reimage again.
- Reimage already in progress: Multiple concurrent reimage operations aren't supported. If there's a reimage operation running on the NVA resource already, wait for the operation to finish before attempting to reimage a different instance.
- Operations on the NVA are not allowed at this time. Please try again later: Try the reimage operation again in 15-30 minutes.
- The NVA operation failed due to an intermittent error: Try the reimage operation again.
- Instance provided does not exist: Reimage API request body references instance IDs. To determine which instance IDs are currently in use, navigate to Instances in Azure portal for your NVA resource. Virtual WAN names NVA instances with the following naming convention: "nvaresourcename_instanceID". In the example below, valid instance IDs are "0" and "1".
