Note
Access to this page requires authorization. You can try signing in or changing directories.
Access to this page requires authorization. You can try changing directories.
[This article is prerelease documentation and is subject to change.]
This article describes the steps required to author a new autonomous Financial Reconciliation agent. After you complete the steps described in this article, an agent can execute financial reconciliations on your behalf and notify you when the process is complete.
The Financial Reconciliation agent creation form is designed to help you create a new Financial Reconciliation agent within your Microsoft 365 applications.
Create a new agent
To create a new agent, follow these steps.
In Excel, go to the Finance agents sidecar, and select Agents.

Select + New agent.

Fill out each of the required fields as described in the following steps.
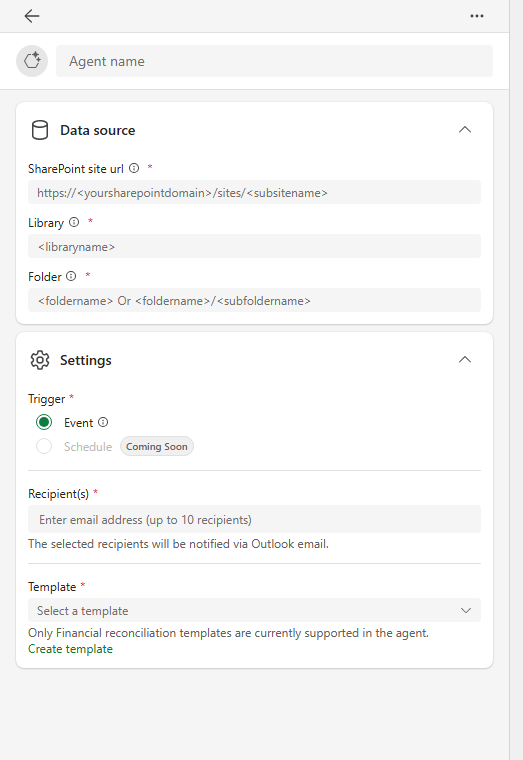
In the Data Source section, complete the following details:
- In SharePoint site URL, enter the URL of your SharePoint site. For example,
https://<yoursharepointdomain>/sites/<subsitename>. This field is required. - In Library specify the SharePoint library name. For example,
<libraryname>. This field is required. - In Folder hierarchy, define the folder hierarchy within the SharePoint library. For example,
<foldername> Or <foldername>/<subfoldername>. This field is required.
- In SharePoint site URL, enter the URL of your SharePoint site. For example,
In the Settings section, complete the following details:
In Trigger, choose a trigger. Either Event, or Schedule. This field is required. The Event Trigger autonomously processes the reconciliation when two source files are added to the source folder. The Schedule Trigger autonomously processes the reconciliation when the schedule criteria have been met and the two source files are present in the source folder.
In Recipient(s), enter the email addresses of the recipients who receive an email notification. You can enter up to 10 recipients. This field is required.
In Template, select a template for reconciling data. Only Financial Reconciliation agent templates are currently supported. This field is required.
Ensure all required fields are completed correctly.
Select Save.
Edit an existing agent
To edit an existing agent, follow these steps.
- In Excel, go to the Finance agents sidecar, and select Agents.
- Select the agent you want to edit.
- Update the required fields as described in the following steps.
- In the Agent Name section, update the name of the agent. This field is required.
- In Data source section, update the URL of your SharePoint site. For example,
https://<yoursharepointdomain>/sites/<subsitename>. This field is required. - In the Recipient(s) section, update the email addresses of the recipients who receive an email notification. You can enter up to 10 recipients. This field is required.
- In the Settings section, update the Trigger type. The user can choose either Event or Schedule.
- In the Template section, update the template for reconciling data. Only Financial Reconciliation agent templates are currently supported. This field is required.
- Ensure all required fields are completed correctly.
- Select Save.
Troubleshoot agents
If you encounter an issue while using the Financial Reconciliation Agent creation form, follow these steps.
- Ensure that you entered the correct SharePoint site URL and library name.
- Verify the folder hierarchy and path.
- Check that the recipient email addresses are valid.
- Make sure you selected a valid template.
- Ensure the specified folder path only contains two files at a time.
- Ensure that source files placed in the folder contain tables with the mapping keys specified in the associated financial reconciliation template.