Note
Access to this page requires authorization. You can try signing in or changing directories.
Access to this page requires authorization. You can try changing directories.
Want to experience Microsoft Defender for Endpoint? Sign up for a free trial.
Overview of network protection
Network protection helps protect devices by preventing connections to malicious or suspicious sites. Examples of dangerous domains are domains that host phishing scams, malicious downloads, tech scams, or other malicious content. Network protection expands the scope of Microsoft Defender SmartScreen to block all outbound HTTP(S) traffic that attempts to connect to poor-reputation sources (based on the ___domain or hostname).
Network protection extends the protection in Web protection to the operating system level, and is a core component for Web Content Filtering (WCF). It provides the web protection functionality found in Microsoft Edge to other supported browsers and nonbrowser applications. Network protection also provides visibility and blocking of indicators of compromise (IOCs) when used with Endpoint detection and response. For example, network protection works with your custom indicators to block specific domains or host names.
Watch this video to learn how network protection helps reduce the attack surface of your devices from phishing scams, exploits, and other malicious content:
Prerequisites
Supported operating systems
- Windows
- macOS
- Linux
Network protection coverage
The following table summarizes network protection areas of coverage.
| Feature | Microsoft Edge | Non-Microsoft browsers | Nonbrowser processes (for example, PowerShell) |
|---|---|---|---|
| Web Threat Protection | SmartScreen must be enabled | Network protection must be in block mode | Network protection must be in block mode |
| Custom Indicators | SmartScreen must be enabled | Network protection must be in block mode | Network protection must be in block mode |
| Web Content Filtering | SmartScreen must be enabled | Network protection must be in block mode | Not supported |
To ensure that SmartScreen is enabled for Microsoft Edge, use Edge Policy: SmartScreen Enabled.
Note
On Windows, network protection doesn't monitor Microsoft Edge. For processes other than Microsoft Edge and Internet Explorer, web protection scenarios leverage network protection for inspection and enforcement. On Mac and Linux, the Microsoft Edge browser only integrates Web Threat Protection. Network protection must be enabled in block mode to support Custom Indicators and Web Content Filtering in Edge and other browsers.
Known issues & limitations
- IP addresses are supported for all three protocols (TCP, HTTP, and HTTPS (TLS))
- Only single IP addresses are supported (no CIDR blocks or IP ranges) in custom indicators
- HTTP URLs (including a full URL path) can be blocked for any browser or process
- HTTPS fully-qualified ___domain names (FQDN) can be blocked in non-Microsoft browsers (indicators specifying a full URL path can only be blocked in Microsoft Edge)
- Blocking FQDNs in non-Microsoft browsers requires that QUIC and Encrypted Client Hello be disabled in those browsers
- FQDNs loaded via HTTP2 connection coalescing can only be blocked in Microsoft Edge
- Network Protection will block connections on all ports (not just 80 and 443).
There might be up to two hours of latency (usually less) between when an indicator/policy is added and a matching URL/IP is blocked.
Requirements for network protection
Network protection requires devices running one of the following operating systems:
- Windows 10 or 11 (Pro or Enterprise) (see Supported Windows versions)
- Windows Server 2012 R2, Windows Server 2016, or Windows Server version 1803 or later (see Supported Windows versions)
- macOS version 12 (Monterey) or later (see Microsoft Defender for Endpoint on Mac)
- A supported Linux version (see Microsoft Defender for Endpoint on Linux)
Network protection also requires Microsoft Defender Antivirus with real-time protection enabled.
| Windows version | Microsoft Defender Antivirus |
|---|---|
| Windows 10 version 1709 or later, Windows 11, Windows Server 1803 or later | Make sure that Microsoft Defender Antivirus real-time protection, behavior monitoring, and cloud-delivered protection are enabled (active) |
| Windows Server 2012 R2 and Windows Server 2016 using the modern unified solution | Platform update version 4.18.2001.x.x or newer |
Why network protection is important
Network protection is a part of the attack surface reduction group of solutions in Microsoft Defender for Endpoint. Network protection enables the network layer to block connections to domains and IP addresses. By default, network protection guards your computers from known malicious domains using the SmartScreen feed, which blocks malicious URLs in a manner similar to SmartScreen in the Microsoft Edge browser. The network protection functionality can be extended to:
- Block IP/URL addresses from your own threat intelligence (indicators)
- Block unsanctioned services from Microsoft Defender for Cloud Apps
- Block browser access to websites based on category (Web content filtering)
Tip
For details about network protection for Windows Server, Linux, macOS and Mobile Threat Defense (MTD), see Proactively hunt for threats with advanced hunting.
Block Command and Control attacks
Command and Control (C2) servers are used to send commands to systems previously compromised by malware.
C2 servers can be used to initiate commands that can:
- Steal data
- Control compromised computers in a botnet
- Disrupt legitimate applications
- Spread malware, such as ransomware
The network protection component of Defender for Endpoint identifies and blocks connections to C2 servers used in human-operated ransomware attacks, using techniques like machine learning and intelligent indicator-of-compromise (IoC) identification.
Network protection: C2 detection and remediation
Ransomware has evolved into a sophisticated threat that is human-driven, adaptive, and focused on large scale outcomes, like holding an entire organization's assets or data for ransom.
Support for Command and Control servers (C2) is an important part of this ransomware evolution, and it's what enables these attacks to adapt to the environment they target. Breaking the link to the command-and-control infrastructure stops the progression of an attack to its next stage. For more information about C2 detection and remediation, see Tech Community blog: Detecting and remediating command and control attacks at the network layer.
Network protection: New toast notifications
| New mapping | Response category | Sources |
|---|---|---|
phishing |
Phishing |
SmartScreen |
malicious |
Malicious |
SmartScreen |
command and control |
C2 |
SmartScreen |
command and control |
COCO |
SmartScreen |
malicious |
Untrusted |
SmartScreen |
by your IT admin |
CustomBlockList |
|
by your IT admin |
CustomPolicy |
Note
customAllowList does not generate notifications on endpoints.
New notifications for network protection determination
When an end user attempts to visit a website in an environment in which network protection is enabled, three scenarios are possible, as outlined in the following table:
| Scenario | What happens |
|---|---|
| The URL has a known good reputation | The user is permitted access without obstruction, and there's no toast notification presented on the endpoint. In effect, the ___domain or URL is set to Allowed. |
| The URL has an unknown or uncertain reputation | The user's access is blocked, but with the ability to circumvent (unblock) the block. In effect, the ___domain or url is set to Audit. |
| The URL has a known bad (malicious) reputation | The user is prevented from access. In effect, the ___domain or url is set to Block. |
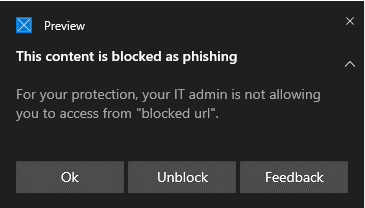
Warn experience
A user visits a website. If the url has an unknown or uncertain reputation, a toast notification presents the user with the following options:
- Ok: The toast notification is released (removed), and the attempt to access the site is ended.
- Unblock: The user has access to the site for 24 hours; at which point the block is reenabled. The user can continue to use Unblock to access the site until such time that the administrator prohibits (blocks) the site, thus removing the option to Unblock.
- Feedback: The toast notification presents the user with a link to submit a ticket, which the user can use to submit feedback to the administrator in an attempt to justify access to the site.
Note
The images shown in this article for both the warn experience and block experience use "blocked url" as example placeholder text. In a functioning environment, the actual url or ___domain is listed.
Use CSP to enable Convert warn verdict to block
By default, SmartScreen verdicts for malicious sites result in a warning that can be overridden by the user. A policy can be set to convert the warning to blocks, preventing such overrides.
For non-Edge browsers, see Defender CSP: Configuration/EnableConvertWarnToBlock. For Edge browsers, see Edge Policy: Prevent SmartScreen Prompt Override.
Use Group Policy to enable Convert warn verdict to block
By enabling this setting, network protection blocks network traffic instead of displaying a warning.
On your Group Policy management computer, open the Group Policy Management Console.
Right-click the Group Policy Object you want to configure, and then select Edit.
In the Group Policy Management Editor go to Computer configuration and then select Administrative templates.
Expand the tree to Windows components > Microsoft Defender Antivirus > Network inspection system.
Double-click Convert warn verdict to block and set the option to Enabled.
Select OK.
Block experience
When a user visits a website whose url has a bad reputation, a toast notification presents the user with the following options:
- Ok: The toast notification is released (removed), and the attempt to access the site is ended.
- Feedback: The toast notification presents the user with a link to submit a ticket, which the user can use to submit feedback to the administrator in an attempt to justify access to the site.
 Your security operations team can customize the notification shown for a blocked connection with your organization's details and contact information.
SmartScreen Unblock
With indicators in Defender for Endpoint, administrators can allow end users to bypass warnings that are generated for some URLs and IPs. Depending on why the URL is blocked, when a SmartScreen block is encountered, it could offer the user the ability to unblock the site for up to 24 hours. In such cases, a Windows Security toast notification appears, permitting the user to select Unblock. In such cases, the URL or IP is unblocked for the specified period of time.

Microsoft Defender for Endpoint administrators can unblock any URL in the Microsoft Defender portal using an allow indicator for IPs, URLs, and domains.
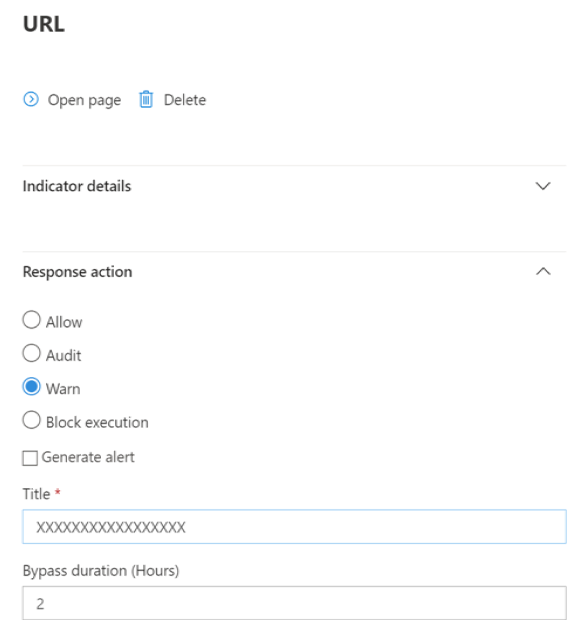
See Create indicators for IPs and URLs/domains.
Using network protection
Network protection is enabled per device, which is typically done using your management infrastructure. For supported methods, see Turn on network protection.
Note
Microsoft Defender Antivirus must be in active mode to enable network protection.
You can enable network protection in audit mode or block mode. If you want to evaluate the impact of enabling network protection before actually blocking IP addresses or URLs, you can enable network protection in audit mode. Audit mode logs whenever end users connect to an address or site that would otherwise be blocked by network protection. To enforce blocking of custom indicators or Web content filtering categories, network protection must be in block mode.
For information about network protection for Linux and macOS see the following articles:
Advanced hunting
If you're using advanced hunting to identify audit events, you have up to 30 days history available from the console. See Advanced hunting.
You can find the audit events in Advanced hunting in the Defender for Endpoint portal (https://security.microsoft.com).
Audit events are in DeviceEvents with an ActionType of ExploitGuardNetworkProtectionAudited. Blocks are shown with an ActionType of ExploitGuardNetworkProtectionBlocked.
Here's an example query for viewing Network Protection events for non-Microsoft browsers:
DeviceEvents
|where ActionType in ('ExploitGuardNetworkProtectionAudited','ExploitGuardNetworkProtectionBlocked')

Tip
These entries have data in the AdditionalFields column which supplies more info around the action, including the fields: IsAudit, ResponseCategory, and DisplayName.
Here's another example:
DeviceEvents
|where ActionType contains "ExploitGuardNetworkProtection"
|extend ParsedFields=parse_json(AdditionalFields)
|project DeviceName, ActionType, Timestamp, RemoteUrl, InitiatingProcessFileName, IsAudit=tostring(ParsedFields.IsAudit), ResponseCategory=tostring(ParsedFields.ResponseCategory), DisplayName=tostring(ParsedFields.DisplayName)
|sort by Timestamp desc
The Response category tells you what caused the event, as in this example:
| ResponseCategory | Feature responsible for the event |
|---|---|
CustomPolicy |
WCF |
CustomBlockList |
Custom indicators |
CasbPolicy |
Defender for Cloud Apps |
Malicious |
Web threats |
Phishing |
Web threats |
For more information, see Troubleshoot endpoint blocks.
If you're using the Microsoft Edge browser, use this query for Microsoft Defender SmartScreen events:
DeviceEvents
| where ActionType == "SmartScreenUrlWarning"
| extend ParsedFields=parse_json(AdditionalFields)
| project DeviceName, ActionType, Timestamp, RemoteUrl, InitiatingProcessFileName
You can use the resulting list of URLs and IPs to determine what would be blocked if network protection is set to block mode on the device. You can also see which features would block URLs and IPs. Review the list to identify any URLS or IPs that are necessary for your environment. You can then create an allow indicator for those URLs or IP addresses. Allow indicators take precedence over any blocks. See Order of precedence for Network protection blocks.
After creating an allow indicator to unblock a site, you may attempt to resolve the original block as follows:
- SmartScreen: report false positive, if appropriate
- Indicator: modify existing indicator
- MCA: review unsanctioned app
- WCF: request recategorization
For information about how to report false positives in SmartScreen data, see Report false positives.
For details on how to create your own Power BI reports, see Create custom reports using Power BI.
Configuring network protection
For more information about how to enable network protection, see Enable network protection. Use Group Policy, PowerShell, or MDM CSPs to enable and manage network protection in your network.
After you've enabled network protection, you might need to configure your network or firewall to allow the connections between your endpoint devices and the web services:
.smartscreen.microsoft.com.smartscreen-prod.microsoft.com
Required browser configuration
In non-Microsoft Edge processes, Network Protection determines the fully qualified ___domain name for each HTTPS connection by examining the content of the TLS handshake that occurs after a TCP/IP handshake. This requires that the HTTPS connection use TCP/IP (not UDP/QUIC) and that the ClientHello message not be encrypted. To disable QUIC and Encrypted Client Hello in Google Chrome, see QuicAllowed and EncryptedClientHelloEnabled. For Mozilla Firefox, see Disable EncryptedClientHello and network.http.http3.enable.
Viewing network protection events
Network protection works best with Microsoft Defender for Endpoint, which gives you detailed reporting as part of alert investigation scenarios.
Review network protection events in the Microsoft Defender portal
Defender for Endpoint provides detailed reporting into events and blocks as part of its alert investigation scenarios. You can view these details in the Microsoft Defender portal (https://security.microsoft.com) in the alerts queue or by using advanced hunting. If you're using audit mode, you can use advanced hunting to see how network protection settings would affect your environment if they were enabled.
Review network protection events in Windows Event Viewer
You can review the Windows event log to see events that are created when network protection blocks (or audits) access to a malicious IP or ___domain:
Select OK.
This procedure creates a custom view that filters to only show the following events related to network protection:
Event ID Description 5007Event when settings are changed 1125Event when network protection fires in audit mode 1126Event when network protection fires in block mode
Network protection and the TCP three-way handshake
With network protection, the determination of whether to allow or block access to a site is made after the completion of the three-way handshake via TCP/IP. Thus, when network protection blocks a site, you might see an action type of ConnectionSuccess under DeviceNetworkEvents in the Microsoft Defender portal, even though the site was blocked. DeviceNetworkEvents are reported from the TCP layer, and not from network protection. After the completion of the TCP/IP handshake and any TLS handshake, access to the site is allowed or blocked by network protection.
Here's an example of how that works:
Suppose that a user attempts to access a website. The site happens to be hosted on a dangerous ___domain, and it should be blocked by network protection.
The three-way handshake via TCP/IP commences. Before it completes, a
DeviceNetworkEventsaction is logged, and itsActionTypeis listed asConnectionSuccess. However, as soon as the three-way handshake process completes, network protection blocks access to the site. All of this happens quickly.In the Microsoft Defender portal, an alert is listed in the alerts queue. Details of that alert include both
DeviceNetworkEventsandAlertEvidence. You can see that the site was blocked, even though you also have aDeviceNetworkEventsitem with the ActionType ofConnectionSuccess.
Considerations for Windows virtual desktop running Windows 10 Enterprise Multi-Session
Due to the multi-user nature of Windows 10 Enterprise, keep the following points in mind:
- Network protection is a device-wide feature and can't be targeted to specific user sessions.
- If you need to differentiate between user groups, consider creating separate Windows Virtual Desktop host pools and assignments.
- Test network protection in audit mode to assess its behavior before rolling out.
- Consider resizing your deployment if you have a large number of users or a large number of multi-user sessions.
Alternative option for network protection
For Windows Server 2012 R2 and Windows Server 2016 using the modern unified solution, Windows Server version 1803 or later, and Windows 10 Enterprise Multi-Session 1909 and later, used in Windows Virtual Desktop on Azure, network protection can be enabled using the following method:
Use Turn on network protection and follow the instructions to apply your policy.
Run the following PowerShell commands:
Set-MpPreference -EnableNetworkProtection EnabledSet-MpPreference -AllowNetworkProtectionOnWinServer 1Set-MpPreference -AllowNetworkProtectionDownLevel 1Set-MpPreference -AllowDatagramProcessingOnWinServer 1
Note
Depending on your infrastructure, volume of traffic, and other conditions,
Set-MpPreference -AllowDatagramProcessingOnWinServer 1can have an effect on network performance.
Network protection for Windows Servers
The following information is specific to Windows Servers.
Verify that network protection is enabled
Verify whether network protection is enabled on a local device by using Registry Editor.
Select the Start button in the task bar and type
regeditto open Registry Editor.Select HKEY_LOCAL_MACHINE from the side menu.
Navigate through the nested menus to SOFTWARE > Policies > Microsoft > Windows Defender > Windows Defender Exploit Guard > Network Protection.
(If the key isn't present, navigate to SOFTWARE > Microsoft > Windows Defender > Windows Defender Exploit Guard > Network Protection)
Select EnableNetworkProtection to see the current state of network protection on the device:
0= Off1= On (enabled)2= Audit mode
For more information, see Turn on network protection.
Network protection registry keys
For Windows Server 2012 R2 and Windows Server 2016 using the modern unified solution, Windows Server version 1803 or later, and Windows 10 Enterprise Multi-Session 1909 and later (used in Windows Virtual Desktop on Azure), enable other registry keys, as follows:
Go to HKEY_LOCAL_MACHINE > SOFTWARE > Microsoft > Windows Defender > Windows Defender Exploit Guard > Network Protection.
Configure the following keys:
AllowNetworkProtectionOnWinServer(DWORD) set to1(hex)EnableNetworkProtection(DWORD) set to1(hex)- (On Windows Server 2012 R2 and Windows Server 2016 only)
AllowNetworkProtectionDownLevel(DWORD) set to1(hex)
Note
Depending on your infrastructure, volume of traffic, and other conditions, HKEY_LOCAL_MACHINE > SOFTWARE > Policies > Microsoft > Windows Defender > NIS > Consumers > IPS - AllowDatagramProcessingOnWinServer (dword) 1 (hex) can have an effect on network performance.
For more information, see Turn on network protection.
Windows Servers and Windows Multi-session configuration requires PowerShell
For Windows Servers and Windows Multi-session, there are other items that you must enable by using PowerShell cmdlets. For Windows Server 2012 R2 and Windows Server 2016 using the modern unified solution, Windows Server version 1803 or later, and Windows 10 Enterprise Multi-Session 1909 and later, used in Windows Virtual Desktop on Azure, run the following PowerShell commands:
Set-MpPreference -EnableNetworkProtection Enabled

Set-MpPreference -AllowNetworkProtectionOnWinServer 1

Set-MpPreference -AllowNetworkProtectionDownLevel 1

Set-MpPreference -AllowDatagramProcessingOnWinServer 1
Note
Depending on your infrastructure, volume of traffic, and other conditions, Set-MpPreference -AllowDatagramProcessingOnWinServer 1 can affect network performance.
Network protection troubleshooting
Due to the environment where network protection runs, the feature might not be able to detect operating system proxy settings. In some cases, network protection clients are unable to reach the cloud service. To resolve the connectivity problem, configure a static proxy for Microsoft Defender Antivirus.
Note
Encrypted Client Hello and the QUIC protocol are not supported with network protection functionality. Ensure that these protocols are disabled in browsers as described in Required Browser Configuration above.
To disable QUIC in all clients, you can block QUIC traffic via the Windows Firewall.
Disable QUIC in Windows Firewall
This method affects all applications, including browsers and client apps (such as Microsoft Office). In PowerShell, run the New-NetFirewallRule cmdlet to add a new firewall rule that disables QUIC by blocking all outbound traffic UDP traffic to port 443:
Copy
$ruleParams = @{
    DisplayName = "Block QUIC"
    Direction = "Outbound"
    Action = "Block"
    RemoteAddress = "0.0.0.0/0"
    Protocol = "UDP"
    RemotePort = 443
}
New-NetFirewallRule @ruleParams
Optimizing network protection performance
Network protection includes a performance optimization that allows block mode to inspect long-lived connections asynchronously, which might provide a performance improvement. This optimization can also help with app compatibility problems. This capability is on by default.
Use CSP to enable AllowSwitchToAsyncInspection
Defender CSP: Configuration/AllowSwitchToAsyncInspection
Use Group Policy to enable Turn on asynchronous inspection
This procedure enables network protection to improve performance by switching from real-time inspection to asynchronous inspection.
On your Group Policy management computer, open the Group Policy Management Console.
Right-click the Group Policy Object you want to configure, and then select Edit.
In the Group Policy Management Editor, go to Computer configuration, and then select Administrative templates.
Expand the tree to Windows components > Microsoft Defender Antivirus > Network inspection system.
Double-click Turn on asynchronous inspection, and then set the option to Enabled.
Select OK.
Use Microsoft Defender Antivirus Powershell cmdlet to enable Turn on asynchronous inspection
You can turn on this capability by using the following PowerShell cmdlet:
Set-MpPreference -AllowSwitchToAsyncInspection $true
See also
- Evaluate network protection | Undertake a quick scenario that demonstrates how the feature works, and what events would typically be created.
- Enable network protection | Use Group Policy, PowerShell, or MDM CSPs to enable and manage network protection in your network.
- Configuring attack surface reduction capabilities in Microsoft Intune
- Network protection for Linux | To learn about using Microsoft Network protection for Linux devices.
- Network protection for macOS | To learn more about Microsoft Network protection for macOS
Tip
Do you want to learn more? Engage with the Microsoft Security community in our Tech Community: Microsoft Defender for Endpoint Tech Community.