Note
Access to this page requires authorization. You can try signing in or changing directories.
Access to this page requires authorization. You can try changing directories.
You can configure unified routing for records in the Copilot Service admin center app.
Important
- Enabling unified routing might affect runtime operations on account of solution import that can affect SQL load.
- If you're upgrading your environment and Omnichannel for Customer Service is also installed, you might have existing workstreams for record routing. We recommend that you provision unified routing only after recreating those workstreams for record routing in your admin app.
- If you're an existing customer, we recommend that you configure and test unified routing in a test or development environment before configuring it in your production environment.
- If you're facing any technical or performance-related issues with multiple updates at a time using unified routing, we recommend that you contact Microsoft Support to troubleshoot the issues.
Prerequisites
- To set up record routing for Customer Service, unified routing must be enabled in your environment. Learn more in Provision unified routing for Customer Service.
- To route records, you must enable the record for routing using records channel configuration. Learn more in Records routing.
- You must have the System Administrator role to configure record routing.
- You must have users configured as bookable resource. Learn more in Set up the user as a bookable resource.
Configure unified routing for records
You must complete all the steps in this section to route records using unified routing.
Note
After you enable unified routing, the active basic routing rule won't route records until you configure intake rules.
In the site map of Copilot Service admin center, select Routing in Customer support. The Routing page appears.
Select Manage for Record routing.
On the Record routing page, select Add.
In the Add a record type dialog, select a record from the Record type list, and select Add. The record is added and listed on the Record routing page.
Configure the following settings:
- Workstreams
- Intake rules
Create workstreams for record routing
In the site map, select Workstreams in Customer support.
Select New workstream.
In the Create a workstream dialog, enter the following details:
- Name: Enter an intuitive name, such as Contoso case workstream.
- Work distribution mode: Select Push or Pick.
- Type: Select Record.
- Record type: Select a record from the list.
Select Create. The workstream is created.
Configure intake rules
Intake rules for a record help determine the workstream to be picked up to assign an incoming work item.
You can create intake rules independently and map them to basic routing rulesets also. However, on any workstream details page, only those intake rules are displayed that are mapped to the workstream. Therefore, if you want to prioritize the runtime evaluation of the intake rules, you need to select See more on the workstream details page, and reorder the rules in the Decision list.
Perform the following steps:
Select the workstream that you configured for routing records, such as the case.
In Intake rules, select Create rule.
In the Create intake rule dialog, enter a name and define the conditions for the rule. By default, the root record is selected and displayed at the top of the condition builder. The record for which you are creating the rule is thus visible for your reference. You can define conditions for up to two levels of the related records and attributes.
You can map the intake rule to a workstream or basic routing rule that's active.

Select Create.
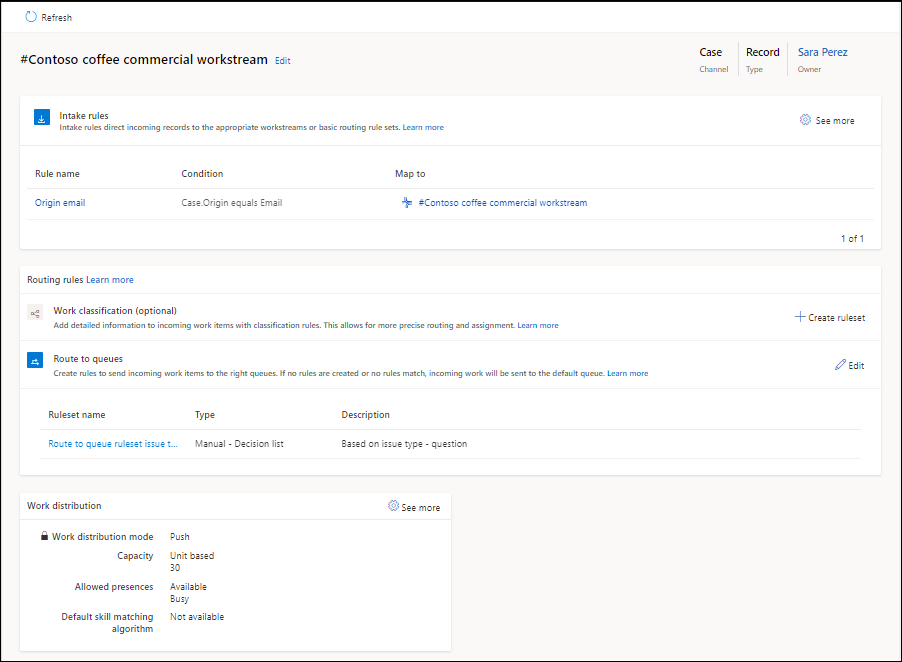
The following screenshot shows a workstream with the required intake rule and route to queues.

You can reorder the rules and create copies to meet your business requirements.

Configure routing rules
Routing rules for a workstream consists of work classification rules and route-to-queue rules. For the steps to configure routing rules, see the following articles:
Configure work distribution and advanced settings
In the Work distribution area, you can either accept the default settings or select See more, and update the following options:
Capacity: Select one of the following options:
- Unit based: Enter a value if your organization uses unit-based capacity.
- Profile based: Specify a profile in the list if your organization uses profile-based capacity. Learn more in Create and manage capacity profiles.
Allowed presences: Select the presences in which customer service representatives (service representatives or representatives) can receive work. If you want to route records in Customer Service Hub, make sure that you add all the required presences to be able to route work items as required.
Default skill matching algorithm: Select Exact Match or Closest Match.
Expand Advanced settings to configure the following options:
Note
- The notifications that you configure for routing of records based on unified routing are displayed in the Copilot Service workspace app only.
- Make sure that the representatives in the queues have correct permissions to handle the incoming work items in the queue. If a representative doesn't have permissions to an assigned work item, the assignment is stopped, and the conversation is closed to protect it.
Next steps
 Enable routing diagnostics
 Process for setting up unified routing
Related information
Overview of unified routing
Create and manage workstreams
Configure routing for email records
Release representative's capacity
Assign roles and enable users
Understand how unified routing affects queue items and live work items for routed records
How to close live work items or deactivate queue items
Release capacity for representatives
FAQ about time taken by configuration changes in unified routing