Note
Access to this page requires authorization. You can try signing in or changing directories.
Access to this page requires authorization. You can try changing directories.
Enable relationship intelligence in Dynamics 365 Sales Premium to give your sales team important insights based on their interactions with customers. Relationship analytics KPIs, customer relationship health scores to know which customers need attention, and who knows whom suggestions for introductions to leads help your sellers be more effective.
Note
- Basic relationship analytics is available out-of-the-box in all regions for Sales Enterprise users and doesn't require any setup.
- Enhanced relationship analytics is available for Sales Premium users and is available only in specific regions.
Important
This feature is intended to help sellers or sales managers enhance their team's performance. This feature is not intended for use in making, and should not be used to make, decisions that affect the employment of an employee or group of employees, including compensation, rewards, seniority, or other rights or entitlements. Customers are solely responsible for using Dynamics 365, this feature, and any associated feature or service in compliance with all applicable laws, including laws relating to accessing individual employee analytics and monitoring, recording, and storing communications with users. This also includes adequately notifying users that their communications with sales persons may be monitored, recorded, or stored and, as required by applicable laws, obtaining consent from users before using the feature with them. Customers are also encouraged to have a mechanism in place to inform their sales persons that their communications with users may be monitored, recorded, or stored.
Prerequisite
Ensure that advanced Sales Insights features are enabled. To learn more, Enable and configure premium Sales Insights features.
If you want Dynamics 365 Sales to use emails and meetings from Exchange to generate insights, enable server-side synchronization for Exchange. Otherwise, insights are generated only using emails and data stored in Dynamics 365.
Ensure that your Office 365 data is in one of the following locations and not in your region-specific datacenter ___location:
- Global Geography 1 – EMEA (Austria, Finland, France, England, Ireland, Netherlands)
- Global Geography 2 – Asia Pacific (Hong Kong SAR, Japan, Malaysia, Singapore, South Korea).
- Global Geography 3 – Americas (Brazil, Chile, United States).
Note
If your data center isn't in one of the above locations, you can still use relationship intelligence features with data stored in Dynamics 365. However, you won't be able to use Exchange data for enhanced insights.
Enable and configure relationship intelligence
In the Sales Hub app, go to Change area in the lower-left corner of the page, and select Sales Insights settings.
Under Relationship insights, select Overview.
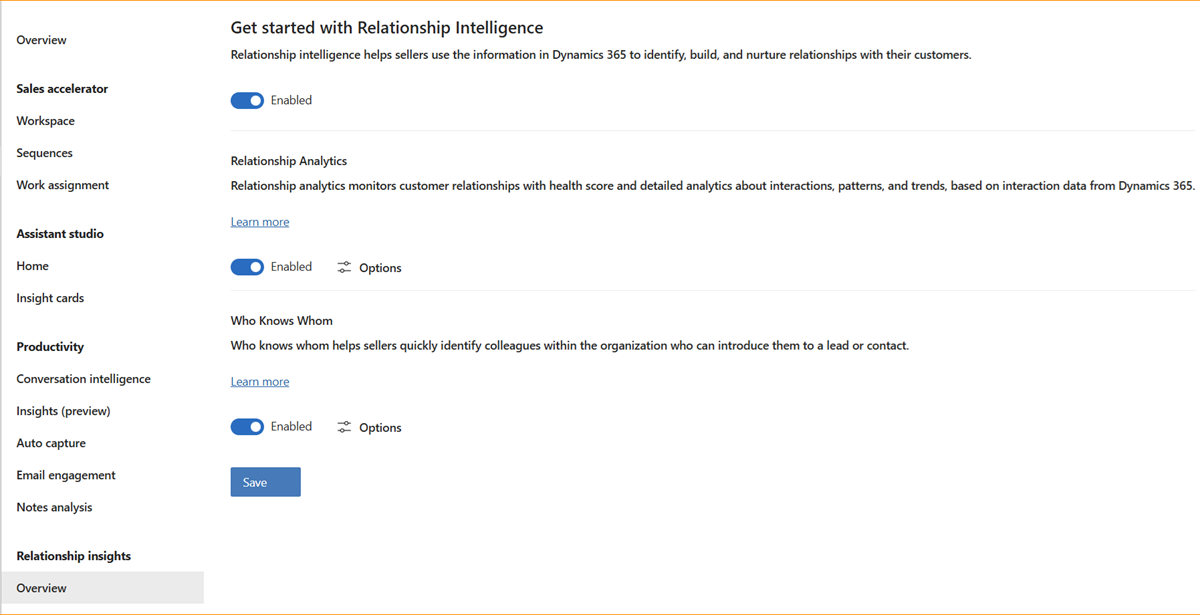
Under Get started with Relationship Intelligence, select Enable. The relationship intelligence features—relationship analytics and who knows whom—are turned on as well.
Note
If you turn off Relationship Analytics, you won't see the scores. However, relevant health data is still collected.
Save the changes.
Relationship intelligence features are enabled.Select Options under each feature to configure the settings.
Configure relationship analytics and health
Configure relationship analytics to define parameters that would determine the customer relationship health. These configurations are only supported for Sales Premium customers.
Select Analytics and health under Relationship insights or select Options under Who knows whom on the Get started with Relationship Intelligence page.
Under Activity influence, update the numbers to indicate the relative importance of different activity types in determining relationship health. Provide a value between 3 and 9. Lower the value, higher the importance of the activity type. For example, if you would like to rank the activities in the following order of importance: Email, Phone call, and Appointment, you can set the values as 3,4, and 5 respectively.
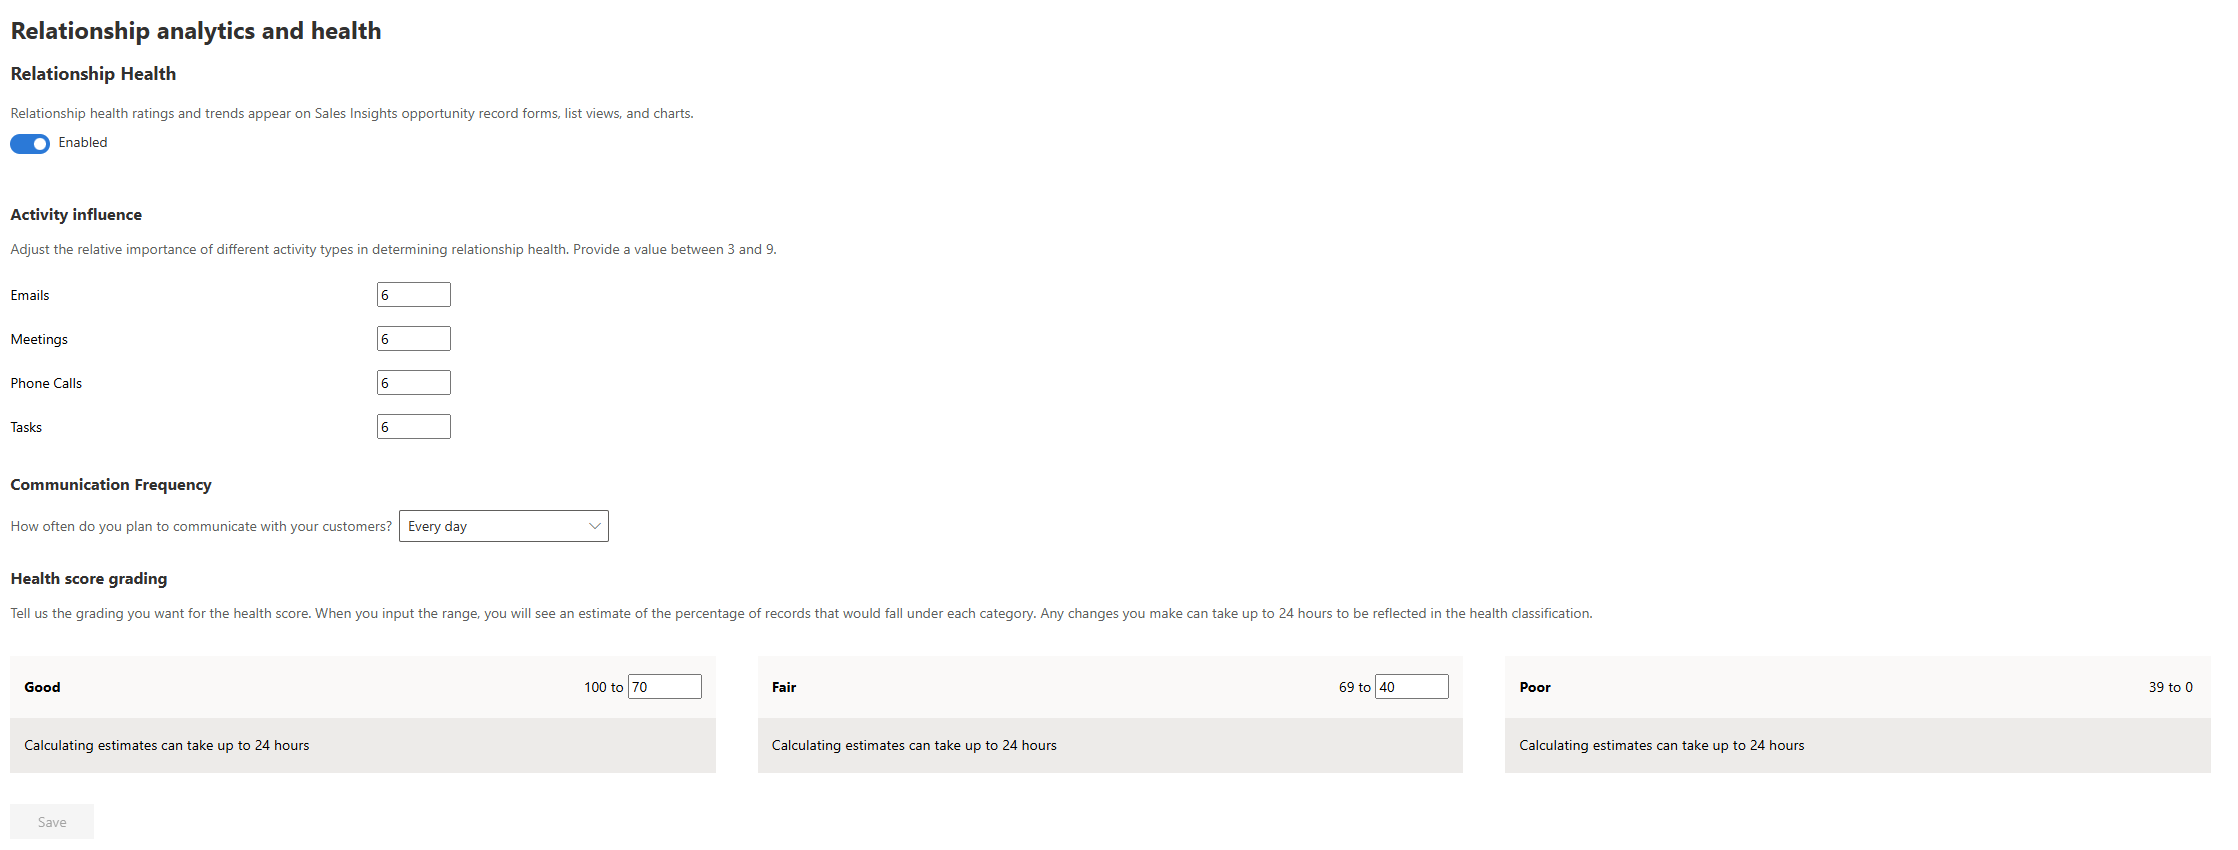
In Communication Frequency, select how often your organization expects sales teams to communicate with customers.
The value you select influences the expectation of more recent frequent communications in the health score. Less frequent communication reduces the expectation. More frequent communication increases it.
Under Health score grading, set the range of health scores to grade opportunities. To change the default values, point to the minimum value in the range and select the up or down arrow or type a new value.
When the health score is calculated, the opportunities in your organization's pipeline are graded as Good, Fair, or Poor, according to the ranges you defined. Grading can take up to 24 hours.
If you change a grade's minimum value, the adjacent grade's maximum value changes automatically with it. For example, if you change the minimum value for Good to 50, the maximum value for Fair changes to 49.
Select Save. Relationship analytics is now enabled and configured for your organization.
For more information about how to view the analytics, see Use relationship analytics to gather KPIs.
Configure who knows whom
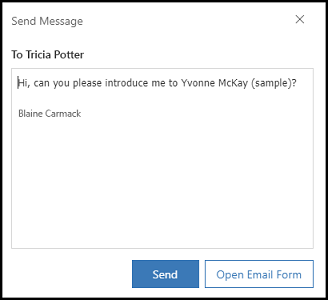
The who knows whom feature helps your sales organization quickly identify colleagues who can introduce them to leads or contacts, based on their interactions through emails and meetings. Configure the feature to select an email template to use for introductions.
Select Who knows whom under Relationship insights or select Options under Who knows whom on the Get started with Relationship Intelligence page.
Select an email template to use for introductions. The email template is used when a salesperson requests an introduction to a lead or contact from a colleague.
The following screenshot shows an example introduction email using the default email template:
Select Save.
Next steps
Add Relationship intelligence widgets to custom forms if your organization is using a custom sales app or a custom form for lead or contact.
Can't find the feature in your app?
There are a few possibilities:
- You don't have the necessary license to use this feature. Check out the comparison table and the licensing guide to see which features are available with your license.
- You don't have the necessary security role to use this feature.
- To configure or setup a feature, you need to have the Administration and customization roles
- To use sales-related features, you need to have the Primary sales roles
- Some tasks require specific Functional roles.
- Your administrator hasn't turned on the feature.
- Your organization is using a custom app. Check with your administrator for exact steps. The steps described in this article are specific to the out-of-the-box Sales Hub and Sales Professional apps.