Note
Access to this page requires authorization. You can try signing in or changing directories.
Access to this page requires authorization. You can try changing directories.
In this article, we review the steps needed to verify your ownership of the ___domain name you're using for your decentralized identifier (DID).
Prerequisites
To verify ___domain ownership to your DID, you need to:
- Complete Getting started and the subsequent tutorial set.
Verify ___domain ownership and distribute the did-configuration.json file
The ___domain you verify ownership of to your DID is defined in the overview section. The ___domain needs to be a ___domain under your control and it should be in the format https://www.example.com/.
From the Microsoft Entra admin center, choose Verified ID page.
Select Overview and from this section, choose Verify ___domain ownership.
Select Verify for the ___domain.
Copy or download the
did-configuration.jsonfile.
Host the
did-configuration.jsonfile at the ___location specified. For example, if you specified ___domainhttps://www.example.com, the file needs to be hosted athttps://www.example.com/.well-known/did-configuration.json. There can be no other path in the URL except the.well-known pathname.When
did-configuration.jsonis publicly available at the.well-known/did-configuration.jsonURL, verify it by selecting Refresh verification status.
Test out issuing or presenting with Microsoft Authenticator to validate. Make sure the Warn about unsafe apps setting in Authenticator is toggled on. The setting is on by default.
How can I verify that the verification is working?
The portal verifies that did-configuration.json is reachable over the internet and valid when you select Refresh verification status. Authenticator doesn't honor HTTP redirects. You should also consider verifying that you can request that URL in a browser to avoid errors like not using HTTPS, a bad TLS/SSL certificate, or the URL not being public. If the did-configuration.json file can't be requested anonymously in a browser or via tools such as curl, without warnings or errors, the portal can't complete the Refresh verification status step either.
Note
If you're experiencing problems refreshing your verification status, you can troubleshoot it by running curl -Iv https://yourdomain.com/.well-known/did-configuration.json on a machine with Ubuntu OS. Windows Subsystem for Linux with Ubuntu also works. If curl fails, refreshing the verification status won't work.
Why do I need to verify ___domain ownership of our DID?
A DID starts out as an identifier that isn't anchored to existing systems. A DID is useful because a user or organization can own it and control it. If an entity interacting with the organization doesn't know "who" the DID belongs to, then the DID isn't as useful.
Linking a DID to a ___domain solves the initial trust problem by allowing any entity to cryptographically verify the relationship between a DID and a ___domain.
How does Verified ID link DIDs and domains?
Verified ID follows the well-known DID configuration specification to create the link. The verifiable credentials service links your DID and ___domain. The service includes the ___domain information that you provided in your DID and generates the well-known configuration file:
Verified ID uses the ___domain information you provide during organization setup to write a service endpoint within the DID document. All parties who interact with your DID can see the ___domain your DID proclaims to be associated with.
"service": [
  {
    "id": "#linkeddomains",
    "type": "LinkedDomains",
    "serviceEndpoint": {
      "origins": [
        "https://verifiedid.contoso.com/"
      ]
    }
  }
]
The verifiable credential service in Verified ID generates a compliant well-known configuration resource that you must host on your ___domain. The configuration file includes a self-issued verifiable credential of the credential type
DomainLinkageCredential, signed with your DID, that has an origin of your ___domain. Here's an example of the configuration file stored at the root ___domain URL.{ "@context": "https://identity.foundation/.well-known/contexts/did-configuration-v0.0.jsonld", "linked_dids": [ "jwt..." ] }
User experience in the wallet
When a user is going through an issuance flow or presenting a verifiable credential, they should know something about the organization and its DID. Authenticator validates a DID's relationship with the ___domain in the DID document and presents users with two different experiences depending on the outcome.
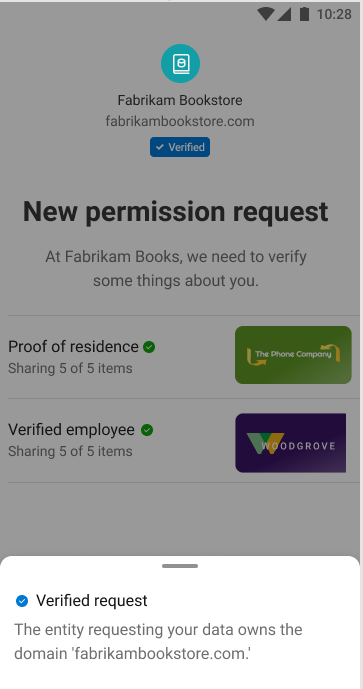
Verified ___domain
Before Authenticator displays a Verified icon, a few points must be true:
- The DID signing the self-issued open ID (SIOP) request must have a service endpoint for a linked ___domain.
- The root ___domain doesn't use a redirect and uses HTTPS.
- The ___domain listed in the DID document has a resolvable well-known resource.
- The well-known resource's verifiable credential is signed with the same DID that was used to sign the SIOP that Authenticator used to kick-start the flow.
If all the previously mentioned points are true, then Authenticator displays a verified page and includes the ___domain that was validated.
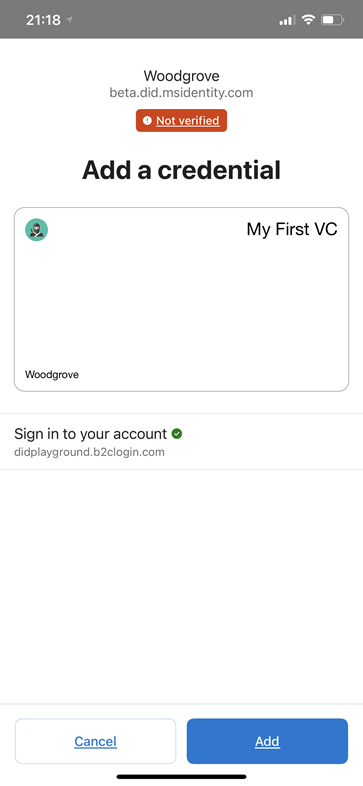
Unverified ___domain
If any of the preceding points aren't true, Authenticator displays a full-page warning indicating that the ___domain is unverified. The user is warned that they're in the middle of a potential risky transaction and should proceed with caution. They might have chosen to take this route because:
- The DID isn't anchored to a ___domain.
- The configuration wasn't set up properly.
- The DID that the user is interacting with could be malicious and actually can't prove that they own the ___domain linked.
It's highly important that you link your DID to a ___domain that's recognizable to the user.
How do I update the linked ___domain on my DID?
With the web trust system, updating your linked ___domain isn't supported. You have to opt out and onboard again.
Linked ___domain made easy for developers
Note
The DID document must be publicly available for DID registration to succeed.
The easiest way for a developer to get a ___domain to use for a linked ___domain is to use the Azure Storage static website feature. You can't control what the ___domain name is, except that it contains your storage account name as part of its hostname.
To quickly set up a ___domain to use for a linked ___domain:
- Create a storage account. During creation, select StorageV2 (general-purpose v2 account) and Locally redundant storage (LRS).
- Go to the storage account and select Static website on the leftmost menu and enable Static website. If you can't see the Static website menu item, you didn't create a V2 storage account.
- Copy the primary endpoint name that appears after saving. This value is your ___domain name. It looks something like
https://<your-storageaccountname>.z6.web.core.windows.net/.
When it's time to upload the did-configuration.json file:
- Go to the storage account and select Containers on the leftmost menu. Then select the container named $web.
- Select Upload and select the folder icon to find your file.
- Before you upload, open the Advanced section and specify .well-known in the Upload to folder text box.
- Upload the file.
You now have your file publicly available at a URL that looks something like https://<your-storageaccountname>.z6.web.core.windows.net/.well-known/did-configuration.json.