Note
Access to this page requires authorization. You can try signing in or changing directories.
Access to this page requires authorization. You can try changing directories.
Mirroring in Fabric is an enterprise, cloud-based, zero-ETL, SaaS technology. In this section, you learn how to create a mirrored SQL Server database, which creates a read-only, continuously replicated copy of your SQL Server data in OneLake.
Important
This feature is in preview.
Prerequisites
- Install or use an existing SQL Server instance, on-premises or in the cloud.
- As a tutorial, we recommend using a copy of one of your existing databases or any existing test or development database that you can recover quickly from a backup.
- Install a T-SQL querying tool like SQL Server Management Studio (SSMS) or the mssql extension with Visual Studio Code.
- You need an existing capacity for Fabric. If you don't, start a Fabric trial.
- The Fabric capacity needs to be active and running. A paused or deleted capacity will affect Mirroring and no data is replicated.
- Ensure the following Fabric tenant settings are enabled. To learn how to enable tenant settings, see Fabric Tenant settings.
- To mirror data from SQL Server 2025, you need to have a member or admin role in your workspace when create a mirrored database from the Fabric portal. During creation, the managed identity of SQL Server is automatically granted "Read and write" permission on the mirrored database. Users with the contributor role don't have the Reshare permission necessary to complete this step.
- Review the Platform limitations in Microsoft Fabric mirrored databases From SQL Server.
- An on-premises data gateway in your SQL Server instance's network. The gateway machine's network must connect to the SQL Server instance via a private endpoint or be allowed by the firewall rule.
Database principal for Fabric
Next, you need to create a way for the Fabric service to authenticate to your SQL Server instance.
You can accomplish this with a login and mapped database user.
Use a login and mapped database user
Follow these instructions for either SQL Server 2025 or SQL Server 2016-2022 to create a login and database user for database mirroring.
Connect to your SQL Server instance using a T-SQL querying tool like SQL Server Management Studio (SSMS) or the mssql extension with Visual Studio Code.
Connect to the
masterdatabase. Create a server login and assign the appropriate permissions.Important
For SQL Server instances in an Always On availability group, the login must be created in all SQL Server instances.
- Create a SQL Authenticated login named
fabric_login. You can choose any name for this login. Provide your own strong password. Run the following T-SQL script in themasterdatabase:
CREATE LOGIN [fabric_login] WITH PASSWORD = '<strong password>'; ALTER SERVER ROLE [##MS_ServerStateReader##] ADD MEMBER [fabric_login];- Or, log in as the Microsoft Entra admin, and create a Microsoft Entra ID authenticated login from an existing account (recommended). Run the following T-SQL script in the
masterdatabase:
CREATE LOGIN [bob@contoso.com] FROM EXTERNAL PROVIDER; ALTER SERVER ROLE [##MS_ServerStateReader##] ADD MEMBER [bob@contoso.com];- Create a SQL Authenticated login named
Connect to the user database your plan to mirror to Microsoft Fabric. Create a database user connected to the login and grant the minimum privileges necessary:
- For a SQL Authenticated login:
CREATE USER [fabric_user] FOR LOGIN [fabric_login]; GRANT SELECT, ALTER ANY EXTERNAL MIRROR, VIEW SERVER SECURITY STATE, VIEW DATABASE SECURITY STATE, VIEW PERFORMANCE DEFINITION TO [fabric_user];- Or, for a Microsoft Entra authenticated login (recommended):
CREATE USER [bob@contoso.com] FOR LOGIN [bob@contoso.com];
GRANT SELECT, ALTER ANY EXTERNAL MIRROR,
   VIEW SERVER SECURITY STATE, VIEW DATABASE SECURITY STATE, VIEW PERFORMANCE DEFINITION TO [bob@contoso.com];
Connect to your SQL Server
The instructions and requirements for configuring a Fabric Mirrored Database from SQL Server differ in SQL Server 2025. In SQL Server 2025, an Azure Arc-enabled server is part of the necessary configuration for the communication to Fabric. Before SQL Server 2025, Azure Arc is not required, and the replication is based on Change Data Capture (CDC).
Connect server to Azure Arc and enable manage identity
To configure Fabric Mirroring, you need to configure Azure Arc for your SQL Server 2025 instance.
Connect the server to Azure Arc. Follow the steps in Quickstart - Connect hybrid machine with Azure Arc-enabled servers.
For SQL Server instances running in an Always On availability group or failover cluster instance configuration, all nodes must be connected to Azure Arc.
Three registry keys are needed on the Windows Server hosting the source SQL Server instance for Fabric Mirroring. The registry keys include information about the system-assigned managed identity (SAMI) for the Windows Server. The following PowerShell script adds three registry keys, the necessary file system permissions, and managed identities.
Note
This section contains a script to modify the Windows registry. Make sure that you follow these steps carefully. For added protection, back up the registry before you modify it. Then, you can restore the registry if a problem occurs. For more information about how to back up and restore the registry, see How to back up and restore the registry in Windows.
The three registry keys are added in the following ___location:
- For a default instance:
HKEY_LOCAL_MACHINE\SOFTWARE\Microsoft\Microsoft SQL Server\MSSQL17.MSSQLSERVER\MSSQLServer\FederatedAuthentication - For a named instance:
HKEY_LOCAL_MACHINE\SOFTWARE\Microsoft\Microsoft SQL Server\MSSQL17.Instancename\MSSQLServer\FederatedAuthentication
The script adds the following keys:
ArcServerManagedIdentityClientIdArcServerSystemAssignedManagedIdentityClientIdArcServerSystemAssignedManagedIdentityTenantID
Run the following PowerShell script to configure the system-assigned managed identity (SAMI) and necessary registry keys on the Windows Server that hosts the source SQL Server instance.
 $apiVersion = "2020-06-01"
 $resource = "https://storage.azure.com/"
 $ep = $env:IDENTITY_ENDPOINT
 $msi = "arc"
 if (!$ep) {
     $msi = "vm"
     $ep = 'http://169.254.169.254/metadata/identity/oauth2/token'
 }
 $endpoint = "{0}?resource={1}&api-version={2}" -f $ep,$resource,$apiVersion
 $secretFile = ""
 try {
     Invoke-WebRequest -Method GET -Uri $endpoint -Headers @{Metadata='True'} -UseBasicParsing > $null
     $msi = "vm"
 } catch {
     if ($_.Exception.Response.Headers) {
         $wwwAuthHeader = $_.Exception.Response.Headers["WWW-Authenticate"]
         if ($wwwAuthHeader -match "Basic realm=.+") {
             $secretFile = ($wwwAuthHeader -split "Basic realm=")[1]
         }
     }
 }
 $secret = ""
 if ($secretFile) {
     $msi = "arc"
     $secret = cat -Raw $secretFile
 }
 try {
     $response = Invoke-WebRequest -Method GET -Uri $endpoint -Headers @{Metadata='True'; Authorization="Basic $secret"} -UseBasicParsing
 } catch {
     Write-Output "Can not establish communication with IMDS service. You need either to have Azure Arc service installed or run this script on Azure VM."
 }
 if ($response) {
     $parts = (ConvertFrom-Json -InputObject $response.Content).access_token -split "\."
     $padLength = 4 - ($parts[1].Length % 4)
     if ($padLength -ne 4) { $parts[1] += "=" * $padLength }
     $payload = [System.Text.Encoding]::UTF8.GetString([System.Convert]::FromBase64String($parts[1])) | ConvertFrom-Json
     $regPath = "HKLM:\SOFTWARE\Microsoft\Microsoft SQL Server\Instance Names\SQL"
     $instance = ""
     $regKey = Get-Item -Path $regPath
     $regKey.GetValueNames() | Where-Object { $regKey.GetValue($_) -match 'MSSQL17' } | ForEach-Object {
         $instance = $_
         $service = if ($instance -eq "MSSQLSERVER") { "MSSQLSERVER" } else { "MSSQL$" + $instance }
         $reginst = $regKey.GetValue($_)
         $regFed = "HKLM:\SOFTWARE\Microsoft\Microsoft SQL Server\$($reginst)\MSSQLServer\FederatedAuthentication"
         if (-not (Test-Path -Path $regFed)) {
             New-Item -Path $regFed -Force > $null
         }
         if ($msi -eq "arc") {
             Write-Host "Registering Azure Arc MSI service for SQL Server instance: " $instance `n
             Set-ItemProperty -Path $regFed -Name "ArcServerManagedIdentityClientId" -Value ""
             Set-ItemProperty -Path $regFed -Name "ArcServerSystemAssignedManagedIdentityClientId" -Value $($payload.appid)
             Set-ItemProperty -Path $regFed -Name "ArcServerSystemAssignedManagedIdentityTenantId" -Value $($payload.tid)
             $svcPath = "HKLM:\SYSTEM\CurrentControlSet\Services\$($service)"
             if (Test-Path -Path $svcPath) {
                 $keyPath = Split-Path $secretFile
                 $svcKey = Get-Item -Path $svcPath
                 $sqlAccount = $svcKey.GetValue("ObjectName")
                 if ($sqlAccount -ne "LocalSystem") {
                     Write-Host "Permissioning folder" $keyPath "for SQL Server account" $sqlAccount `n
                     icacls $keyPath /grant "$($sqlAccount):(OI)(CI)R"
                     $group = "Hybrid agent extension applications"
                     $isMember = Get-LocalGroupMember -Group $group | Where-Object { $_.Name -eq $sqlAccount }
                     if (-not $isMember) {
                         Write-Host "Also adding SQL running account to local group: $group" `n
                         Add-LocalGroupMember -Group $group -Member $sqlAccount
                     } else {
                         Write-Host ""
                     }
                 }
             }
         } else {
             Write-Host "Registering Azure VM MSI service for SQL Server instance: " $instance `n
             Set-ItemProperty -Path $regFed -Name "PrimaryAADTenant" -Value ""
             Set-ItemProperty -Path $regFed -Name "OnBehalfOfAuthority" -Value "https://login.windows.net/"
             Set-ItemProperty -Path $regFed -Name "FederationMetadataEndpoint" -Value "login.windows.net"
             Set-ItemProperty -Path $regFed -Name "AzureVmManagedIdentityClientId" -Value ""
             Set-ItemProperty -Path $regFed -Name "AzureVmSystemAssignedManagedIdentityClientId" -Value $($payload.appid)
             Set-ItemProperty -Path $regFed -Name "AzureVmSystemAssignedManagedIdentityTenantId" -Value $($payload.tid)
         }
     }
     Write-Host "Registeration complete for:" `n "Client ID: " $($payload.appid) `n "Tenant ID: " $($payload.tid) `n
 }
Important
For SQL Server instances running in an Always On availability group or failover cluster instance configuration, run the PowerShell script locally on each node.
- For a default instance:
Connect to your local SQL Server 2025 instance. When you connect, select Trust server certificate.
View the managed identities:
SELECT *
FROM sys.dm_server_managed_identities;
This should return 1 row with the correct
client_idandtenant_id.Identity_typeshould be "System-assigned".
Add managed identities permissions in Microsoft Fabric
The managed identity of the SQL Server is created and granted permissions by Microsoft Fabric automatically.
However, for SQL Server instances running in an Always On availability group or failover cluster instance configuration, the system-assigned managed identity (SAMI) of every secondary node needs to be granted Contributor permissions to the Fabric workspace. A managed identity is created by the PowerShell script provided for each secondary node, and that must be granted Fabric permissions manually.
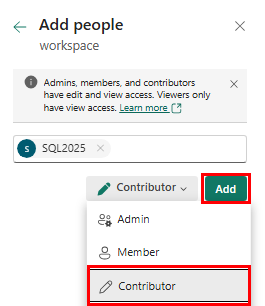
- In the Fabric portal, grant Fabric permissions to each secondary node's managed identity.
In the Fabric workspace, select Manage access.

Select Add people or groups.
In the Add people dialogue, find the server names for each node in the availability group or failover cluster.
Grant each membership to the Contributor role.
Configure the on-premises data gateway
Check your networking requirements for Fabric to access your SQL Server. You need to install an on-premises data gateway to mirror the data. Make sure the on-premises gateway machine's network can connect to the SQL Server instance. For more information, see How to: Secure data Microsoft Fabric mirrored databases From SQL Server.
- Download On-premises data gateway from the Official Microsoft Download Center.
- Start installation. Follow instructions in Install an on-premises data gateway.
- Provide your Microsoft account email address.
- Name:
MyOPDGor any name you desire. - Recovery key: provide a strong recovery key.
Create a mirrored SQL Server
- Open the Fabric portal.
- Use an existing workspace, or create a new workspace.
- Navigate to the Create pane. Select the Create icon.
- Scroll to select Mirrored SQL Server database.
- Enter the name of your SQL Server database to be mirrored, then select Create.
Connect Fabric to your SQL Server instance
To enable Mirroring, you will need to connect to the SQL Server instance from Fabric to initiate the connection from Fabric. The following steps guide you through the process of creating the connection to your SQL Server:
Under New sources, select SQL Server database. Or, select an existing SQL Server connection from the OneLake hub.
If you selected New connection, enter the connection details to the SQL Server instance.
- Server: The fully qualified server name path that Fabric will use to reach your SQL Server instance, the same that you would use for SSMS.
Tip
SQL Server instances in an Always On availability group, use the Always On listener for Server. If SQL Server is running in a failover cluster instance configuration, use the Virtual Network Name for Server.
- Database: Enter the name of your SQL Server.
- Connection: Create new connection.
- Connection name: An automatic name is provided. You can change it.
- Data gateway: Select the on-premises data gateway you set up according to your scenario.
- Authentication kind: Choose the authentication method and provide the principal you set up in Use a login and mapped database user.
- Select the Use encrypted connection checkbox.
Select Connect.
Important
Any granular security established in the source database must be reconfigured in the mirrored database in Microsoft Fabric. For more information, see How to: Secure data Microsoft Fabric mirrored databases From SQL Server.
Start mirroring process
The Configure mirroring screen allows you to mirror all data in the database, by default.
Mirror all data means that any new tables created after Mirroring is started will be mirrored.
Optionally, choose only certain objects to mirror. Disable the Mirror all data option, then select individual tables from your database.
For this tutorial, we select the Mirror all data option.
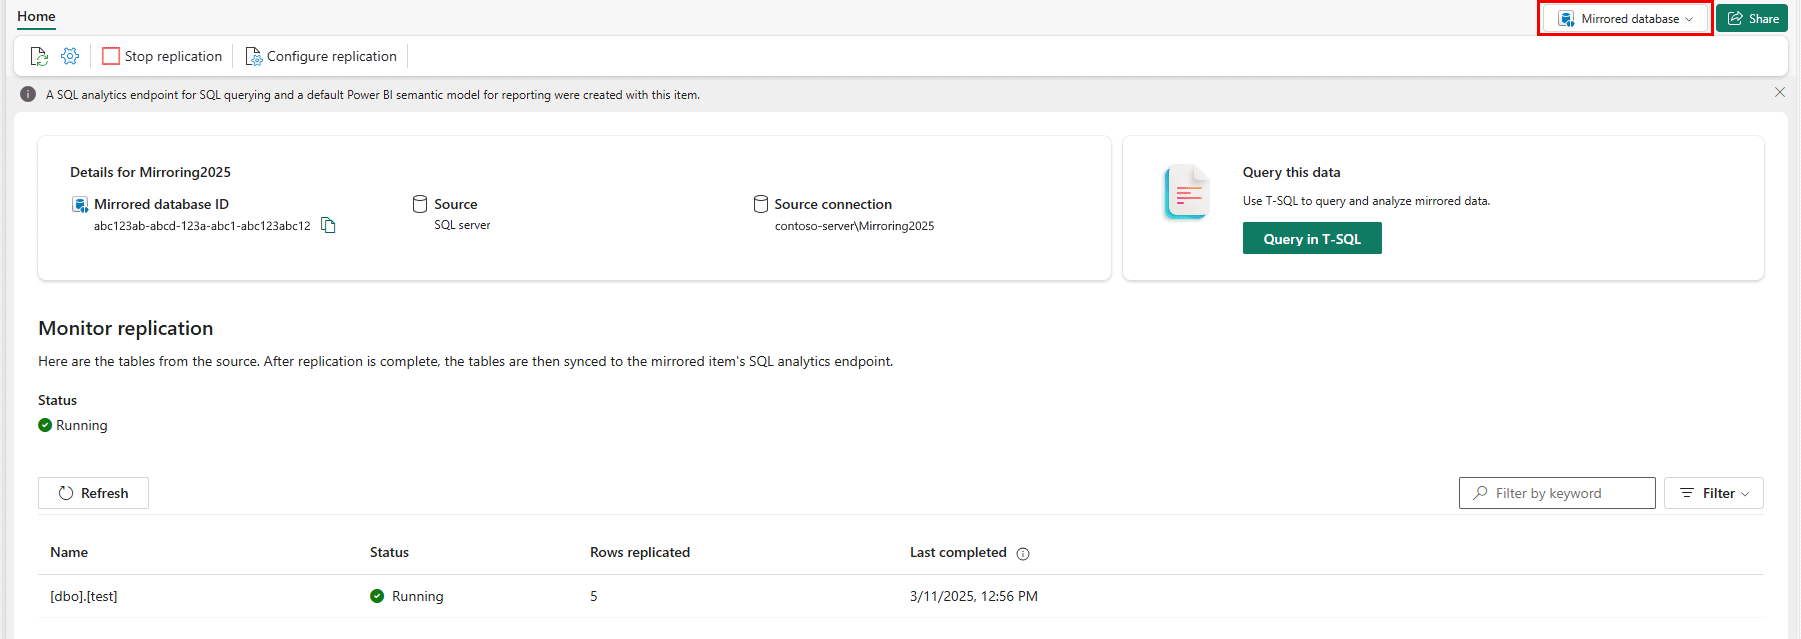
Select Create mirrored database. Mirroring begins.
Wait for 2-5 minutes. Then, select Monitor replication to see the status.
After a few minutes, the status should change to Running, which means the tables are being synchronized.
If you don't see the tables and the corresponding replication status, wait a few seconds and then refresh the panel.
When they have finished the initial copying of the tables, a date appears in the Last refresh column.
Now that your data is up and running, there are various analytics scenarios available across all of Fabric.
Monitor Fabric Mirroring
Once mirroring is configured, you're directed to the Mirroring Status page. Here, you can monitor the current state of replication.
For more information and details on the replication states, see Monitor Fabric mirrored database replication.
Validate data in OneLake
With Fabric Mirroring up and running, you can now query from your SQL Server database in Microsoft Fabric. For possibilities, see Explore data in your mirrored database using Microsoft Fabric.
