Note
Access to this page requires authorization. You can try signing in or changing directories.
Access to this page requires authorization. You can try changing directories.
The item details page in the OneLake catalog explorer provides a comprehensive view of each item, including an item's metadata, lineage, permissions, and more. This page is designed to help users find, explore, and use items effectively across their organization.
The item details view includes several tabs that help you explore and manage the selected item. It's especially useful for:
- Item owners: Manage permissions, view refresh history, and track lineage to monitor and manage items.
- Developers and Analysts: Access trust signals for an item, identify high-quality data to use as starting points, and avoid creating redundant items.
- Consumers: Discover reliable apps, reports, and dashboards to support everyday work.
The item details page adapts to how you access it, offering two convenient ways to explore items:
- In-context view: When you click on an item's name in OneLake catalog explorer, its details appear as a pane next to your current filtered list of items. This allows you to seamlessly explore and compare items, helping you find the most suitable one. You can expand this pane for a full-page view, then retract or close it to return to your full list.
- Full-page view: If you open an item's details from outside the Catalog, for example by selecting "View Details" from an item's context menu in Workspaces, or by using a direct URL, the page opens in full-screen. This gives you a dedicated, comprehensive view of that single item. Since you're not coming from a filtered list in the Catalog, you won't see other items alongside it. To browse for other items, just select the OneLake Catalog entry point in the left navigation.
About the item details view
The item details page features multiple tabs that vary by item type (for example, semantic model, dataflow, or pipeline), each providing relevant information and functionality. This article describes each tab, its contents, and the actions you can perform on the item details page.
Overview tab
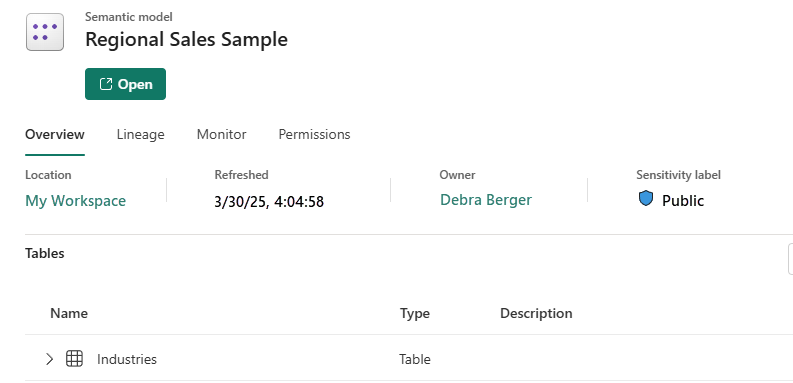
The Overview tab is the default view when you open an item in the OneLake catalog explorer. It shows the following information about the selected item:
- Description: The description associated with the item, displayed under the item name. A useful and meaningful description helps users discover the right item for them.
- Location: The workspace where the item is located. Selecting the workspace navigates to the workspace.
- Refreshed: The last time the item was refreshed or run. A red warning icon appears if the last update was unsuccessful. Selecting the icon displays the error details.
- Owner: Displays the item owner or contact. Selecting the name opens an email to them.
- Sensitivity label: If applied, the name of the sensitivity label associated with the item.
- Tags: If applied, the list of tags associated with the item.
- Endorsement: Endorsement status and the details of the endorsing user. Endorsing your item (promoting or certifying it) makes it easier for users to find and signifies it's a trustworthy data source.
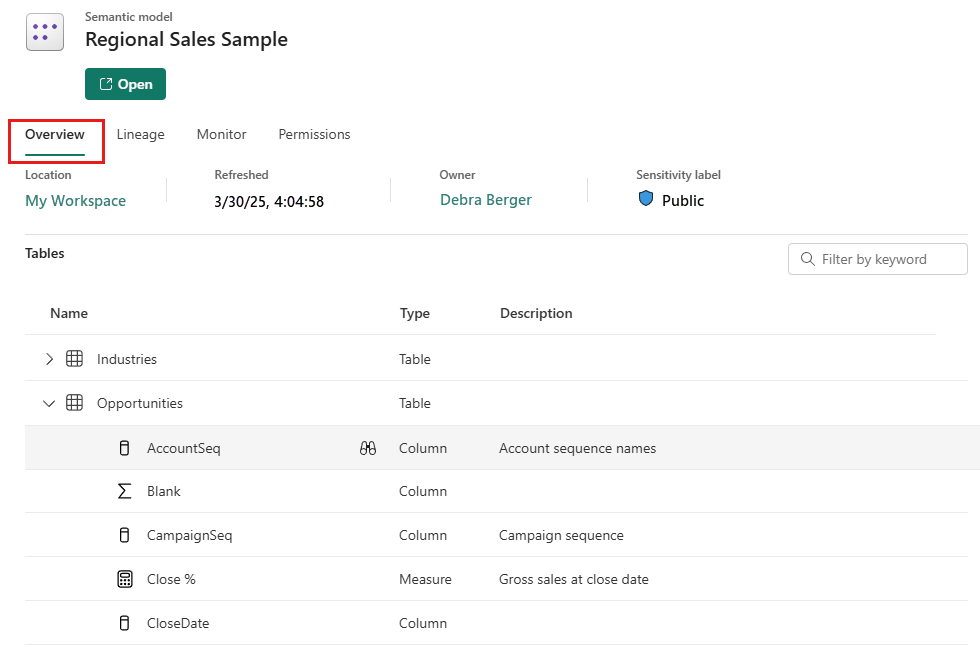
Data schema in the Tables section
For data items like semantic models and lakehouses, the Tables section displays a structured view of the underlying table and column schema for the item.
- Use the Filter by keyword box to search for a specific table or column.
- To explore data in a table or column, point to it and select the binoculars icon. The Explore this data view opens, which displays the data for ad-hoc analysis.
Details about semantic models
In the OneLake catalog explorer, you can view and interact with semantic models based on your permissions and whether the model is set to be discoverable.
- Discoverable: These are semantic models that have been made discoverable by their owner. Discoverable semantic models make it easier for users across the organization to find relevant data assets. While you can see the semantic model and its metadata, you can't see the owner details, view underlying data, or build content on top of the semantic model. You need to request access (Build permission) to access the semantic model's full information and capabilities.
- Read-only Permission: If someone shares a report or semantic model with you but doesn’t grant Build permission, you might have read-only access, which limits your ability to view and interact with the semantic model. To create content or perform more actions, you need at least Build permission.
- Build Permission: If you have Build permission on a semantic model, you can create new reports based on it, connect to it from Excel, and export its data.
Lineage tab
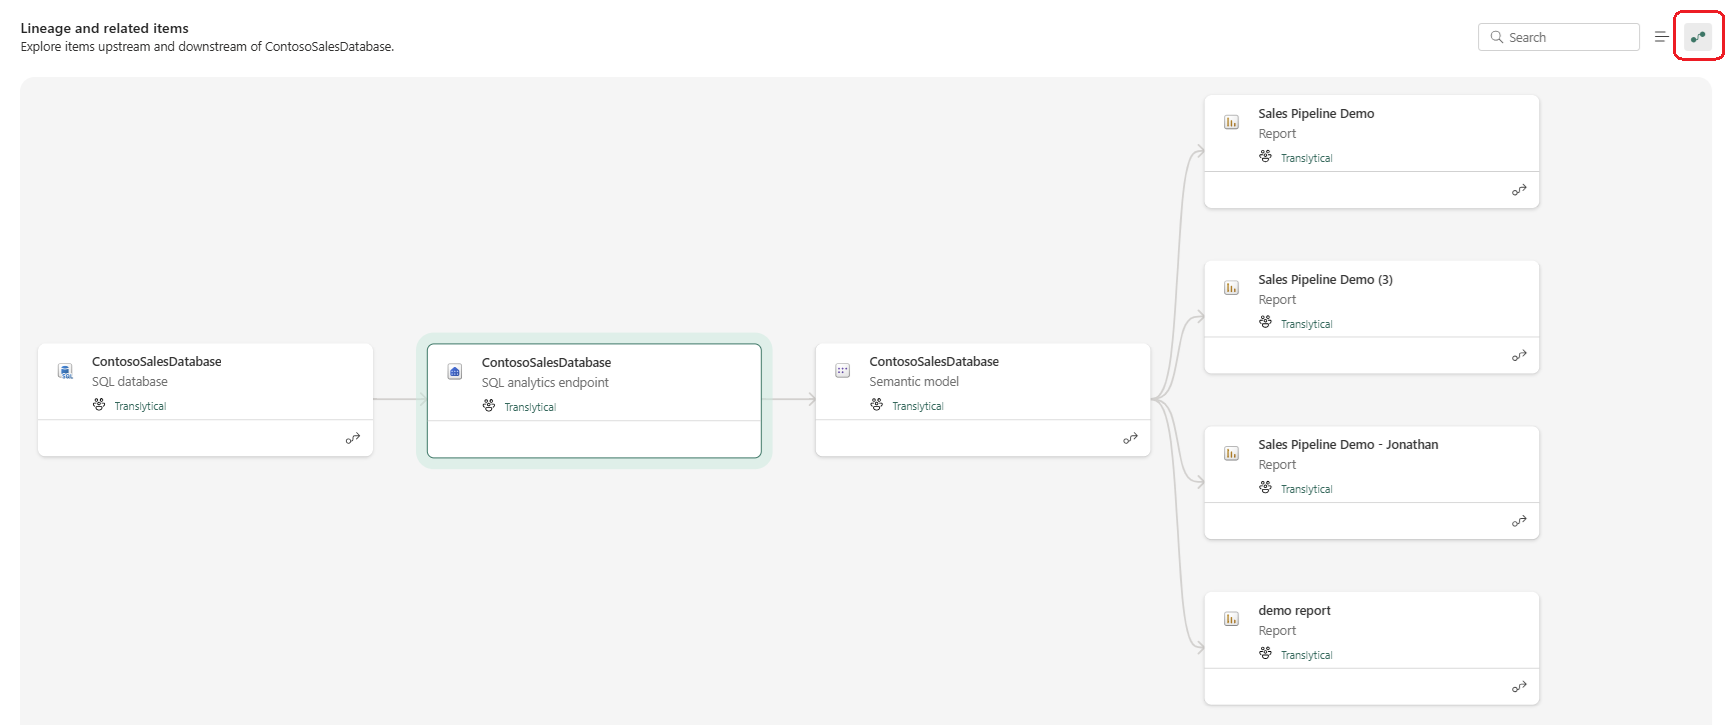
The Lineage tab shows the item's upstream and downstream relationships. It also shows metadata associated with the item, including ___location, endorsement, and sensitivity information. You can view this lineage in either a list or a graph format.
The graph view provides a visual representation of the relationships between the current item and its related items. Each related item is shown as a card containing key metadata, with the current item highlighted for context.
For more information, see Lineage in Fabric.
Monitor tab
The Monitor tab displays historical activities for the item. Select Show for a record to see the details about that activity. The Monitor tab is available for item types supported by the monitor hub.
Permissions tab
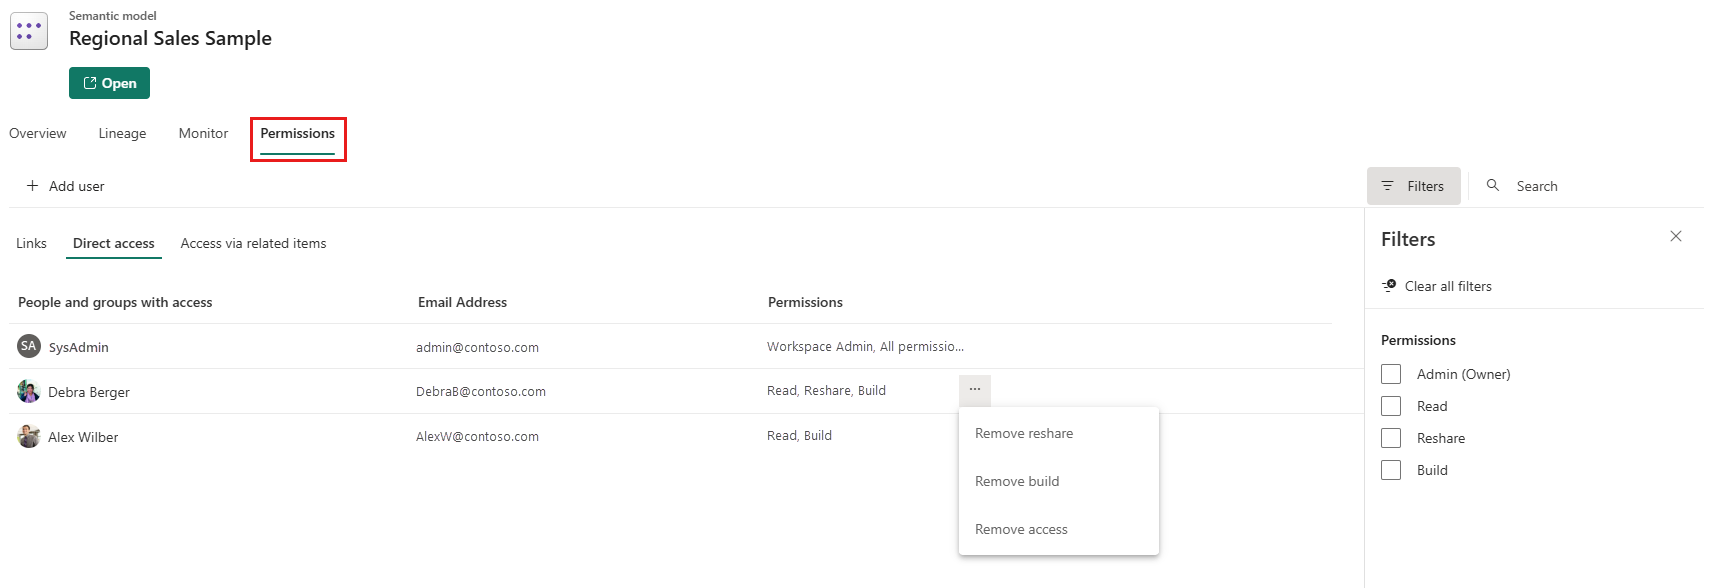
The Permissions tab is available to you if you're a member of the Admin or Member workspace roles. It shows who has direct access to the item, any links that grant access, related items that provide inherited access, and any pending access requests. From this tab, you can manage user permissions, audit or remove access links, and approve or deny access requests.
The subtabs available on the Permissions tab vary slightly depending on the item type. To see the available actions for a specific row in any subtab, point to the row and select More options (...).
You can use the filter to refine your search.
Available actions in the item details view
From within the item details page, you can perform a range of actions on an item based on its type and your permissions. The available actions are grouped into general actions that apply to all item types, and item-specific actions that are unique to data or process items.
General Actions
General actions are universally available across all item types in OneLake catalog explorer. Your access to these actions is based on your permissions.
These actions are available in:
- The item's context menu (three dots icon), which is available when you point to an item in the list.
- The item's details page, which opens when you select an item in the list.
| Action | Description | Where to find it in the item details page |
|---|---|---|
| Settings | Opens the settings page for the item. | Settings cog icon |
| Manage permissions | Opens the manage permissions page for the item. | Manage permissions key icon |
| Share | Allows you to grant other users or group direct access to an item, without giving access to the workspace and the rest of its items. Depending on the item type, more options are available to control user permissions. | Share button |
| Open workspace lineage | Shows the lineage relationships between all the items in the current workspace, and data sources external to the workspace one-step upstream. | More options (...) > Open workspace lineage |
| Impact analysis | Impact analysis allows you to assess the potential impact of changes to this item on downstream workspaces and items that depend on it. | Lineage > Impact analysis |
| Chat in Teams | Invite people to start chatting in Teams. People you invite receive a Teams chat message with a link to this item's details page. If they have access to the item, the link opens this details page in Teams. | More options (...) > Chat in Teams |
Item-specific actions
Item-specific actions are unique to particular artifact types, providing specialized functionality. They're categorized by whether the item is primarily a data source or a processing artifact.
These actions are available in:
- The item's context menu (three dots icon), which is available when you point to an item in the list.
- The item's details page, which opens when you select an item in the list.
Data Items
This section covers actions unique to Semantic Models, SQL Analytics Endpoints, Warehouses, SQL Databases, and Warehouse Snapshots.
| Item Type | Action | Description | Where to find it in the item details page |
|---|---|---|---|
| Common Data Item Actions | Refresh now | Starts an immediate refresh of the item. | Refresh button > Refresh now |
| Schedule refresh | Opens the settings page where you can configure scheduled refresh. | Refresh button > Schedule refresh | |
| Semantic Model | Download this file | Downloads the .pbix file for this semantic model. | Download button |
| Version History | With version history, self-service users can recover from the most critical mistakes when editing their semantic models on the web. | File > Version history | |
| Explore this data | A lightweight tool for quick, ad-hoc data analysis. Explore the data to create matrix/visual pairs without building a full report. To Explore a specific table or column of a semantic model, point to it in the Overview tab and select the binoculars icon. | Explore this data button > Explore this data (or binoculars icon on Overview tab) | |
| Auto-create a report | Automatically generates a summary report with key insights and visuals from the selected semantic model, which is useful for quick data checks. | Explore this data button > Auto-create a report | |
| Create a blank report | Opens the report editing canvas to a new report built on the semantic model. Saving your new report saves it in the workspace that contains the semantic model if you have write permissions for that workspace. If you don't have write permissions for the workspace, the new report saves in My workspace. | Explore this data button > Create a blank report | |
| Create from template | You can create a report template that users can use to get started building their own reports based on your semantic model. This template is a regular report designed to be used as a starting point. When you save it, you should add the suffix "(template)" to the report name, for example, Monthly Sales (template). When a user selects Create from template in the details page, a copy of the template is created in the user's My workspace and opens in the report editing canvas. Report templates are also easily identifiable in the list of related reports in the semantic model details view. | Explore this data > From a template. | |
| Create a paginated report | Opens the paginated report editing canvas. You can then export it using the rich export functionality which retains the applied formatting & styling, or you can save it to a workspace of your choice. | Explore this data button > Create a paginated report. | |
| Analyze in Excel | Creates an Excel workbook containing the entire semantic model, allowing you to analyze it using PivotTables, Pivot Charts, and other Excel features. | Analyze in Excel button | |
| Prep data for AI | Prepares the semantic model's data for use with AI capabilities. | More options (...) > Prep data for AI | |
| Best practice analyzer | Runs a preconfigured notebook that analyzes the semantic model against a set of best practices to identify potential issues and provide recommendations for optimization. | More options (...) > Best practice analyzer | |
| Memory analyzer | Runs a preconfigured notebook that provides insights into the semantic model's memory/storage consumption, helping to identify and resolve performance bottlenecks. | More options (...) > Memory analyzer | |
| Community Notebooks | Opens a gallery of community notebooks that can be used to further analyze and extend the semantic model. | More options (...) > Community notebooks | |
| SQL Analytics Endpoint, Warehouse, Warehouse Snapshot | Open in Visual Studio Code | Shows the server connection information to connect the SQL database server externally and offers to directly open VS Code. | Specific menu option |
| Open in SSMS | Shows the server connection information to connect the SQL database server externally in SQL Server Management Studio. | Specific menu option | |
| Explore this data | A lightweight tool for quick, ad-hoc data analysis. Explore the data allows you to create matrix/visual pairs without building a full report. | Explore this data button | |
| Copy SQL connection string | Copies the connection string needed to connect to the SQL endpoint from external tools. | Specific menu option | |
| Analyze in Excel | Creates an Excel workbook containing the item, allowing you to analyze it using PivotTables, Pivot Charts, and other Excel features. | Analyze in Excel button | |
| SQL DB | Refresh Git sync status | Refreshes the synchronization status with the connected Git repository. | Specific menu option |
| Open Performance summary | Opens the Performance Dashboard to view database performance metrics, identify performance bottlenecks and find solutions to performance issues. | Specific menu option | |
| Restore database | Recover your database into a specific point in time within the retention period | Specific menu option | |
| Warehouse Snapshot | Capture new state | Capture a read-only representation of a warehouse item at a specific point in time, retained to up to 30 days. | Specific menu option |
Process Items
This section covers actions unique to Pipelines, Dataflow Gen2 CI/CD, and Notebooks.
| Item Type | Action | Description | Where to find it |
|---|---|---|---|
| Common Process Item Actions | Save As | Allows you to save a copy of the item to a workspace of your choice. | Specific menu option |
| Refresh now | Launches an immediate refresh of the item. | Refresh button > Refresh now | |
| Schedule refresh | If your process item needs to be refreshed on a regular interval, you can schedule the refresh using the Fabric scheduler. | Refresh button > Schedule refresh | |
| Pipeline | Export | Enables you to back up your pipelines. Exporting ensures that your data integration processes are portable and can be easily restored or replicated. | Specific menu option |
| Download | Downloads the pipeline definition file. | Download button | |
| Dataflow Gen2 CI/CD | Check Validation | Determine the validity of the dataflow by running a "zero row" evaluation for all the queries in the dataflow. | Specific menu option |
| Notebook | Download | Downloads the notebook file. | Download button |
Considerations and limitations
- Real-time semantic models don't have a details page, as they're being retired.


