Note
Access to this page requires authorization. You can try signing in or changing directories.
Access to this page requires authorization. You can try changing directories.
Note
The development feature described in this article is in preview. We encourage you to experiment with this feature, but it shouldn't be used in a production plugin. The following are the limitations during the initial preview:
- The feature is only enabled for Office on Windows and Office on the web. We're working to bring support to Office on Mac.
- The feature is only enabled for Excel, PowerPoint, or Word. We're working to bring support to Outlook.
A plugin for a declarative agent can call the APIs in the Office JavaScript Library to perform read and write operations on the content and metadata of an Office document that is currently open in an Office application. This ability enables Copilot to work with Office documents in precise and error-free ways that would otherwise require an Office Add-in.
The relation of Copilot agents to the Office Add-in framework
Both Office Add-ins and declarative agent plugins call APIs in the Office JavaScript Library, and a Microsoft 365 extension that uses the library can include either a plugin, an add-in, or both. The best approach depends on the user scenarios that the extension should enable.
- If the extension should provide simple, fast actions that don't need parameters passed to them, include only an add-in with custom ribbon buttons or menus, called add-in commands.
- If the extension needs a dashboard experience, needs the user to configure settings, needs to display metadata about the content of the Office document, or needs a page-like experience for any other reason, include an add-in with a task pane.
- If the extension needs to provide complex actions that require parameters passed at runtime or needs a natural language interface, include a Copilot agent.
Scenarios
The following are some selected ways in which a Copilot agent that calls Office JavaScript Library APIs enhances the value of a Microsoft 365 extension.
Content analysis: An agent can be used to analyze the content of a document, presentation, or spreadsheet and take action depending on what it finds. The following are examples.
- An agent analyzes a Request for Proposal (RFP) and then fetches the answers to questions in the RFP from a backend system. The user simply asks the agent to "Fill in the answers you know to the questions."
- An agent analyzes a document, or a table in a spreadsheet, for content that implies certain actions must be taken, either in the document itself or elsewhere in the customer's business systems. The user might ask the agent to "Review the document for any items I missed on the audit list."
Trusted insertion of data: If you ask a typical AI engine a question, it combines information it finds and compose an answer; a process that can introduce inaccuracies. But a Copilot agent based on an add-in can insert data unchanged from a trusted source. Some examples:
- Consider an agent that enables the insertion of legal research into Word where it can then be edited. A user asks the agent "In what circumstances can a lessor unilaterally break a lease of residential space in Indiana?" The agent then fetches content, unchanged, from precedents and statutes, and inserts it into the document.
- Consider an agent that manages the inventory of digital assets. In the Copilot agent chat, a user asks "Insert a table of our color photos with the name of each, the number of times it was downloaded, and its size in megabytes, sorted in order from most downloaded." The agent then fetches this data, unchanged, from the system of record and inserts the table into an Excel spreadsheet.
When the agent is combined with an add-in, even more scenarios are enabled. Including a Microsoft 365 Copilot agent with an Office Add-in provides at least two benefits to the add-in:
- Copilot becomes a natural language interface for the add-in's functionality.
- The agent can pass parameters to the JavaScript it invokes, which isn't possible when a function command in an add-in is invoked from a button or menu item.
Learning how to use the add-in is one way that an agent can enhance an add-in. When a user needs to perform multiple steps or tasks with the add-in to achieve a goal, the chat interface of Copilot can ease the process of getting started with the add-in. For example, consider a legal firm that needs to have a list of questions that must be answered about each lease that it prepares. Creating this list of questions can be time-consuming and labor-intensive. But a Copilot agent can be prompted to produce a first draft list of questions and the insert them into a Word document using the Office JavaScript Library.
Create your first Office JavaScript Library plugin
The following are the major steps for creating an API plugin for a Copilot agent that calls Office JavaScript Library APIs.
- Ensure that you meet the Prerequisites
- Create the project
- Configure the manifest
- Configure the declarative agent
- Configure the plugin
- Create the JavaScript functions
- Copy project configuration files
- Test the agent and plugin
- Make changes in the agent
Prerequisites
- Requirements specified in Requirements for Copilot extensibility options
- Visual Studio Code
- Node.js 18, 20, 22, or 24
- Microsoft 365 Agents Toolkit
Create the project
Begin by creating a basic declarative agent.
Open Visual Studio Code.
Select Microsoft 365 Agents Toolkit on the activity bar.
Select Create a New Agent/App.

Select Declarative Agent.
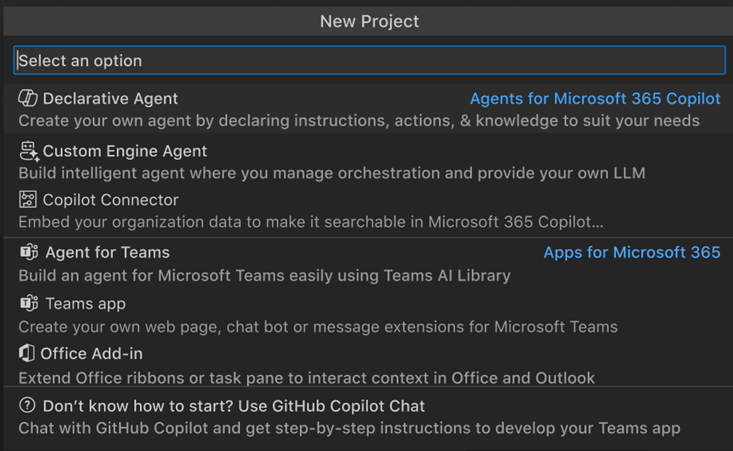
Select No Action to create a basic declarative agent.
In the Workspace Folder list, either select Default folder to store your project root folder in the default ___location or browse to a folder where you want to put the new agent project.
Enter
Excel Agentas the Application Name and press Enter.The project opens in a new Visual Studio Code window. Close the original Visual Studio Code window.
Configure the manifest
The following steps configure the manifest.
Open the manifest.json file in the appPackage folder.
You need to use the preview version of the manifest schema, so replace the
$schemaandmanifestVersionproperties with the following."$schema": "https://developer.microsoft.com/json-schemas/teams/vDevPreview/MicrosoftTeams.schema.json", "manifestVersion": "devPreview",At the root of the manifest, add the following authorization property. This property gives your agent permission to read and write to Office documents.
"authorization": {
  "permissions": {
    "resourceSpecific": [
      {
        "name": "Document.ReadWrite.User",
        "type": "Delegated"
      }
    ]
  }
}
At the root of the manifest, add the following extensions property. About this code, note the following.
- The
requirements.scopesproperty ensures that the agent is only available in Excel, not other Office applications. - The object in the
runtimesconfigures the JavaScript runtime that Office uses to run the Office JavaScript Library APIs that your agent invokes. - The
code.scriptproperty specifies the URL of a JavaScript file that contains the functions that call the Office JavaScript Library APIs. That same file contains an invocation of the Office.actions.associate method to map the function to an action ID. You create this file in a later step. - The
code.pageproperty specifies the URL of a web page that contains an embedded<script>tag that loads the file that is reference in thecode.pageproperty. You create this file in a later step. - The runtime object includes an
actionsarray that includes an action object - The value of the
actions.idproperty is the same action ID that is passed to the call ofassociate. - The
actions.typeproperty is set toexecuteDataFunction, which is the type that can accept parameters when invoked by Copilot.
"extensions": [ { "requirements": { "scopes": [ "workbook" ] }, "runtimes": [ { "id": "ContosoAgentRuntime", "type": "general", "code": { "page": "https://localhost:3000/commands.html", "script": "https://localhost:3000/commands.js" }, "lifetime": "short", "actions": [ { "id": "FillColor", "type": "executeDataFunction" } ] } ] } ]- The
The reference documentation for the manifest JSON is at Microsoft 365 app manifest schema reference.
Configure the declarative agent
Open the file declarativeAgent.json in the appPackage folder.
Replace its contents with the following code. About this JSON, note the following:
- The
actions.idproperty in this file is the collective ID of all the functions in the file specified inactions.file. It normally shouldn't match theextensions.runtimes.actions.idin the manifest, which is the ID of a specific action. - You create the file that you specify in the
actions.fileproperty in a later next step.
{ "$schema": "https://developer.microsoft.com/json-schemas/copilot/declarative-agent/v1.4/schema.json", "version": "v1.4", "name": "Excel Agent", "description": "Agent for working with Excel cells.", "instructions": "You are an agent for working with an add-in. You can work with any cells, not just a well-formatted table.", "conversation_starters": [ { "title": "Change cell color", "text": "I want to change the color of cell B2 to orange" } ], "actions": [ { "id": "ExcelActions", "file": "Office-API-local-plugin.json" } ] }- The
The reference documentation for declarative agents is at Declarative agent schema 1.4 for Microsoft 365 Copilot.
Configure the plugin
Create a file in the appPackage folder and give it the name assigned to the
actions.fileproperty in the declarativeAgent.json file: Office-API-local-plugin.json.Paste the following content into the file. About this JSON, note the following details:
- The API plugin configuration file specifies the functions of the plugin in the sense of agent actions, not JavaScript functions. It includes the instructions for each action. It also configures the runtime for Copilot. (You configured the runtime for Office in the manifest in an earlier step.)
- The
functions.namemust match theextensions.runtimes.actions.idproperty in the add-in manifest:FillColor. - The
runtimes.run_for_functionsarray must include either the same string asfunctions.nameor a wildcard string that matches it. - The
runtimes.spec.local_endpointproperty specifies that the JavaScript function that is associated with theFillColorstring is available in the Office JavaScript Library, rather than in some REST endpoint.
{
  "$schema": "https://developer.microsoft.com/json-schemas/copilot/plugin/v2.3/schema.json",
  "schema_version": "v2.3",
  "name_for_human": "Excel Agent",
  "description_for_human": "Excel actions in agent",
  "namespace": "addInFunction",
  "functions": [
    {
      "name": "FillColor",
      "description": "FillColor changes a single cell ___location to a specific color.",
      "parameters": {
        "type": "object",
        "properties": {
          "Cell": {
            "type": "string",
            "description": "A cell ___location in the format of A1, B2, etc.",
            "default": "B2"
          },
          "Color": {
            "type": "string",
            "description": "A color in hex format, e.g., #30d5c8",
            "default": "#30d5c8"
          }
        },
        "required": [
          "Cell",
          "Color"
        ]
      },
      "returns": {
        "type": "string",
        "description": "A string indicating the result of the action."
      },
      "states": {
        "reasoning": {
          "description": "`FillColor` changes the color of a single cell based on the grid ___location and a color value.",
          "instructions": "The user will pass ask for a color that isn't in the hex format needed in most cases, make sure to convert to the closest approximation in the right format."
        },
        "responding": {
          "description": "`FillColor` changes the color of a single cell based on the grid ___location and a color value.",
          "instructions": "If there is no error present, tell the user the cell ___location and color that was set."
        }
      }
    }
  ],
  "runtimes": [
    {
      "type": "LocalPlugin",
      "spec": {
        "local_endpoint": "Microsoft.Office.Addin"
      },
      "run_for_functions": [
        "FillColor"
      ]
    }
  ]
}
Note
You might get a validation error from the plugin JSON that says you need an auth property. You can ignore this error. Your agent will work fine without that property.
The reference documentation for API plugins is at API plugin manifest schema 2.3 for Microsoft 365 Copilot.
Create the JavaScript functions
In the root of the project, create folder named src, and then create a subfolder under it named commands.
In the commands folder, create a file named commands.ts and give it the following content. Note the following details about this code.
- The
fillColorfunction sets the background color of the specified cell to the specified color. It calls objects and methods from the Office JavaScript Library, which is loaded into the JavaScript runtime by a file that you create in a later step. - The first parameter of the
associatemethod must exactly match both theextensions.runtimes.actions.idproperty in the manifest and thefunctions.nameproperty in the API plugins JSON. - The
messageparameter is an object passed by the Copilot runtime to the JavaScript runtime in Office. It's an object that contains the cell address and color parameters as the user specified in a natural language prompt, such as "Set cell C4 to green."
async function fillColor(cell, color) { // @ts-ignore await Excel.run(async (context) => { context.workbook.worksheets.getActiveWorksheet().getRange(cell).format.fill.color = color; await context.sync(); }) } // @ts-ignore Office.onReady((info) => { // @ts-ignore Office.actions.associate("FillColor", async (message) => { const { Cell: cell, Color: color } = JSON.parse(message); await fillColor(cell, color); return "Cell color changed."; }) });- The
In the commands folder, create a file named commands.html and give it the following content. This file is needed because JavaScript files can't be directly loaded into the type of runtime that Office uses for Copilot API plugins. Instead, an HTML file with a
<script>element loads the JavaScript. Note the following details about this file.- Since the file's only purpose is to load other files, the
<body>element is empty. The file has no UI and is never displayed to users. - It loads the file office.js, which is the Office JavaScript Library, from a Microsoft server.
- It doesn't have a
<script>element to load a commands.js file (transpiled from the commands.ts that you created) because this<script>element is added at build-time by a file you add in a later step. - When project is built and served on a server, the URL of this HTML file matches the value of the
extensions.runtimes.code.pageproperty in the manifest. See Configure the manifest earlier in this article.
<html> <head> <meta charset="UTF-8" /> <meta http-equiv="X-UA-Compatible" content="IE=Edge" /> <!-- Office JavaScript API --> <script type="text/javascript" src="https://appsforoffice.microsoft.com/lib/1.1/hosted/office.js"></script> </head> <body> </body> </html>- Since the file's only purpose is to load other files, the
Copy project configuration files
Office uses the infrastructure of Office Add-ins to run API plugins for the Office JavaScript library. During the initial preview period for local Office API plugins, there isn't an Agents Toolkit template for this type of project. For this reason, some files used by Agents Toolkit for the development of Office Add-ins need to be added to the project. The fastest way to generate those files is to create an add-in project, copy the needed files from the add-in project to this agent project, and then make a few light edits.
Open a new Visual Studio Code window.
Select Microsoft 365 Agents Toolkit on the activity bar.
Select Create a New Agent/App.
Select Office Add-in.
Select Task pane.
In the Workspace Folder list, either select Default folder to store your project root folder in the default ___location or browse to a folder where you want to put the new agent project.
Enter any string as the Application Name and press Enter.
The project opens in a new Visual Studio Code window. Close both the new Visual Studio Code window and the one from which you created the project.
Copy the following files from the root of the add-in project that you created to the root of API plugin project. After you copy the files, delete the add-in project folder.
- babel.config.json
- package.json
- tsconfig.json
- webpack.config.js
Note
Some of the content of these files isn't needed for your API plugin project. In the remaining steps in this section, you make only the minimal changes to these files that are needed to ensure that the plugin sideloads and runs properly. We're working hard to develop an Agents Toolkit project template for plugins that call Office JavaScript Library APIs.
In Visual Studio Code, open the webpack.config.js file.
Find the definition of the
entryobject, and then delete thetaskpaneproperty from it. When you're done, theentryproperty should look like the following.entry: { polyfill: ["core-js/stable", "regenerator-runtime/runtime"], commands: "./src/commands/commands.ts", },Find the definition of the
pluginsarray. At the top is a call ofnew HtmlWebpackPluginfor an add-in task pane. Delete this call ofnew HtmlWebpackPlugin. When you're done, the entirepluginsarray should look like the following.plugins: [ new CopyWebpackPlugin({ patterns: [ { from: "appPackage/assets/*", to: "assets/[name][ext][query]", }, { from: "appPackage/manifest*.json", to: "[name]" + "[ext]", transform(content) { if (dev) { return content; } else { return content.toString().replace(new RegExp(urlDev, "g"), urlProd); } }, }, ], }), new HtmlWebpackPlugin({ filename: "commands.html", template: "./src/commands/commands.html", chunks: ["polyfill", "commands"], }), ],In the appPackage folder, there are two image files; color.png and outline.png. To work with the add-in tooling infrastructure, these files need to be moved. Create a subfolder named assets in the appPackage folder and move the two files into it.
Open manifest.json, and change the values of the
colorandoutlineproperties to match their new locations. When you're done, theiconsproperty should look like the following."icons": { "outline": "assets/outline.png", "color": "assets/color.png" },
Test the agent and plugin
In your command line interface (CLI), navigate to the root of the API plugin project, and then run
npm install. Wait for the installation to complete.Close all Office applications.
In Visual Studio Code, select Microsoft 365 Agents Toolkit on the activity bar, and then in the ACCOUNTS pane, ensure that you're logged into a Microsoft 365 account in which support is enabled for Copilot and for uploading custom apps.
Select Provision in the LIFECYCLE pane.
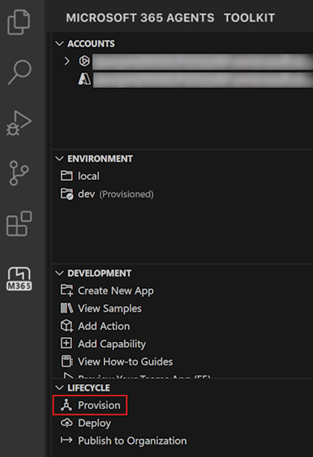
Among other things, provisioning creates a build folder inside the appPackage folder with the package zip file. The file contains the manifest and JSON files for the agent and plugin.
In your CLI in the root of the project, run
npm run dev-serverto start the server on localhost.Note
If you are prompted to delete an old certificate and/or to install a new one, agree to both prompts.
Wait until you see a line in the server window similar to the following example that indicates that the app compiled successfully. This output means the server is running and serving the files.
webpack 5.99.8 compiled successfully in 1090 msThe first step in testing depends on the platform.
- To test in Office on Windows, open Excel, and then open (or create) a workbook.
- To test in Office on the web, in a browser, navigate to
https://excel.cloud.microsoft, and then open (or create) a workbook.
The process of opening your agent depends on the UI for Copilot in Office applications, which is in transition.
- If you see a Copilot button on the ribbon (not a drop down menu), select the Copilot button to open the Copilot pane.
- If you see a Copilot drop down menu, open the menu and select App Skills from the drop down list to open the Copilot pane.
Select the hamburger control in the Copilot pane.
In the pane, Excel Agent should be in the list of agents. You might need to select See more to see a list of all agents. If the agent isn't listed, try one or both of the following actions.
- Wait a few minutes and reload Copilot.
- With Copilot open to the list of agents, place the cursor in the Copilot pane and press Ctrl+R.

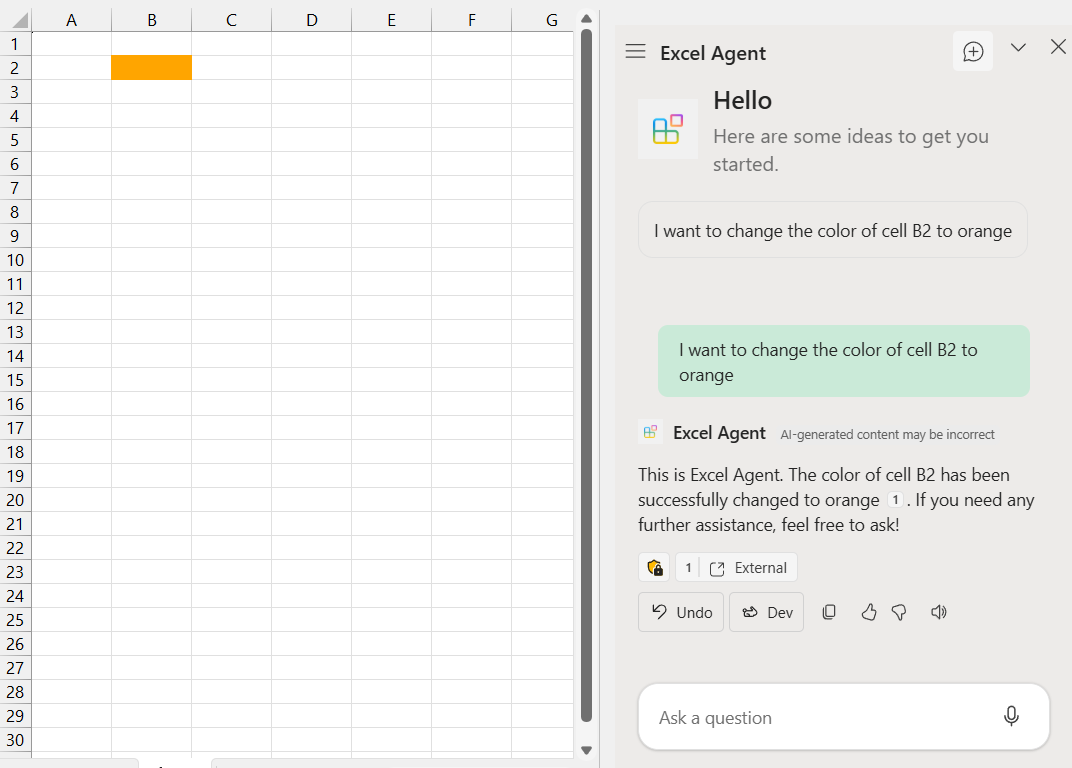
Select Excel Agent, select the Change cell color conversation starter, and then select the Send control in the conversation box at the bottom of the pane. In a few seconds, you should see a confirmation prompt similar to the following.

Select Confirm in response to the confirmation prompt. The cell's color should change.
Tip
If Copilot reports an error, repeat your prompt but add the following sentence to the prompt: "If you get an error, report the complete text of the error to me."
Try entering other combinations of cell and color in the conversation box, such as "Set cell G5 to the color of the sky."
Make changes in the agent
Live reloading and hot reloading for an Office API plugin isn't supported in the preview period. To make changes, first shut down the server and uninstall the agent with these steps.
Shutting down the server depends on what window it's running in.
- If the web server is running in the same command prompt or Visual Studio Code TERMINAL where you ran
npm run dev-server, give the window focus and press Ctrl+C. To end the process, choose "Y" in response to the prompt. - If the web server is running in a separate window, then in a command prompt, bash shell, or Visual Studio Code TERMINAL in the root of the project, run
npm run stop. The server window closes.
- If the web server is running in the same command prompt or Visual Studio Code TERMINAL where you ran
Clear the Office cache following the instructions at Manually clear the cache.
Open Teams and select Apps from the activity bar, then select Manage your apps at the bottom of the Apps pane.
Find Excel Agentdev in the list of apps.
To expand its row, select the arrow head to the left of the name.

Select the trash can icon near the right end of the row, and then select Remove in the prompt.
Make your changes and then repeat the steps in Test the agent and plugin.