Note
Access to this page requires authorization. You can try signing in or changing directories.
Access to this page requires authorization. You can try changing directories.
Check the Domains FAQ if you don't find what you're looking for.
If Cloudflare is your DNS hosting provider, follow the steps in this article to verify your ___domain and set up DNS records for email, Skype for Business Online, and so on.
Tip
Some configuration tasks might be complex to perform. For technical support, follow these steps:
- Go to admin.microsoft.com, select Help & Support at the bottom right, and type your question.
- Review the results and if you still have questions, select the headset to contact technical support.
To learn about your options for contacting support, see Get support for Microsoft 365 for business.
Before you begin
You have two options for setting up DNS records for your ___domain:
Use Domain Connect If you haven't set up your ___domain with another email service provider, use the Domain Connect steps to automatically verify and set up your new ___domain to use with Microsoft 365.
OR
Use the manual steps Verify your ___domain using the manual steps below and choose when and which records to add to your ___domain registrar. This allows you to set up new MX (mail) records, for example, at your convenience.
Use Domain Connect to verify and set up your ___domain
Follow these steps to automatically verify and set up your Cloudflare ___domain with Microsoft 365:
In the Microsoft 365 admin center, select Settings > Domains, and select the ___domain you want to set up.
Select the three dots (more actions) > choose Manage DNS.
On the How do you want to connect your ___domain? page, select Continue.
On the Add DNS record page, select Add DNS records.
On the Cloudflare login page, sign in to your account, and select Authorize.
This completes your ___domain setup for Microsoft 365.
Create DNS records with manual setup
After you add these records at Cloudflare, your ___domain will be set up to work with Microsoft 365 services.
Note
Typically it takes about 15 minutes for DNS changes to take effect. However, it can occasionally take longer for a change you've made to update across the Internet's DNS system. If you're having trouble with mail flow or other issues after adding DNS records, see Troubleshoot issues after changing your ___domain name or DNS records.
Change your ___domain's nameserver (NS) records
Important
You must perform this procedure at the ___domain registrar where you purchased and registered your ___domain.
When you signed up for Cloudflare, you added a ___domain by using the Cloudflare Setup process.
The ___domain that you added was purchased from Cloudflare or a separate ___domain registrar. To verify and create DNS records for your ___domain in Microsoft 365, you first need to change the nameservers at your ___domain registrar so that they use the Cloudflare nameservers.
To change your ___domain's name servers at your ___domain registrar's website yourself, follow these steps.
Find the area on the ___domain registrar's website where you can edit the nameservers for your ___domain.
Either create two nameserver records by using the values in the following table, or edit the existing nameserver records so that they match these values.
Type Value First nameserver Use the nameserver value provided by Cloudflare. Second nameserver Use the nameserver value provided by Cloudflare. Tip
You should use at least two name server records. If there are any other name servers listed, you should delete them.
Save your changes.
Note
Your nameserver record updates may take up to several hours to update across the Internet's DNS system. Then your Microsoft email and other services will be all set to work with your ___domain.
Add a TXT record for verification
Before you use your ___domain with Microsoft, we have to make sure that you own it. Your ability to log in to your account at your ___domain registrar and create the DNS record proves to Microsoft that you own the ___domain.
Note
This record is used only to verify that you own your ___domain; it doesn't affect anything else. You can delete it later, if you like.
Make sure you have added a ___domain in the Microsoft 365 Admin Center using the steps in Add a ___domain, and that the ___domain has not already been verified. You'll need to copy the TXT value from the Add a record to verify ownership page for use later in this procedure.
To get started, go to your domains page at Cloudflare by using this link. You'll be prompted to log in first.
On the Account Home page, find the ___domain that you want to update, select the three dots (...) at the right and select Configure DNS from the drop-down menu.

On the DNS management page, select +Add record.

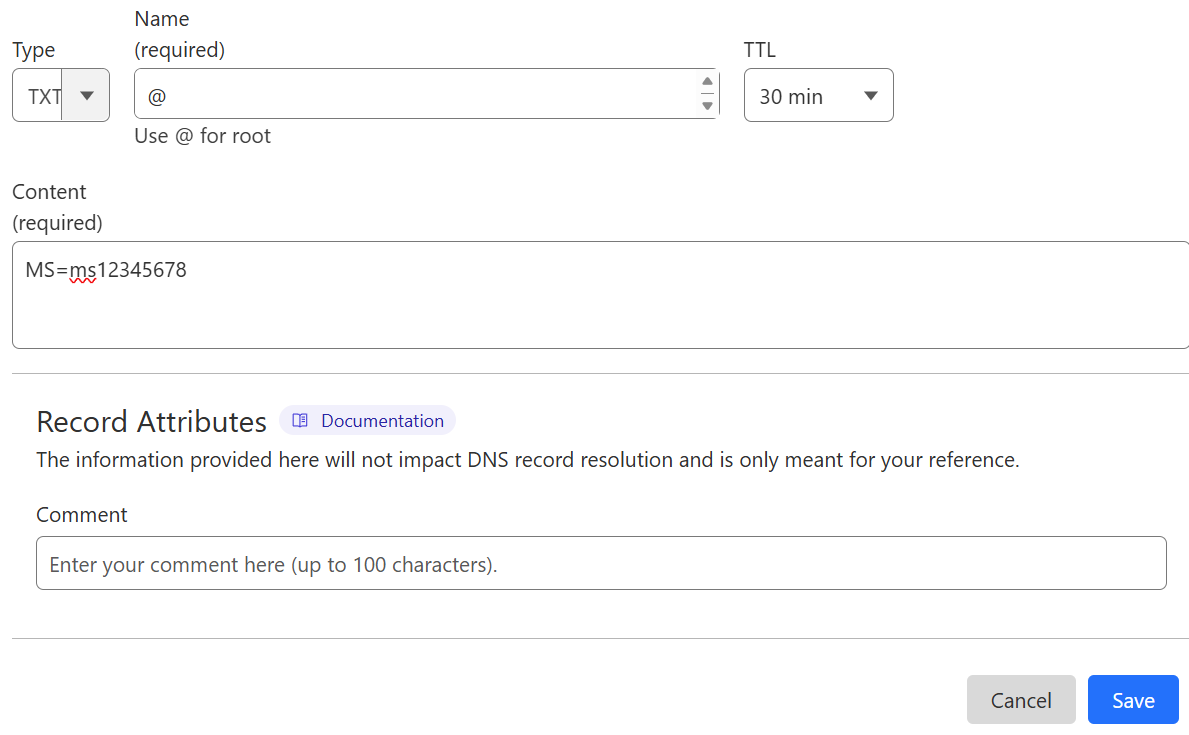
Select the TXT type from the drop-down list, and type or copy and paste the values from this table. You'll use the TXT value (MS=msXXXXXXXX) that you copied earlier.
Type Name TTL Content TXT @ 30 minutes MS=msXXXXXXXX
Note: This is an example. Use your specific Destination or Points to Address value here, from the table. How do I find this?Select Save.
Wait a few minutes before you continue, so that the record you just created can update across the Internet.
Now that you've added the record at your ___domain registrar's site, you'll go back to Microsoft and search for the record. When Microsoft finds the correct TXT record, your ___domain is verified.
To verify the record in Microsoft 365:
In the admin center, go to the Settings > Domains.
On the Domains page, select the ___domain that you're verifying, and select Manage DNS.
Select Continue.
On the Verify ___domain page, select Verify.
Note
Typically it takes about 15 minutes for DNS changes to take effect. However, it can occasionally take longer for a change you've made to update across the Internet's DNS system. If you're having trouble with mail flow or other issues after adding DNS records, see Troubleshoot issues after changing your ___domain name or DNS records.
Add an MX record so email for your ___domain will come to Microsoft
To get started, go to your domains page at Cloudflare by using this link. You'll be prompted to log in first.
On the Account Home page, find the ___domain that you want to update, select the three dots (...) at the right and select Configure DNS from the drop-down menu.
On the DNS management page, select +Add record.
Select the MX type from the drop-down list, and type or copy and paste the values from this table.
Type Name Mail server TTL Priority MX @ <___domain-key>.mail.protection.outlook.com
Note: Get your <___domain-key> from your Microsoft 365 account. How do I find this?30 minutes 1
For more information about priority, see What is MX priority?Select Save.

If there are any other MX records listed in the MX Records section, delete them by selecting Edit, and then select Delete.

In the confirmation dialog box, select Delete to confirm your changes.
Add the CNAME record required for Microsoft
To get started, go to your domains page at Cloudflare by using this link. You'll be prompted to log in first.
On the Account Home page, find the ___domain that you want to update, select the three dots (...) at the right and select Configure DNS from the drop-down menu.
On the DNS management page, select +Add record
Select the CNAME type from the drop-down list, and type or copy and paste the values from this table.
Type Name Target TTL CNAME autodiscover autodiscover.outlook.com Auto Select Save.

Add a TXT record for SPF to help prevent email spam
Important
You cannot have more than one TXT record for SPF for a ___domain. If your ___domain has more than one SPF record, you'll get email errors, as well as delivery and spam classification issues. If you already have an SPF record for your ___domain, don't create a new one for Microsoft 365. Instead, add the required Microsoft 365 values to the current record so that you have a single SPF record that includes both sets of values.
To get started, go to your domains page at Cloudflare by using this link. You'll be prompted to log in first.
On the Account Home page, find the ___domain that you want to update, select the three dots (...) at the right and select Configure DNS from the drop-down menu.
On the DNS management page, select +Add record.
Select the TXT type from the drop-down list, and type or copy and paste the values from this table.
Type Name TTL Content TXT @ 30 minutes v=spf1 include:spf.protection.outlook.com -all
Note: We recommend copying and pasting this entry, so that all of the spacing stays correct.Select Save.

Advanced option: Skype for Business
Only select this option if your organization uses Skype for Business for online communication services like chat, conference calls, and video calls, in addition to Microsoft Teams. Skype needs 4 records: 2 SRV records for user-to-user communication, and 2 CNAME records to sign-in and connect users to the service.
Add the two required SRV records
Important
Keep in mind that Cloudflare is responsible for making this functionality available. In case you see discrepancies between the steps below and the current Cloudflare GUI (Graphical User Interface), leverage the Cloudflare Community.
To get started, go to your domains page at Cloudflare by using this link. You'll be prompted to log in first.
On the Account Home page, find the ___domain that you want to update, select the three dots (...) at the right and select Configure DNS from the drop-down menu.
On the DNS management page, select +Add record
Select the SRV type from the drop-down list, and type or copy and paste the values from this table.
Type Name Service Protocol TTL Priority Weight Port Target SRV Use your domain_name; for example, contoso.com _sip TLS 30 minutes 100 1 443 sipfed.online.lync.com SRV Use your domain_name; for example, contoso.com _sipfederationtls TCP 30 minutes 100 1 5061 sipfed.online.lync.com Select Save.

Add the other SRV record by copying the values from the second row of the table.
Note
Typically it takes about 15 minutes for DNS changes to take effect. However, it can occasionally take longer for a change you've made to update across the Internet's DNS system. If you're having trouble with mail flow or other issues after adding DNS records, see Troubleshoot issues after changing your ___domain name or DNS records.
Add the two required CNAME records for Skype for Business
To get started, go to your domains page at Cloudflare by using this link. You'll be prompted to log in first.
On the Account Home page, find the ___domain that you want to update, select the three dots (...) at the right and select Configure DNS from the drop-down menu.
On the DNS management page, select +Add record
Select the CNAME type from the drop-down list, and type or copy and paste the values from this table.
Type Name Target TTL CNAME sip sipdir.online.lync.com 1 Hour CNAME lyncdiscover webdir.online.lync.com 1 Hour Select Save.
Add the other CNAME record by copying the values from the second row of the table.
Note
Typically it takes about 15 minutes for DNS changes to take effect. However, it can occasionally take longer for a change you've made to update across the Internet's DNS system. If you're having trouble with mail flow or other issues after adding DNS records, see Troubleshoot issues after changing your ___domain name or DNS records.
Advanced option: Intune and Mobile Device Management for Microsoft 365
This service helps you secure and remotely manage mobile devices that connect to your ___domain. Mobile Device Management needs 2 CNAME records so that users can enroll devices to the service.
Add the two required CNAME records for Mobile Device Management
To get started, go to your domains page at Cloudflare by using this link. You'll be prompted to log in first.
On the Account Home page, find the ___domain that you want to update, select the three dots (...) at the right and select Configure DNS from the drop-down menu.
On the DNS management page, select +Add record
Select the CNAME type from the drop-down list, and type or copy and paste the values from this table.
Type Name Target TTL CNAME enterpriseregistration enterpriseregistration.windows.net 1 Hour CNAME enterpriseenrollment enterpriseenrollment-s.manage.microsoft.com 1 Hour Select Save.
Add the other CNAME record by copying the values from the second row of the table.
Note
Typically it takes about 15 minutes for DNS changes to take effect. However, it can occasionally take longer for a change you've made to update across the Internet's DNS system. If you're having trouble with mail flow or other issues after adding DNS records, see Troubleshoot issues after changing your ___domain name or DNS records.