Note
Access to this page requires authorization. You can try signing in or changing directories.
Access to this page requires authorization. You can try changing directories.
Before you can use Basic Mobility and Security to manage devices and protect access to company, you need to follow the procedures in this article to turn on and configure Basic Mobility and Security in the organization.
For more information about Basic Mobility and Security, see Overview of Basic Mobility and Security in Microsoft 365 for business.
What do you need to know before you begin?
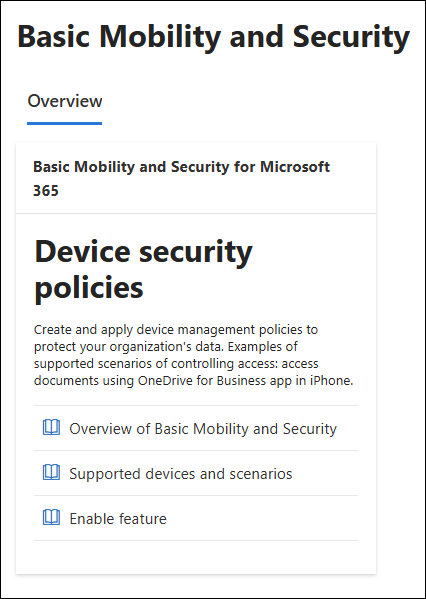
You open the Basic Mobility and Security page at https://compliance.microsoft.com/basicmobilityandsecurity.
To connect to Security & Compliance PowerShell, see Connect to Security & Compliance PowerShell.
You need to be assigned permissions before you can do the procedures in this article. You have the following options:
Microsoft Entra permissions: Membership in the Global Administrator* or Directory Writers roles gives users the required permissions and permissions for other features in Microsoft 365.
Important
* Microsoft recommends that you use roles with the fewest permissions. Using lower permissioned accounts helps improve security for your organization. Global Administrator is a highly privileged role that should be limited to emergency scenarios when you can't use an existing role.
You can't use a delegated admin account to manage Basic Mobility and Security. For more information about delegated administration, see Partners: Offer delegated administration.
Questions? See the Basic Mobility and Security FAQ.
Step 1: Enable Basic Mobility and Security in the organization
Tip
If Basic Mobility and Security is already enabled in your organization, Enable feature isn't available on the Overview tab of the Basic Mobility and Security page, so you can skip this step.
Use the following steps to enable Basic Mobility and Security in your organization:
On the Basic Mobility and Security page at https://compliance.microsoft.com/basicmobilityandsecurity, verify the Overview tab is selected.
On the Overview tab, select Enable feature.
In the confirmation dialog that opens, select OK. The following message is shown in the dialog:
Activation request submitted for processing. Please reload the page in a few minutes.
After a few minutes, refresh the page in your browser.

After Basic Mobility and Security is enabled, the following changes happen on the Overview tab of the Basic Mobility and Security page:
- Enable feature on the Overview tab is replaced by Managed devices and Manage Apple MDM Push Certificate.
- The Policies and Organization Setting tabs are available.

Use PowerShell to enable Basic Mobility and Security in the organization
If you'd rather use Security & Compliance PowerShell to enable Basic Mobility and security in your organization, do the following steps:
Run the following one line commands to see if Basic Mobility and Security is already enabled in the organization:
Write-Output -InputObject `r`n,"Device tenant policy",("-"*25); Get-DeviceTenantPolicy | Format-Table Name; Write-Output -InputObject "Device tenant rule",("-"*25); Get-DeviceTenantRule | Format-List Name,ExclusionList,BlockUnsupportedDevicesIf the previous command returns no results, run the following commands to enable Basic Mobility and Security using the same values as if you enabled it on the Overview tab of the Basic Mobility and Security page:
New-DeviceTenantPolicy

New-DeviceTenantRule -ExclusionList 00000000-0000-0000-0000-000000000000
Tip
The value
00000000-0000-0000-0000-000000000000means all users are included in Basic Mobility and Security (no security groups specify exceptions from Basic Mobility and Security). Or you can specify the GUID values of one or more security groups separated by commas to exclude from Basic Mobility and Security/ For instructions, see the Use PowerShell to configure organization settings in Basic Mobility and Security section later in this article.Likewise, you can set the BlockUnsupportedDevices parameter to the value
$truewhen you create the device tenant rule instead of setting it later.
For detailed syntax and parameter information, see New-DeviceTenantPolicy and New-DeviceTenantRule.
Step 2: Configure CNAME records for custom Microsoft 365 domains in Basic Mobility and Security
Tip
This step is required if users sign in using accounts in a custom Microsoft 365 ___domain (for example, michelle@contoso.com). If users sign in using accounts in the Microsoft Online Email Routing Address (MOERA) ___domain only (for example, michelle@contoso.onmicrosoft.com), you can skip this step.
You need to add two CNAME records for Basic Mobility and Security at the DNS registrar for your custom Microsoft 365 email ___domain. The basic syntax of the CNAME records is:
Hostname: EnterpriseEnrollment.company_domain.com
Points to address or value: EnterpriseEnrollment-s.manage.microsoft.us

Hostname: EnterpriseRegistration.company_domain.com
Points to address or value: EnterpriseRegistration.windows.net
For example:
Hostname: EnterpriseEnrollment.contoso.com
Points to address or value: EnterpriseEnrollment-s.manage.microsoft.us

Hostname: EnterpriseRegistration.contoso.com
Points to address or value: EnterpriseRegistration.windows.net
Tip
Need help with setting up the CNAME records? We provide instructions to create CNAME records for different Microsoft 365 services at many ___domain registrars. You can use these instructions as a starting point to create the CNAME records for Basic Mobility and Security. For more information, see Add DNS records to connect your ___domain.
If you're unfamiliar with DNS configuration, contact your ___domain registrar and ask for help.
After you add the CNAME records, users who sign in on Windows devices using email addresses in the custom Microsoft 365 ___domain are redirected to enroll in Basic Mobility and Security.
Step 3: Create an Apple Push Notification service certificate for Apple devices
Tip
If you don't plan on using Basic Mobility and Security to manage iOS/iPadOS devices, you can skip this step.
Basic Mobility and Security requires an Apple Push Notification service (APNs) certificate to manage iOS/iPadOS devices. Use the following steps to create an APNs certificate:
Do either of the following steps:
- On the Overview tab of the Basic Mobility and Security page at https://compliance.microsoft.com/basicmobilityandsecurity, select Manage Apple MDM Push Certificate to open the Configure MDM Push Certificate page. Or, use the direct link https://portal.azure.com/#view/Microsoft_Intune_Enrollment/APNSCertificateUploadBlade.
- Go to the iOS/iPadOS | Enrollment page of the Intune admin center at https://intune.microsoft.com/#view/Microsoft_Intune_DeviceSettings/DevicesIosMenu/~/iosEnrollment. In the Prerequisites section, select Apple MDM Push Certificate to open the Configure MDM Push Certificate flyout.
On the Configure MDM Push Certificate page or flyout, do the displayed steps to configure the APNs certificate. For detailed instructions, start at Step 1: Grant Microsoft permission to send user and device information to Apple.
The Apple MDM Push certificate is valid for 365 days (with a 30-day grace period to renew after it expires). You need to renew the certificate every year to maintain Apple device management. For instructions, see Renew Apple MDM push certificate.
Step 4: Configure organization settings in Basic Mobility and Security
The Organization Setting tab on the Basic Mobility and Security page at https://compliance.microsoft.com/basicmobilityandsecurity contains the following settings that you need to consider:
Access restriction for unsupported MDM device: Prevents users from accessing Microsoft 365 email on devices that Basic Mobility and Security doesn't support. For more information about supported devices, see Supported device platforms in Basic Mobility and Security.
After you expand this section, the following values are available:
Allow access (device enrollment is required). This value is the default.
Block access: We recommend this value to help secure your organization. Unsupported devices aren't allowed to access Microsoft 365 email on the device. After you select this value, the tab automatically refreshes and both sections on the page are collapsed. Expand this section to see the value you selected.
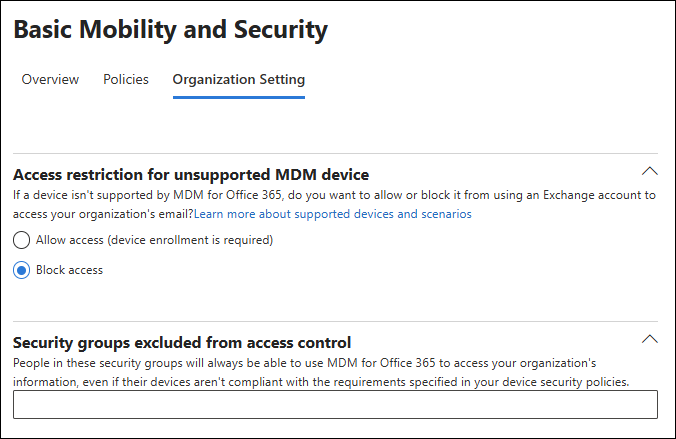
Security groups excluded from access control: Use this setting to exclude members of the specified security groups from Basic Mobility and Security. For example:
- Specific, temporary exceptions for known, noncompliant devices.
- You no longer want to use Basic Mobility and Security in your organization (specify one or more groups that contain all users in your organization).
The following security group types are supported:
User groups: To create user security groups in the Microsoft 365 admin center, see Create, edit, or delete a security group
Business Basic and Business Standard include Microsoft Entra Free, which supports creating assigned user groups (not dynamic user groups), although the built-in All Users dynamic user group is available. To create assigned user groups in the Microsoft Entra admin center, see Create a basic group and add members. Use the following settings:
- Group type: Security (default).
- Microsoft Entra roles can be assigned to the group: No (default).
- Members: (Step 10): Select No members selected. On the Add members page that opens, select the Users tab to select the users to add to the group.
Assigned device groups: Similarly, Microsoft Entra Free supports creating assigned device groups (not dynamic device groups). To create assigned device groups in the Microsoft Entra admin center, see Create a basic group and add members. Use the following settings:
- Group type: Security (default).
- Microsoft Entra roles can be assigned to the group: No (default).
- Members: (Step 10): Select No members selected. On the Add members page that opens, select the Devices tab to select the devices to add to the group.
After you expand this section, start typing the name of the group in the box, and then select the group when it appears. The tab automatically refreshes and the section collapses. Expand the section to see the group you selected below the box.
To remove a selected group, select
 on the entry. The tab automatically refreshes and the section collapses. Expand the section to see the group you removed is no longer below the box.
Repeat these steps as many times as necessary.

Use PowerShell to configure organization settings in Basic Mobility and Security
If you'd rather use Security & Compliance PowerShell to configure organization setting in Basic Mobility and Security in your organization, do the following steps:
Run the following command to see the current status of the settings:
Get-DeviceTenantRule | Format-List BlockUnsupportedDevices,ExclusionListIf the current values of ExclusionList are truncated, run the following command to see them all:
Get-DeviceTenantRule | Select-Object -ExpandProperty ExclusionListTo configure the organization settings, use the following syntax:
Set-DeviceTenantPolicy [-BlockUnsupportedDevices <$true | $false>] [-ExclusionList "SecurityGroupGUID1","SecurityGroupGUID2",..."SecurityGroupGUIDN"]BlockUnsupportedDevices: Corresponds to the Access restriction for unsupported MDM device setting.
$true= Block Access$false= Allow access (device enrollment is required) (default)
ExclusionList: Corresponds to the Security groups excluded from access control setting. Specify one or more security groups separated with commas. You identify groups by GUID value:
- The value
00000000-0000-0000-0000-000000000000means no security groups are excluded (default). - To find the GUID values of available security groups, use the following procedures:
If necessary, install the Microsoft Graph PowerShell module in PowerShell by running the following command:
Install-Module -Name Microsoft.Graph -Scope CurrentUserAnswer yes to any directives about installing the NuGet provider or installing from the PSGallery.
Connect to Microsoft.Graph.Groups PowerShell by running the following command:
Connect-MgGraph -Scopes "Group.ReadWrite.All"For detailed syntax and parameter information, see Connect-MgGraph.
Run the following command:
Get-MgGroupUse the DisplayName value to find and copy the Id value to use.
Tip
You might need to decrease the font size in the PowerShell window and run the command again to clearly see all of the values. For example, click in the window and use the scroll wheel on your mouse to scroll down, and then run the command again.
You can't use Microsoft 365 Groups (the GroupTypes property value is
Unified).Values that you specify for the ExclusionList parameter overwrite existing values. Refer back to Step 1 to see how to view the complete list of security groups.
For detailed syntax and parameter information, see Get-MgGroup.
- The value
This example configures the following organization settings:
- Block access for unsupported devices.
- Exclude the specified security groups from Basic Mobility and Security.
Set-DeviceTenantPolicy -BlockUnsupportedDevices $true -ExclusionList "6010e907-3193-4a6f-b94c-a4c24b1398cc","0be37e4a-8f43-4b9f-ab7f-74659816067a"For detailed syntax and parameter information, see Set-DeviceTenantPolicy.
Step 5: Create device security policies
For instructions, see Configure policies in Basic Mobility and Security.
Next steps
After you create at least one policy in Basic Mobility and Security, users identified in the policies receive enrollment messages the next time they sign into their device using a Microsoft 365 ID or attempt to access company data using a supported application.
Users must complete the enrollment and activation steps before they can access Microsoft 365 email and documents. For more information, see Enroll your mobile device using Basic Mobility and Security.
Tip
If a user's preferred language isn't available in the device enrollment process, the user might receive the notification and steps in a different language. Currently, not all supported languages in Microsoft 365 are available for the enrollment process on mobile devices.