Note
Access to this page requires authorization. You can try signing in or changing directories.
Access to this page requires authorization. You can try changing directories.
A significant part of agent conversations in Copilot Studio is natural language understanding, which is the ability for the AI to understand a user's intent. For example, a customer might say "I tried to use my gift card but it doesn't work." The agent knows to route the customer to the topic related to gift cards not working, even if that exact phrase isn't listed as a trigger phrase.
One fundamental aspect of natural language understanding is to identify entities in a user dialog.
An entity can be thought of as a unit of information that represents a certain type of a real-world subject. For example, a phone number, postal code, city, or even a person's name. With the knowledge granted by entities, an agent can smartly recognize the relevant information from a user input and save it for later use.
Prebuilt entities
Entities in agents let you store information in similar groups.
Copilot Studio supports a set of prebuilt entities, which represent the most commonly used information types in real-world dialogs, such as age, colors, numbers, and names.
With the knowledge granted by entities, an agent can smartly recognize the relevant information from user input and save it for later use.
To help understand that notion, let's use the Money entity as an example.
Open your agent in Copilot Studio and select Settings at the top of the page and then Entities in the menu.
A list of all available entities appears.
Select the Money entity. The details panel for the entity opens.
.png)
Here you can see an explanation of this entity and ways it can be used to extract information related to money or currency from user input.
For example, when a user inputs "It costs 1000 dollars," using this money entity the agent knows that "1000 dollars" represents the money type of information. When the agent extracts this information and saves it to a variable, it saves "1000" as a number even though the surrounding information was text.
Custom entities
The prebuilt entities cover commonly used information types. Occasionally, such as when building an agent that serves a specific purpose, you might need to teach the agent's language understanding model ___domain-specific knowledge.
For instance, let's say you want to build an agent for an outdoor store. In this case, you need to teach the agent to acknowledge the "outdoor gears product" category in a conversation.
First, create a custom entity. In this case, you can create an entity that gives the agent the knowledge of all outdoor product categories.
Go to the Settings page for your agent and select Entities.
Select Add an entity > New entity.
Select the desired type of entity: either a closed list entity or a regular expression (regex) entity.

Closed list entities
Closed list entities let you define a list of items. These entities are best used for small lists that are easy to manage and that have simple item labels.
In Create an entity, select Closed list.
In the panel that opens, enter a name for your new entity—for example, Camping activity.
Add a description, if desired.
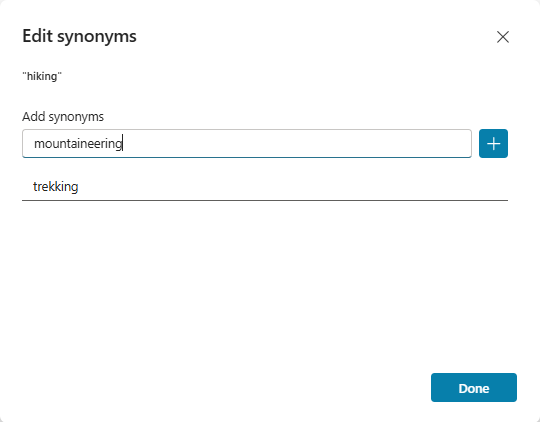
Under List items, enter values you want to associate with this entity. For example, hiking and yoga.
Alternatively, you can upload a file listing all the desired values you want to add for this entity.
When you enter items, you can:
- Select an item and change its name.
- Select the trash can icon to delete the item.
- Select Synonyms (or select the listed synonyms if they're already added) to open the Edit synonyms panel.
You can add synonyms to expand the matching logic for each value in the list. For example, for hiking, you can add trekking and mountaineering as synonyms.
If desired, turn on Smart matching for this entity.
Smart matching is part of the intelligence supported by the agent's language understanding model. When smart matching is active, the agent interprets user input using fuzzy logic against the values listed for the entity.
In particular, the agent can autocorrect misspellings and expand its matching logic semantically. For example, the agent can automatically match "softball" to "baseball."
When you're finished creating or editing your entity, select Save. Select Close to discard your changes.

Upload values for a closed list entity
From the details panel for a closed list entity, you can add or replace the set of values and synonyms associated with the entity.
Prepare a text file (maximum 3 MB) listing all values you want to add for your entity, including synonyms, if any. Use this format: one value per line, and use the pipe (
|) as a delimiter for synonyms. For example:hiking|trekking hiking|mountaineering yoga cycling|bicycling cookingUnder List items, select upload a file.
In Upload a file, select the desired option:
- If you want to add new values and synonyms for your entity, select Append.
- To replace all existing values and synonyms with the list from your file, select Replace.
Drop your file onto the window. Alternatively, select click to browse, navigate to your file, and select it.
Review the values and synonyms that appear, and select Add.
Download values for a closed list entity
From the details panel for a closed list entity, you can download a text file listing the set of values and synonyms associated with the entity.
Under List items, select download a file.
Save the resulting text file, or open it in a text editor to review its content. Each entity value appears on a separate line. If a value has multiple synonyms, they appear on separate lines, like this:
hiking|trekking
hiking|mountaineering
Regular expression (regex) entities
Regular expression (regex) entities let you define logical patterns that you can use to match and extract information from an input. Regex entities are great for complex pattern matching against user input. They're also useful if you need to allow for specific variations in how a user might format or enter their input in a conversation.
For example, use regex entities to identify items such as a tracking ID, a license number, a credit card number, or an IP address.
In Create an entity, select Regular expression (regex).
In the panel that opens, enter a name for your new entity.
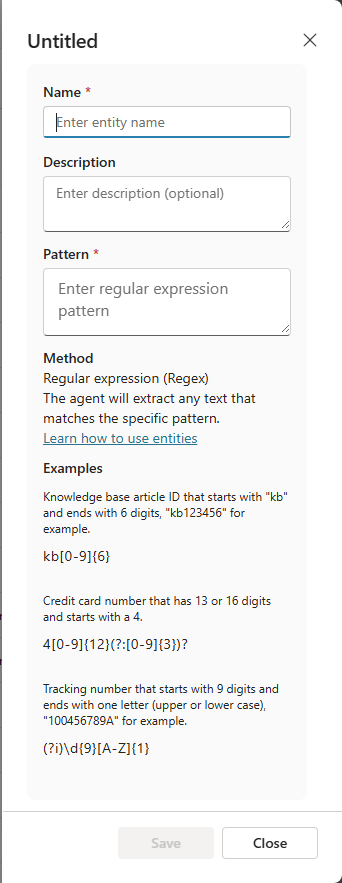
Add a description, if desired.
Enter the regular expression pattern that should be used to match and extract entity items from the input.
Copilot Studio NLU and CLU language understanding use the .NET regular expressions syntax. NLU+ uses the JavaScript regular expressions syntax.
By default, pattern matching is case sensitive. To make it case insensitive, use the
(?i)regular expression option in your pattern string. Some basic examples are included in the regex entity pane. For more information on the syntax, and for more examples, see Regular Expression Language - Quick Reference.If you need the regular expression to accommodate multiple patterns, you can use the alternation operator
|to concatenate regular expressions. For example, you could combine two regex patterns to look for both the old and new formats of a product ID code.When you're finished creating or editing your entity, select Save. Select Close to discard your changes.
Use entities in a conversation
Now that your agent knows about outdoor gear based on the Camping activity entity and other custom entities you created, you can start to use them in your agent.
Go to the Topics page for your agent.
Open the topic for an entity you want to collect.
Select the Add node icon
 and then select Ask a question.
Under Identify, select the entity you created in Custom entities.
.png)
You can also optionally select items to show as buttons. For example, if you'd like to show some categories as buttons for users to conveniently choose from as their input, you can choose Select options for user and then pick them from the list that contains the items you added when you created the custom entity.
.png)
Name the variable for the output of the user's response, if necessary.
Slot filling
Slot filling is a natural language understanding concept that means saving an extracted entity to an object. In Copilot Studio, slot filling means placing the extracted entity value into a variable. For more information about the variable base type associated with each prebuilt entity, see Entities.
Let's continue to use the camping activities topic, which is triggered by typing "I want something to do" in the test chat, as an example.
The topic is successfully triggered and the agent asks for the type of activity, also showing the button choices specified when authoring the Question node. If you turn on the option to track between topics, the dialog tree also shows the agent is running to this Question node.
.png)
A user can use the predefined choices by selecting one of the buttons. Alternatively, they can also type in something like "trekking" and see that it maps to "hiking," because those words were defined as synonyms.
The tracking view shows that the dialog is correctly routed to the path in which the product category value is "Hiking." You can inspect the variable value from the variable watch window at the bottom of the authoring canvas. The watch window shows that the variable value is "Hiking."
Essentially, slot filling happens by inserting the extracted entity "Hiking" into the variable VarCampType.
.png)
You can also use what is known as "proactive slot filling" where the user can specify multiple pieces of information that map to multiple entities. The agent is able to understand what information belongs to which entity automatically. In cases where it's unsure of the intended mapping, it prompts the user to be more specific by providing choices.
In this example, the user wrote "I'm bored but I like mountaineering." This message includes the trigger phrase that the user wants help with outdoor activities and a second piece of information, "mountaineering," which is a synonym for hiking. In this case, the agent fills in both the entity for choosing an outdoor activity, and for the type of activity.
.png#lightbox)
The tracking view shows that the agent takes in this user input, and intelligently skips the Question node asking for the type of activity.
The agent is always actively listening to the user input, remembering information upfront so it can skip unnecessary steps as appropriate.
Let's restart the testing again and try another case. In this round, you can add a couple more Question nodes asking for things like how much time you have for the activity (using the Duration entity) and the price range (using the Money entity).
This time when the product category question is presented, instead of telling the agent only the product category, the user can say "I want to buy a pair of hiking boots under $100." In this example, the agent isn't only able to route to the correct hiking product category path, but also actively fill the slots asking for the type of hiking gear and the target price range information.
.png)
Proactive slot filling can be manually controlled at the node level. If you'd like to always prompt for the question within a specific node, regardless of whether the slot is already filled from previous user responses, you can disable the Skip question option for that Question node. Perform the following steps to disable the Skip question option.
Select the More icon (…) of the Question node, and then select Properties. The Question properties panel appears.

On the Question properties panel, select Question behavior.
On the Question behavior panel, under Skip question, select Ask every time, and then select Save at the top of the page.

Accept one of multiple entities at a conversation turn
In some situations, an agent can accept one of multiple valid answers at a given conversation turn. For example, your agent might prompt a customer to provide either their account number or their phone number. You might also want your agent to let a customer state that they don't have the information, and route the customer accordingly instead of immediately escalating to a customer service representative.
Add a Question node.
Under Identify, select One of multiple entities.
For each entity you want to accept at this node, select New entity and select the desired entity. A Question node can support up to five different entities.
Select the default variable name under Save user response as to open the Variable properties panel and change the name to something meaningful—for example, Identifier.
The variable that stores the recognized entity value is of type record, with one element for each supported entity at this node—for example Identifier.account, Identifier.phone, Identifier.unknown.
Add conditions to route the conversation according to the information provided by the customer. It's a good practice to set up your conditions with the is not Blank operator (or is Blank).
Recognition behavior for "One of multiple entities"
This type of recognition is intended to identify a single entity out of a set of possible entities at a conversation turn. If a customer enters a statement that contains two or more of the entities configured for identification at the corresponding Question node, the agent identifies only the first entity in the list. Therefore, make sure to craft the questions and the conditional logic that follows such Question nodes accordingly.
For example, let's say a Question node is configured to recognize one of the following: a library card number, a phone number, or "I don't know," in this order. If a customer says "My phone number is 777 555-1212 and my card number is 123456789," the recognized entity value is the card number because it's the first entity in the list of possible entities at the corresponding Question node.
If the agent can't identify any of the entities a Question node is configured to recognize, it applies the reprompt behavior specified for this node.
Limitations
The following are known limitations for Question nodes configured to collect one of multiple entities at a conversation turn:
Support limited to a maximum of five entities.
No support for external entities.
Support for only one entity of any given type. For example, one Question node can't recognize two entities of type Date.