Note
Access to this page requires authorization. You can try signing in or changing directories.
Access to this page requires authorization. You can try changing directories.
Adding authentication to your agent allows users to sign in, giving your agent access to a restricted resource or information.
This article covers how to configure Microsoft Entra ID as your service provider. To learn about other service providers and user authentication in general, see Configure user authentication in Copilot Studio.
If you have tenant administration rights, you can configure API permissions. Otherwise, you need to ask a tenant administrator to do it for you.
Prerequisites
Learn how to add user authentication to a topic
You complete the first several steps in the Azure portal, and complete the final two steps in Copilot Studio.
Create an app registration
Sign in to the Azure portal, using an admin account in the same tenant as your agent.
Go to App registrations.
Select New registration and enter a name for the registration. Don't alter existing app registrations.
It can be helpful later to use the name of your agent. For example, if your agent is called "Contoso sales help," you might name the app registration "ContosoSalesReg."
Under Supported account types, select Accounts in this organizational directory only (Contoso only - Single tenant).
Leave the Redirect URI section blank for now. Enter that information in the next steps.
Select Register.
After the registration is complete, go to Overview.
Copy the Application (client) ID and paste it in a temporary file. You need it in later steps.
Add the redirect URL
Under Manage, select Authentication.
Under Platform configurations, select Add a platform, and then select Web.
Under Redirect URIs, enter
https://token.botframework.com/.auth/web/redirectorhttps://europe.token.botframework.com/.auth/web/redirectfor Europe. You can also copy the URI from Redirect URL textbox under Copilot Studio Security setting page under Authenticate manually.This action takes you back to the Platform configurations page.
Select both Access tokens (used for implicit flows) and ID tokens (used for implicit and hybrid flows).
Select Configure.
Configure manual authentication
Next, configure manual authentication. You can choose from multiple options for your provider, however we recommend you use Microsoft Entra ID V2 with federated credentials. You can also use client secrets if you're unable to use federated credentials.
Configure manual authentication using federated credentials
In Copilot Studio, go to Settings for your agent, and select Security.
Select Authentication.
Select Authenticate manually.
Leave Require users to sign in on.
Enter the following values for the properties:
Service provider: Select Microsoft Entra ID V2 with federated credentials.
Client ID: Enter the application (client) ID that you copied earlier from the Azure portal.
Select Save to see the federated credential issuer and value.
Copy the Federated credential issuer and Federated credential value and paste it in a temporary file. You need it in later steps.
Go to the Azure portal and the app registration you previously created. Under Manage, select Certificates & secrets and then Federated credentials.
Select Add credential.
Under Federated credential scenario, select Other issuer.
Enter the following values for the properties:
- Issuer: Enter the federated credential issuer value that you copied earlier from Copilot Studio.
- Value: Enter the federated credential value data that you copied earlier from Copilot Studio.
- Name: Provide a name.
Select Add to finish the configuration.
Configure API permissions
Go to API permissions.
Select Grant admin consent for <your tenant name>, and then select Yes. If the button isn't available, you might need to ask a tenant administrator to do enter it for you.
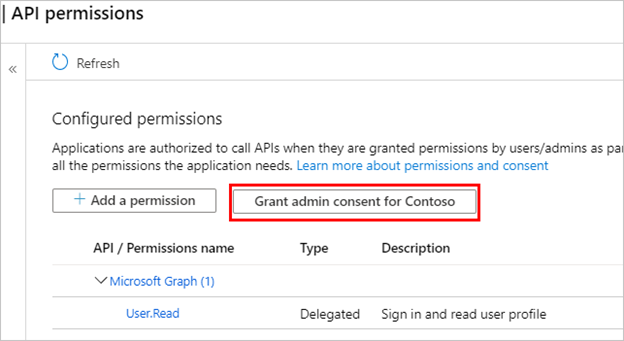
Important
To avoid users having to consent to each application, someone assigned at least the Application Administrator or Cloud Application Administrator role can grant tenant-wide consent to your application registrations.
Select Add a permission, and then select Microsoft Graph.
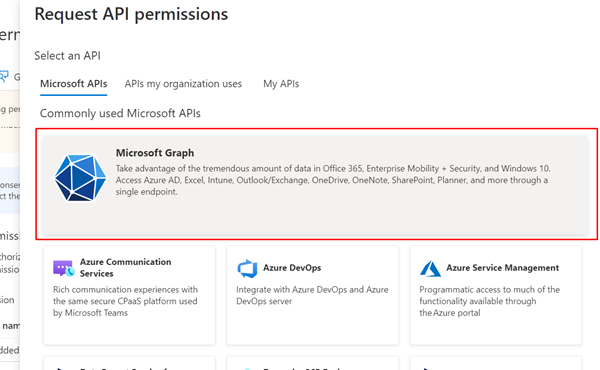
Select Delegated permissions.

Expand OpenId permissions and turn on openid and profile.

Select Add permissions.
Define a custom scope for your agent
Scopes allow you to determine user and admin roles and access rights. You create a custom scope for the canvas app registration that you create in a later step.
Go to Expose an API and select Add a scope.

Set the following properties. You can leave the other properties blank.
Property Value Scope name Enter a name that makes sense in your environment, such as Test.ReadWho can consent? Select Admins and users Admin consent display name Enter a name that makes sense in your environment, such as Test.ReadAdmin consent description Enter Allows the app to sign the user in.State Select Enabled Select Add scope.
Configure authentication in Copilot Studio
In Copilot Studio, under Settings, select Security > Authentication.
Select Authenticate manually.
Leave Require users to sign in on.
Select a Service provider and provide the required values. See Configure manual authentication in Copilot Studio.
Select Save.
Tip
The token exchange URL is used to exchange the On-Behalf-Of (OBO) token for the requested access token. For more information, see Configure single sign-on with Microsoft Entra ID.
Note
The scopes should include profile openid and the following, depending on your use case:
Sites.Read.All Files.Read.Allfor SharePointExternalItem.Read.Allfor Graph Connectionhttps://[OrgURL]/user_impersonationfor Dataverse structured data
For example, Dataverse Structure Data should have the following scopes: profile openid Sites.Read.All Files.Read.All https://myorg123.com/user_impersonation
Test your agent
Publish your agent.
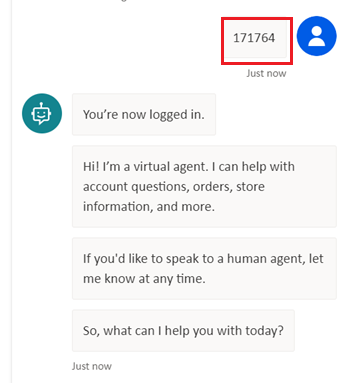
In the Test your agent panel, send a message to your agent.
When the agent responds, select Login.
A new browser tab opens, asking you to sign in.
Sign in, and then copy the displayed validation code.
Paste the code in the agent chat to complete the sign-in process.