Note
Access to this page requires authorization. You can try signing in or changing directories.
Access to this page requires authorization. You can try changing directories.
Microsoft 365 Agents Toolkit (previously known as Teams Toolkit) provides a way to run and test your app in different targets for deployment like dev, staging, production, or locally on your machine. To do this, Agents Toolkit includes an optional set of features that orchestrate the configuration of these different targets using information in environment files. The environment files represent a collection of all the resources of a deployment target. Agents Toolkit project templates include two default environment groupings: one for running the app on your machine named 'local' and another for hosting somewhere else named 'dev'. You can rename the 'dev' environment and add another environments using the Environments window or manually with a new .env.{environment-name} file. You can't rename the local environment.
By adding different environment files, Agents Toolkit can help automate the provisioning of resources needed to run the app and deploy your code to those resources. You can have a single set of deployment rules for number of environments using these features.
Using environment files with Agents Toolkit
Agents Toolkit uses a naming convention for the environment files such as: .env.{environment-name}. Using the toolkit's lifecycle commands (Provision, Deploy, or Publish) you're required to provide an environment name. The name of the environment should be the same as the value chosen for {environment-name} when creating the environment file.
Note
You can define environment variables for Agents Toolkit in your current shell environment which override any values in the .env file during a naming conflict.
Environment file ___location
By default, Agents Toolkit doesn't load any env variables, and just proceed with executing actions and write outputs to ./env/.env.dev. If environmentFolderPath isn't defined, Agents Toolkit doesn't load any environment variables from the .env file, and executes actions assuming the env is dev. The outputs are written to ./env/.env.dev.
Local environments
To build a Microsoft Teams app, certain resources, such as app registrations and the Teams client are hosted in the cloud. However, the other resources, such as including the application logic can be hosted locally to simplify the testing changes during app development. All Agents Toolkit project templates and samples are configured with a local environment. The local environment has ./env/.env.local and ./env/.env.local.user files and helps you to run your app with a locally hosted web server. When using Visual Studio Code (VS Code) and Visual Studio (VS), the project templates and samples are set up to support debugging with breakpoints.
To differentiate between a local environment and all other environments, you can create a separate project file called m365agents.local.yml in the same directory as m365agents.yml.
Create a new environment manually in Visual Studio Code
Each project can have one local environment but multiple remote environments. After you create a project, Agents Toolkit configures the following default environments:
- local environment to represent the local machine environment configuration.
- dev environment to represent the remote or cloud environment configuration.
To create a new environment:
Open your Teams app project in Visual Studio Code.
Select the Microsoft 365 Agents Toolkit icon from the Visual Studio Code activity bar.
Select the + icon in the ENVIRONMENT section.
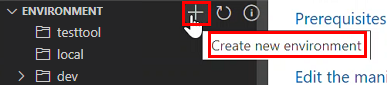
Enter a name for the environment and select Enter.

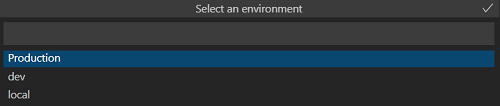
Targeting an environment
When you have multiple environments and select the Production, dev, or local menu items, Agents Toolkit prompts you to select a target environment.
See also
Collaborate with us on GitHub
The source for this content can be found on GitHub, where you can also create and review issues and pull requests. For more information, see our contributor guide.
Platform Docs