Note
Access to this page requires authorization. You can try signing in or changing directories.
Access to this page requires authorization. You can try changing directories.
The Center of Excellence (CoE) Starter Kit includes multiple nurture components that require configuration to install. These installation instructions are organized based on the set of components that you install together. Each section outlines dependencies on other groups.
Prerequisites
- Complete the instructions in Set up the CoE Starter Kit and Set up inventory components.
- Create your environments.
- Sign in with the correct identity.
Import the solution
The core components solution is required for the nurture components solution to work.
- Import the
CenterOfExcellenceNurtureComponents_x_x_x_xx_managed.zipfile solution from the download to install the solution. - Leave all environment variables blank on import.
Set up Video hub components
Note
The Setup Wizard is currently in preview. If you experience issues with the Setup Wizard, raise the issues on GitHub and set up the inventory components manually.
Set up the Video hub components using the Setup Wizard
Open the Center of Excellence - Core Components solution.
Open the CoE Setup and Upgrade Wizard app.
Open the More features page and select Video hub.
Follow the Video hub app's configuration steps.


Set up the Video hub components manually
Review and enable Video hub canvas app features.
The canvas app has two features you can enable:
- Comments
- Related video
You can enable either or both by updating environment variables in the CoE Admin Command Center app:
- Video Hub - Enable Comments
- Video Hub - Related Videos
Follow the instructions for setting environment variables.
Enable Comments
When enabled, Video hub users can comment on selected videos. Comment moderation is managed through the admin app. Comments need approval before they appear in the Video hub.

Related video
When the feature is enabled, Video hub shows users a list of videos similar to the one they selected. The content category value filters similar videos.

Share Video hub apps with admins and makers
Video hub components include two apps:
Nurture apps - admin to manage content, playlists, and comments. Share this app with other admins and assign them to the Power Platform security role (SR).
Video hub for video content. Share this app with your makers and assign them to the Power Platform security role (SR).
Learn more: Share an app from a production environment.
Import starter data (optional)
If you want to prepopulate the Video hub with videos from the Microsoft Power Platform YouTube channel, import data from the Video hub starter workbook.
- Open the Nurture - Admin app and navigate to the Content page.
- From the command bar, select Import from Excel.
- Select Choose File.
- Go to the ___location where you saved the microsoft-video-hub-starter-data.xlsx file, and then select Open.
- Select Next.
- Select Finish.
An import job is created. Track its progress by selecting Track Progress.
Manage content in admin Nurture app
You can manage video content, playlists, and comments in the Nurture - Admin app.
Video content
| Column | Column type | Description |
|---|---|---|
| Name | Text | The title of the video; for example, 'Building responsive Power Apps.' |
| Owner | User | The creator of the record. |
| Content description | Text | Detailed description of the video. |
| Content URL | Text (URL) | The URL to the video. |
| View count | Number | The count is updated, via the Video hub canvas app, when a user watches a video. |
| Power Platform product | Choice | Categorizes the video based on the Power Platform product. |
| Content category | Choice | The type of video; for example, How-to, Success story, Community session. |
Playlists
Playlists are curated lists of video content managed by administrators.
| Column | Column type | Description |
|---|---|---|
| Name | Text | Represents the display name for the playlist. |
| Owner | User | The creator of the record. |
| Playlist description | Text | Represents a detailed description of the playlist. |
| Playlist type | Choice | Represents the playlist type. Options available are personal or shared. Shared playlists are visible to all users. Private playlists are only visible to the author. |
Playlists are a curated collection of videos. One playlist has many playlist items.
| Column | Column type | Description |
|---|---|---|
| Name | Text | The name can be set to any value. The name isn't used in the Video hub canvas app. |
| Playlist | Lookup | This lookup column returns a list of playlists. |
| Community hub content | Lookup | This lookup column returns a list of video content. |
Comments
Users of the Video hub canvas app create comments. Comments are moderated and only visible when an administrator sets the Comment status column value to Approved.
| Column | Column type | Description |
|---|---|---|
| Name | Text | Unused in the admin app. The name column is populated when comments are created via the Video hub canvas app. |
| Comment text | Text | The users comment text. |
| Comment status | Choice | Approved or rejected. Only approved comments appear in the Video hub canvas app. |
| Community hub content | Lookup | The video related to the comment. |
Set up Training in a Day components
Note
The Setup Wizard is currently in preview. If you experience issues with the Setup Wizard, raise the issues on GitHub and set up the components manually.
Set up Training in a Day components using the Setup Wizard
Open the Center of Excellence - Core Components solution.
Open the CoE Setup and Upgrade Wizard app.
Open the More features page and select Training in a day.
Follow the Training in a day app's configuration steps.


Set up Training in a Day components manually
Update environment variables, set up a feedback form, turn on flows, and share with admins and makers.
Update Training in a Day environment variables
Update environment variables used by the environment request management components.
| Name | Description |
|---|---|
| Training in a day - Feedback Form | The Training in a day package includes a flow that automatically sends a feedback request to attendees on the day of the event. Configure the form through Microsoft Forms or the Forms app for a DoD tenant. |
| Community URL | Link to your internal Power Platform community; for example, Yammer or Teams. |
Set up a feedback form for your Training in a Day
Open the Microsoft Power Platform Training Feedback template form.
Select Duplicate it.
Edit the form to add your own questions.
Select Share, and copy the link for Send and collect responses.
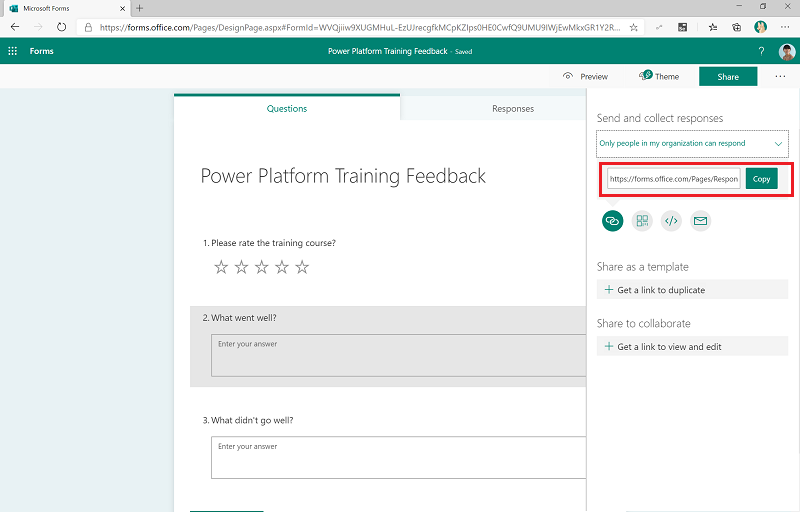
When importing the solution, update the Training in a day - Feedback Form with this value.
Turn on flows
Turn on the following flows for the Training in a Day components:
- Training in a day: Feedback Reminder
- Training in a day: Registration Confirmation
- Training in a day: Reminder three days before an event
Share Training in a Day apps with admins and makers
The Training in a Day components consist of two apps:
- Nurture apps - Admin for training organizers to view and manage events and registrations. Share this app with other admins or training organizers and assign them the Power Platform Admin security role (SR).
- Nurture apps - Maker for attendees to register for training events. Share this app with your makers and assign them the Power Platform Maker security role (SR).
Learn more: Share an app from a production environment.
Set up Maker Assessment components
Note
The Setup Wizard is currently in preview. If you experience issues with the Setup Wizard, raise the issues on GitHub and set up the components manually.
Set up Maker Assessment components using the Setup Wizard
Open the Center of Excellence - Core Components solution.
Open the CoE Setup and Upgrade Wizard app.
Open the More features page and select Maker Assessment.
Follow the Maker Assessment app's configuration steps.


Set up Maker Assessment components manually
Update the environment variable used by the environment request management.
| Name | Description |
|---|---|
| Maker Assessment Admin eMail | The email of the admin or CoE team that responds to queries from the Maker Assessment app. |
Import starter data set for the Maker Assessment app
Import an initial set of assessment questions to get started using the Maker Assessment app. You can add your own questions or customize the existing ones using the admin app for this solution.
Turn on flow
Turn on the flow:
Add Maker Assessment Starter data.
Run the Add Maker Assessment Starter Data flow once to add starter data for the Maker Assessment apps: categories, questions, and answers.
Share Maker Assessment apps with admins and makers
The Maker Assessment components consist of two apps:
- Nurture apps - Admin for admins to manage assessment questions. Share this app with other admins or training organizers, and assign them the Power Platform Admin security role (SR).
- Nurture apps - Maker for makers to complete assessments. Share this app with your makers, and assign them the Power Platform Maker security role (SR).
Learn more: Share an app from a production environment
Set up Pulse feedback survey
Important
The flows supporting this component processes post adaptive cards to users using the Microsoft Teams connector. The ability to post adaptive cards in Teams isn't available in GCC, GCC High and DoD. These flows should remain turned off in these regions.
Note
The Setup Wizard is currently in preview. If you experience issues with the Setup Wizard, raise the issues on GitHub and proceed with setting up the components manually.
Set up Pulse feedback survey using the Setup Wizard
Open the Center of Excellence - Core Components solution.
Open the CoE Setup and Upgrade Wizard app.
Open the More features page and select Pulse feedback.
Follow the Pulse feedback survey app's configuration steps.


Set up Pulse feedback survey manually
Update environment variable used by the environment request management components.
| Name | Description |
|---|---|
| Pulse - How many makers to survey? | The Pulse survey is sent to makers to provide feedback on their experience working with the CoE and Power Platform. Provide the number of makers you want to survey regularly here. If you set this number to 5, the survey is sent to 5 random makers per week. The default value is 1. |
Turn on flows to start collecting feedback
Turn on the following flows for the Pulse feedback survey components:
- Pulse [Child] - Post adaptive cards to maker
- Pulse - Survey Makers for CoE feedback
Set up the Power BI dashboard to view feedback
- Download and install Microsoft Power BI Desktop.
- Enable the TDS endpoint on your environment.
- Get the environment URL.
- In Power BI Desktop, open the Pulse_CoEDashboard.pbit file, which can be found in the CoE Starter Kit you downloaded from aka.ms/CoeStarterKitDownload.
- Enter the URL of your environment instance. Don't include the
https://prefix or/postfix for OrgUrl. - Save the dashboard locally, or select Publish and choose the workspace you want to publish the report to.
- Configure scheduled refresh for your Power BI Dataset to update the report daily.
You can find the report later by going to app.powerbi.com.
Set up template catalog components
Note
The Setup Wizard is currently in preview. If you experience issues with the Setup Wizard, raise the issues on GitHub and proceed with setting up the components manually.
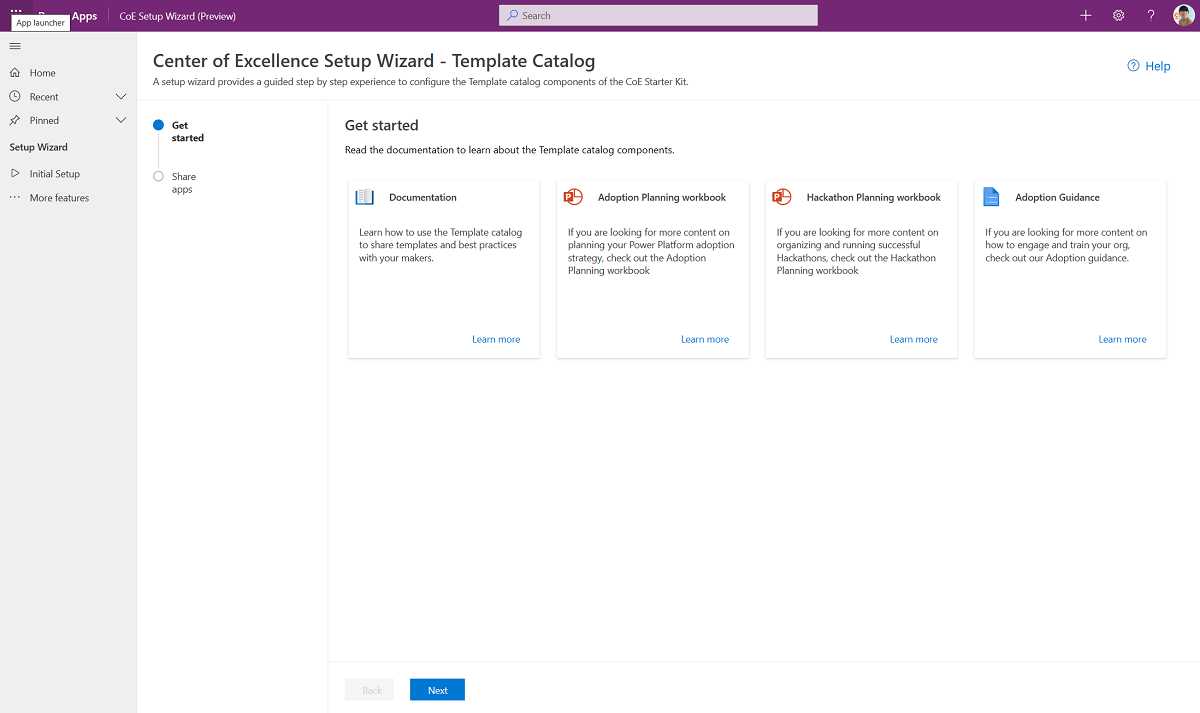
Set up Template catalog components using the Setup Wizard
Open the Center of Excellence - Core Components solution.
Open the CoE Setup and Upgrade Wizard app.
Open the More features page and select Template Catalog.
Follow the Template Catalog app's configuration steps.

Set up Template catalog components manually
If you have existing templates, such as template apps, brand guidelines, or app and flow samples, you can add them to the CoE Templates table. The templates appear in the template catalog once added.
- Go to make.powerapps.com and select your CoE environment
- On the left pane, select Solutions.
- Select the Center of Excellence - Nurture components solution.
- Open the CoE Templates table.
- Select Data.
- Select + Add Record to add your template description and file.
Share the template catalog apps with admins and makers
The template catalog components have one app:
- Nurture apps - Maker for makers and end users to browse available templates. Share this app with end users, and assign them the Power Platform User security role (SR).
Learn more: Share an app from a production environment.
Set up product newsletter
Turn on the Admin | Newsletter with Product Updates flow to receive a weekly email with updates from the Power Apps, Power Automate, Power BI, and Copilot Studio blog posts. This email is sent to the administrators only.
All environment variables
This list of environment variables affects the nurture solution. You might need to update environment variables after import.
Important
You don't have to change the environment variables in setup. However, you can change the environment variable you configured during import or when you want to change a default value. Restart all flows after you change environment variables to see the latest values.
Environment variables are used to store application and flow configuration data with data specific to your organization or environment.
| Name | Description | Default Value |
|---|---|---|
| Training in a day - Feedback Form | The Training in a day package includes a flow that automatically sends a feedback request to attendees on the day of the event. Configure the form through Microsoft Forms or the Forms app for a DoD tenant. | n/a |
| Power User Site URL (SharePoint Site) | The site that your Microsoft Power Platform power users can use to communicate and share files. Use this ___location to store the template library for the team. Currently not used. | n/a |
| Innovation Backlog URL | (Optional) URL to the Innovation Backlog canvas app, if you're using this app. | n/a |
| Maker Assessment Admin eMail | The email of the admin or CoE team that responds to queries from the Maker Assessment app. | n/a |
| Community URL | Link to your internal Microsoft Power Platform community; for example, Yammer or Teams. | n/a |
| Pulse - How many makers to survey? | The Pulse feedback survey is sent to makers to provide feedback on their experience working with the CoE and Power Platform. Provide the number of makers you want to survey regularly here. If you set this number to 5, the survey is sent to 5 random makers per week. |
1 |
| Video hub - Enable Comments | Enable or disable end users to leave comments on videos published via the Video hub app. Disabled by default. | No |
| Video hub - Related Videos | Enable or disable showing related videos in the Video hub. Enabled by default. | Yes |
How to file an issue
To file a bug against the solution, go to aka.ms/coe-starter-kit-issues.