Note
Access to this page requires authorization. You can try signing in or changing directories.
Access to this page requires authorization. You can try changing directories.
Access and permission settings in eDiscovery let you add or remove users to a case, manage role group membership for a case, and add people outside your organization as guest users for a case.
Tip
Get started with Microsoft Security Copilot to explore new ways to work smarter and faster using the power of AI. Learn more about Microsoft Security Copilot in Microsoft Purview.
Add or remove users from an eDiscovery case
You can add or remove users to manage who can access the case. However, before a user can access an eDiscovery case (and perform tasks in the case), you must add the user to the eDiscovery Manager role group in the Microsoft Purview portal. For more information, see Assign eDiscovery permissions.
Adding users to a case
Complete the following steps to add users to a case:
Go to the Microsoft Purview portal and sign in with the credentials for a user account assigned eDiscovery permissions.
Select the eDiscovery solution card and then select Cases (preview) in the left nav.
Select a case, then select Case settings.
On Case settings, select Access and permissions.
Under Users, select Add to add users to the case. You can also choose to add a role group to the case by selecting Add under Role groups.
In the list of users or role groups that you can add to the case, select the check box next to the names of the users or role groups that you want to add.
Note
When adding a role group to a case, you can only add the role groups that you're a member of.
After you select the people or role groups to add as members of the case, select Add. The selected users are added to the case.
Important
If you add or remove a role from a role group that you added as a member of a case, the role group is automatically removed as a member of the case (or any case the role group is a member of). This behavior protects your organization from inadvertently providing extra permissions to members of a case. Similarly, if you delete a role group, it's removed from all cases it was a member of. For more information, see Assign eDiscovery permissions.
Removing users from a case
Only an eDiscovery Administrator can remove users from a case. Even if you're assigned to the eDiscovery Manager role group or initially created the case, you can't remove yourself or other members from a case unless you're also an eDiscovery Administrator. To remove yourself or other members from a case, contact an eDiscovery Administrator in your organization.
Complete the following steps to remove users from a case:
- Go to the Microsoft Purview portal and sign in with the credentials for a user account assigned eDiscovery permissions.
- Select the eDiscovery solution card and then select Cases (preview) in the left nav.
- Select a case, then select Case settings.
- On Case settings, select Access and permissions.
- Under Users, select Remove to remove users from the case. You can also remove users from a role group for the case by selecting Remove under Role groups.
- In the list of users or role groups that you can remove from the case, select the check box next to the names of the users or role groups that you want to remove.
- After you select the people or role groups to add as members of the case, select Remove. The selected users are removed from the case.
Guest access in eDiscovery
With guest access, you can provide access to an eDiscovery case to people outside your organization. You can invite guest users to eDiscovery cases just like you can invite guests into your Teams environment. eDiscovery admins must enable guest access in eDiscovery before they can invite users as guests.
Invite guests to an eDiscovery case
After you enable guest access for eDiscovery, complete the following steps to invite guests to an eDiscovery case:
In the Microsoft Purview portal, go to eDiscovery > Cases and select the case you want to invite guests to.
In the selected case, select the Case settings tab.
Select Access and permissions.
In the Guest users section on the Access and permissions page, select Invite.
On the Invite guest flyout pane, complete the following fields:
- Full name: Enter the full name of the guest you want to invite.
- Email address: Enter the email address of the guest you want to invite.
- Organization: Enter the organization of the guest you want to invite.
- Guest role: Select the role you want to assign to the guest. The guest is currently limited to Reviewer role group permission only.
- Justification: Explain why this person needs access to the case.
Select Invite to submit the invitation request for review and approval by an eDiscovery admin.
Approve guest access requests
After submitting guest invitations, eDiscovery admins must approve the requests before the guest can access the case. eDiscovery managers receive notifications of pending invitation requests on the Guest users page in eDiscovery settings in the Microsoft Purview portal. To approve guest access requests, eDiscovery administrators must have the Role Management role assigned.
To review and approve guest access requests, eDiscovery managers complete the following steps:
- Go to the Microsoft Purview portal and sign in with the credentials for a user account assigned eDiscovery permissions.
- Go to Settings > eDiscovery > Guest users.
- Select the guest request and select Approve or Deny from the flyout pane.
If the guest is being added to the tenant for the first time, eDiscovery admins need to perform a two-step approval process. They first need to approve creation of an account, which might take up to 24 hours. After 24 hours, eDiscovery admins can approve guest access to the case. For future access requests for access to other cases for the same guest, only one-step approval is required.
If you encounter an error when approving the guest access to a case, check the following points:
- The guest's email isn't disabled, blocked, or deleted by the tenant admin.
- If there are any members in the Reviewer role group whose Microsoft Entra account is deleted. Currently, an error occurs when adding a new member to a role group that has any deleted users. If the Reviewer role group has any deleted users, remove them from the role group and retry the guest approval.
Accepting guest invitations
After the eDiscovery admin approves the request, the guest receives a welcome email from Microsoft Invitations. This email contains information about the eDiscovery invitation and a link where the guest can accept the invite and sign in. The guest must select the unique link provided in the email or copy and paste the link in a browser to sign in to the specific eDiscovery organization.
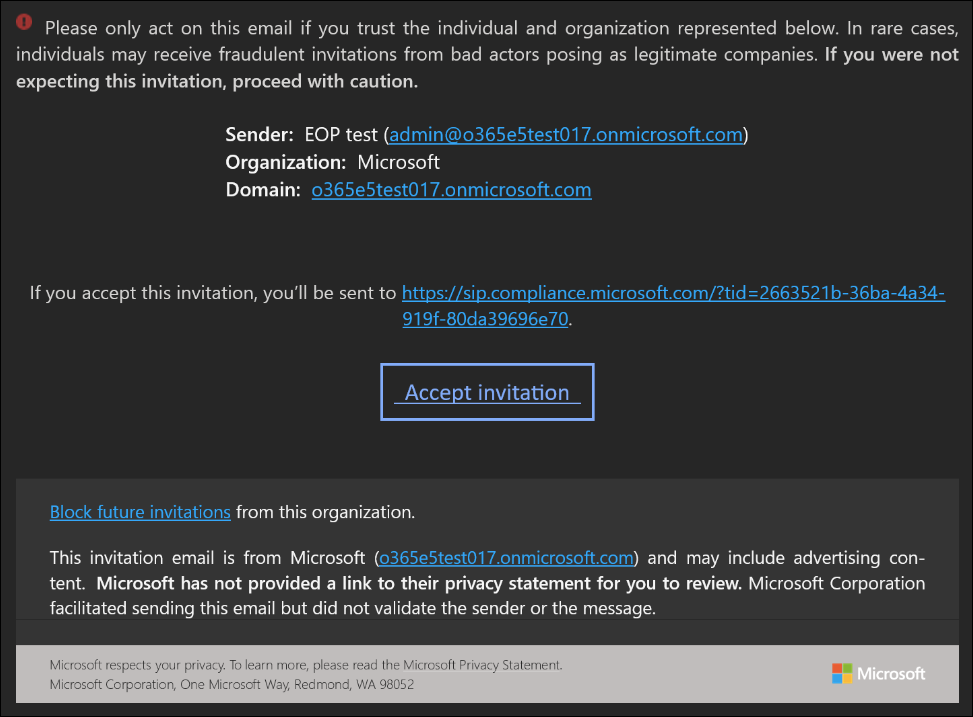
Guests with a work or school account in Microsoft Entra ID can accept the invitation and authenticate immediately. Other users receive a one-time passcode to validate their identity. You must ensure that the one-time passcode setting is enabled in your organization.
Note
If the guest is signed in to another eDiscovery organization in their browser, they need to sign out from the organization and clear their browser cache before selecting the link in the invitation email.
After accepting the invitation and authenticating, the guest can participate in the eDiscovery case like an internal reviewer of the case and perform review activities such as querying, filtering, tagging, redaction, downloading single items for review, and more.
Removing guest access
An eDiscovery admin can remove a guest’s access to a case from the eDiscovery settings page. To remove guest access for a user, eDiscovery admins must complete the following steps:
- Go to the Microsoft Purview portal and sign in with the credentials for a user account assigned eDiscovery permissions.
- Go to Settings > eDiscovery > Guest users.
- Select the guest and select Remove from the flyout pane.
The guest keeps access to other cases they were added to. When you remove a guest from the last case they have access to, you remove them from the Reviewer role group and they lose access to all cases in eDiscovery.
The guest keeps their Microsoft Entra guest account in the organization. Regularly review and clean up guest accounts from Microsoft Entra ID.