Note
Access to this page requires authorization. You can try signing in or changing directories.
Access to this page requires authorization. You can try changing directories.
Important
These features are only available if you're using the new Microsoft Purview portal.
If you're using the classic governance experience (https://web.purview.azure.com/), see the classic create and manage collections article instead.
Domains and collections in the Microsoft Purview Data Map can be used to organize assets and sources by your business's flow. They're also the tool used to manage access across the Microsoft Purview governance portal. This guide will take you through the creation and management of domains and collections, as well as cover steps about how to register sources and add assets into your collections.
For more information about domains, and the structure of the Microsoft Purview Data Map, see our article about domains in Microsoft Purview.
Prerequisites
An Azure account with an active subscription. Create an account for free.
Your own Microsoft Entra tenant.
A Microsoft Purview account using the new Microsoft Purview experience.
You need to be a Purview administrator within the Microsoft Purview governance portal to manage domains. To check or set these roles, see our permissions documentation.
Permissions to manage domains and collections
To manage domains, and permissions in domains, a user needs to be a Purview administrator or a ___domain admin.
To manage collections, a user needs to be at least a Domain Admin or Collection Admin within the Microsoft Purview governance portal.
To manage collections, a user needs to be at least a Domain Admin or Collection Admin within the Microsoft Purview governance portal.
We can check these permissions in the Microsoft Purview governance portal:
Navigate to the Microsoft Purview portal (https://purview.microsoft.com).
Open the Data Map solution.
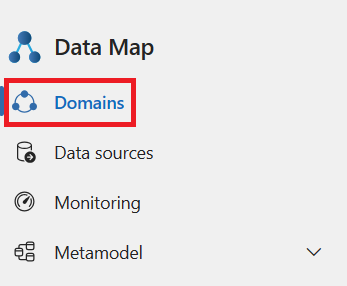
Select Domains from the left pane to open the domains management page.
Select your default ___domain. Currently it's the only available ___domain.
Select Role assignments in the collection window.

Search under these roles for your user:
- Domain admins - to be able to manage the ___domain or permissions in it.
- Collection admins - to be able to create or manage collections in the ___domain.
Tip
If you don't have either of the needed permissions, contact the ___domain admin to grant you permission.
Default ___domain
Every Microsoft Purview Data Map starts with a default ___domain.
When an account is upgraded to the new experience, the primary account's root collection becomes the default ___domain.
If you haven't upgraded to the new experience yet, take these points into consideration when choosing which account to elevate as your default ___domain:
- Data Assets: Choose the account with the most valuable or frequently used data assets, as this will become the default ___domain after the upgrade.
- Account Usage: Evaluate how each account is currently being used and its role within your organization. Accounts that are considered "production" would be most viable to select for this purpose.
- Permissions and Access Controls: Consider the existing permissions and access controls for each account, as they'll be carried over to the upgraded environment (as an isolated Domain). The permissions are applied in the new environment exactly as they are in the original environment. No more permissions are granted.
For more information about the new experience, see our guide on governance in the new Microsoft Purview experience.
Custom domains
You can create up to four custom domains in your Microsoft Purview Data Map.
Create custom domains
Navigate to https://purview.microsoft.com.
Open the Data Map solution.
Select Domains from the left pane to open the domains management page.
Select the + New ___domain (Preview) button.

Give your ___domain a name, description, and assign one or more ___domain administrators.

Select Create.
Edit custom domains
You can modify the description or the administrators of your custom domains by editing them.
- Navigate to https://purview.microsoft.com.
- Open the Data Map solution.
- Select Domains from the left pane to open the domains management page.
- Select the ___domain you want to edit.
- Select the Edit button on the ___domain details page.
Delete custom domains
Important
- Before you delete a custom ___domain, you must remove everything under it first. Including: subcollections, data sources, scans, assets, glossaries, terms, credentials, Azure Key Vaults, etc.
- Default domains can't be deleted.
To remove a ___domain, you need to have either Microsoft Purview administrator or ___domain administrator permissions.
- Navigate to https://purview.microsoft.com.
- Open the Data Map solution.
- Select Domains from the left pane to open the domains management page.
- Select the ___domain you want to delete.
- Select the Delete button and confirm the deletion.
Collection management
Create a collection
You'll need to be a collection admin or ___domain admin within a ___domain order to create a collection. If you aren't sure, follow the guide above to check permissions.
Navigate to https://purview.microsoft.com.
Open the Data Map solution.
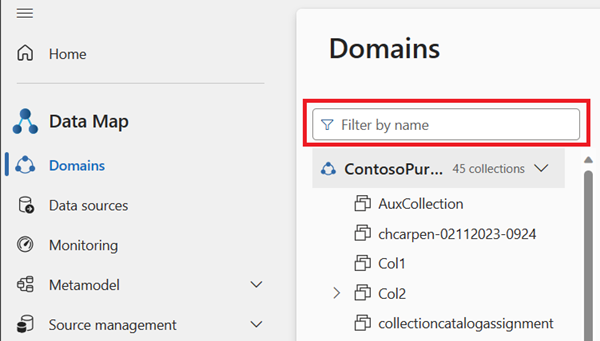
Select Domains from the left pane to open the domains management page.
Select the drop-down next to your default ___domain.
Select your default ___domain, or select an existing collection where you want to make a child collection.
Select + New collection. Again, note that only ___domain and collection admins can manage collections.

In the new collection window, enter the collection display name and description. If needed, you can also add users or groups as collection admins to the new collection.
Select Create.
The new collection's information will reflect in the collection list under your ___domain, and you'll be taken to your collection's detail page.
Edit a collection
Select Edit either from the collection detail page, or from the collection's dropdown menu.
Make any changes, then select Save to save your change.

View Collections
Select the arrow icon beside the collection's name to expand or collapse the collection hierarchy. Select the collection names to navigate.

Type in the filter box at the top of the list to filter collections.
Select Refresh in collection detail page to reload the single collection.

Delete a collection
You'll need to be a ___domain admin or a collection admin in order to delete a collection. If you aren't sure, follow the guide above to check permissions. Collections can be deleted only if no child collections, assets, data sources or scans are associated with it.
Select Delete from the collection detail page.
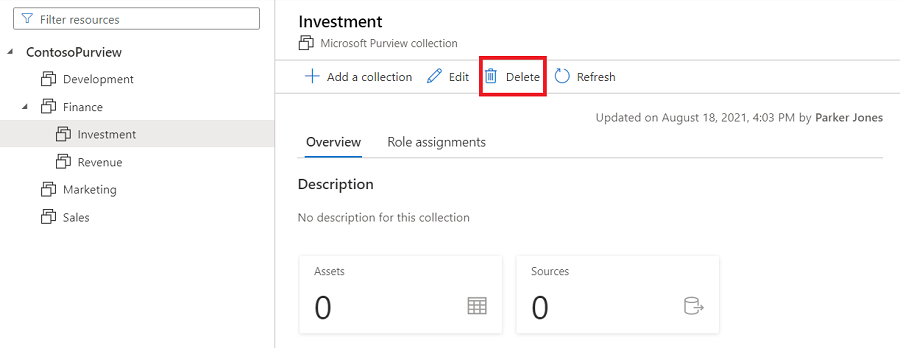
Select Confirm when prompted, Are you sure you want to delete this collection?

Verify deletion of the collection from your Microsoft Purview Data Map.
Note
Collections can be deleted only if no child collections, assets, data sources or scans are associated with it.
Move registered sources between collections
You can move registered sources from one collection to another you have access to. For steps, see the manage data sources article.
Add roles and restrict access
Since permissions are managed through domains and collections in the Microsoft Purview Data Map, it's important to understand the roles and what permissions they'll give your users.
The roles are assigned and inherited in domains and collections the same way. A user granted permissions on a ___domain or collection will have access to sources and assets associated with that collection, and inherit permissions to its subcollections. Inheritance can be restricted, but is allowed by default.
The following guide discusses the roles, how to manage them, and permissions inheritance.
Roles
All assigned roles apply to sources, assets, and other objects within the ___domain or collection where the role is applied.
- Domain admin (___domain level only) - Can assign permissions within a ___domain and manage its resources.
- Collection administrator - a role for users that will need to assign roles to other users in the Microsoft Purview governance portal or manage collections. Collection admins can add users to roles on collections where they're admins. They can also edit collections, their details, and add subcollections. A collection administrator on the root collection also automatically has permission to the Microsoft Purview governance portal. If your root collection administrator ever needs to be changed, you can follow the steps in the section below.
- Data curators - a role that provides access to the Microsoft Purview Unified Catalog to manage assets, configure custom classifications, create and manage glossary terms, and view data estate insights. Data curators can create, read, modify, move, and delete assets. They can also apply annotations to assets.
- Data readers - a role that provides read-only access to data assets, classifications, classification rules, collections and glossary terms.
- Data source administrator - a role that allows a user to manage data sources and scans. If a user is granted only to Data source admin role on a given data source, they can run new scans using an existing scan rule. To create new scan rules, the user must be also granted as either Data reader or Data curator roles.
- Insights reader - a role that provides read-only access to insights reports for collections where the insights reader also has at least the Data reader role. For more information, see insights permissions.
- Policy author - a role that allows a user to view, update, and delete Microsoft Purview policies through the Data policy app within Microsoft Purview.
- Workflow administrator - a role that allows a user to access the workflow authoring page in the Microsoft Purview governance portal, and publish workflows on collections where they have access permissions. Workflow administrator only has access to authoring, and so will need at least Data reader permission on a collection to be able to access the Purview governance portal.
Note
At this time, Microsoft Purview policy author role is not sufficient to create policies. The Microsoft Purview data source admin role is also required.
Important
The user that created the account is automatically assigned ___domain admin on the default ___domain and collection admin on the root collection.
Add role assignments
Open the Microsoft Purview Data Map.
Select the ___domain or collection where you want to add your role assignment.
Select the Role assignments tab to see all the roles in a collection or a ___domain. Only a collection admin or ___domain admin can manage role assignments.

Select Edit role assignments or the person icon to edit each role member.

Type in the textbox to search for users you want to add to the role member. Select X to remove members you don't want to add.

Select OK to save your changes, and you'll see the new users reflected in the role assignments list.
Remove role assignments
Select X button next to a user's name to remove a role assignment.

Select Confirm if you're sure to remove the user.

Restrict inheritance
Collection permissions are inherited automatically from the parent collection. You can restrict inheritance from a parent collection at any time, using the restrict inherited permissions option.
Note
Currently permissions from the default ___domain cannot be restricted. Any permissions assigned at the default ___domain will be inherited by the ___domain's direct subcollections.
Once you restrict inheritance, you'll need to add users directly to the restricted collection to grant them access.
Navigate to the collection where you want to restrict inheritance and select the Role assignments tab.
Select Restrict inherited permissions and select Restrict access in the popup dialog to remove inherited permissions from this collection and any subcollections. Collection admin permissions won't be affected.

After restriction, inherited members are removed from the roles expect for collection admin.
Select the Restrict inherited permissions toggle button again to revert.

Register and scan source in a ___domain or collection
Important
Every source has its own prerequisites and information for registration and scanning. Get detailed registration and scanning steps for each data source.
Navigate to https://purview.microsoft.com.
Open the Data Map solution.
Select Data sources from the left pane to open the data sources map page.
Select Register or the register icon on a ___domain or collection node to register a data source. Only a data source admins can register sources.

Fill in the data source name, and other source information.
Select a ___domain.
Select a collection. To register the resource in the ___domain, choose the Select ___domain only option. All assets under this source will belong to the ___domain or collection you select.

The created data source will be put under the selected ___domain or collection. Select View details to see the data source.

Select New scan to create scan under the data source.

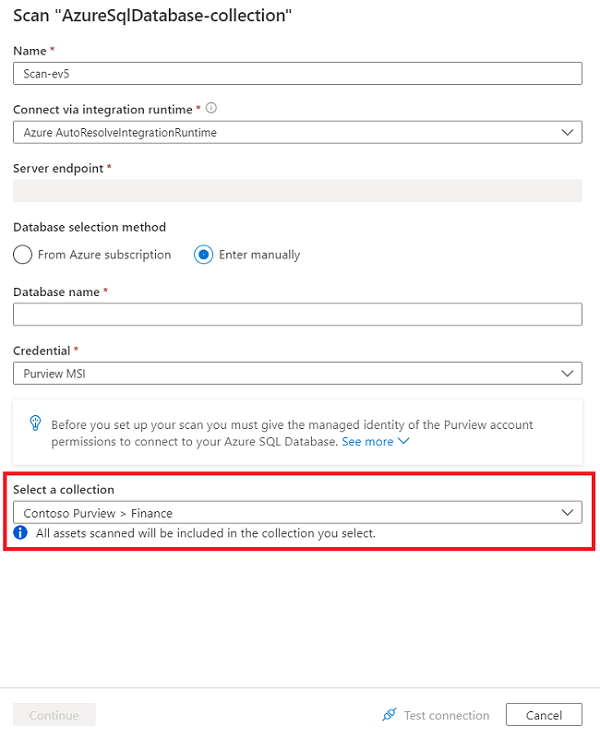
When creating a scan, you can select a collection and all assets scanned will be included in that collection. Collections listed in a scan are subcollections of the data source collection.
After your scan, you'll see the data sources linked to the collection or ___domain on their data sources card.
Add assets to collection and domains
Assets and sources are also associated with domains and collections. During a scan, if the scan was associated with a ___domain or collection, the assets will be automatically added to that resource, but the assets can also be manually moved to any subcollections (if you have the write permissions on those subcollections.)
Check the ___domain and collection information in asset details. You can find information in the Collection path section on right-top corner of the asset details page.
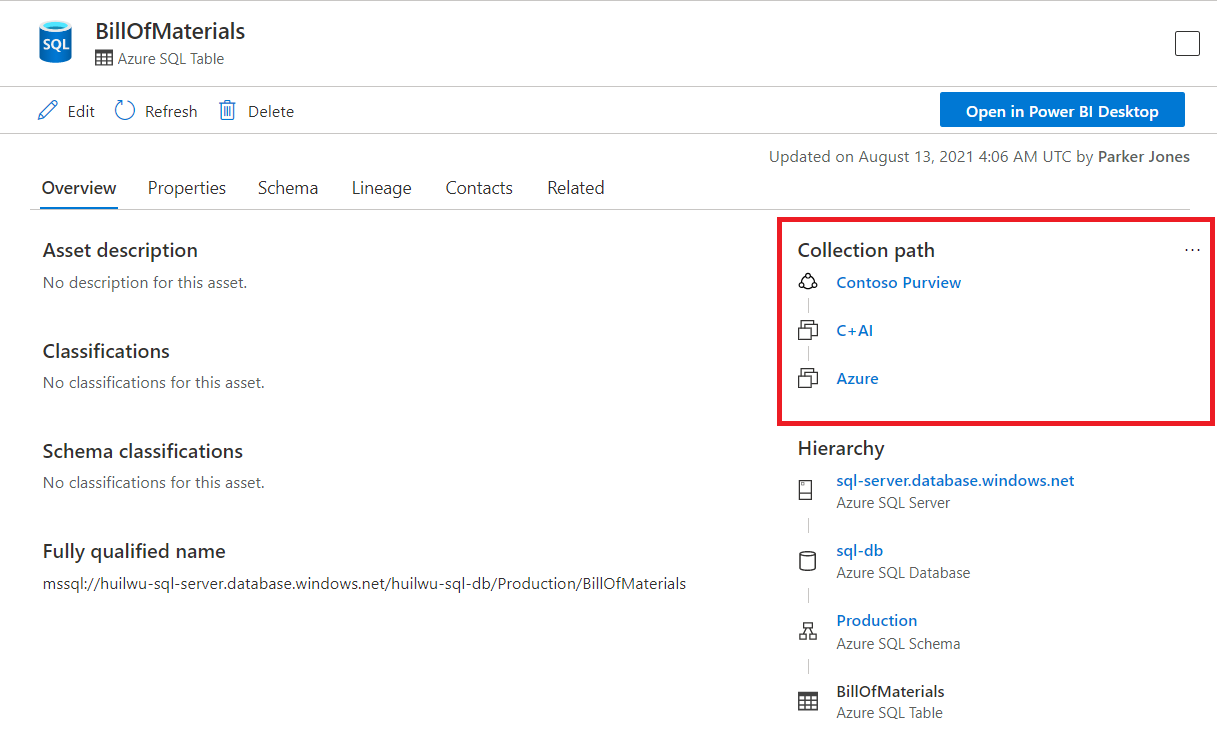
Select the ellipsis button on the right-top corner of the Collection path section.
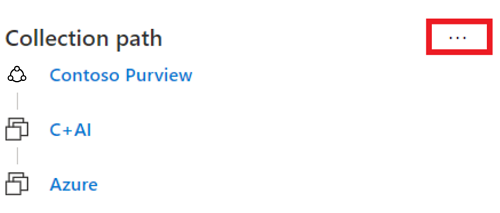
Select the Move to another collection button.
In the right side panel, choose the target collection you want move to. You can only see the collections where you have write permissions. The asset can also only be added to the subcollections of the data source collection.
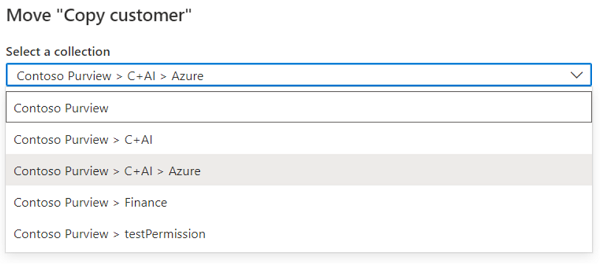
Select Move button on the bottom of the window to move the asset.
Rename collections (preview)
Important
This feature is currently in preview. The Supplemental Terms of Use for Microsoft Azure Previews include additional legal terms that apply to Azure features that are in beta, in preview, or otherwise not yet released into general availability.
In the Microsoft Purview governance portal, navigate to the collection that you want to rename.
Select Edit either from the collection detail page, or from the collection's dropdown menu.
Provide a new friendly name and select Save to save your change.

Move collections (preview)
Important
This feature is currently in preview. The Supplemental Terms of Use for Microsoft Azure Previews include additional legal terms that apply to Azure features that are in beta, in preview, or otherwise not yet released into general availability.
In the Microsoft Purview governance portal, navigate to the collection that you want to move to a different parent collection.
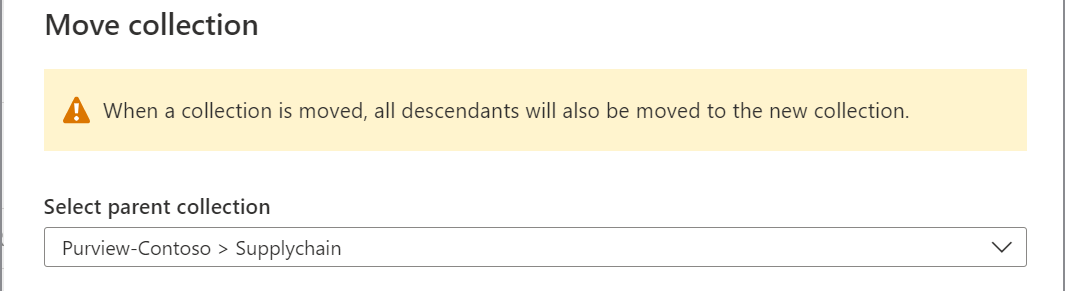
Select the ellipsis button on the right-top corner of collection path section and select Move to another collection.
From Select parent collection dropdown list, select a new parent for the collection and select OK.
Best practices
- Domains and collections architecture best practices
- Data Map domains and governance domains best practices
Next steps
Now that you have organized your domains and collections, you can follow these guides below to add resources and scan: