Note
Access to this page requires authorization. You can try signing in or changing directories.
Access to this page requires authorization. You can try changing directories.
Applies to: ![]() SQL Server
SQL Server ![]() Azure SQL Database
Azure SQL Database ![]() Azure SQL Managed Instance
Azure SQL Managed Instance ![]() SQL database in Microsoft Fabric
SQL database in Microsoft Fabric
This article provides direct links for downloading AdventureWorks sample databases and instructions for restoring them to your database.
For more information about samples, see the Samples GitHub repository.
Prerequisites
Download backup files
Use these links to download the appropriate sample database for your scenario.
- OLTP data is for most typical online transaction processing workloads.
- Data Warehouse (DW) data is for data warehousing workloads.
- Lightweight (LT) data is a lightweight and pared down version of the OLTP sample.
If you're not sure what you need, start with the OLTP version that matches your SQL Server version.
You can find additional files on GitHub:
Restore to SQL Server
You can use the .bak file to restore your sample database to your SQL Server instance. You can do so using the RESTORE T-SQL command, or using the graphical interface (GUI) in SSMS, the MSSQL extension for Visual Studio Code, or any T-SQL query tool.
If you're not familiar with using SSMS, you can review Connect and query using SSMS to get started.
To restore your database in SSMS, follow these steps:
Download the appropriate
.bakfile from one of links provided in the Download backup files section of this article.Move the
.bakfile to your SQL Server backup ___location. This ___location varies depending on your installation ___location, instance name, and version of SQL Server. For example, the default ___location for a default instance of SQL Server 2022 (16.x) is:C:\Program Files\Microsoft SQL Server\MSSQL17.MSSQLSERVER\MSSQL\BackupOpen SSMS and connect to your SQL Server instance.
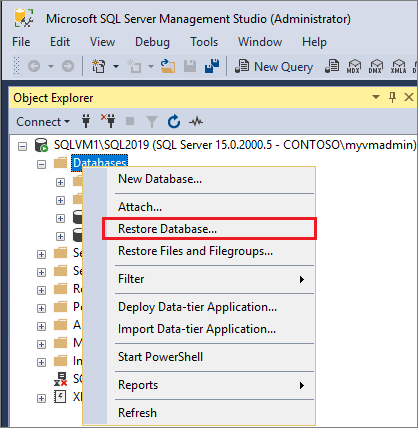
Right-click Databases in Object Explorer and then select Restore Database... to start the Restore Database wizard.
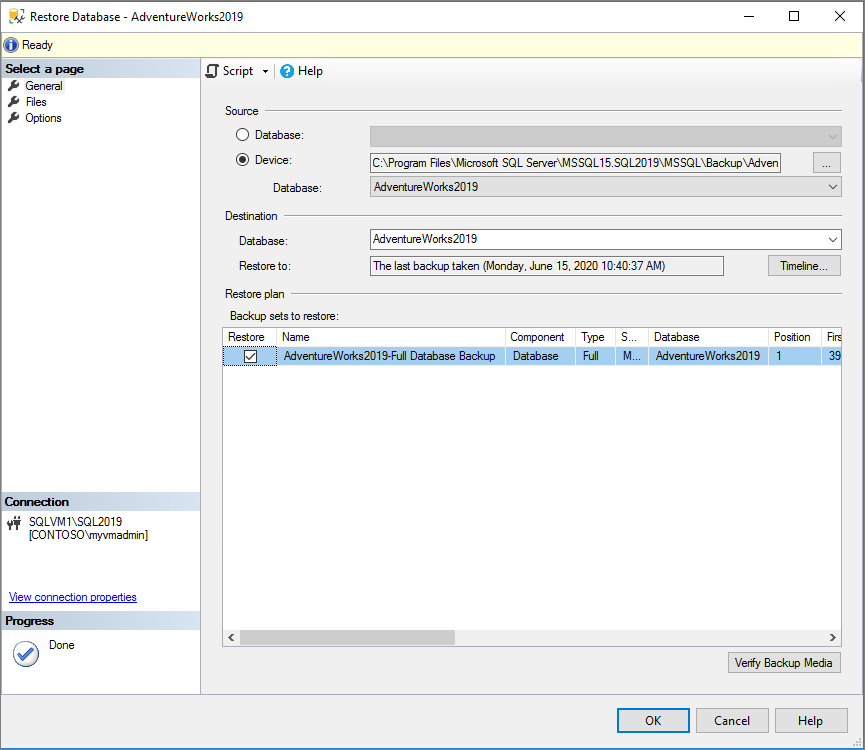
Select Device, and then select the ellipsis (...) to choose a device.
Select Add, and then choose the
.bakfile you recently moved to the backup ___location. If you moved your file to this ___location but you don't see it in the wizard, SQL Server or the user signed into SQL Server doesn't have permission to this file in this folder.Select OK to confirm your database backup selection and close the Select backup devices window.
Check the Files tab to confirm that the Restore as ___location and file names match your intended ___location and file names in the Restore Database wizard.
Select OK to restore your database.

For more information on restoring a SQL Server database, see Restore a database backup using SSMS.
Deploy to Azure SQL Database
You have two options for viewing sample SQL Database data. You can use a sample when you create a new database, or you can deploy a database from SQL Server directly to Azure by using SSMS.
To get sample data for SQL Managed Instance instead, see Quickstart: Restore a database to Azure SQL Managed Instance with SSMS.
Deploy a new sample database
When you create a new database in SQL Database, you can create a blank database, restore from a backup, or select sample data to populate your new database.
Follow these steps to deploy a new sample AdventureWorksLT database in Azure SQL Database:
In the pane for Azure SQL Database, select Show options.
In the Azure SQL Database options window, select Create SQL Database.

Fill in the requested information to create your database.
On the Additional settings tab, choose Sample as the existing data under Data source:

Select Next: Tags.
Consider using Azure tags. For example, the "Owner" or "CreatedBy" tag to identify who created the resource, and the Environment tag to identify whether this resource is in Production, Development, etc. For more information, see Develop your naming and tagging strategy for Azure resources.
Select Create to create your new SQL Database, which is the restored copy of the
AdventureWorksLTdatabase.


Deploy a database from SQL Server
SSMS allows you to deploy a database directly to SQL Database. This method doesn't currently provide data validation, so it's intended for development and testing and shouldn't be used for production.
To deploy a sample database from SQL Server to SQL Database, follow these steps:
Connect to your SQL Server in SSMS.
If you haven't already done so, restore the sample database to SQL Server.
Right-click your restored database in Object Explorer and then select Tasks > Deploy Database to Microsoft Azure SQL Database.

Complete the steps in the wizard to connect to SQL Database and deploy your database.
Deploy to SQL database in Microsoft Fabric
To load a sample AdventureWorksLT database in a new SQL database in Microsoft Fabric, create a new SQL database in Fabric. Then, under Build your database, select the Sample data button.
Scripts for creating a database
Instead of restoring a database, you can use scripts to create the AdventureWorks databases, regardless of version.
You can use the following scripts to create the entire AdventureWorks database:
You can find additional information about using the scripts on GitHub.