Note
Access to this page requires authorization. You can try signing in or changing directories.
Access to this page requires authorization. You can try changing directories.
Applies to: ![]() SQL Server
SQL Server
This article teaches you how to migrate your SQL Server instance enabled by Azure Arc to Azure SQL Managed Instance by using Database migration (preview) in the Azure portal.
Note
Database migration to Azure SQL Managed Instance through the Azure portal is currently in preview.
Overview
Azure SQL Managed Instance is a fully managed lift and shift Platform-as-a-service (PaaS) target to run your SQL Server workloads in the Azure cloud. After you enable your SQL Server instance with Azure Arc, you can assess your SQL Server data estate to identify an optimal SQL Managed Instance configuration, and then migrate your SQL Server databases to Azure SQL Managed Instance directly from the Azure portal.
When your SQL Server instance is enabled with Azure Arc, you can:
- Evaluate and assess how ready your SQL Server instance is to migrate to Azure SQL Managed Instance.
- Identify potential migration risks, and learn how to mitigate them.
- Optimize for performance and cost with guidance around service tiers, configuration, and sizing.
Discovery of SQL Server instances and generation of readiness reports happen instantly, automatically and continuously, with no extra configuration or setup required. After you've chosen an appropriate SQL Managed Instance target, and prepared your environment, you can migrate your SQL Server databases to Azure SQL Managed Instance directly from the Azure portal through a fully managed and automated process.
Database migration (preview) is available by default for all SQL Server instances enabled by Azure Arc, starting with SQL Server 2012 (11.x).
Choose integrated migration method
You can choose the migration method that best fits your needs on the Database migration (preview) page. After some initial configuration, migration is automated for you based on your selection.
The following methods are built into the migration process:
- Managed Instance link: Migrate using real-time replication with a distributed availability group (online)
- Log replay service (LRS): Migrate using log shipping (online)
Review Compare the MI link with LRS migration methods to understand the differences between the two migration options. Choose the option that best suits your needs on the Migrate data step of the Database migration (preview) page in the Azure portal.
Prerequisites
To migrate your SQL Server instance to Azure SQL Managed Instance through the Azure portal, your instance must meet the following prerequisites:
- Enabled by Azure Arc starting with the July 2025 update to the Azure Extension for SQL Server (1.1.3106.305).
Requirements for the source SQL Server instance are determined by the migration method you plan to use. For example:
- Managed Instance link supports SQL Server 2016 and later on any supported edition of Windows Server.
- Log replay service (LRS) supports SQL Server 2008 and later on any supported edition of Windows Server.
Permissions
This section details the permissions required to migrate your SQL Server instance to Azure SQL Managed Instance through the Azure portal.
On the source SQL Server instance, you must have the following permissions:
- If you've enabled least privilege, necessary permissions, including
sysadmin, are granted as needed during the database migration process. - If you're not able to use least privilege, then you should have sysadmin permissions on the source SQL Server instance.
To migrate with the Managed Instance link, you must have one of the following permissions on the target SQL Managed Instance:
- Azure SQL Managed Instance Contributor role.
- Subscription-level Contributor or Owner.
- For minimum permissions, see Custom permissions.
Note
Users with the SqlServerAvailabilityGroups_CreateManagedInstanceLink, SqlServerAvailabilityGroups_failoverMiLink, and SqlServerAvailabilityGroups_deleteMiLink permissions in Azure can perform actions on the Database migration (preview) page during the migration process that elevate the SQL Server permissions of the account used by the extension, including the sysadmin role.
Prepare environment for migration
To use either the link or LRS to migrate your databases, you must first prepare your environment.
To use the MI link, follow these steps:
- Your SQL Server database must be in full recovery mode, and you must have a recent full backup of your database. For SQL Server instances that meet the licensing requirement, you can enable the automated backups (preview) feature, which automatically determines backup qualifications. SQL Server instances that don't support the automated backup feature can still migrate their database through the Managed Instance link, but must manually validate the database is in full recovery mode and take a current full backup.
- Prepare your environment.
- Establish trust between instances.
Migrate to Azure SQL Managed Instance
The following tiles guide you through the migration of your SQL Server databases to Azure SQL Managed Instance:
- Assess source instance: Assess your SQL Server instance to determine its readiness to migrate to Azure SQL Managed Instance.
- Select target: Select an Azure SQL Managed Instance target for your migration.
- Migrate data: Migrate your SQL Server databases to Azure SQL Managed Instance.
- Monitor and cutover: Monitor the migration process and cut over to the target Azure SQL Managed Instance.
The following screenshot shows the tiles on the Database migration (preview) page for your SQL Server instance in the Azure portal:

Assess source instance
To assess the source instance, follow these steps:
Go to your SQL Server instance in the Azure portal.
Under Migration, select Database migration (preview) to open the Database migration (preview) pane. Under Assess source instance, select View report to open the Assessments page:

On the Assessments page:
- Use Run assessment to initiate a new assessment, if one hasn't been run recently.
- Use View assessment details in the Azure SQL MI target box to learn more about your assessment results, including the readiness of your SQL Server instance to migrate to Azure SQL Managed Instance, and the recommended service tier and configuration for your target instance.
Select target
After you assess your SQL Server instance, select a target Azure SQL Managed Instance:
On the Assessments page, use Create target to open the Create or select target page and identify a migration target.
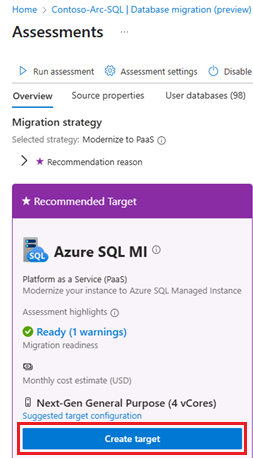
On the Create or select target page, choose one of the following options under Target exists:
- Yes, I already created a target: Select an existing Azure SQL Managed Instance target.
- No, I want to create a new target: Create a new Azure SQL Managed Instance target.

Fill in the required information for the target Azure SQL Managed Instance, and then use either Select target or Create target to proceed to the next step based on your Target exists selection.
- If you already have an instance as a target, choosing Select target takes you to the Database migration (preview) page for your SQL Server instance, where the instance name is populated as the selected target. You can then proceed to the Migrate data step.
- If you chose to create a new instance, you're guided to Create Azure SQL Managed Instance page within the Database migration (preview) page to create the target instance. Once finished, you can check the progress of the deployment on the Database migration (preview) page for your SQL Server instance, and see the target name populated in the Target tile. You can then proceed to the Migrate data step.
Migrate data
After your target is ready, you can start the migration process by selecting Migrate data on the Database migration (preview) page to go to the New data migration page.
On the New data migration page, choose the migration option that suits your business need and then use Select to proceed to the next page:
- Managed Instance link: Migrate using real-time replication (online)
- Log Replay Service (LRS): Migrate using log shipping (online)
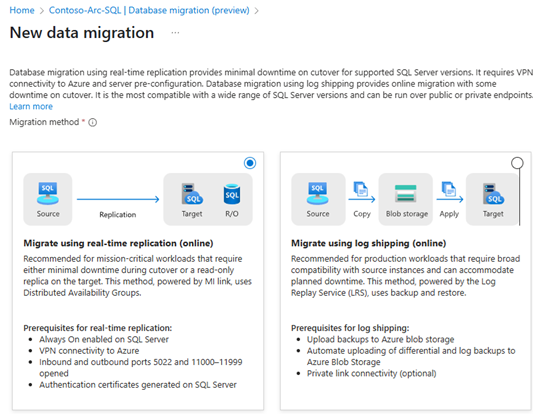
If you're still choosing between the two migration methods, check the comparison page to help you decide.
On the Data source tab, choose the databases you want to migrate. On the Settings tab, configure the migration settings based on the method you selected.
Finally, on the Review + create tab, review the settings and select Start data migration to start migrating your data to your target Azure SQL Managed Instance.
Note
Starting the data migration process when using the Managed Instance link grants additional just-in-time permissions until the distributed availability group is created.
Monitor and cutover
After you've started your migration, you can monitor the progress of your migration by selecting Monitor migrations on the Database migration (preview) page.
The Monitor and cutover page shows useful information about the migration process, such as:
- Which databases have successfully migrated, as well as those that are still in progress.
- The chosen migration method.
- The target instance and target database.
- The duration of the current migration of each database.
- When the migration started.
You can pause, resume, or cancel the migration from the Monitor and cutover page, as well as view logs for details about the migration. Selecting a database takes you to a page with more details about the source and target.
Once the migration is complete, and the migration status shows Ready for cutover, you can cut over to the target Azure SQL Managed Instance by selecting Cutover from the:
- Monitor and Cutover page.
- Database details page.
Selecting Cutover opens the Cutover page, with different options based on the migration method you selected.
Note
Completing the cutover, or canceling the migration when using the Managed Instance link grants additional just-in-time permissions until the link is removed or the migration is canceled.
Limitations
The limitations of Managed Instance link and Log Replay Service (LRS) apply to migrations through the Azure portal.
Monitoring the migration through the Azure portal is only available to SQL Server instances that meet monitoring licensing requirements.