AI アプリケーションの実行を可視化するトレース結果を表示する方法について説明します。 トレースを使用して、不正確なツール呼び出し、誤解を招くプロンプト、待機時間のボトルネック、低品質の評価スコアを診断します。
この記事では、次の方法について説明します。
- プロジェクトのトレースを有効にします。
- OpenAI SDK をインストルメント化します。
- メッセージの内容をキャプチャします (省略可能)。
- トレースのタイムラインとスパンを表示します。
- トレースと評価ループを接続します。
この記事では、Azure AI Foundry で OpenAI SDK と OpenTelemetry を使用して、AI アプリケーションのトレース結果を表示する方法について説明します。
Prerequisites
このチュートリアルを完了するには、次のものが必要です。
Azure AI Foundry プロジェクトが作成されました。
OpenAI SDK を使用して Azure AI Foundry でホストされているモデルを呼び出す AI アプリケーション。
プロジェクトでトレースを有効にする
Azure AI Foundry は、OpenTelemetry を使用して Azure Application Insights にトレースを格納します。 新しいリソースでは、Application Insights は自動的にプロビジョニングされません。 Azure AI Foundry リソースごとに 1 回、リソースを関連付ける (または作成する)。
次の手順では、リソースを構成する方法を示します。
Azure AI Foundry ポータルに移動し、プロジェクトに移動します。
横のナビゲーション バーで、[トレース] を選択 します。
Azure Application Insights リソースが Azure AI Foundry リソースに関連付けられていない場合は、関連付けます。 Application Insights リソースが既に関連付けられている場合は、以下の有効化ページが表示されないため、この手順をスキップできます。
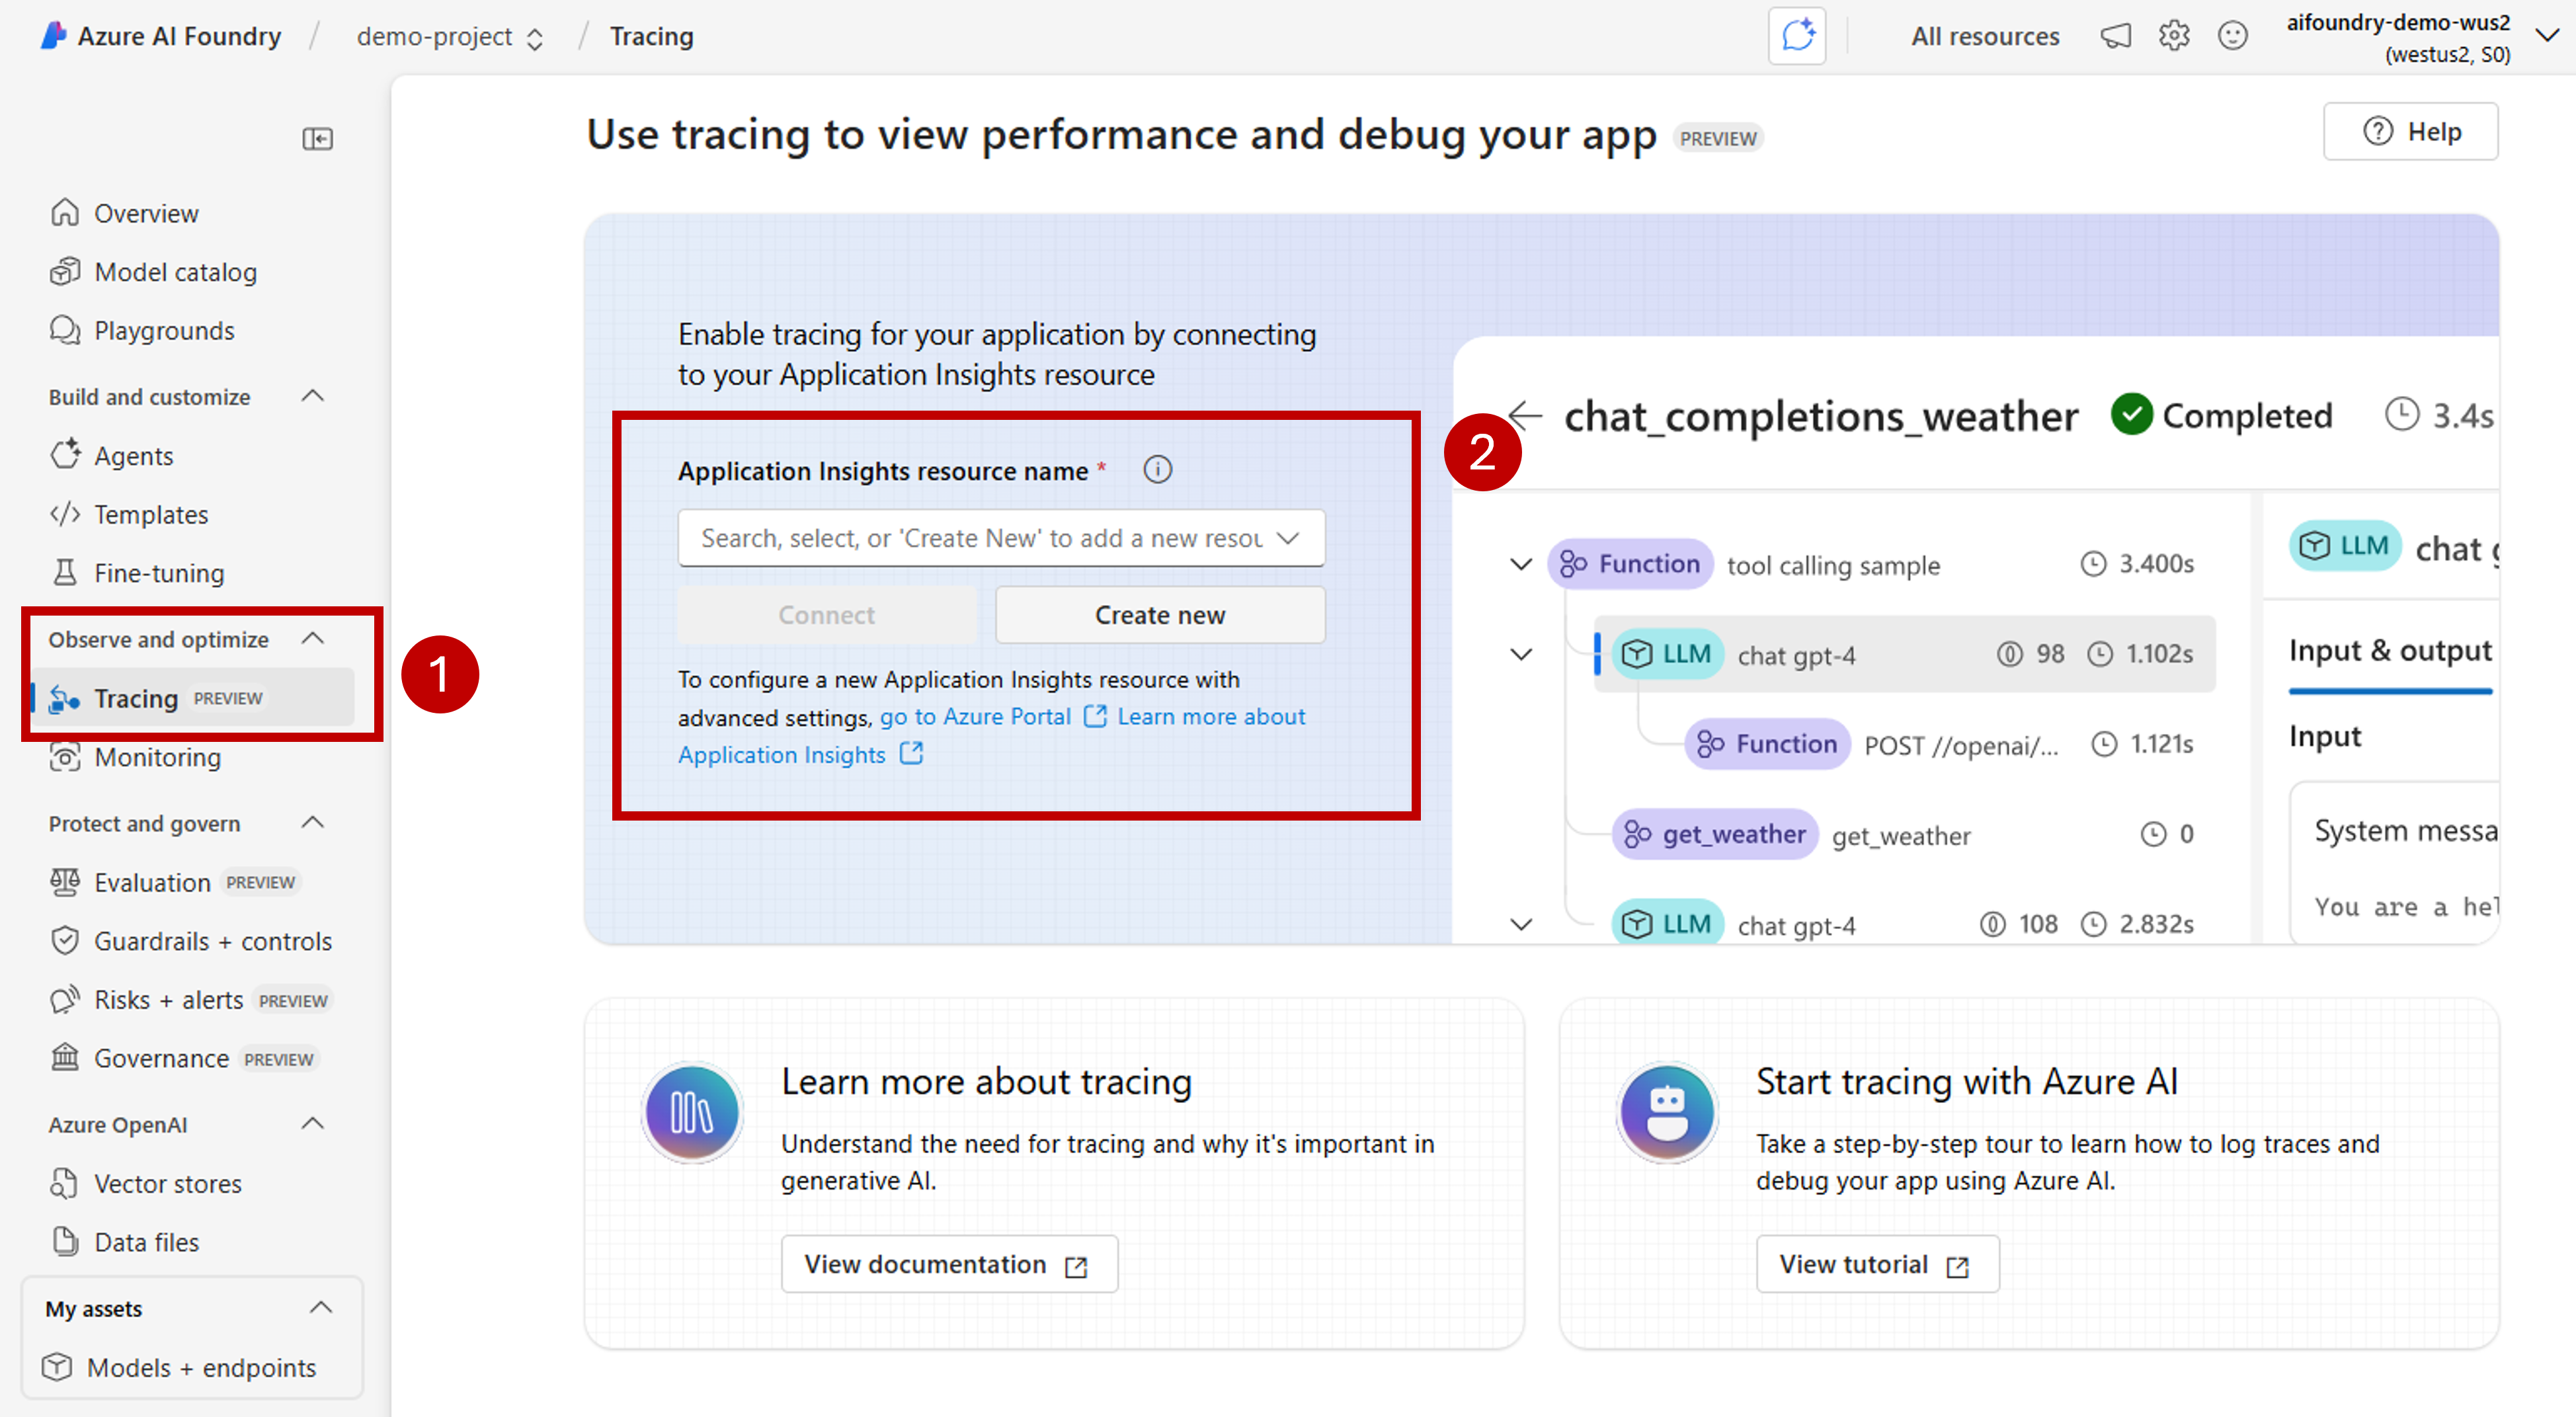
既存の Azure Application Insights を再利用するには、ドロップダウン の Application Insights リソース名 を使用してリソースを検索し、[ 接続] を選択します。
Tip
既存の Azure Application Insights に接続するには、Azure AI Foundry リソース (またはハブ) への少なくとも共同作成者アクセス権が必要です。
新しい Azure Application Insights リソースに接続するには、[新規作成] オプションを選択します。
構成ウィザードを使用して、新しいリソースの名前を構成します。
既定では、新しいリソースは、Azure AI Foundry リソースが作成されたのと同じリソース グループに作成されます。 [詳細設定] オプションを使用して、別のリソース グループまたはサブスクリプションを構成します。
Tip
新しい Azure Application Insights リソースを作成するには、選択したリソース グループ (または既定のリソース グループ) に対する共同作成者ロールも必要です。
[作成] を選択してリソースを作成し、Azure AI Foundry リソースに接続します。
接続が構成されると、リソース内の任意のプロジェクトでトレースを使用する準備が整います。
Tip
Application Insights リソースに Log Analytics 閲覧者ロール が割り当てられていることを確認します。 ロールを割り当てる方法の詳細については、 Azure portal を使用した Azure ロールの割り当てに関するページを参照してください。 Microsoft Entra グループを使用すると、ユーザーのアクセスをより簡単に管理できます。
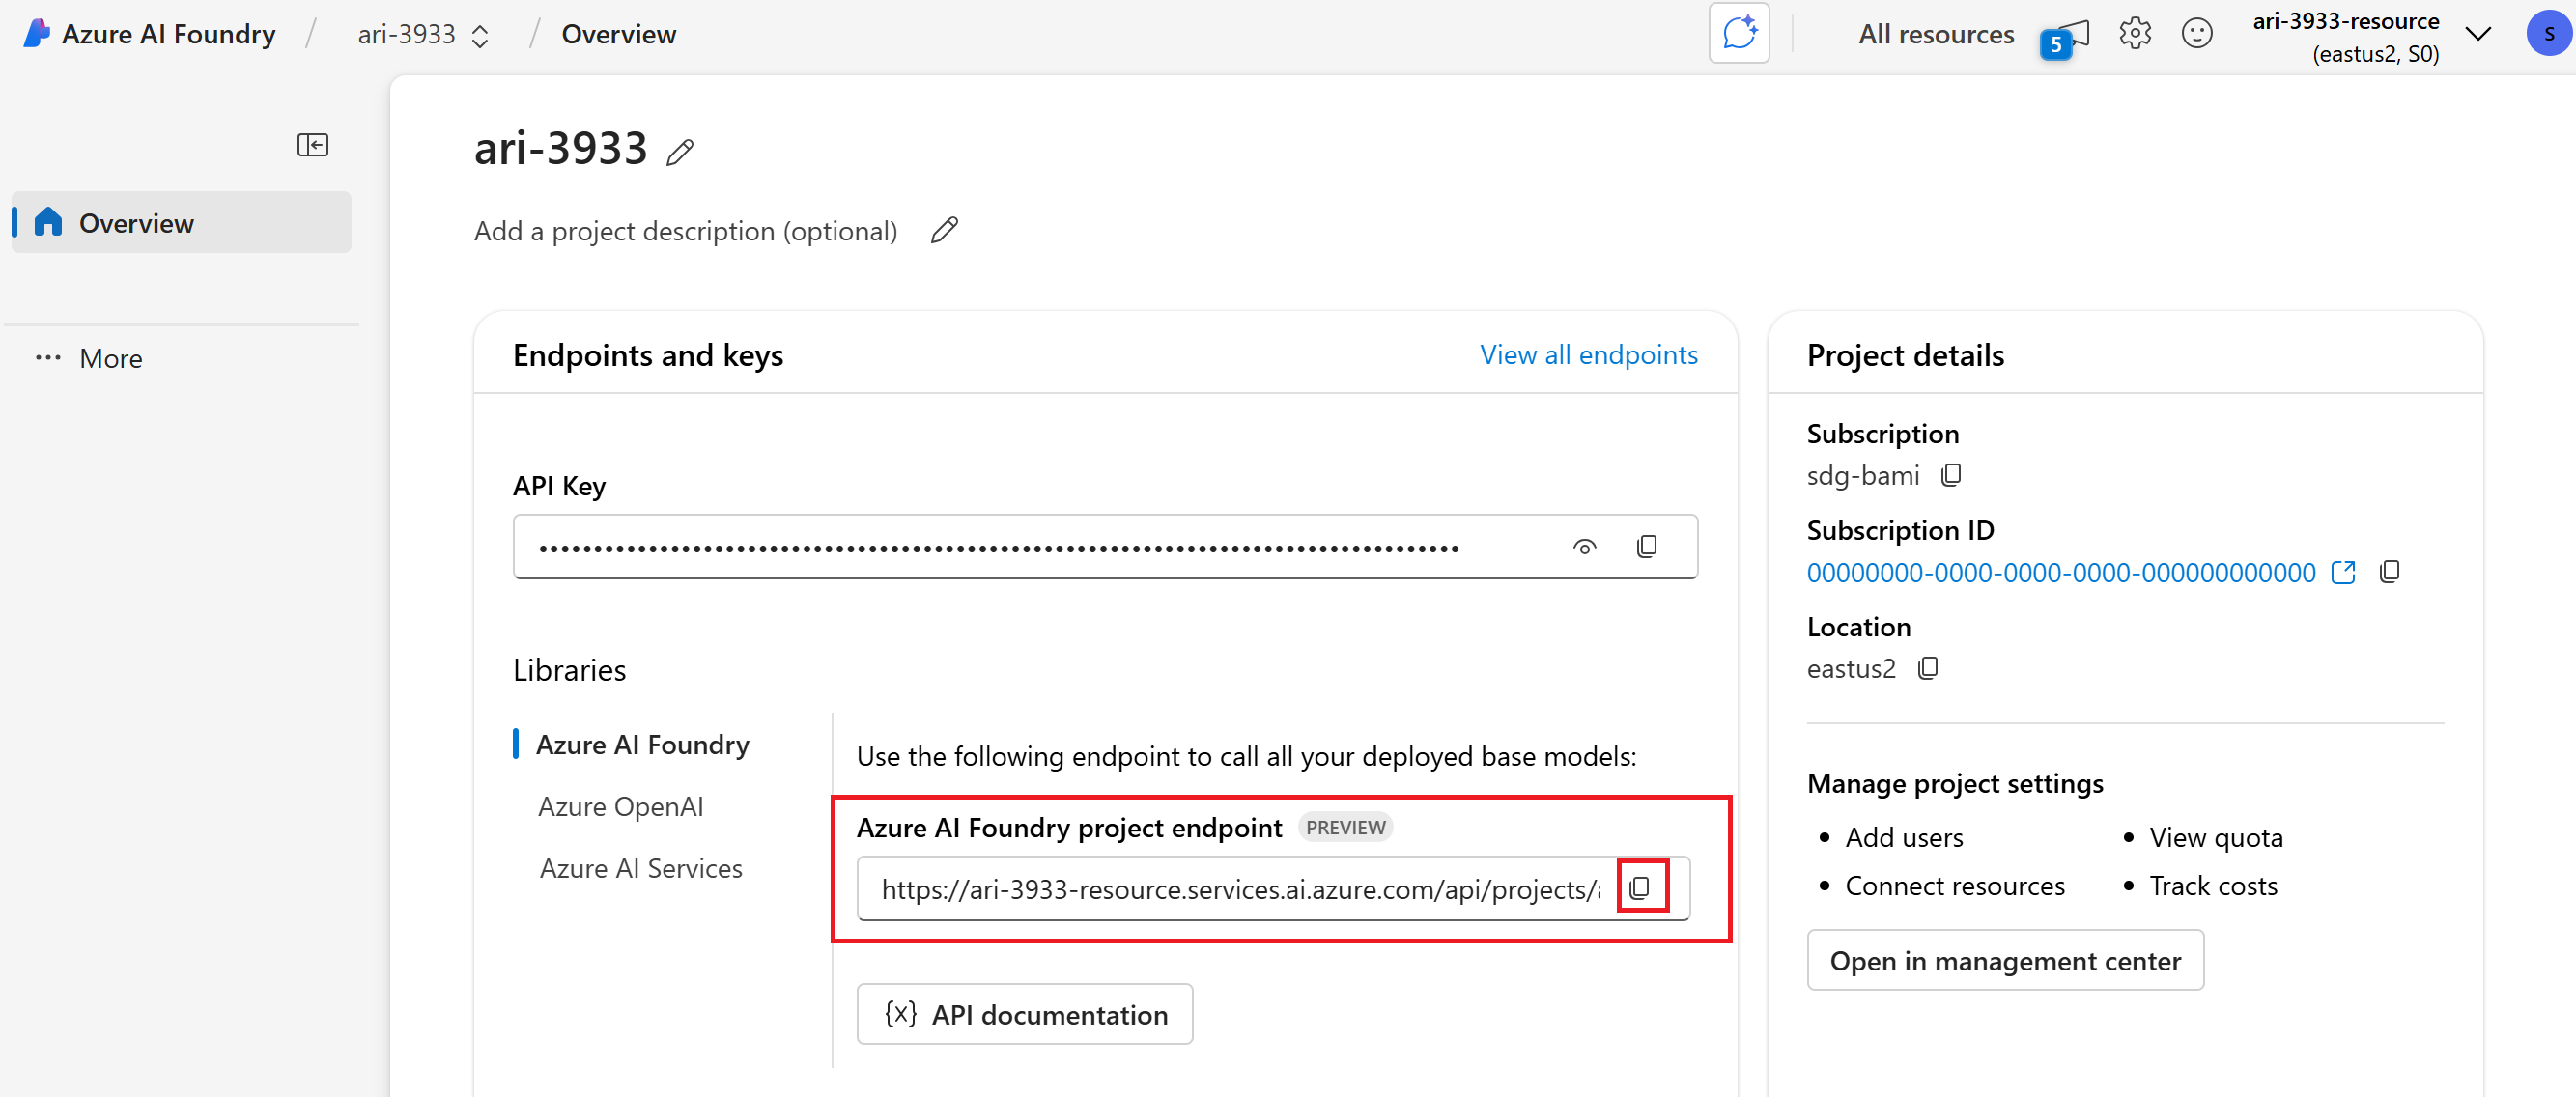
プロジェクトのランディング ページに移動し、プロジェクトのエンドポイント URI をコピーします。 この情報は後で必要になります。
Important
プロジェクトのエンドポイントを使用するには、アプリケーションで Microsoft Entra ID を構成する必要があります。 Entra ID が構成されていない場合は、チュートリアルの手順 3 で示されているように、Azure Application Insights 接続文字列を使用します。


Azure AI Foundry ポータルでトレース結果を表示する
トレースが構成され、アプリケーションがインストルメント化されたら、Azure AI Foundry ポータルでトレース結果を表示できます。
Azure AI Foundry ポータルに移動し、プロジェクトに移動します。
横のナビゲーション バーで、[トレース] を選択 します。
インストルメント化されたアプリケーションからのトレース結果の一覧が表示されます。 各トレースには、次の情報が表示されます。
- トレース ID: トレースの一意の識別子
- 開始時刻: トレースが開始されたとき
- 期間: 操作にかかった時間
- 状態: 成功または失敗の状態
- 操作: トレース内のスパンの数
トレースを選択すると、次のような詳細なトレース結果が表示されます。
- 実行タイムラインの完了
- 各操作の入力データと出力データ
- パフォーマンス メトリックとタイミング
- 発生した場合のエラーの詳細
- カスタム属性とメタデータ
OpenAI SDK をインストルメント化する
OpenAI SDK を使用して開発する場合は、コードをインストルメント化して、トレースが Azure AI Foundry に送信されるようにすることができます。 コードをインストルメント化するには、次の手順に従います。
パッケージをインストールします。
pip install azure-ai-projects azure-monitor-opentelemetry opentelemetry-instrumentation-openai-v2(省略可能)メッセージの内容をキャプチャする:
- PowerShell:
setx OTEL_INSTRUMENTATION_GENAI_CAPTURE_MESSAGE_CONTENT true - Bash:
export OTEL_INSTRUMENTATION_GENAI_CAPTURE_MESSAGE_CONTENT=true
- PowerShell:
リンクされている Application Insights のリソースの接続文字列を取得します (プロジェクト > トレース > データ ソースの管理 > 接続文字列)。
from azure.ai.projects import AIProjectClient
from azure.identity import DefaultAzureCredential

project_client = AIProjectClient(
     credential=DefaultAzureCredential(),
     endpoint="https://<your-resource>.services.ai.azure.com/api/projects/<your-project>",
)
connection_string = project_client.telemetry.get_application_insights_connection_string()
Azure Monitor を構成し、OpenAI SDK をインストルメント化します。
from azure.monitor.opentelemetry import configure_azure_monitor
from opentelemetry.instrumentation.openai_v2 import OpenAIInstrumentor

configure_azure_monitor(connection_string=connection_string)
OpenAIInstrumentor().instrument()
要求を送信します。
client = project_client.get_openai_client()
response = client.chat.completions.create(
     model="gpt-4o-mini",
     messages=[{"role": "user", "content": "Write a short poem on open telemetry."}],
)
print(response.choices[0].message.content)
ポータルで トレース に戻り、新しいトレースを表示します。

複雑なアプリケーションを開発するときに、ビジネス ロジックとモデルを組み合わせたコードのセクションをキャプチャすると役立つ場合があります。 OpenTelemetry では、スパンの概念を使用して、関心のあるセクションをキャプチャします。 独自のスパンの生成を開始するには、現在の トレーサー オブジェクトのインスタンスを取得します。
from opentelemetry import trace

tracer = trace.get_tracer(__name__)
次に、メソッドでデコレーターを使用して、関心のあるコード内の特定のシナリオをキャプチャします。 これらのデコレーターはスパンを自動的に生成します。 次のコード例では、要求の一覧を反復処理し、LLM を使用してコンテキストで要求がサポートされているかどうかを確認する、
assess_claims_with_contextというメソッドをインストルメント化します。 このメソッドで行われたすべての呼び出しは、同じスパン内でキャプチャされます。def build_prompt_with_context(claim: str, context: str) -> str: return [{'role': 'system', 'content': "I will ask you to assess whether a particular scientific claim, based on evidence provided. Output only the text 'True' if the claim is true, 'False' if the claim is false, or 'NEE' if there's not enough evidence."}, {'role': 'user', 'content': f""" The evidence is the following: {context} Assess the following claim on the basis of the evidence. Output only the text 'True' if the claim is true, 'False' if the claim is false, or 'NEE' if there's not enough evidence. Do not output any other text. Claim: {claim} Assessment: """}] @tracer.start_as_current_span("assess_claims_with_context") def assess_claims_with_context(claims, contexts): responses = [] for claim, context in zip(claims, contexts): response = client.chat.completions.create( model="gpt-4.1", messages=build_prompt_with_context(claim=claim, context=context), ) responses.append(response.choices[0].message.content.strip('., ')) return responsesトレース結果は次のようになります。

現在のスパンに追加情報を追加する可能性もあります。 OpenTelemetry では、そのために 属性 の概念を使用しています。
traceオブジェクトを使用してそれらにアクセスし、追加情報を含めます。 属性を含むようにassess_claims_with_contextメソッドがどのように変更されたかを確認します。@tracer.start_as_current_span("assess_claims_with_context") def assess_claims_with_context(claims, contexts): responses = [] current_span = trace.get_current_span() current_span.set_attribute("operation.claims_count", len(claims)) for claim, context in zip(claims, contexts): response = client.chat.completions.create( model="gpt-4.1", messages=build_prompt_with_context(claim=claim, context=context), ) responses.append(response.choices[0].message.content.strip('., ')) return responses


トレースをコンソールへ
また、アプリケーションをトレースし、そのトレースをローカル実行コンソールに送信すると役立つ場合があります。 この方法は、自動化された CI/CD パイプラインを使用してアプリケーションで単体テストまたは統合テストを実行する場合に役立つ場合があります。 トレースはコンソールに送信され、CI/CD ツールでキャプチャしてさらに分析を行うことができます。
トレースを次のように構成します。
通常どおり OpenAI SDK をインストルメント化します。
from opentelemetry.instrumentation.openai_v2 import OpenAIInstrumentor

OpenAIInstrumentor().instrument()
トレースをコンソールに送信するように OpenTelemetry を構成します。
from opentelemetry import trace
from opentelemetry.sdk.trace import TracerProvider
from opentelemetry.sdk.trace.export import SimpleSpanProcessor, ConsoleSpanExporter

span_exporter = ConsoleSpanExporter()
tracer_provider = TracerProvider()
tracer_provider.add_span_processor(SimpleSpanProcessor(span_exporter))
trace.set_tracer_provider(tracer_provider)
通常どおり OpenAI SDK を使用します。
response = client.chat.completions.create(
    model="deepseek-v3-0324",
    messages=[
        {"role": "user", "content": "Write a short poem on open telemetry."},
    ],
)
{ "name": "chat deepseek-v3-0324", "context": { "trace_id": "0xaaaa0a0abb1bcc2cdd3d", "span_id": "0xaaaa0a0abb1bcc2cdd3d", "trace_state": "[]" }, "kind": "SpanKind.CLIENT", "parent_id": null, "start_time": "2025-06-13T00:02:04.271337Z", "end_time": "2025-06-13T00:02:06.537220Z", "status": { "status_code": "UNSET" }, "attributes": { "gen_ai.operation.name": "chat", "gen_ai.system": "openai", "gen_ai.request.model": "deepseek-v3-0324", "server.address": "my-project.services.ai.azure.com", "gen_ai.response.model": "DeepSeek-V3-0324", "gen_ai.response.finish_reasons": [ "stop" ], "gen_ai.response.id": "aaaa0a0abb1bcc2cdd3d", "gen_ai.usage.input_tokens": 14, "gen_ai.usage.output_tokens": 91 }, "events": [], "links": [], "resource": { "attributes": { "telemetry.sdk.language": "python", "telemetry.sdk.name": "opentelemetry", "telemetry.sdk.version": "1.31.1", "service.name": "unknown_service" }, "schema_url": "" } }
AI Toolkit を使用してローカルでトレースする
AI Toolkit は、VS Code でローカルにトレースする簡単な方法を提供します。 ローカルの OTLP 互換コレクターを使用するため、クラウド アクセスを必要とせずに開発とデバッグに最適です。
このツールキットは、OpenTelemetry を通じて OpenAI SDK とその他の AI フレームワークをサポートします。 開発環境でトレースをすぐに確認できます。
詳細なセットアップ手順と SDK 固有のコード例については、「 AI Toolkit でのトレース」を参照してください。