適用対象:✅ Microsoft Fabric でのデータ エンジニアリングとデータ サイエンス
Livy API for Fabric Data Engineering を使用して Spark セッション ジョブを送信する方法について説明します。
重要
この機能は プレビュー段階です。
前提条件
リモート クライアントとして、Visual Studio Code、Jupyter Notebooks、PySpark、および Python 用 Microsoft Authentication Library (MSAL) などがあります。
Microsoft Entra アプリ トークンのいずれか。 Microsoft ID プラットフォームにアプリケーションを登録する
または、Microsoft Entra SPN トークン。 Microsoft Entra でアプリケーション資格情報を追加および管理する
レイクハウス内のデータ。この例では、NYC Taxi & Limousine Commission の green_tripdata_2022_08 (レイクハウスに読み込まれた parquet ファイル) を使用します
Livy API で、操作用に統合エンドポイントを定義します。 この記事の例に従うときは、プレースホルダー {Entra_TenantID}、{Entra_ClientID}、{Fabric_WorkspaceID}、{Fabric_LakehouseID}、および {Entra_ClientSecret} を適切な値に置き換えます。
Livy API セッションの Visual Studio Code を構成する
Fabric Lakehouse で [Lakehouse の設定] を選択します。

[Livy エンドポイント] セクションに移動します。

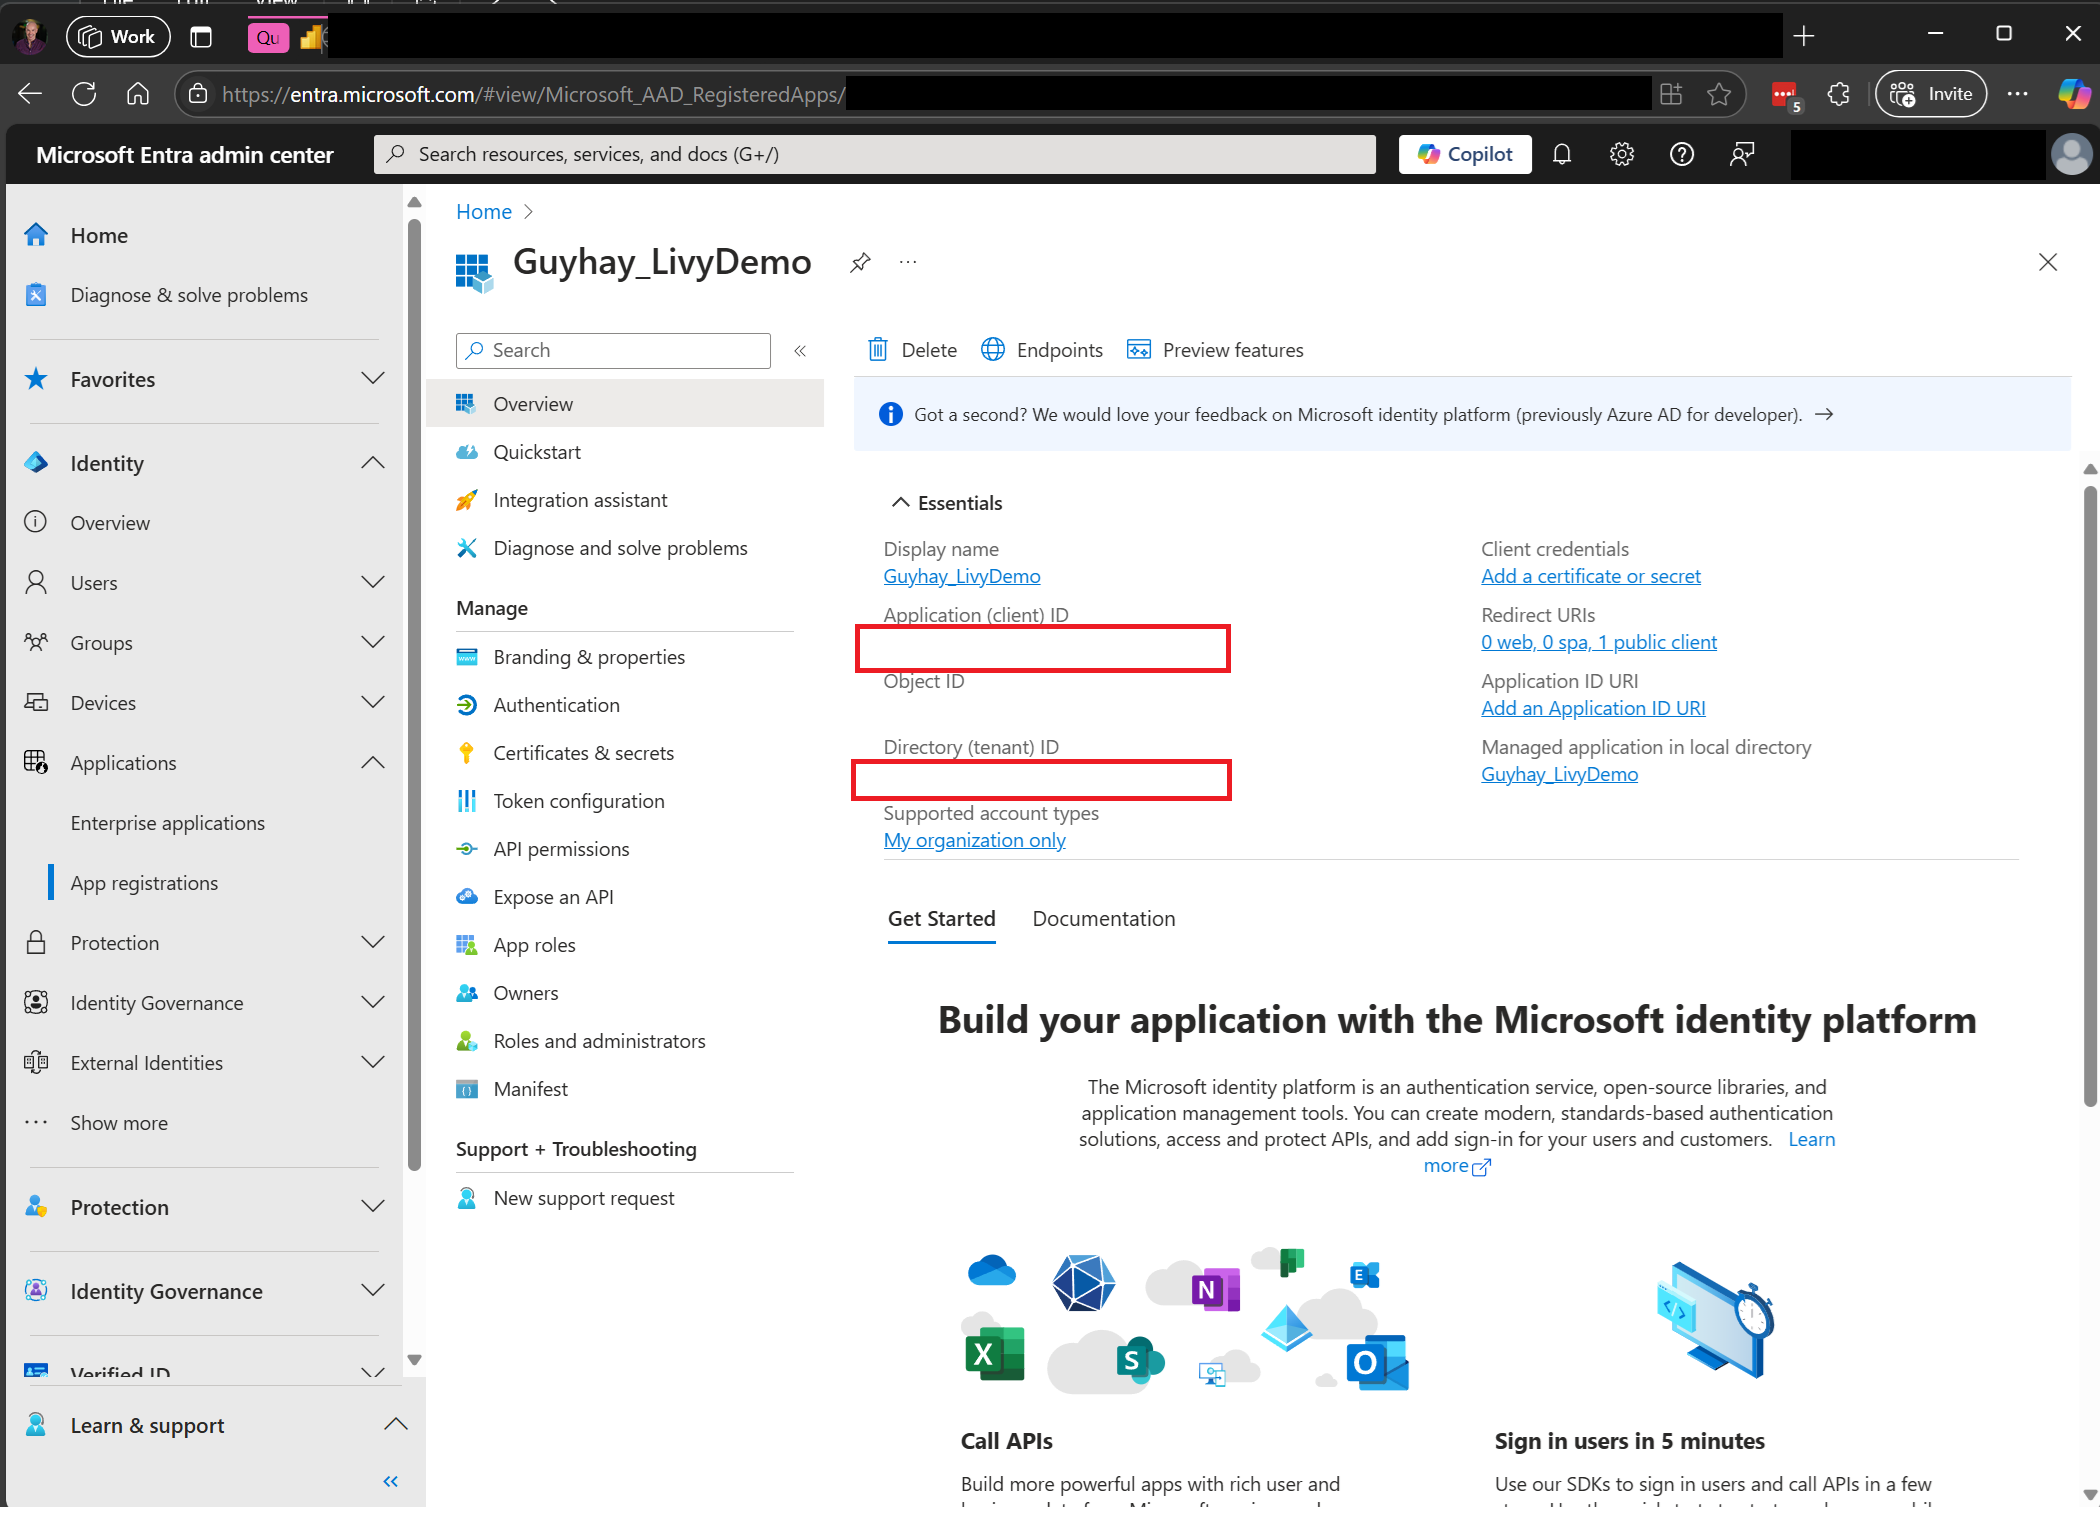
セッション ジョブの接続文字列 (画像内の 1 つ目の赤い枠) をコードにコピーします。
Microsoft Entra 管理センターに移動し、アプリケーション (クライアント) ID とディレクトリ (テナント) ID の両方をコードにコピーします。


Entra ユーザー トークンまたは Entra SPN トークンを使用して Livy API Spark セッションを認証する
Entra SPN トークンを使用して Livy API Spark セッションを認証する
Visual Studio Code で
.ipynbノートブックを作成し、次のコードを挿入します。from msal import ConfidentialClientApplication import requests import time tenant_id = "Entra_TenantID" client_id = "Entra_ClientID" client_secret = "Entra_ClientSecret" audience = "https://api.fabric.microsoft.com/.default" workspace_id = "Fabric_WorkspaceID" lakehouse_id = "Fabric_LakehouseID" # Get the app-only token def get_app_only_token(tenant_id, client_id, client_secret, audience): """ Get an app-only access token for a Service Principal using OAuth 2.0 client credentials flow. Args: tenant_id (str): The Azure Active Directory tenant ID. client_id (str): The Service Principal's client ID. client_secret (str): The Service Principal's client secret. audience (str): The audience for the token (e.g., resource-specific scope). Returns: str: The access token. """ try: # Define the authority URL for the tenant authority = f"https://login.microsoftonline.com/{tenant_id}" # Create a ConfidentialClientApplication instance app = ConfidentialClientApplication( client_id = client_id, client_credential = client_secret, authority = authority ) # Acquire a token using the client credentials flow result = app.acquire_token_for_client(scopes = [audience]) # Check if the token was successfully retrieved if "access_token" in result: return result["access_token"] else: raise Exception("Failed to retrieve token: {result.get('error_description', 'Unknown error')}") except Exception as e: print(f"Error retrieving token: {e}", fil = sys.stderr) sys.exit(1) token = get_app_only_token(tenant_id, client_id, client_secret, audience) api_base_url = 'https://api.fabric.microsoft.com/v1/' livy_base_url = api_base_url + "/workspaces/"+workspace_id+"/lakehouses/"+lakehouse_id +"/livyApi/versions/2023-12-01/batches" headers = {"Authorization": "Bearer " + token} print(token)Visual Studio Code で、Microsoft Entra トークンが返されていることがわかります。
 ```
```

Entra ユーザー トークンを使用して Livy API Spark セッションを認証する
Visual Studio Code で
.ipynbノートブックを作成し、次のコードを挿入します。from msal import PublicClientApplication import requests import time tenant_id = "Entra_TenantID" client_id = "Entra_ClientID" workspace_id = "Fabric_WorkspaceID" lakehouse_id = "Fabric_LakehouseID" app = PublicClientApplication( client_id, authority = "https://login.microsoftonline.com/"Entra_TenantID" ) result = None # If no cached tokens or user interaction needed, acquire tokens interactively if not result: result = app.acquire_token_interactive(scopes = ["https://api.fabric.microsoft.com/Lakehouse.Execute.All", "https://api.fabric.microsoft.com/Lakehouse.Read.All", "https://api.fabric.microsoft.com/Item. ReadWrite.All", "https://api.fabric.microsoft.com/Workspace.ReadWrite.All", "https://api.fabric.microsoft.com/Code.AccessStorage.All", "https://api.fabric.microsoft.com/Code.AccessAzureKeyvault.All", "https://api.fabric.microsoft.com/Code.AccessAzureDataExplorer.All", "https://api.fabric.microsoft.com/Code.AccessAzureDataLake.All", "https://api.fabric.microsoft.com/Code.AccessFabric.All"]) # Print the access token (you can use it to call APIs) if "access_token" in result: print(f"Access token: {result['access_token']}") else: print("Authentication failed or no access token obtained.") if "access_token" in result: access_token = result['access_token'] api_base_url ='https://api.fabric.microsoft.com/v1' livy_base_url = api_base_url + "/workspaces/"+workspace_id+"/lakehouses/"+lakehouse_id +"/livyApi/versions/2023-12-01/sessions" headers = {"Authorization": "Bearer " + access_token}Visual Studio Code で、Microsoft Entra トークンが返されていることがわかります。


Livy API Spark セッションを作成する
別のノートブック セルを追加し、このコードを挿入します。
create_livy_session = requests.post(livy_base_url, headers = headers, json={})
print('The request to create the Livy session is submitted:' + str(create_livy_session.json()))

livy_session_id = create_livy_session.json()['id']
livy_session_url = livy_base_url + "/" + livy_session_id
get_session_response = requests.get(livy_session_url, headers = headers)
print(get_session_response.json())
ノートブック セルを実行すると、Livy セッションの作成時に出力された 1 行が表示されます。

[監視ハブでジョブを表示する](#監視ハブでジョブを表示する) を使用して、Livy セッションが作成されたことを確認できます。

Fabric 環境との統合
既定では、この Livy API セッションはワークスペースの既定のスターター プールに対して実行されます。 または、Microsoft Fabric の 環境を作成、構成、使用して、 Livy API セッションがこれらの Spark ジョブに使用する Spark プールをカスタマイズすることもできます。 Fabric Environment を使用するには、前のノートブック セルをこの json ペイロードで更新するだけです。
create_livy_session = requests.post(livy_base_url, headers = headers, json = {
    "conf" : {
        "spark.fabric.environmentDetails" : "{\"id\" : \""EnvironmentID""}"}
        }
)
Livy API Spark セッションを使用して spark.sql ステートメントを送信する
別のノートブック セルを追加し、このコードを挿入します。
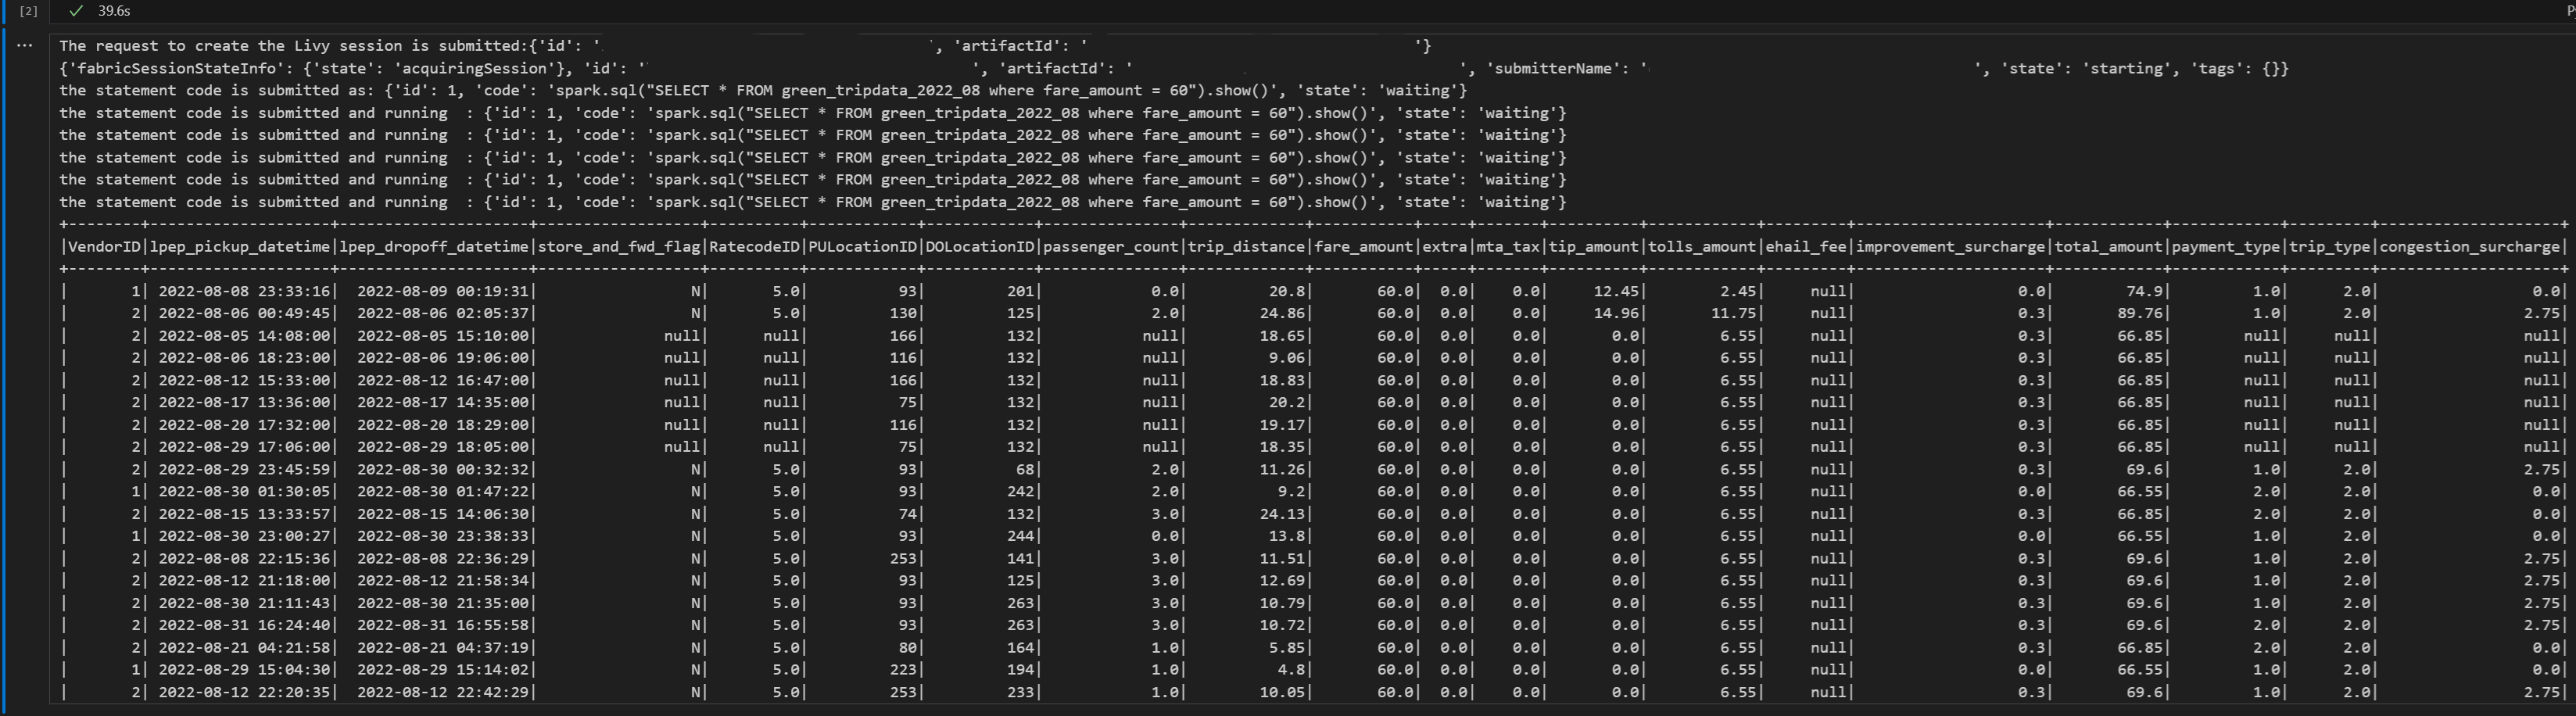
# call get session API
livy_session_id = create_livy_session.json()['id']
livy_session_url = livy_base_url + "/" + livy_session_id
get_session_response = requests.get(livy_session_url, headers = headers)

print(get_session_response.json())
while get_session_response.json()["state"] != "idle":
    time.sleep(5)
    get_session_response = requests.get(livy_session_url, headers = headers)

execute_statement = livy_session_url + "/statements"
payload_data = {
    "code": "spark.sql(\"SELECT * FROM green_tripdata_2022_08 where fare_amount = 60\").show()",
        "kind": "spark"
    }

execute_statement_response = requests.post(execute_statement, headers = headers, json = payload_data)
print('the statement code is submitted as: ' + str(execute_statement_response.json()))

statement_id = str(execute_statement_response.json()['id'])
get_statement = livy_session_url + "/statements/" + statement_id
get_statement_response = requests.get(get_statement, headers = headers)

while get_statement_response.json()["state"] != "available":
    # Sleep for 5 seconds before making the next request
    time.sleep(5)
    print('the statement code is submitted and running : ' + str(execute_statement_response.json()))

# Make the next request
get_statement_response = requests.get(get_statement, headers = headers)

rst = get_statement_response.json()['output']['data']['text/plain']
print(rst)
ノートブック セルを実行して、ジョブが送信され、結果が返されると、複数の増分行が出力されます。

Livy API Spark セッションを使用して 2 つ目の spark.sql ステートメントを送信する
別のノートブック セルを追加し、このコードを挿入します。
# call get session API

livy_session_id = create_livy_session.json()['id']
livy_session_url = livy_base_url + "/" + livy_session_id
get_session_response = requests.get(livy_session_url, headers = headers)

print(get_session_response.json())
while get_session_response.json()["state"] != "idle":
    time.sleep(5)
    get_session_response = requests.get(livy_session_url, headers = headers)

execute_statement = livy_session_url + "/statements"
payload_data = {
    "code": "spark.sql(\"SELECT * FROM green_tripdata_2022_08 where tip_amount = 10\").show()",
    "kind": "spark"
}

execute_statement_response = requests.post(execute_statement, headers = headers, json = payload_data)
print('the statement code is submitted as: ' + str(execute_statement_response.json()))

statement_id = str(execute_statement_response.json()['id'])
get_statement = livy_session_url + "/statements/" + statement_id
get_statement_response = requests.get(get_statement, headers = headers)

while get_statement_response.json()["state"] != "available":
# Sleep for 5 seconds before making the next request
    time.sleep(5)
    print('the statement code is submitted and running : ' + str(execute_statement_response.json()))

# Make the next request
get_statement_response = requests.get(get_statement, headers = headers)

rst = get_statement_response.json()['output']['data']['text/plain']
print(rst)
ノートブック セルを実行して、ジョブが送信され、結果が返されると、複数の増分行が出力されます。


3 つ目のステートメントで Livy セッションを終了する
別のノートブック セルを追加し、このコードを挿入します。
# call get session API with a delete session statement

get_session_response = requests.get(livy_session_url, header = headers)
print('Livy statement URL ' + livy_session_url)

response = requests.delete(livy_session_url, headers = headers)
print (response)
監視ハブでジョブを表示する
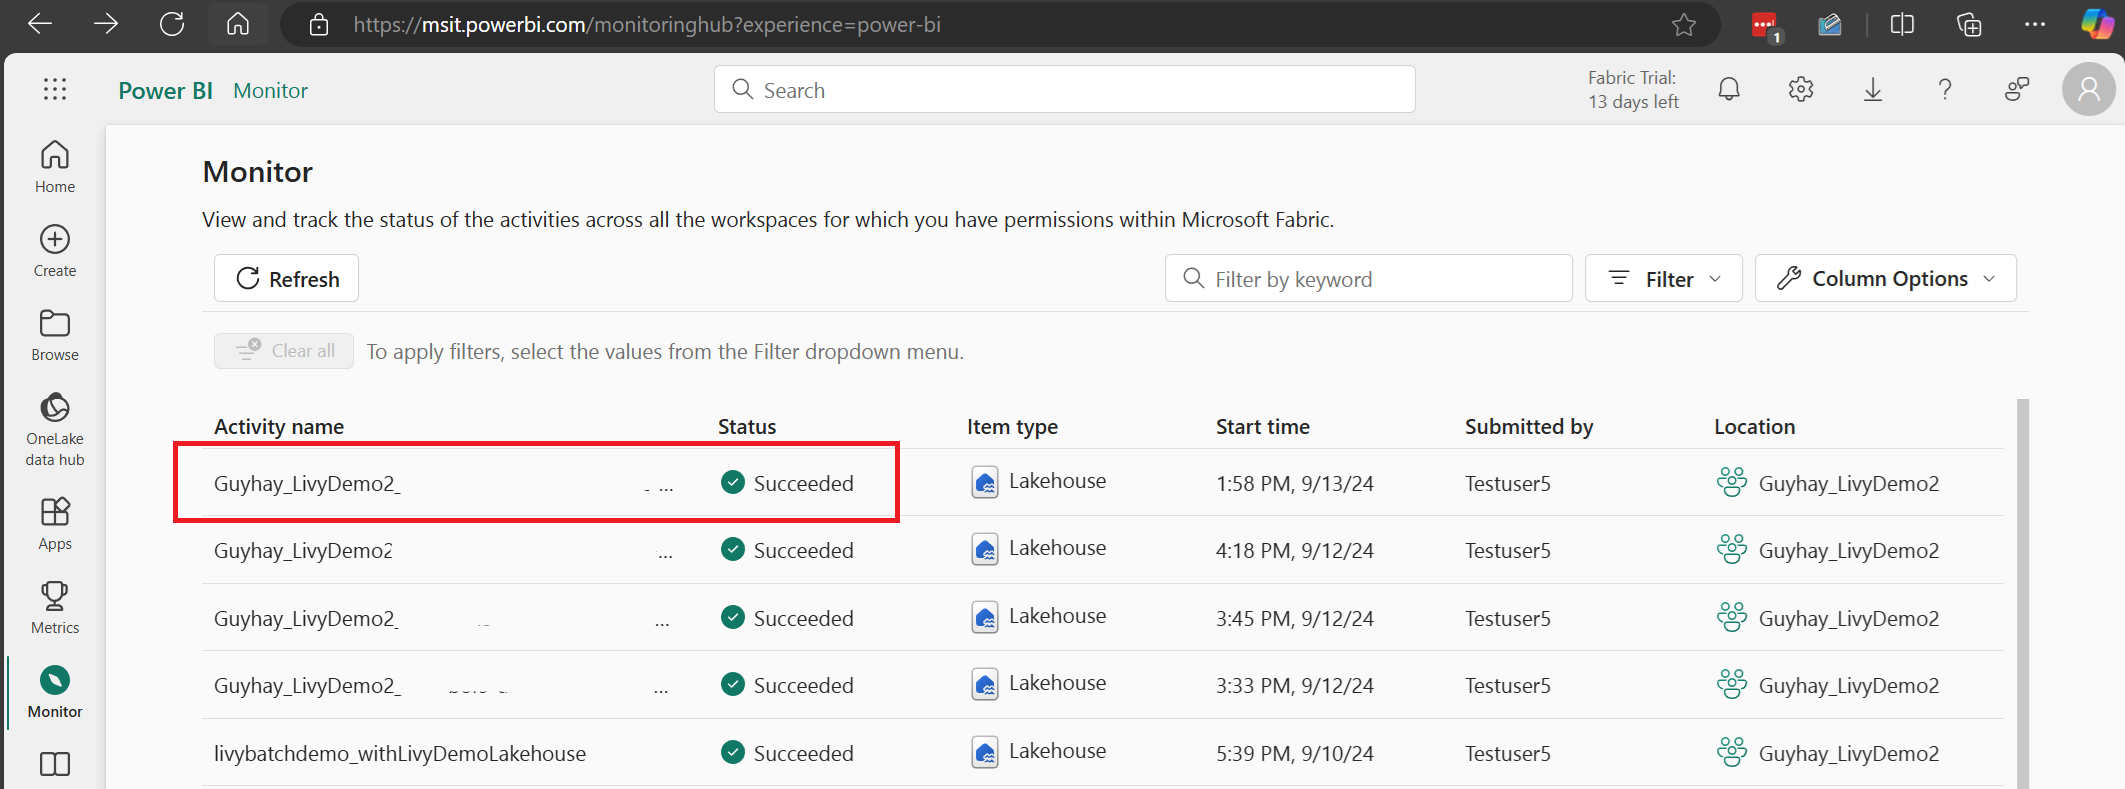
左側のナビゲーション リンクの [監視] を選択して監視ハブにアクセスすると、さまざまな Apache Spark アクティビティを表示できます。
セッションが進行中または完了状態の場合、[モニター] に移動してセッションの状態を表示できます。

最新のアクティビティ名を選択して開きます。
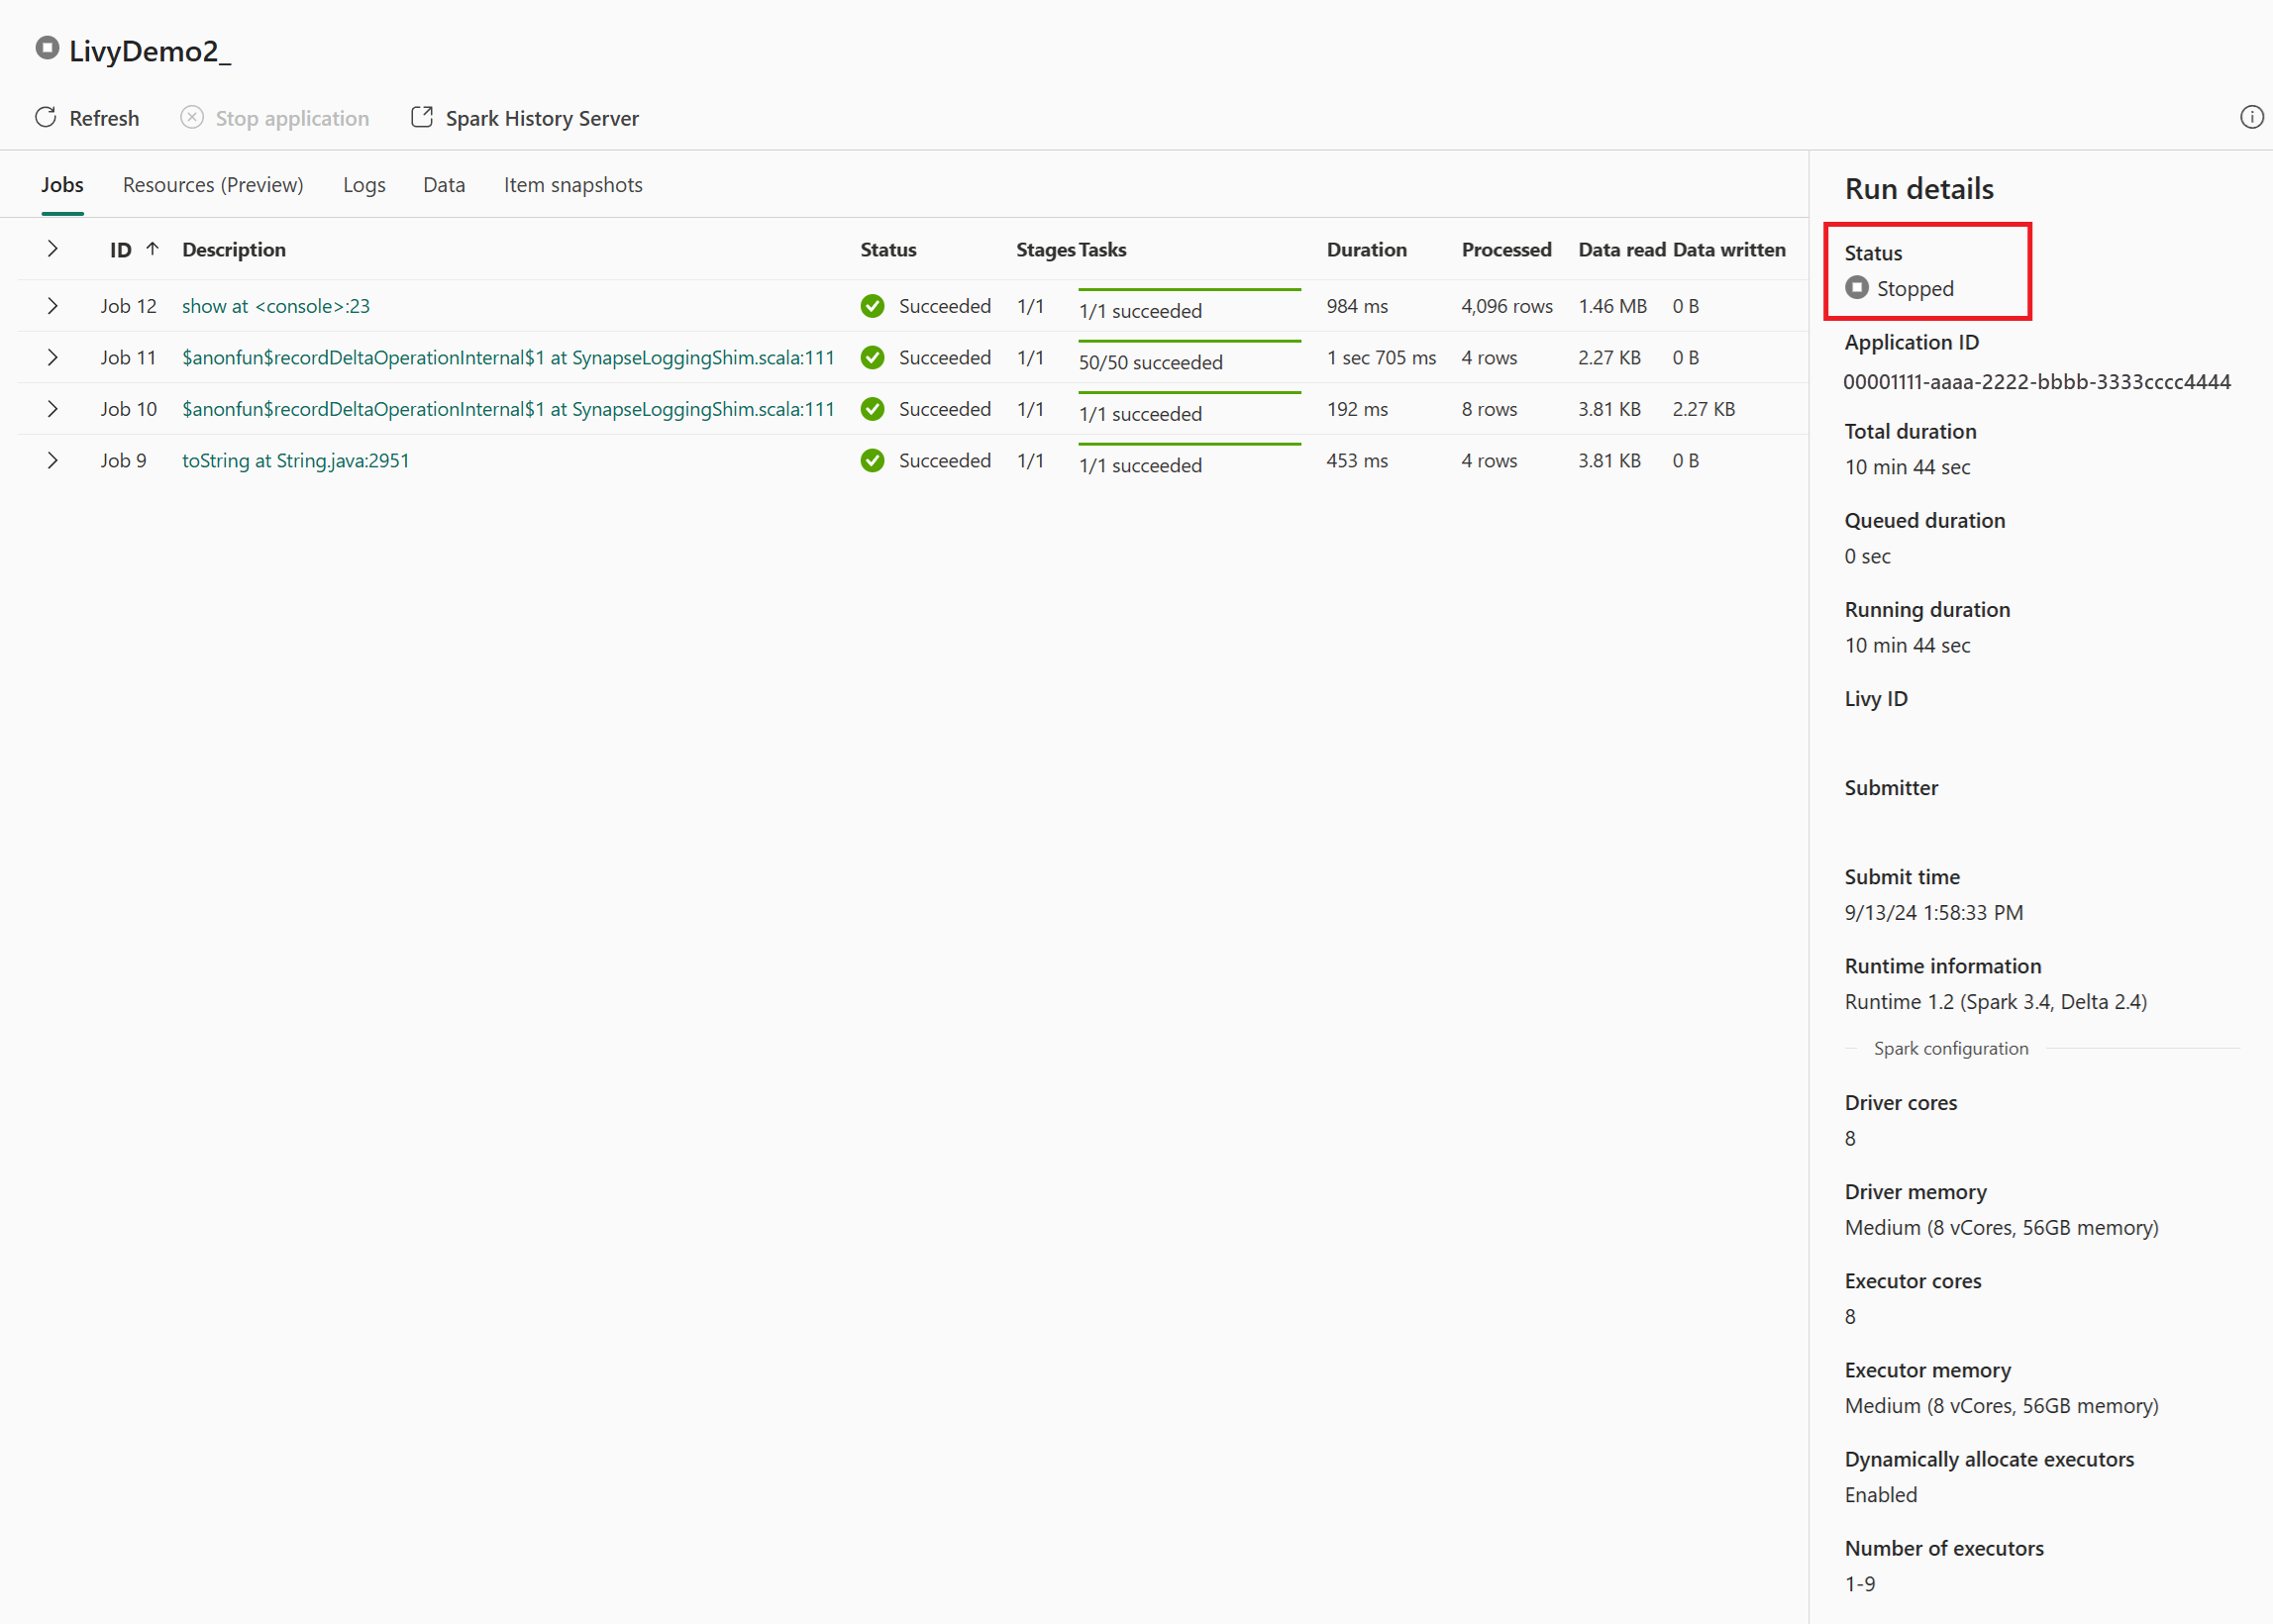
この Livy API セッションのケースでは、以前のセッション送信、実行の詳細、Spark のバージョン、構成を確認できます。 右上の停止状態に注目してください。

プロセス全体を要約するには、 Visual Studio Code、Microsoft Entra アプリ/SPN トークン、Livy API エンドポイント URL、Lakehouse に対する認証、最後に Session Livy API などのリモート クライアントが必要です。