추적은 각 실행 단계에서 자세한 원격 분석을 캡처하여 애플리케이션 실행에 대한 심층적인 가시성을 제공합니다. 이렇게 하면 부정확한 도구 호출, 잘못된 프롬프트, 높은 대기 시간, 낮은 품질 평가 점수 등의 문제를 식별하여 문제를 진단하고 성능을 향상시킬 수 있습니다.
This article explains how to implement tracing for AI applications using OpenAI SDK with OpenTelemetry in Azure AI Foundry.
Prerequisites
이 자습서를 완료하려면 다음이 필요합니다.
Azure AI Foundry 프로젝트가 생성되었습니다.
An AI application that uses OpenAI SDK to make calls to models hosted in Azure AI Foundry.
프로젝트에서 추적 기능 사용
Azure AI Foundry는 OpenTelemetry를 사용하여 Azure Application Insight 리소스에 추적을 저장합니다. 기본적으로 새 Azure AI Foundry 리소스는 이러한 리소스를 프로비전하지 않습니다. 프로젝트를 기존 Azure Application Insights 리소스에 연결하거나 프로젝트 내에서 새 프로젝트를 만들 수 있습니다. 이러한 구성은 각 Azure AI Foundry 리소스당 한 번씩 수행합니다.
다음 단계에서는 리소스를 구성하는 방법을 보여 줍니다.
Azure AI Foundry 포털로 이동하여 프로젝트로 이동합니다.
On the side navigation bar, select Tracing.
Azure Application Insights 리소스가 Azure AI Foundry 리소스와 연결되지 않은 경우 해당 리소스를 연결합니다.
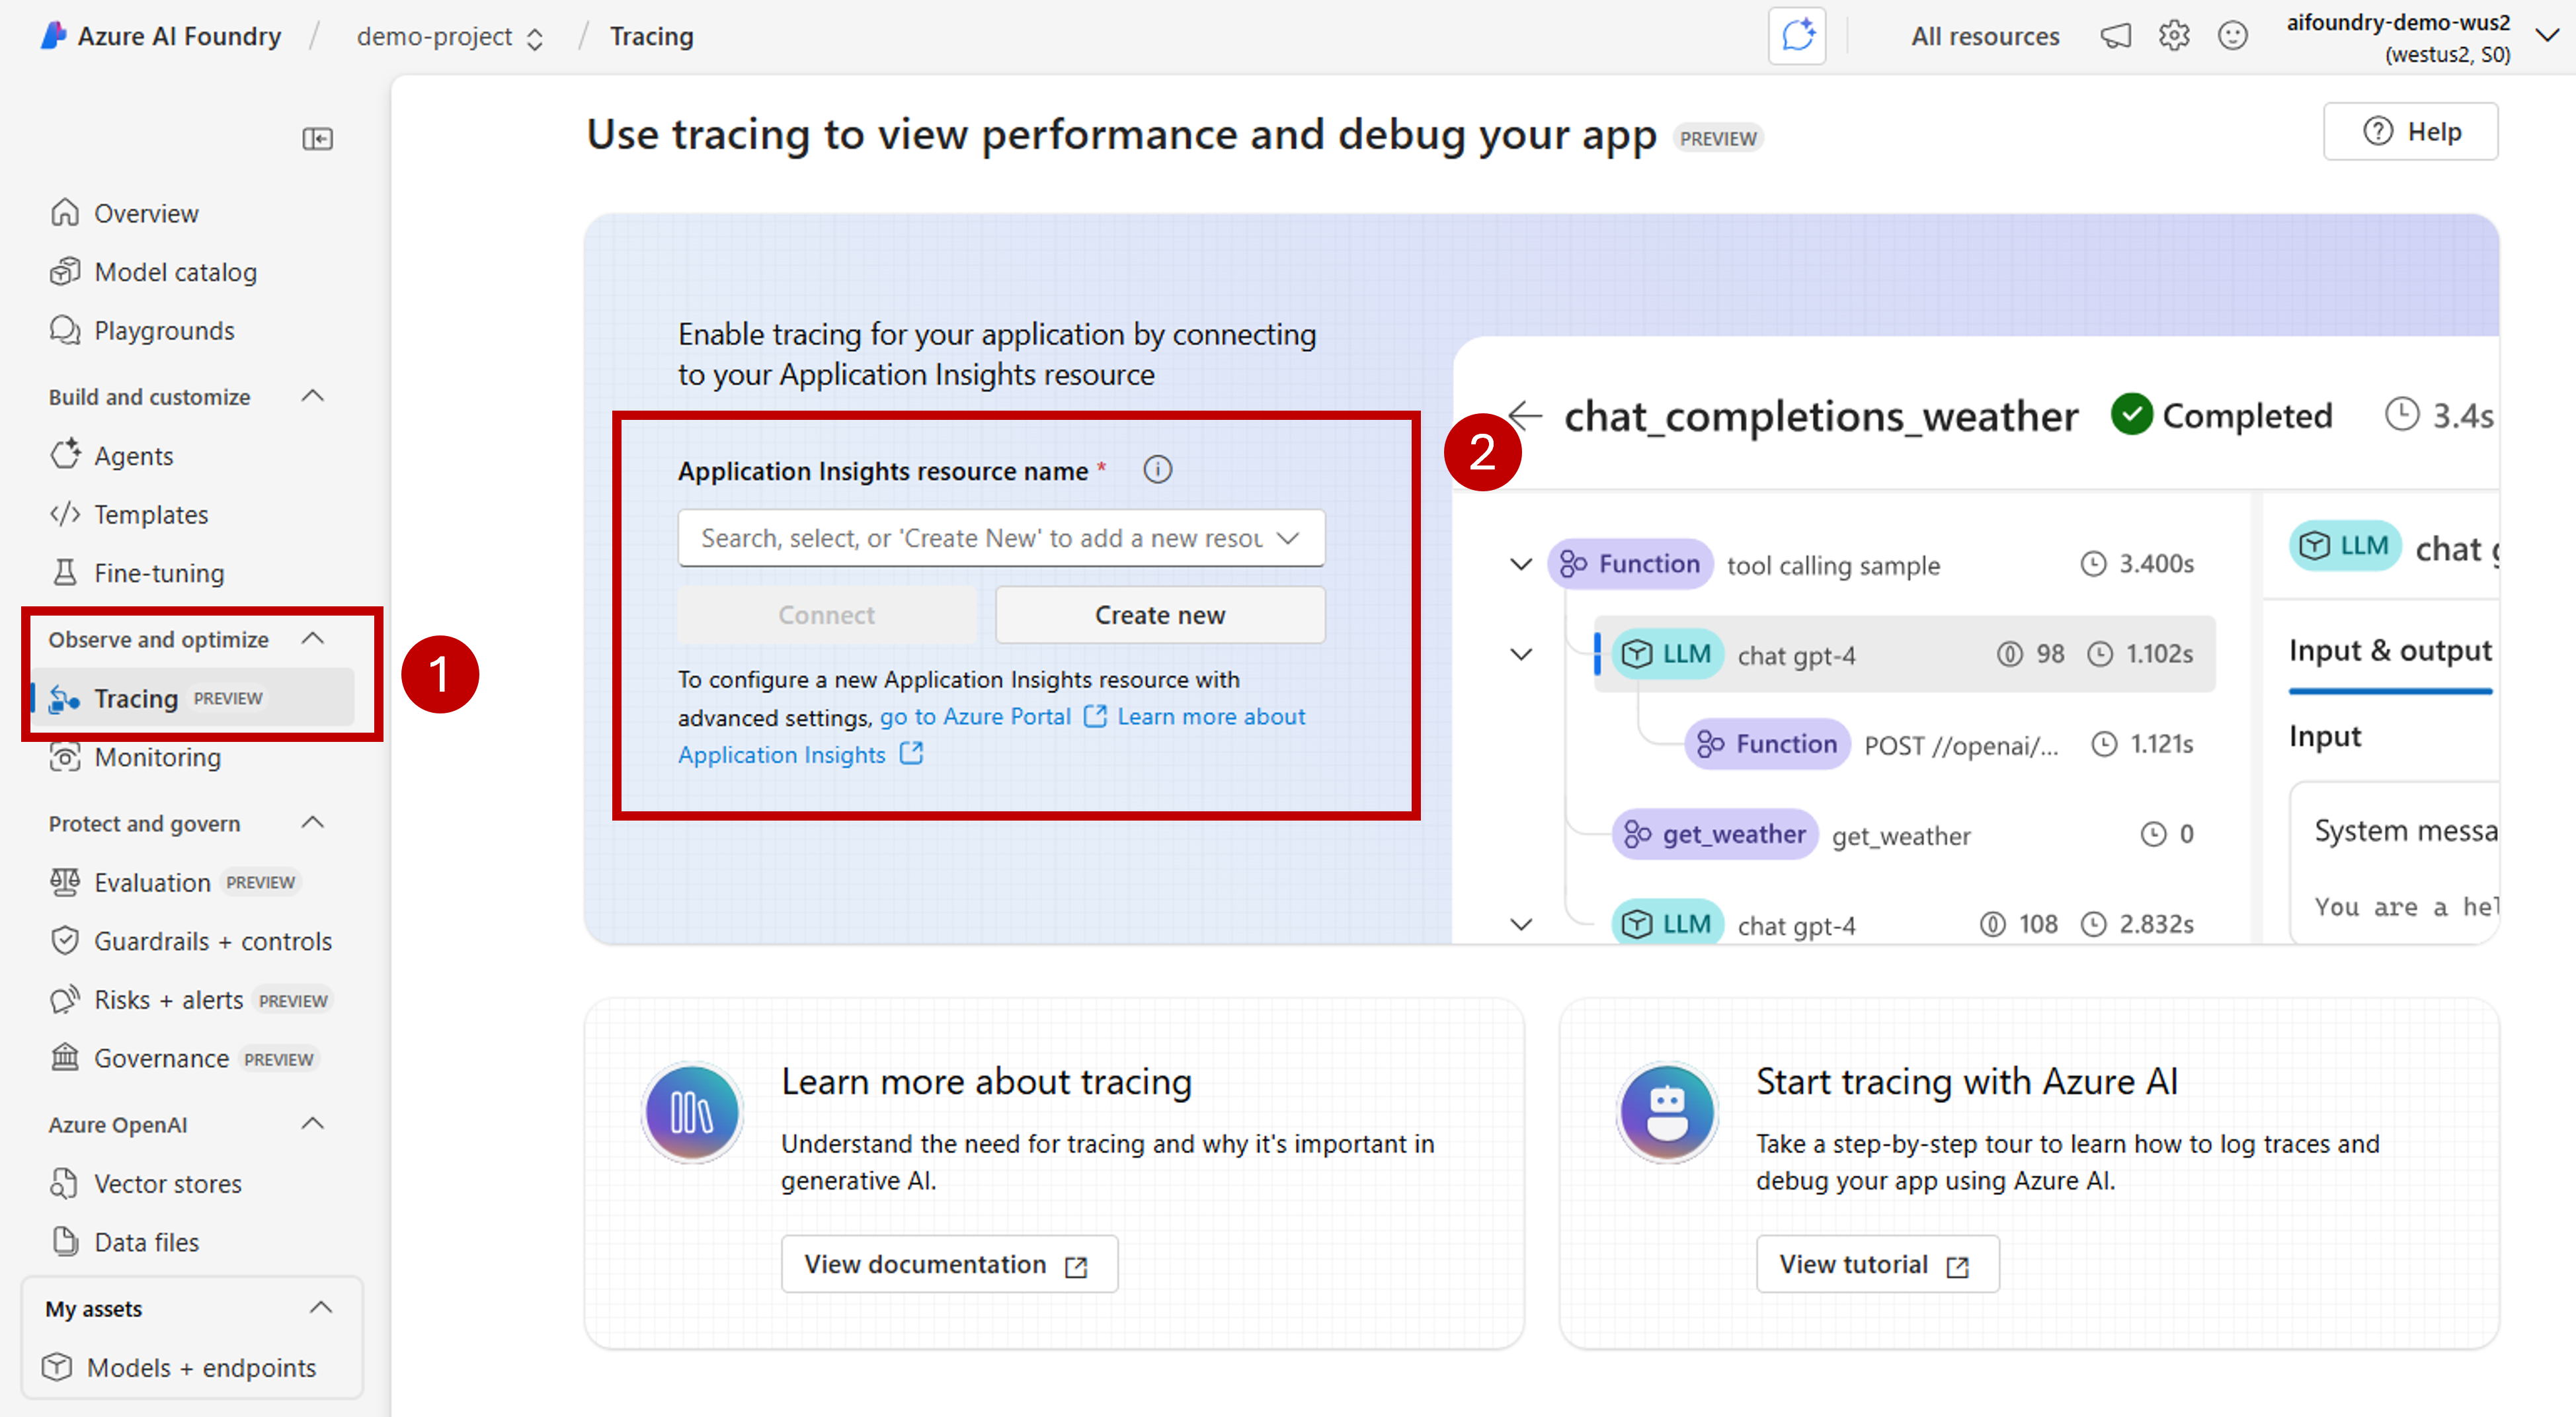
기존 Azure Application Insights를 다시 사용하려면 드롭다운 Application Insights 리소스 이름을 사용하여 리소스 를 찾고 연결을 선택합니다.
Tip
기존 Azure Application Insights에 연결하려면 적어도 Azure AI Foundry 리소스(또는 허브)에 대한 기여자 액세스 권한이 필요합니다.
To connect to a new Azure Application Insights resource, select the option Create new.
구성 마법사를 사용하여 새 리소스의 이름을 구성합니다.
기본적으로 새 리소스는 Azure AI Foundry 리소스가 만들어진 동일한 리소스 그룹에 만들어집니다. Use the Advance settings option to configure a different resource group or subscription.
Tip
새 Azure Application Insight 리소스를 만들려면 선택한 리소스 그룹(또는 기본 리소스 그룹)에 대한 기여자 역할도 필요합니다.
Select Create to create the resource and connect it to the Azure AI Foundry resource.
연결이 구성되면 리소스 내의 모든 프로젝트에서 추적을 사용할 준비가 된 것입니다.
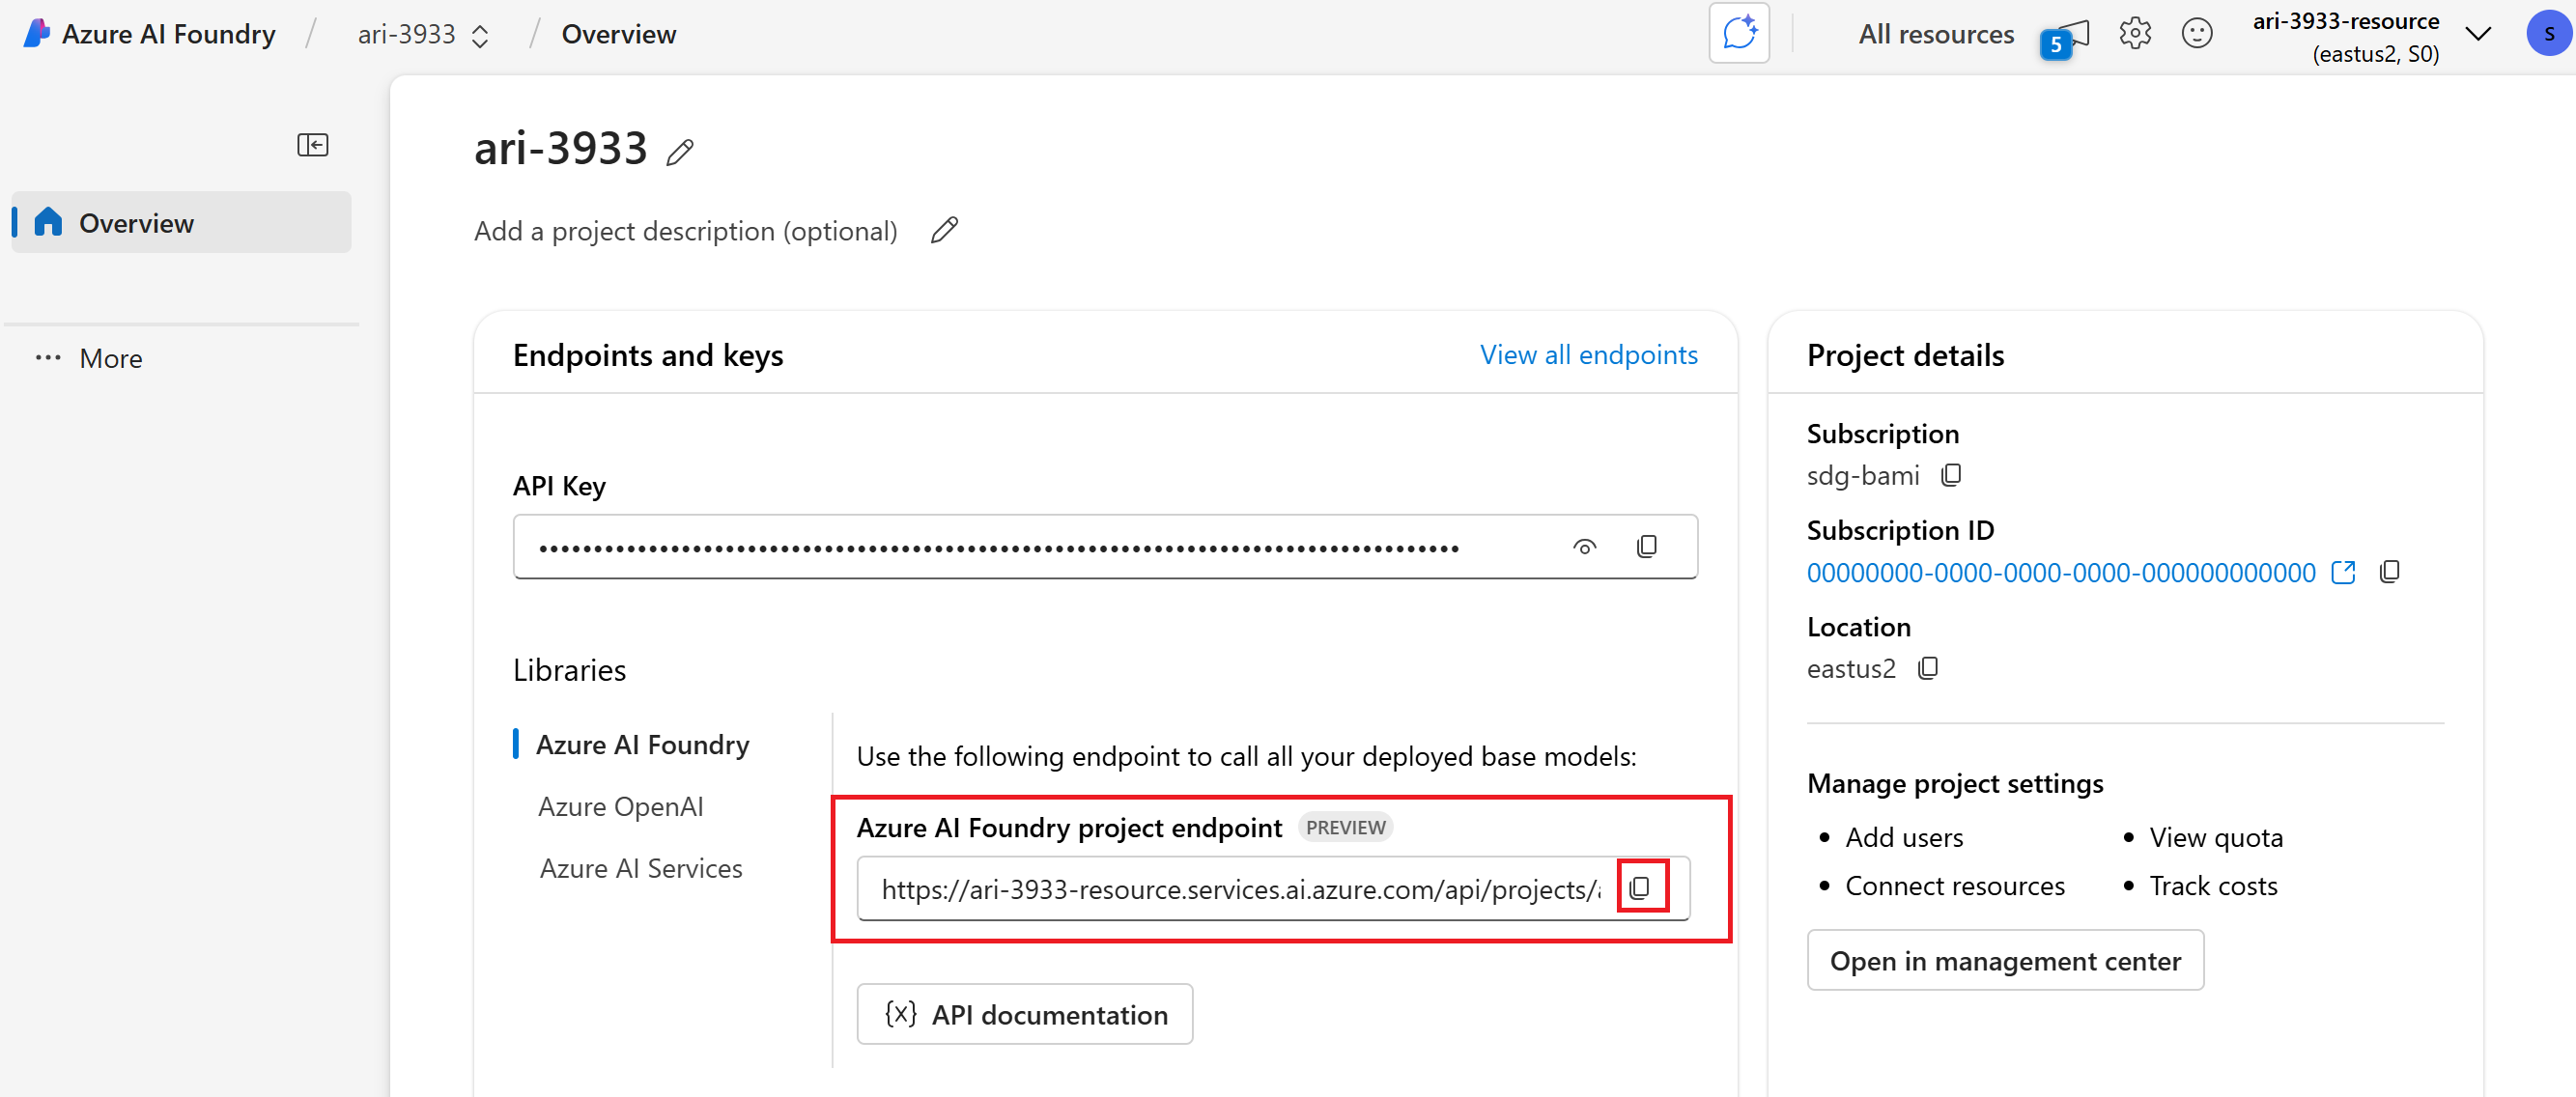
프로젝트의 방문 페이지로 이동하여 프로젝트의 엔드포인트 URI를 복사합니다. 자습서의 뒷부분에서 필요합니다.
Important
프로젝트의 엔드포인트를 사용하려면 애플리케이션에서 Microsoft Entra ID를 구성해야 합니다. Entra ID가 구성되지 않은 경우 자습서의 3단계에 표시된 대로 Azure Application Insights 연결 문자열을 사용합니다.


OpenAI SDK 구현
OpenAI SDK를 사용하여 개발할 때 추적이 Azure AI Foundry로 전송되도록 코드를 계측할 수 있습니다. 다음 단계에 따라 코드를 계측합니다.
azure-ai-projects,azure-monitor-opentelemetry, 및opentelemetry-instrumentation-openai-v2를 사용자 환경에 설치합니다. 다음 예제에서는pip를 사용합니다.pip install azure-ai-projects azure-monitor-opentelemetry opentelemetry-instrumentation-openai-v2OpenAIInstrumentor()를 사용하여 OpenAI SDK를 계측하기from opentelemetry.instrumentation.openai_v2 import OpenAIInstrumentor OpenAIInstrumentor().instrument()프로젝트와 연결된 Azure Application Insights 리소스에 대한 연결 문자열을 가져옵니다. 다음 줄에서는 인증에 Microsoft Entra ID를 사용해야 하는 Azure AI Project 클라이언트를 사용합니다.
from azure.ai.projects import AIProjectClient from azure.identity import DefaultAzureCredential project_client = AIProjectClient( credential=DefaultAzureCredential(), endpoint="https://<your-resource>.services.ai.azure.com/api/projects/<your-project>", ) connection_string = project_client.telemetry.get_connection_string()Tip
Azure Application Insights에 대한 연결 문자열은 다음과 같습니다
InstrumentationKey=aaaa0a0a-bb1b-cc2c-dd3d-eeeee4e4e4e;.... You can also access the connection string used in your project from the section Tracing in Azure AI Foundry portal. 위쪽 탐색 모음에서 데이터 원본 관리를 선택하고 연결 문자열을 복사합니다. 환경 변수에서 연결 문자열을 구성합니다.
Azure Application Insights에 추적을 보내도록 OpenTelemetry를 구성합니다.
from azure.monitor.opentelemetry import configure_azure_monitor configure_azure_monitor(connection_string=connection_string)기본적으로 OpenTelemetry는 입력 및 출력을 캡처하지 않습니다. 환경 변수
OTEL_INSTRUMENTATION_GENAI_CAPTURE_MESSAGE_CONTENT=true를 사용하여 캡처합니다. 이 환경 변수가 코드가 실행되는 환경 수준에서 구성되었는지 확인합니다.다음과 같이 OpenAI SDK를 사용합니다.
client = project_client.inference.get_azure_openai_client() response = client.chat.completions.create( model="deepseek-v3-0324", messages=[ {"role": "user", "content": "Write a short poem on open telemetry."}, ], )Azure AI Foundry 포털로 돌아가면 추적이 표시됩니다.

복잡한 애플리케이션을 개발할 때 비즈니스 논리를 모델과 혼합하는 코드 섹션을 캡처하는 것이 유용할 수 있습니다. OpenTelemetry는 범위 개념을 사용하여 관심 있는 섹션을 캡처합니다. To start generating your own spans, get an instance of the current tracer object.
from opentelemetry import trace tracer = trace.get_tracer(__name__)그런 다음 메서드에서 데코레이터를 사용하여 관심 있는 코드의 특정 시나리오를 캡처합니다. 이러한 데코레이터는 자동으로 범위를 생성합니다. 다음 코드 예제에서는
assess_claims_with_context라는 메서드를 계측하여 클레임 목록을 반복하면서 각 클레임이 LLM을 사용한 컨텍스트에서 지원되는지를 확인합니다. 이 메서드에서 수행된 모든 호출은 동일한 범위 내에서 캡처됩니다.def build_prompt_with_context(claim: str, context: str) -> str: return [{'role': 'system', 'content': "I will ask you to assess whether a particular scientific claim, based on evidence provided. Output only the text 'True' if the claim is true, 'False' if the claim is false, or 'NEE' if there's not enough evidence."}, {'role': 'user', 'content': f""" The evidence is the following: {context} Assess the following claim on the basis of the evidence. Output only the text 'True' if the claim is true, 'False' if the claim is false, or 'NEE' if there's not enough evidence. Do not output any other text. Claim: {claim} Assessment: """}] @tracer.start_as_current_span("assess_claims_with_context") def assess_claims_with_context(claims, contexts): responses = [] for claim, context in zip(claims, contexts): response = client.chat.completions.create( model="gpt-4.5-preview", messages=build_prompt_with_context(claim=claim, context=context), ) responses.append(response.choices[0].message.content.strip('., ')) return responses추적 결과는 다음과 같습니다.

현재 범위에 추가 정보를 추가할 수도 있습니다. OpenTelemetry uses the concept of attributes for that.
trace개체를 사용하여 그들에게 접근하고 추가 정보를 포함합니다. 메서드가 어떻게 수정되어 특성을 포함하게 되었는지assess_claims_with_context확인하세요.@tracer.start_as_current_span("assess_claims_with_context") def assess_claims_with_context(claims, contexts): responses = [] current_span = trace.get_current_span() current_span.set_attribute("operation.claims_count", len(claims)) for claim, context in zip(claims, contexts): response = client.chat.completions.create( model="gpt-4.5-preview", messages=build_prompt_with_context(claim=claim, context=context), ) responses.append(response.choices[0].message.content.strip('., ')) return responses


콘솔로 추적
애플리케이션을 추적하고 추적을 로컬 실행 콘솔로 보내는 것도 유용할 수 있습니다. 이러한 접근 방식은 자동화된 CI/CD 파이프라인을 사용하여 애플리케이션에서 단위 테스트 또는 통합 테스트를 실행할 때 도움이 될 수 있습니다. 추적을 콘솔로 보내고 CI/CD 도구에서 캡처하여 추가 분석을 수행할 수 있습니다.
다음과 같이 추적을 구성합니다.
다음과 같이 OpenAI SDK를 계측합니다.
from opentelemetry.instrumentation.openai_v2 import OpenAIInstrumentor OpenAIInstrumentor().instrument()콘솔에 추적을 보내도록 OpenTelemetry를 구성합니다.
from opentelemetry import trace
from opentelemetry.sdk.trace import TracerProvider
from opentelemetry.sdk.trace.export import SimpleSpanProcessor, ConsoleSpanExporter

span_exporter = ConsoleSpanExporter()
tracer_provider = TracerProvider()
tracer_provider.add_span_processor(SimpleSpanProcessor(span_exporter))
trace.set_tracer_provider(tracer_provider)
평소와 같이 OpenAI SDK를 사용합니다.
response = client.chat.completions.create(
    model="deepseek-v3-0324",
    messages=[
        {"role": "user", "content": "Write a short poem on open telemetry."},
    ],
)
{ "name": "chat deepseek-v3-0324", "context": { "trace_id": "0xaaaa0a0abb1bcc2cdd3d", "span_id": "0xaaaa0a0abb1bcc2cdd3d", "trace_state": "[]" }, "kind": "SpanKind.CLIENT", "parent_id": null, "start_time": "2025-06-13T00:02:04.271337Z", "end_time": "2025-06-13T00:02:06.537220Z", "status": { "status_code": "UNSET" }, "attributes": { "gen_ai.operation.name": "chat", "gen_ai.system": "openai", "gen_ai.request.model": "deepseek-v3-0324", "server.address": "my-project.services.ai.azure.com", "gen_ai.response.model": "DeepSeek-V3-0324", "gen_ai.response.finish_reasons": [ "stop" ], "gen_ai.response.id": "aaaa0a0abb1bcc2cdd3d", "gen_ai.usage.input_tokens": 14, "gen_ai.usage.output_tokens": 91 }, "events": [], "links": [], "resource": { "attributes": { "telemetry.sdk.language": "python", "telemetry.sdk.name": "opentelemetry", "telemetry.sdk.version": "1.31.1", "service.name": "unknown_service" }, "schema_url": "" } }