이제 Azure OpenAI는 Azure OpenAI Batch 입력 및 출력 파일에 Azure Blob Storage 사용을 지원합니다. 사용자 고유의 스토리지를 사용하면 파일 수에 대한 일괄 처리 제한이 적용되지 않습니다.
지역 지원
이제 일괄 처리 배포가 지원되는 모든 지역에서 지원됩니다.
Azure Blob Storage 구성
필수 조건
- Azure Blob Storage 계정.
- 배포 유형
Global-Batch또는DataZoneBatch배포 모델이 있는 Azure OpenAI 리소스입니다. 이 프로세스에 대한 도움말은 리소스 만들기 및 모델 배포 가이드를 참조하세요.
관리형 아이덴티티
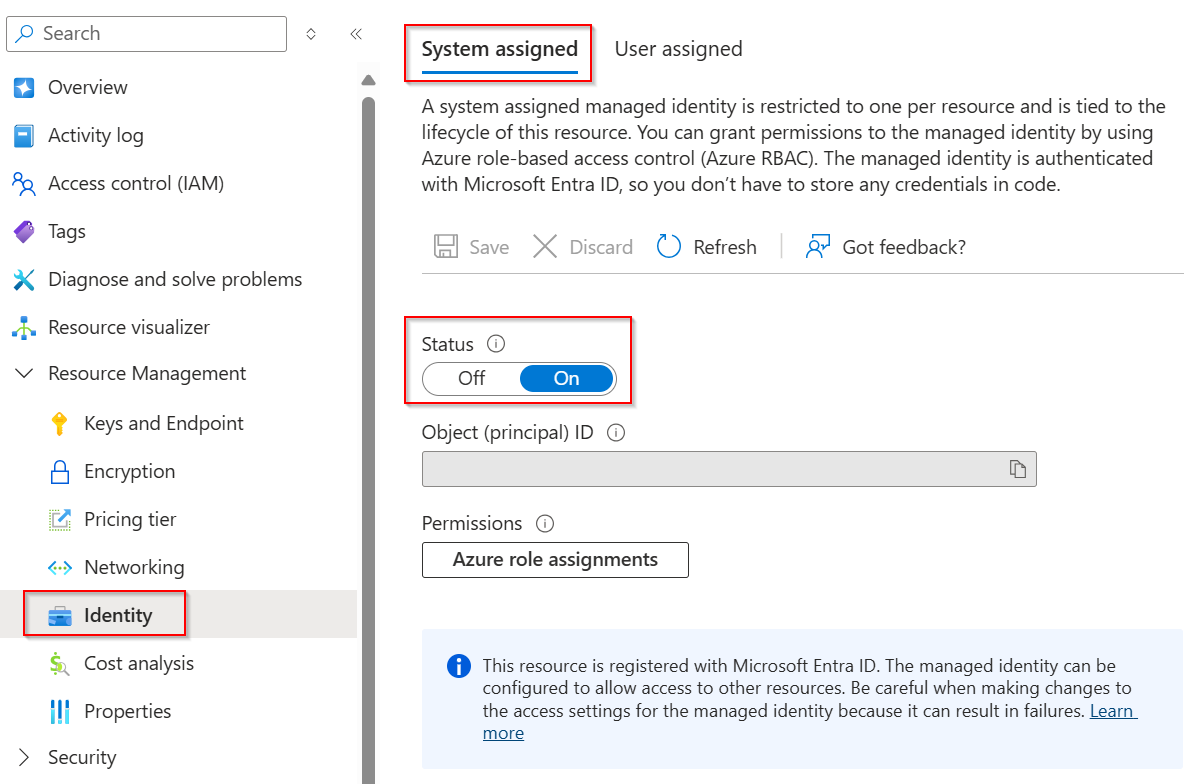
Azure OpenAI 리소스가 Azure Blob Storage 계정에 안전하게 액세스하려면 시스템 할당 관리 ID를 사용하여 리소스를 설정해야 합니다.
비고
현재 사용자 할당 관리 ID는 지원되지 않습니다.
https://portal.azure.com에 로그인하세요.
Azure OpenAI 리소스 > 찾기 리소스 관리>ID>시스템 할당> 설정 상태를 켜기로 선택합니다.

역할 기반 액세스 제어
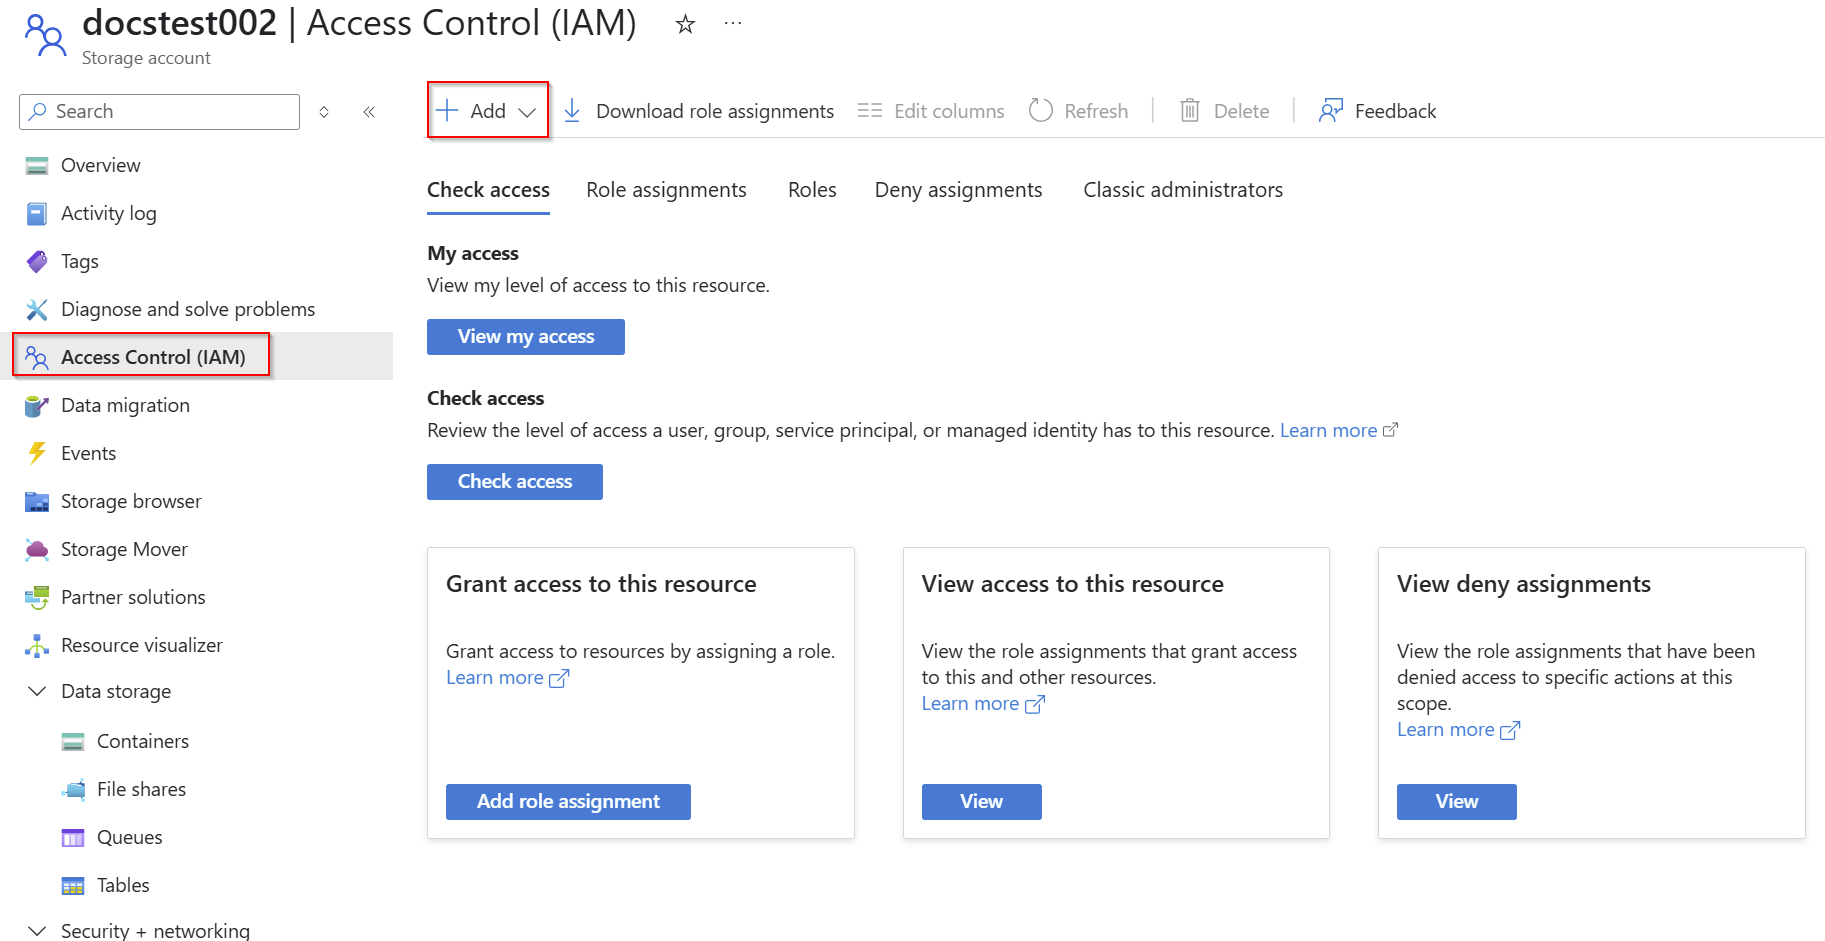
시스템 할당 관리 ID에 대해 Azure OpenAI 리소스가 구성되면 Azure Blob Storage 계정에 대한 액세스 권한을 부여해야 합니다.
https://portal.azure.com에서 Azure Blob Storage 리소스를 찾아 선택합니다.
IAM(액세스 제어)>추가>역할 할당 추가를 선택합니다.
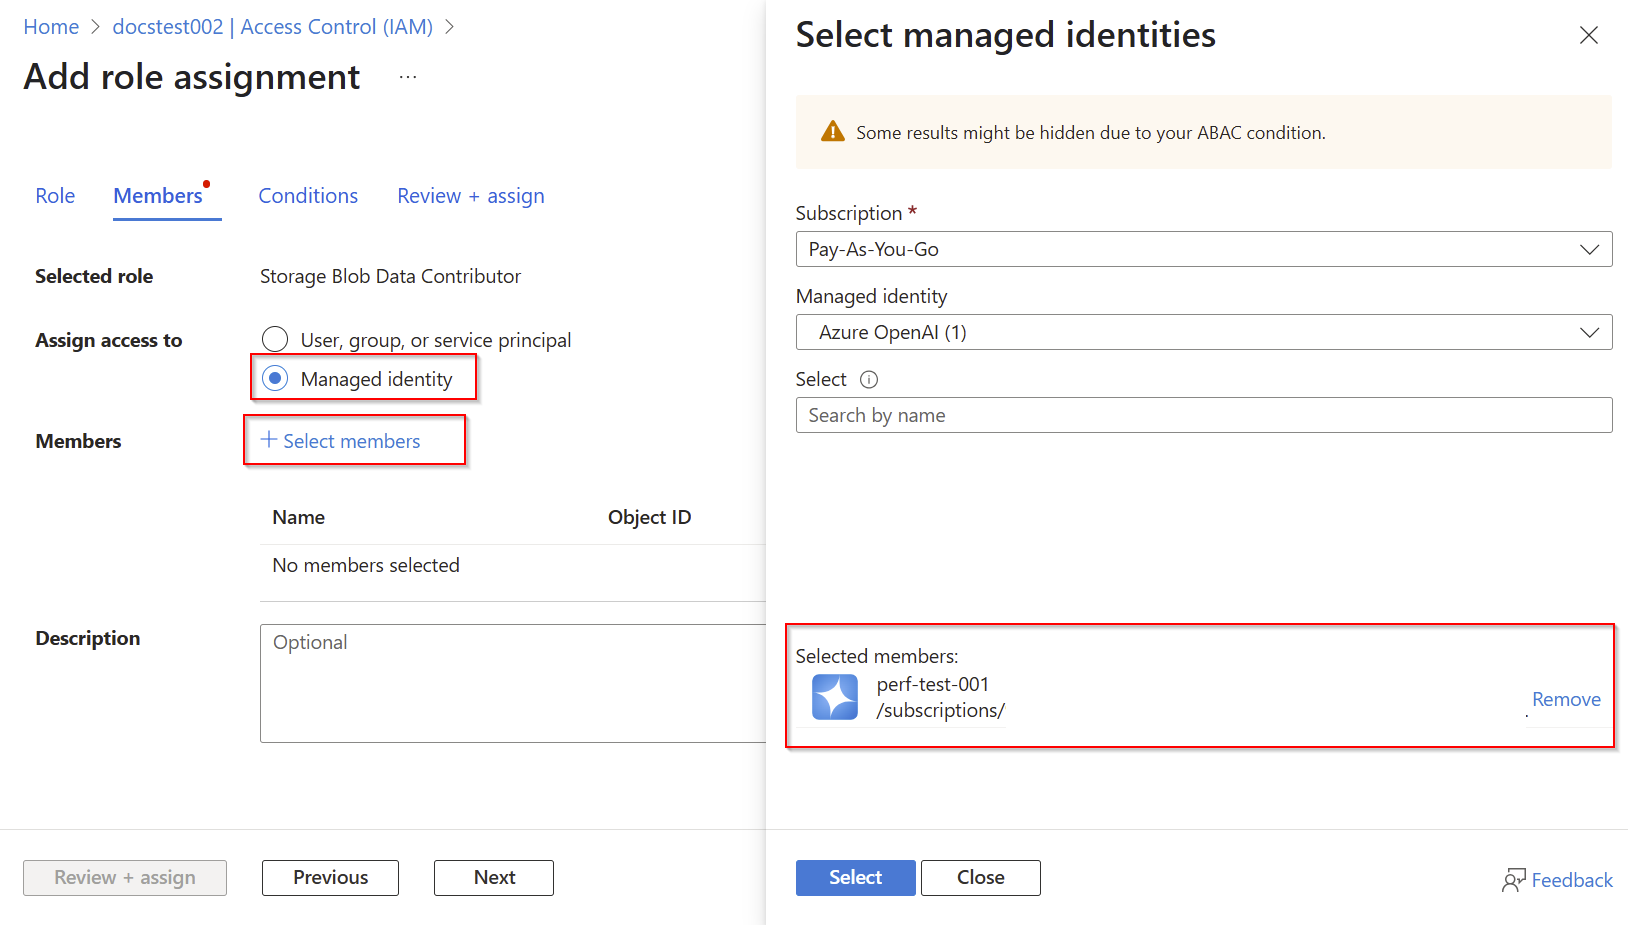
Storage Blob 데이터 기여자>다음을 검색합니다.
관리 ID>+구성원 선택> Azure OpenAI 리소스의 관리 ID를 선택하십시오.


보다 세부적인 액세스에 사용자 지정 역할을 사용하려면 다음 권한이 필요합니다.
입력 데이터:
Microsoft.Storage/storageAccounts/blobServices/containers/blobs/read
출력 데이터/폴더:
Microsoft.Storage/storageAccounts/blobServices/containers/blobs/readMicrosoft.Storage/storageAccounts/blobServices/containers/blobs/write
컨테이너 만들기
이 예제에서는 두 개의 컨테이너를 batch-inputbatch-output만듭니다. 원하는 대로 이름을 지정할 수 있지만 대체 이름을 사용하는 경우 다음 단계에서 예제를 조정해야 합니다.
데이터 스토리지> 아래에 컨테이너를 만들려면 +컨테이너> 이름을 선택합니다.

컨테이너가 만들어지면 각 컨테이너의 URL을 검색하려면 컨테이너 >>을 선택하세요. 그 후 URL을 복사하세요.
이 경우 다음을 수행합니다.
https://{AZURE-BLOB-STORAGE-RESOURCE-NAME}.blob.core.windows.net/batch-inputhttps://{AZURE-BLOB-STORAGE-RESOURCE-NAME}.blob.core.windows.net/batch-output
입력 파일 만들기
이 문서에서는 명명된 test.jsonl 파일을 만들고 아래 내용을 파일에 복사합니다. 파일의 각 줄에 글로벌 일괄 처리 배포 이름을 수정하여 추가해야 합니다.
{"custom_id": "task-0", "method": "POST", "url": "/chat/completions", "body": {"model": "REPLACE-WITH-MODEL-DEPLOYMENT-NAME", "messages": [{"role": "system", "content": "You are an AI assistant that helps people find information."}, {"role": "user", "content": "When was Microsoft founded?"}]}}
{"custom_id": "task-1", "method": "POST", "url": "/chat/completions", "body": {"model": "REPLACE-WITH-MODEL-DEPLOYMENT-NAME", "messages": [{"role": "system", "content": "You are an AI assistant that helps people find information."}, {"role": "user", "content": "When was the first XBOX released?"}]}}
{"custom_id": "task-2", "method": "POST", "url": "/chat/completions", "body": {"model": "REPLACE-WITH-MODEL-DEPLOYMENT-NAME", "messages": [{"role": "system", "content": "You are an AI assistant that helps people find information."}, {"role": "user", "content": "What is Altair Basic?"}]}}
학습 파일 업로드
Azure Blob Storage 계정에서 이전에 만든 일괄 처리 입력 컨테이너를 엽니다.
업로드를 선택하고 파일을 선택합니다test.jsonl.

일괄 처리 작업의 일환으로 jsonl 파일을 처리하는 동안에는 해당 파일을 변경할 수 없습니다. 일괄 처리 작업이 실행되는 동안 파일이 변경되면 작업이 실패합니다.
일괄 작업 만들기
비고
metadata 는 현재 이 기능에서 지원되지 않습니다.
import os
from datetime import datetime
from openai import AzureOpenAI
from azure.identity import DefaultAzureCredential, get_bearer_token_provider

token_provider = get_bearer_token_provider(
    DefaultAzureCredential(), "https://cognitiveservices.azure.com/.default"
)

client = AzureOpenAI(
  azure_endpoint = os.getenv("AZURE_OPENAI_ENDPOINT"),
  azure_ad_token_provider=token_provider,
  api_version="2025-04-01-preview"
)

batch_response = client.batches.create(
    input_file_id=None,
    endpoint="/chat/completions",
    completion_window="24h",
      extra_body={
        "input_blob": "https://{AZURE-BLOB-STORAGE-RESOURCE-NAME}.blob.core.windows.net/batch-input/test.jsonl",
        "output_folder": {
                "url": "https://{AZURE-BLOB-STORAGE-RESOURCE-NAME}.blob.core.windows.net/batch-output",
        }
    }
)

# Save batch ID for later use
batch_id = batch_response.id

print(batch_response.model_dump_json(indent=2))
출력:
{
  "id": "batch_b632a805-797b-49ed-9c9c-86eb4057f2a2",
  "completion_window": "24h",
  "created_at": 1747516485,
  "endpoint": "/chat/completions",
  "input_file_id": null,
  "object": "batch",
  "status": "validating",
  "cancelled_at": null,
  "cancelling_at": null,
  "completed_at": null,
  "error_file_id": null,
  "errors": null,
  "expired_at": null,
  "expires_at": 1747602881,
  "failed_at": null,
  "finalizing_at": null,
  "in_progress_at": null,
  "metadata": null,
  "output_file_id": null,
  "request_counts": {
    "completed": 0,
    "failed": 0,
    "total": 0
  },
  "error_blob": "",
  "input_blob": "https://docstest002.blob.core.windows.net/batch-input/test.jsonl",
  "output_blob": ""
}
Azure OpenAI 일괄 처리 사용에 대한 포괄적인 가이드에 설명된 것과 동일한 방식으로 상태를 모니터링할 수 있습니다.
import time
import datetime

status = "validating"
while status not in ("completed", "failed", "canceled"):
    time.sleep(60)
    batch_response = client.batches.retrieve(batch_id)
    status = batch_response.status
    print(f"{datetime.datetime.now()} Batch Id: {batch_id},  Status: {status}")

if batch_response.status == "failed":
    for error in batch_response.errors.data:
        print(f"Error code {error.code} Message {error.message}")
출력:
2025-05-17 17:16:56.950427 Batch Id: batch_b632a805-797b-49ed-9c9c-86eb4057f2a2,  Status: validating
2025-05-17 17:17:57.532054 Batch Id: batch_b632a805-797b-49ed-9c9c-86eb4057f2a2,  Status: validating
2025-05-17 17:18:58.156793 Batch Id: batch_b632a805-797b-49ed-9c9c-86eb4057f2a2,  Status: in_progress
2025-05-17 17:19:58.739708 Batch Id: batch_b632a805-797b-49ed-9c9c-86eb4057f2a2,  Status: in_progress
2025-05-17 17:20:59.398508 Batch Id: batch_b632a805-797b-49ed-9c9c-86eb4057f2a2,  Status: finalizing
2025-05-17 17:22:00.242371 Batch Id: batch_b632a805-797b-49ed-9c9c-86eb4057f2a2,  Status: completed
status이(가) completed하면, output_blob 경로를 검색할 수 있습니다.
print(batch_response.model_dump_json(indent=2))
출력:
{
  "id": "batch_b632a805-797b-49ed-9c9c-86eb4057f2a2",
  "completion_window": "24h",
  "created_at": 1747516485,
  "endpoint": "/chat/completions",
  "input_file_id": null,
  "object": "batch",
  "status": "completed",
  "cancelled_at": null,
  "cancelling_at": null,
  "completed_at": 1747516883,
  "error_file_id": null,
  "errors": null,
  "expired_at": null,
  "expires_at": 1747602881,
  "failed_at": null,
  "finalizing_at": 1747516834,
  "in_progress_at": 1747516722,
  "metadata": null,
  "output_file_id": null,
  "request_counts": {
    "completed": 3,
    "failed": 0,
    "total": 3
  },
  "error_blob": "https://docstest002.blob.core.windows.net/batch-output/{GUID}/errors.jsonl",
  "input_blob": "https://docstest002.blob.core.windows.net/batch-input/test.jsonl",
  "output_blob": "https://docstest002.blob.core.windows.net/batch-output/{GUID}/results.jsonl"
}
일괄 처리 작업이 완료되면 Azure 포털의 Azure Blob Storage 인터페이스를 통해 error_blob 및 output_blob을 다운로드할 수 있으며, 프로그래밍 방식으로도 다운로드할 수 있습니다.
비고
error_blob및 output_blob 경로는 해당 파일이 만들어지지 않은 경우에도 항상 응답에 반환됩니다. 이 경우 오류가 없으므로 errors.jsonl는 생성되지 않았고, results.jsonl만 존재합니다.
pip install azure-identity azure-storage-blob
Azure Blob Storage에 대한 Azure OpenAI 리소스 프로그래밍 방식 액세스 권한을 부여한 반면 결과를 다운로드하려면 아래 스크립트를 실행하는 사용자 계정에도 액세스 권한을 부여해야 할 수 있습니다. 파일을 다운로드하려면 Storage Blob Data Reader 액세스 권한만 있으면 됩니다.
# Import required libraries
from azure.identity import DefaultAzureCredential
from azure.storage.blob import BlobServiceClient

# Define storage account and container information
storage_account_name = "docstest002" # replace with your storage account name
container_name = "batch-output"

# Define the blob paths to download
blob_paths = [
    "{REPLACE-WITH-YOUR-GUID}/results.jsonl",
]

credential = DefaultAzureCredential()
account_url = f"https://{storage_account_name}.blob.core.windows.net"
blob_service_client = BlobServiceClient(account_url=account_url, credential=credential)
container_client = blob_service_client.get_container_client(container_name)

for blob_path in blob_paths:
    blob_client = container_client.get_blob_client(blob_path)

    file_name = blob_path.split("/")[-1]

    print(f"Downloading {file_name}...")
    with open(file_name, "wb") as file:
        download_stream = blob_client.download_blob()
        file.write(download_stream.readall())

    print(f"Downloaded {file_name} successfully!")
참고하십시오
Azure OpenAI Batch에 대한 자세한 내용은 포괄적인 일괄 처리 가이드를 참조하세요.