적용 대상:✅ Microsoft Fabric의 데이터 엔지니어링 및 데이터 과학
패브릭 데이터 엔지니어링용 Livy API를 사용하여 Spark 세션 작업을 제출하는 방법을 알아봅니다.
중요합니다
이 기능은 프리뷰로 제공됩니다.
필수 조건
Jupyter Notebook,PySpark 및 Python용 MSAL(Microsoft 인증 라이브러리)을 사용하는 Visual Studio Code와 같은 원격 클라이언트
Microsoft Entra 앱 토큰 중 하나. Microsoft ID 플랫폼을 사용하여 애플리케이션 등록
또는 Microsoft Entra SPN 토큰입니다. Microsoft Entra에서 애플리케이션 자격 증명 추가 및 관리
레이크하우스의 일부 데이터로 이 예제에서는 레이크하우스에 로드된 parquet 파일인 NYC Taxi 및 리무진 커미션의 green_tripdata_2022_08을 사용합니다.
Livy API는 작업에 대한 통합 엔드포인트를 정의합니다. 이 문서의 예제를 따를 때 자리 표시자 {Entra_TenantID}, {Entra_ClientID}, {Fabric_WorkspaceID}, {Fabric_LakehouseID}, {Entra_ClientSecret}을(를) 적절한 값으로 바꿉니다.
Livy API 세션에 대한 Visual Studio Code 구성
패브릭 레이크하우스에서 레이크하우스 설정을 선택합니다.

Livy 엔드포인트 섹션으로 이동합니다.

세션 작업 연결 문자열(이미지의 첫 번째 빨간색 상자)를 코드에 복사합니다.
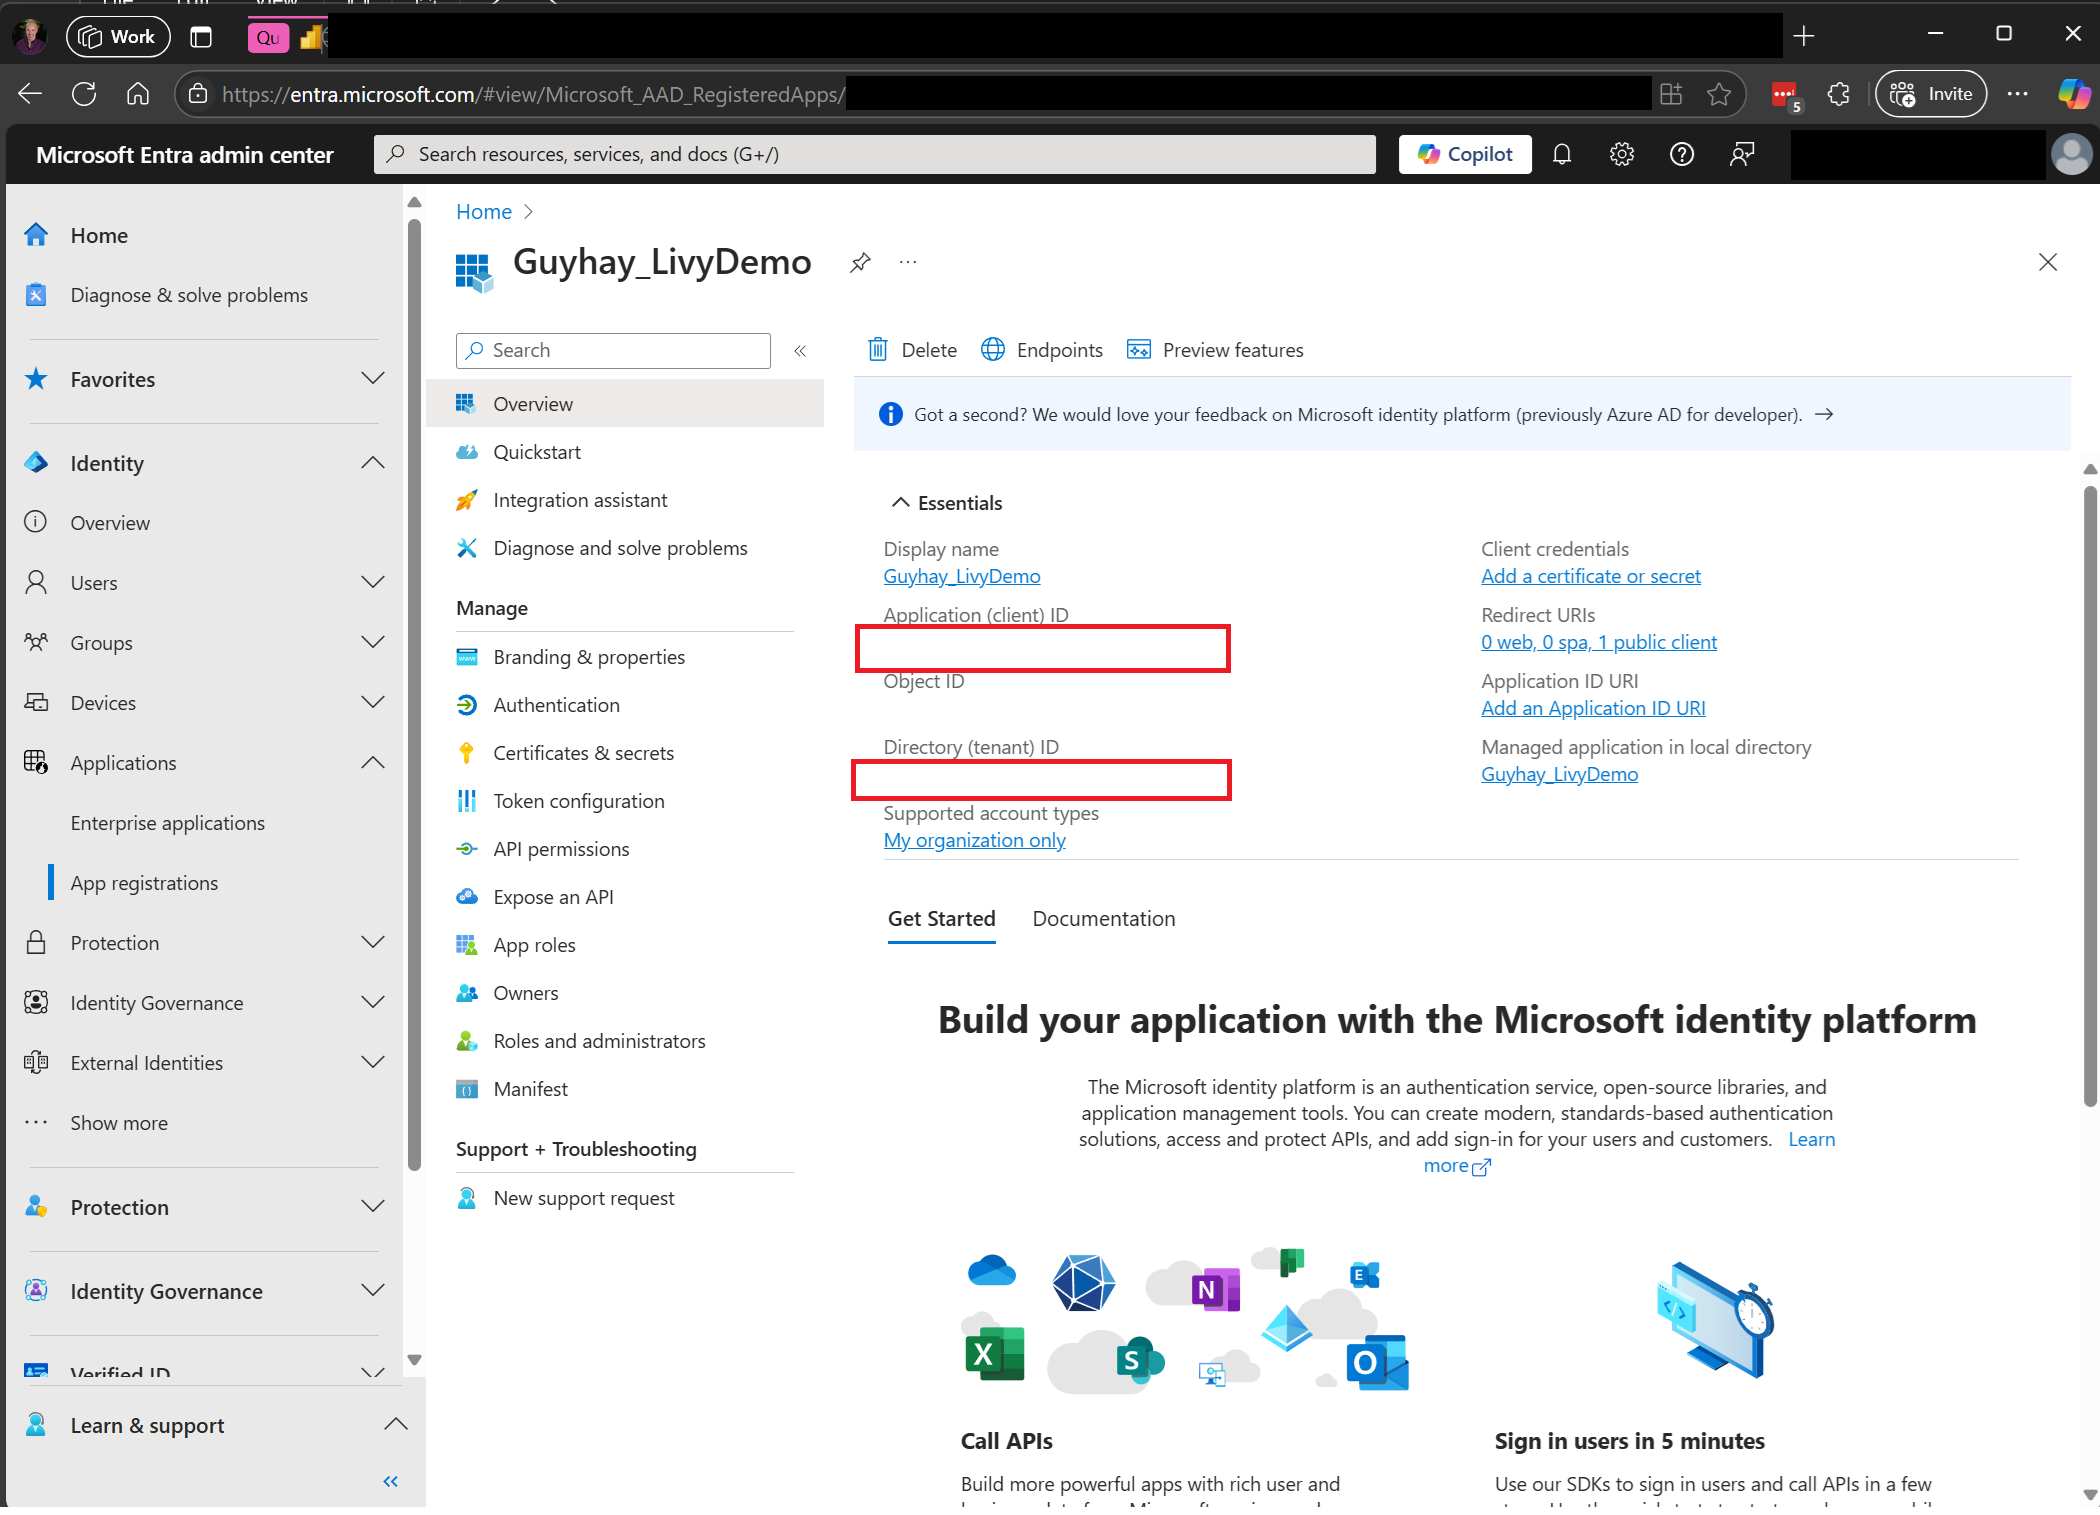
Microsoft Entra 관리 센터로 이동하여 애플리케이션(클라이언트) ID와 디렉터리(테넌트) ID를 모두 코드에 복사합니다.


Entra 사용자 토큰 또는 Entra SPN 토큰을 사용하여 Livy API Spark 세션 인증
Entra SPN 토큰을 사용하여 Livy API Spark 세션 인증
Visual Studio Code에서 Notebook을
.ipynb만들고 다음 코드를 삽입합니다.from msal import ConfidentialClientApplication import requests import time tenant_id = "Entra_TenantID" client_id = "Entra_ClientID" client_secret = "Entra_ClientSecret" audience = "https://api.fabric.microsoft.com/.default" workspace_id = "Fabric_WorkspaceID" lakehouse_id = "Fabric_LakehouseID" # Get the app-only token def get_app_only_token(tenant_id, client_id, client_secret, audience): """ Get an app-only access token for a Service Principal using OAuth 2.0 client credentials flow. Args: tenant_id (str): The Azure Active Directory tenant ID. client_id (str): The Service Principal's client ID. client_secret (str): The Service Principal's client secret. audience (str): The audience for the token (e.g., resource-specific scope). Returns: str: The access token. """ try: # Define the authority URL for the tenant authority = f"https://login.microsoftonline.com/{tenant_id}" # Create a ConfidentialClientApplication instance app = ConfidentialClientApplication( client_id = client_id, client_credential = client_secret, authority = authority ) # Acquire a token using the client credentials flow result = app.acquire_token_for_client(scopes = [audience]) # Check if the token was successfully retrieved if "access_token" in result: return result["access_token"] else: raise Exception("Failed to retrieve token: {result.get('error_description', 'Unknown error')}") except Exception as e: print(f"Error retrieving token: {e}", fil = sys.stderr) sys.exit(1) token = get_app_only_token(tenant_id, client_id, client_secret, audience) api_base_url = 'https://api.fabric.microsoft.com/v1/' livy_base_url = api_base_url + "/workspaces/"+workspace_id+"/lakehouses/"+lakehouse_id +"/livyApi/versions/2023-12-01/batches" headers = {"Authorization": "Bearer " + token} print(token)Visual Studio Code에서 반환된 Microsoft Entra 토큰이 표시됩니다.
 ```
```

Entra 사용자 토큰을 사용하여 Livy API Spark 세션 인증
Visual Studio Code에서 Notebook을
.ipynb만들고 다음 코드를 삽입합니다.from msal import PublicClientApplication import requests import time tenant_id = "Entra_TenantID" client_id = "Entra_ClientID" workspace_id = "Fabric_WorkspaceID" lakehouse_id = "Fabric_LakehouseID" app = PublicClientApplication( client_id, authority = "https://login.microsoftonline.com/"Entra_TenantID" ) result = None # If no cached tokens or user interaction needed, acquire tokens interactively if not result: result = app.acquire_token_interactive(scopes = ["https://api.fabric.microsoft.com/Lakehouse.Execute.All", "https://api.fabric.microsoft.com/Lakehouse.Read.All", "https://api.fabric.microsoft.com/Item. ReadWrite.All", "https://api.fabric.microsoft.com/Workspace.ReadWrite.All", "https://api.fabric.microsoft.com/Code.AccessStorage.All", "https://api.fabric.microsoft.com/Code.AccessAzureKeyvault.All", "https://api.fabric.microsoft.com/Code.AccessAzureDataExplorer.All", "https://api.fabric.microsoft.com/Code.AccessAzureDataLake.All", "https://api.fabric.microsoft.com/Code.AccessFabric.All"]) # Print the access token (you can use it to call APIs) if "access_token" in result: print(f"Access token: {result['access_token']}") else: print("Authentication failed or no access token obtained.") if "access_token" in result: access_token = result['access_token'] api_base_url ='https://api.fabric.microsoft.com/v1' livy_base_url = api_base_url + "/workspaces/"+workspace_id+"/lakehouses/"+lakehouse_id +"/livyApi/versions/2023-12-01/sessions" headers = {"Authorization": "Bearer " + access_token}Visual Studio Code에서 반환된 Microsoft Entra 토큰이 표시됩니다.


Livy API Spark 세션 만들기
다른 Notebook 셀을 추가하고 이 코드를 삽입합니다.
create_livy_session = requests.post(livy_base_url, headers = headers, json={})
print('The request to create the Livy session is submitted:' + str(create_livy_session.json()))

livy_session_id = create_livy_session.json()['id']
livy_session_url = livy_base_url + "/" + livy_session_id
get_session_response = requests.get(livy_session_url, headers = headers)
print(get_session_response.json())
Notebook 셀을 실행하면 Livy 세션이 생성될 때 한 줄이 인쇄됩니다.

[모니터링 허브에서 작업 보기](모니터링 허브에서 작업 #View)를 사용하여 Livy 세션이 생성되었는지 확인할 수 있습니다.

패브릭 환경과 통합
기본적으로 이 Livy API 세션은 작업 영역에 대한 기본 시작 풀에 대해 실행됩니다. 또는 패브릭 환경 만들기, 구성 및 Microsoft Fabric의 환경을 사용하여 Livy API 세션에서 이러한 Spark 작업에 사용하는 Spark 풀을 사용자 지정할 수 있습니다. 패브릭 환경을 사용하려면 이 json 페이로드를 사용하여 이전 Notebook 셀을 업데이트하기만 하면 됩니다.
create_livy_session = requests.post(livy_base_url, headers = headers, json = {
    "conf" : {
        "spark.fabric.environmentDetails" : "{\"id\" : \""EnvironmentID""}"}
        }
)
spark.sql 문을 Livy API Spark 세션을 사용하여 제출하십시오.
다른 Notebook 셀을 추가하고 이 코드를 삽입합니다.
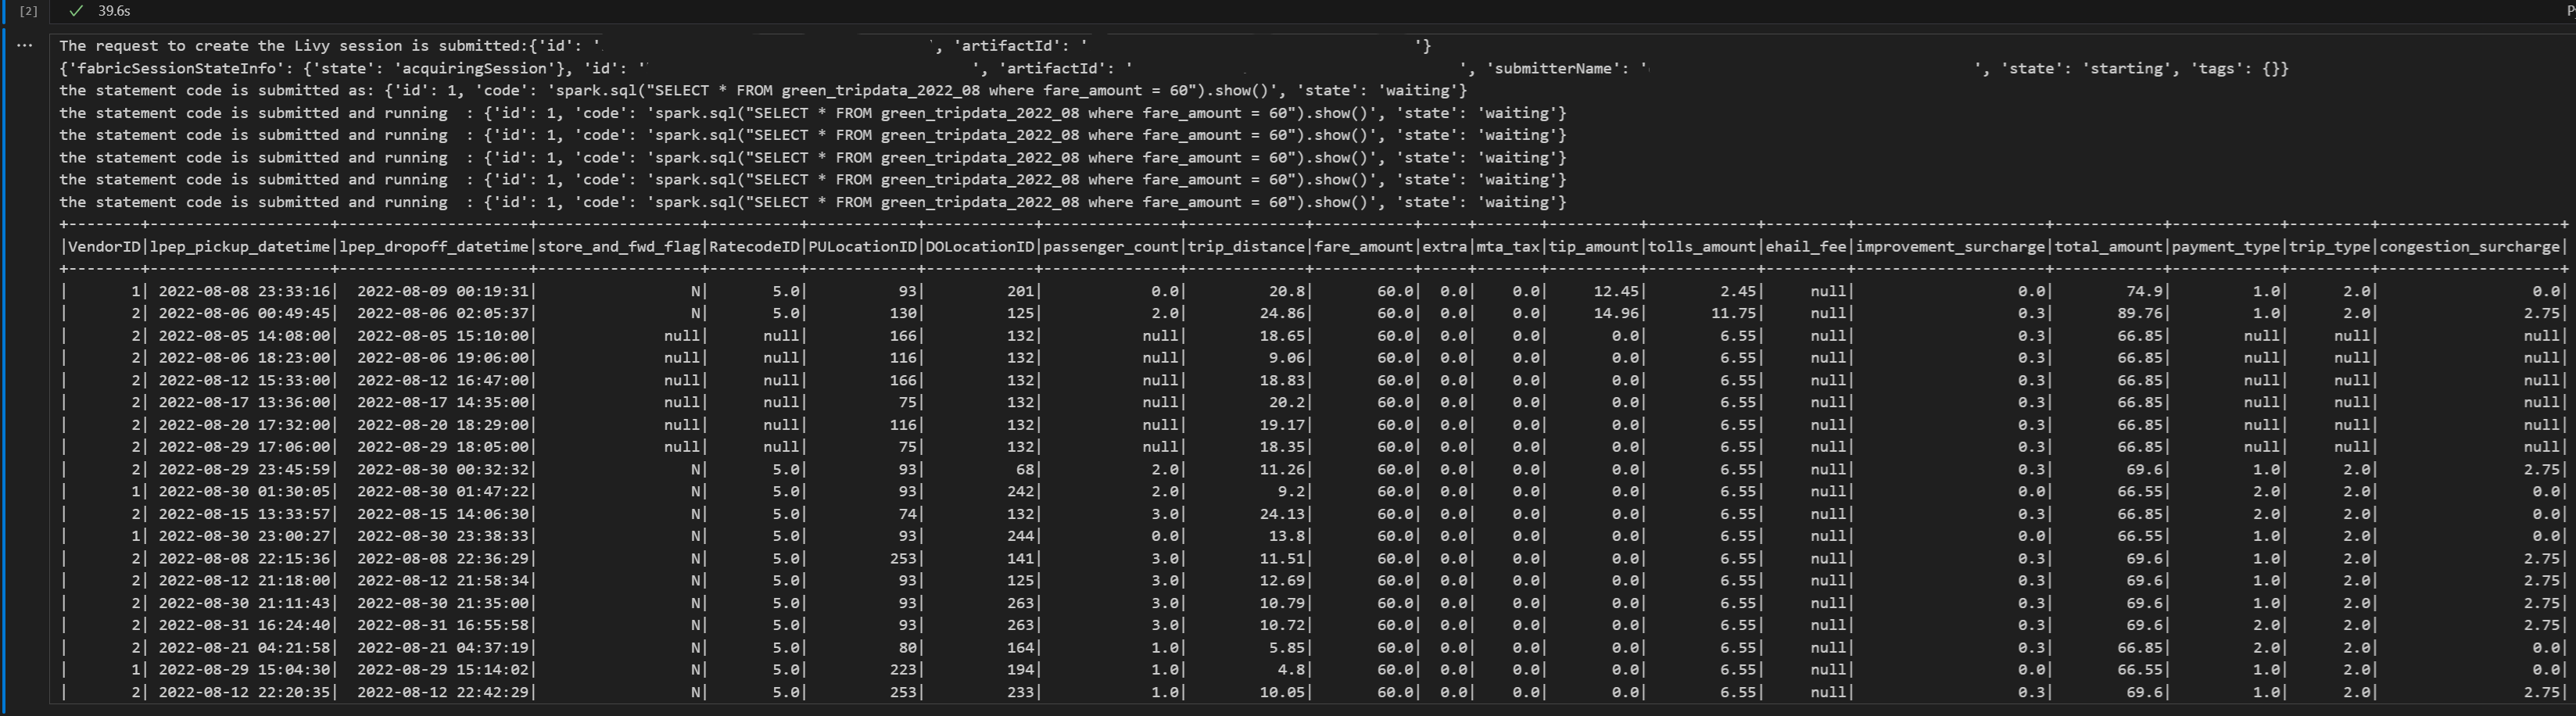
# call get session API
livy_session_id = create_livy_session.json()['id']
livy_session_url = livy_base_url + "/" + livy_session_id
get_session_response = requests.get(livy_session_url, headers = headers)

print(get_session_response.json())
while get_session_response.json()["state"] != "idle":
    time.sleep(5)
    get_session_response = requests.get(livy_session_url, headers = headers)

execute_statement = livy_session_url + "/statements"
payload_data = {
    "code": "spark.sql(\"SELECT * FROM green_tripdata_2022_08 where fare_amount = 60\").show()",
        "kind": "spark"
    }

execute_statement_response = requests.post(execute_statement, headers = headers, json = payload_data)
print('the statement code is submitted as: ' + str(execute_statement_response.json()))

statement_id = str(execute_statement_response.json()['id'])
get_statement = livy_session_url + "/statements/" + statement_id
get_statement_response = requests.get(get_statement, headers = headers)

while get_statement_response.json()["state"] != "available":
    # Sleep for 5 seconds before making the next request
    time.sleep(5)
    print('the statement code is submitted and running : ' + str(execute_statement_response.json()))

# Make the next request
get_statement_response = requests.get(get_statement, headers = headers)

rst = get_statement_response.json()['output']['data']['text/plain']
print(rst)
Notebook 셀을 실행하면 작업이 제출되고 결과가 반환될 때 여러 증분 줄이 인쇄됩니다.

Livy API Spark 세션을 사용하여 두 번째 spark.sql 문 제출
다른 Notebook 셀을 추가하고 이 코드를 삽입합니다.
# call get session API

livy_session_id = create_livy_session.json()['id']
livy_session_url = livy_base_url + "/" + livy_session_id
get_session_response = requests.get(livy_session_url, headers = headers)

print(get_session_response.json())
while get_session_response.json()["state"] != "idle":
    time.sleep(5)
    get_session_response = requests.get(livy_session_url, headers = headers)

execute_statement = livy_session_url + "/statements"
payload_data = {
    "code": "spark.sql(\"SELECT * FROM green_tripdata_2022_08 where tip_amount = 10\").show()",
    "kind": "spark"
}

execute_statement_response = requests.post(execute_statement, headers = headers, json = payload_data)
print('the statement code is submitted as: ' + str(execute_statement_response.json()))

statement_id = str(execute_statement_response.json()['id'])
get_statement = livy_session_url + "/statements/" + statement_id
get_statement_response = requests.get(get_statement, headers = headers)

while get_statement_response.json()["state"] != "available":
# Sleep for 5 seconds before making the next request
    time.sleep(5)
    print('the statement code is submitted and running : ' + str(execute_statement_response.json()))

# Make the next request
get_statement_response = requests.get(get_statement, headers = headers)

rst = get_statement_response.json()['output']['data']['text/plain']
print(rst)
Notebook 셀을 실행하면 작업이 제출되고 결과가 반환될 때 여러 증분 줄이 인쇄됩니다.


세 번째 명령문을 사용하여 Livy 세션 닫기
다른 Notebook 셀을 추가하고 이 코드를 삽입합니다.
# call get session API with a delete session statement

get_session_response = requests.get(livy_session_url, header = headers)
print('Livy statement URL ' + livy_session_url)

response = requests.delete(livy_session_url, headers = headers)
print (response)
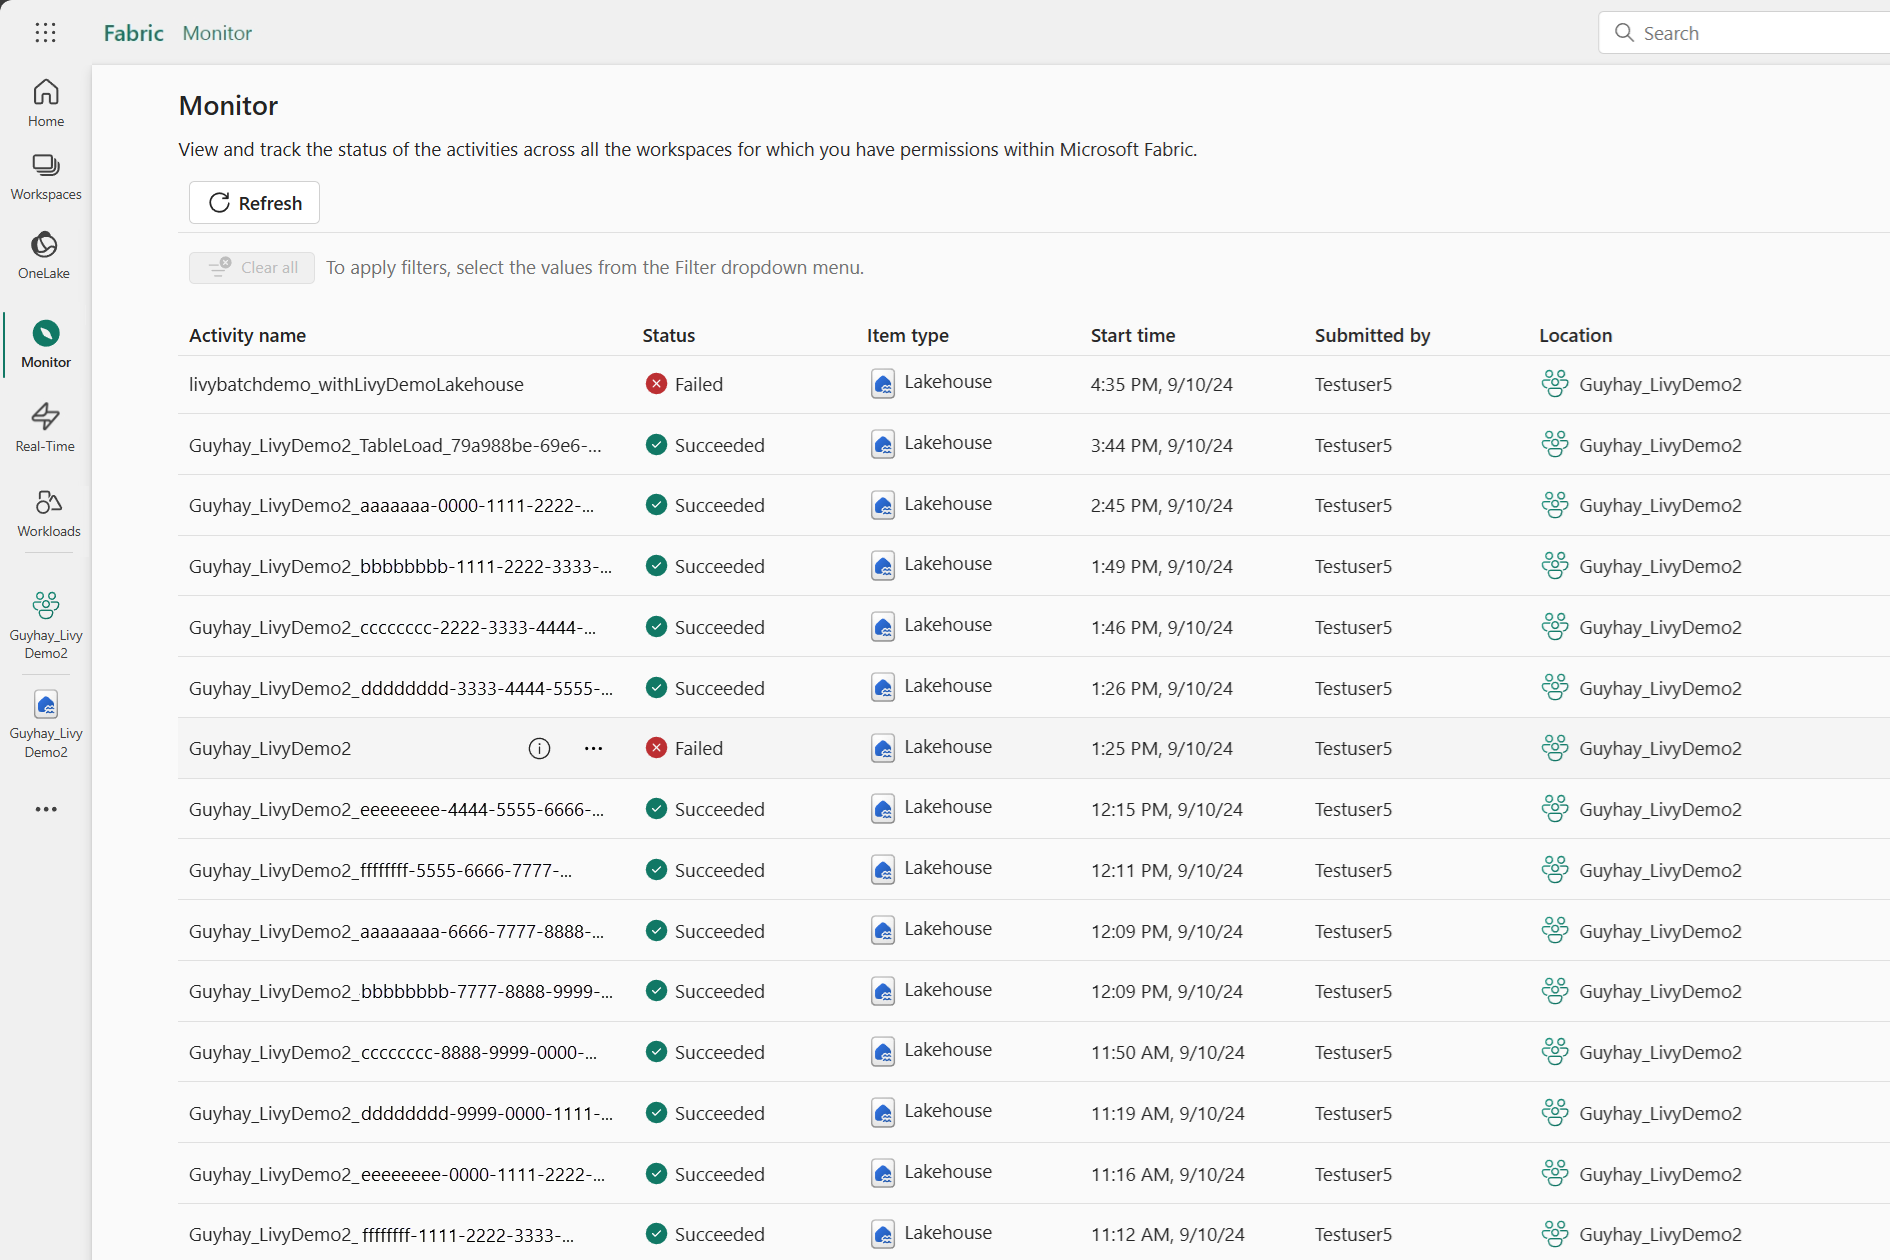
모니터링 허브에서 작업 보기
왼쪽 탐색 링크에서 모니터를 선택하여 모니터링 허브에 액세스하여 다양한 Apache Spark 활동을 볼 수 있습니다.
세션이 진행 중이거나 완료된 상태인 경우 모니터로 이동하여 세션 상태를 볼 수 있습니다.
가장 최근 활동 이름을 선택하고 엽니다.

이 Livy API 세션의 경우 이전 세션 제출, 실행 세부 정보, Spark 버전 및 구성을 볼 수 있습니다. 오른쪽 위에 중지된 상태를 확인합니다.


전체 프로세스를 요약하려면 Visual Studio Code, Microsoft Entra 앱/SPN 토큰, Livy API 엔드포인트 URL, Lakehouse에 대한 인증 및 마지막으로 세션 Livy API와 같은 원격 클라이언트가 필요합니다.