Note
Access to this page requires authorization. You can try signing in or changing directories.
Access to this page requires authorization. You can try changing directories.
This article describes how to create a Foundry project in Azure AI Foundry. Projects let you organize your work, such as agents, evaluations, and files, as you build stateful apps and explore new ideas.
-
An Azure AI Foundry project is managed under an Azure AI Foundry resource. It's a container for access management, data upload and integration, and monitoring. This lets you keep your work separated between use cases without needing to create extra Azure resources.
This project type gives you access to the latest generative AI features in AI Foundry, including:
- Agents
- Foundry SDK and API to build agents and switch easily between models
- Models sold directly by Azure - Azure OpenAI, Mistral, xAI, DeepSeek, etc.
- Partner & Community Models sold through Marketplace - Stability, Bria, Cohere, etc.
- Content understanding
- Evaluations
- Fine-tuning
- OpenAI SDK and API incl. Batch and Stored Completions
- AI Services
Do you need access to Open Source models, or PromptFlow? Create a hub project type instead.
See Types of projects for more information on the different project types.
Prerequisites
Use the following tabs to select the method you plan to use to create a Azure AI Foundry project:
- An Azure account with an active subscription. If you don't have one, create a free Azure account, which includes a free trial subscription.
- You must be Owner of the subscription to have appropriate access control necessary to create the Azure AI Foundry resource that is the parent of the project. If you don't have this access, have your administrator create an AI Foundry resource for you to use. Then skip to Create multiple projects on the same resource to create your project.
Create a Foundry project
These steps provide a way to create a new Azure resource with basic, defaulted, settings.
Tip
If your organization requires customized Azure configurations like alternative names, security controls or cost tags, use one of these methods instead to comply with your organization's Azure Policy compliance:
To create a Foundry project in Azure AI Foundry, follow these steps:
Sign in to Azure AI Foundry.
-
What you do next depends on where you are:
If you don't have any existing projects: Follow the steps in Quickstart: Get started with Azure AI Foundry to create your first project.
If you're in a project: Select the project breadcrumb, then select Create new resource.
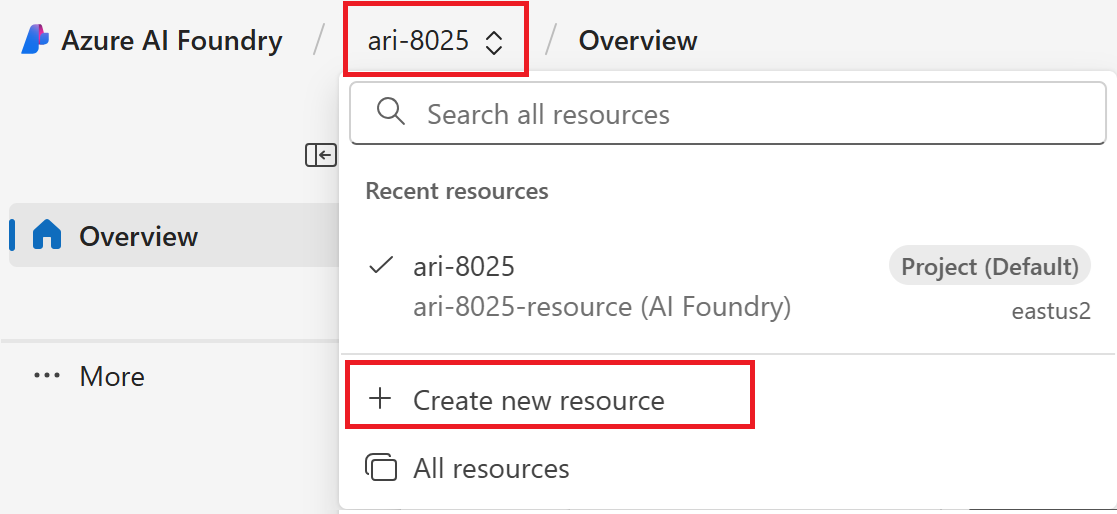
If you're not in a project: Select Create new in the top right to create a new Azure AI Foundry project

Select Azure AI Foundry resource, then select Next.
Provide a name for your project and select Create. Or see next section for advanced options.
Advanced options
A Foundry project is created on an AI Foundry resource. This resource is created for you automatically when you create the project.
To customize the settings for your project, follow these steps:
In the Create a project form, select Advanced options.
Select an existing Resource group you want to use, or leave the default to create a new resource group.
Tip
Especially for getting started we recommend you create a new resource group for your project. The resource group allows you to easily manage the project and all of its resources together.
Select a Location or use the default. The ___location is the region where the hub is hosted. Azure AI services availability differs per region. For example, certain models might not be available in certain regions.
Select Create. You see progress of resource creation and the project is created when the process is complete.
Create multiple projects on the same resource
Create multiple Azure AI Foundry projects on an existing AI Foundry resource to enable team collaboration and shared resource access including security, deployments, and connected tools. This setup is ideal in restricted Azure subscriptions where developers need self-serve exploration ability within the setup of a pre-configured environment.

Azure AI Foundry projects as Azure child resources may get assigned their own access controls, but share common settings such as network security, deployments, and Azure tool integration from their parent resource.
While not all Foundry capabilities support organizing work in projects yet, your resource's first "default" project is more powerful. You can identify it by the tag "default" in UX experiences and the resource property "is_default" when using code options.
| Feature | Default project | Other projects |
|---|---|---|
| Model inference | ✅ | ✅ |
| Playgrounds | ✅ | ✅ |
| Agents | ✅ | ✅ |
| Evaluations | ✅ | ✅ |
| Tracing | ✅ | ✅ |
| Datasets | ✅ | ✅ |
| Indexes | ✅ | ✅ |
| Foundry SDK and API | ✅ | ✅ |
| Content understanding | ✅ | ✅ |
| OpenAI SDK and API | ✅ | - |
| OpenAI Batch, Fine-tuning, Stored completions | ✅ | - |
| Language fine-tuning | ✅ | ✅ |
| Speech fine-tuning | ✅ | - |
| Connections | ✅ | ✅ |
To add a project to a Foundry resource:
Tip
Because you can customize the left pane in the Azure AI Foundry portal, you might see different items than shown in these steps. If you don't see what you're looking for, select ... More at the bottom of the left pane.
In Azure AI Foundry, select either the Azure AI Foundry project or its associated resource.
In the left pane, select Management center.
In the resource section, select Overview.
Select New project and provide a name.

If you delete your Foundry resource's default project, the next project created will become the default project.
View project settings
On the project Home page, you can find information about the project.
- Name: The name of the project appears in the top left corner.
- Subscription: The subscription that hosts the hub that hosts the project.
- Resource group: The resource group that hosts the hub that hosts the project.
Delete projects
- In Azure AI Foundry portal, open your project.
- Select Management center.
- Select Overview under the Resource section.
- Select any projects you no longer want to keep.
- Select Delete project.
To delete the AI Foundry resource along with all its projects:
- From the Management center, select the resource name from the Overview section to go to Azure portal.
- From Azure portal, select Delete to delete the resource and all its associated projects.