In this quickstart, we walk you through setting up your local development environment with the Azure AI Foundry SDK. We write a prompt, run it as part of your app code, trace the LLM calls being made, and run a basic evaluation on the outputs of the LLM.
Tip
The rest of this article shows how to use a hub based project. Select Foundry project at the top of this article if you want to use a Foundry project instead.
Prerequisites
- An Azure subscription. If you don't have an Azure subscription, create a free account before you begin.
- A hub based project. If you're new to Azure AI Foundry and don't have a hub based project, select Foundry project at the top of this article to use a Foundry project instead.
Set up your development environment
Set up your development environment
Make sure you install these packages:
pip install azure-ai-projects azure-ai-inference azure-identity
Deploy a model
Tip
Because you can customize the left pane in the Azure AI Foundry portal, you might see different items than shown in these steps. If you don't see what you're looking for, select ... More at the bottom of the left pane.
Sign in to Azure AI Foundry.
Select a hub based project. If you don't have a hub based project, select Foundry project at the top of this article to use a Foundry project instead.
Select Model catalog from the left pane.
Select the gpt-4o-mini model from the list of models. You can use the search bar to find it.
On the model details page, select Deploy.
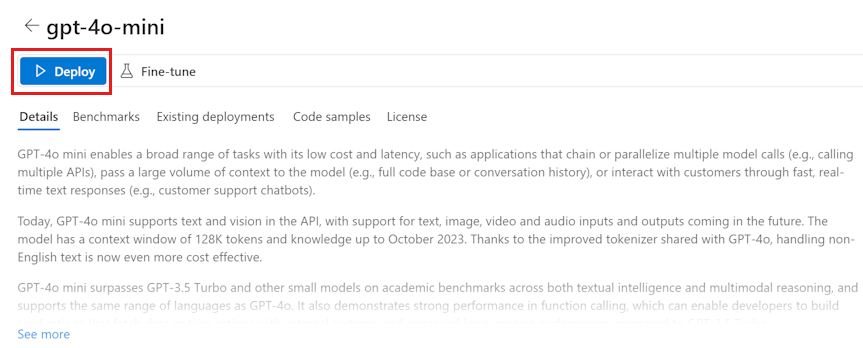
Leave the default Deployment name. Select Deploy.
Once the model is deployed, select Open in playground to test your model.
Build your chat app
Create a file named chat.py. Copy and paste the following code into it.
from azure.ai.projects import AIProjectClient
from azure.identity import DefaultAzureCredential

project_connection_string = "<your-connection-string-goes-here>"

project = AIProjectClient.from_connection_string(
    conn_str=project_connection_string, credential=DefaultAzureCredential()
)

chat = project.inference.get_chat_completions_client()
response = chat.complete(
    model="gpt-4o-mini",
    messages=[
        {
            "role": "system",
            "content": "You are an AI assistant that speaks like a techno punk rocker from 2350. Be cool but not too cool. Ya dig?",
        },
        {"role": "user", "content": "Hey, can you help me with my taxes? I'm a freelancer."},
    ],
)

print(response.choices[0].message.content)
Insert your connection string
Your project connection string is required to call the Azure OpenAI in Azure AI Foundry Models from your code.
Find your connection string in the Azure AI Foundry project you created in the Azure AI Foundry playground quickstart. Open the project, then find the connection string on the Overview page.

Copy the connection string and replace <your-connection-string-goes-here> in the chat.py file.
Run your chat script
Run the script to see the response from the model.
python chat.py
The script uses hardcoded input and output messages. In a real app you'd take input from a client application, generate a system message with internal instructions to the model, and then call the LLM with all of the messages.
Let's change the script to take input from a client application and generate a system message using a prompt template.
Remove the last line of the script that prints a response.
Now define a get_chat_response function that takes messages and context, generates a system message using a prompt template, and calls a model. Add this code to your existing chat.py file:
from azure.ai.inference.prompts import PromptTemplate


def get_chat_response(messages, context):
    # create a prompt template from an inline string (using mustache syntax)
    prompt_template = PromptTemplate.from_string(
        prompt_template="""
        system:
        You are an AI assistant that speaks like a techno punk rocker from 2350. Be cool but not too cool. Ya dig? Refer to the user by their first name, try to work their last name into a pun.

        The user's first name is {{first_name}} and their last name is {{last_name}}.
        """
    )

    # generate system message from the template, passing in the context as variables
    system_message = prompt_template.create_messages(data=context)

    # add the prompt messages to the user messages
    return chat.complete(
        model="gpt-4o-mini",
        messages=system_message + messages,
        temperature=1,
        frequency_penalty=0.5,
        presence_penalty=0.5,
    )
Note
The prompt template uses mustache format.
The get_chat_response function could be easily added as a route to a FastAPI or Flask app to enable calling this function from a front-end web application.
Now simulate passing information from a frontend application to this function. Add the following code to the end of your chat.py file. Feel free to play with the message and add your own name.
if __name__ == "__main__":
    response = get_chat_response(
        messages=[{"role": "user", "content": "what city has the best food in the world?"}],
        context={"first_name": "Jessie", "last_name": "Irwin"},
    )
    print(response.choices[0].message.content)
Run the revised script to see the response from the model with this new input.
python chat.py
Next step
In this quickstart, you use Azure AI Foundry to:
- Create a project
- Deploy a model
- Run a chat completion
- Create and run an agent
- Upload files to the agent
The Azure AI Foundry SDK is available in multiple languages, including Python, Java, JavaScript, and C#. This quickstart provides instructions for each of these languages.
Tip
The rest of this article shows how to use a Foundry project. Select hub based project at the top of this article if you want to use a hub based project instead.
Prerequisites
- An Azure subscription. If you don't have an Azure subscription, create a free account before you begin.
- You must be Owner of the subscription to receive the appropriate access control needed to use your project.
Important
Items marked (preview) in this article are currently in public preview. This preview is provided without a service-level agreement, and we don't recommend it for production workloads. Certain features might not be supported or might have constrained capabilities. For more information, see Supplemental Terms of Use for Microsoft Azure Previews.
Start with a project and model
Sign in to the Azure AI Foundry portal.
On the home page, select Create an agent.
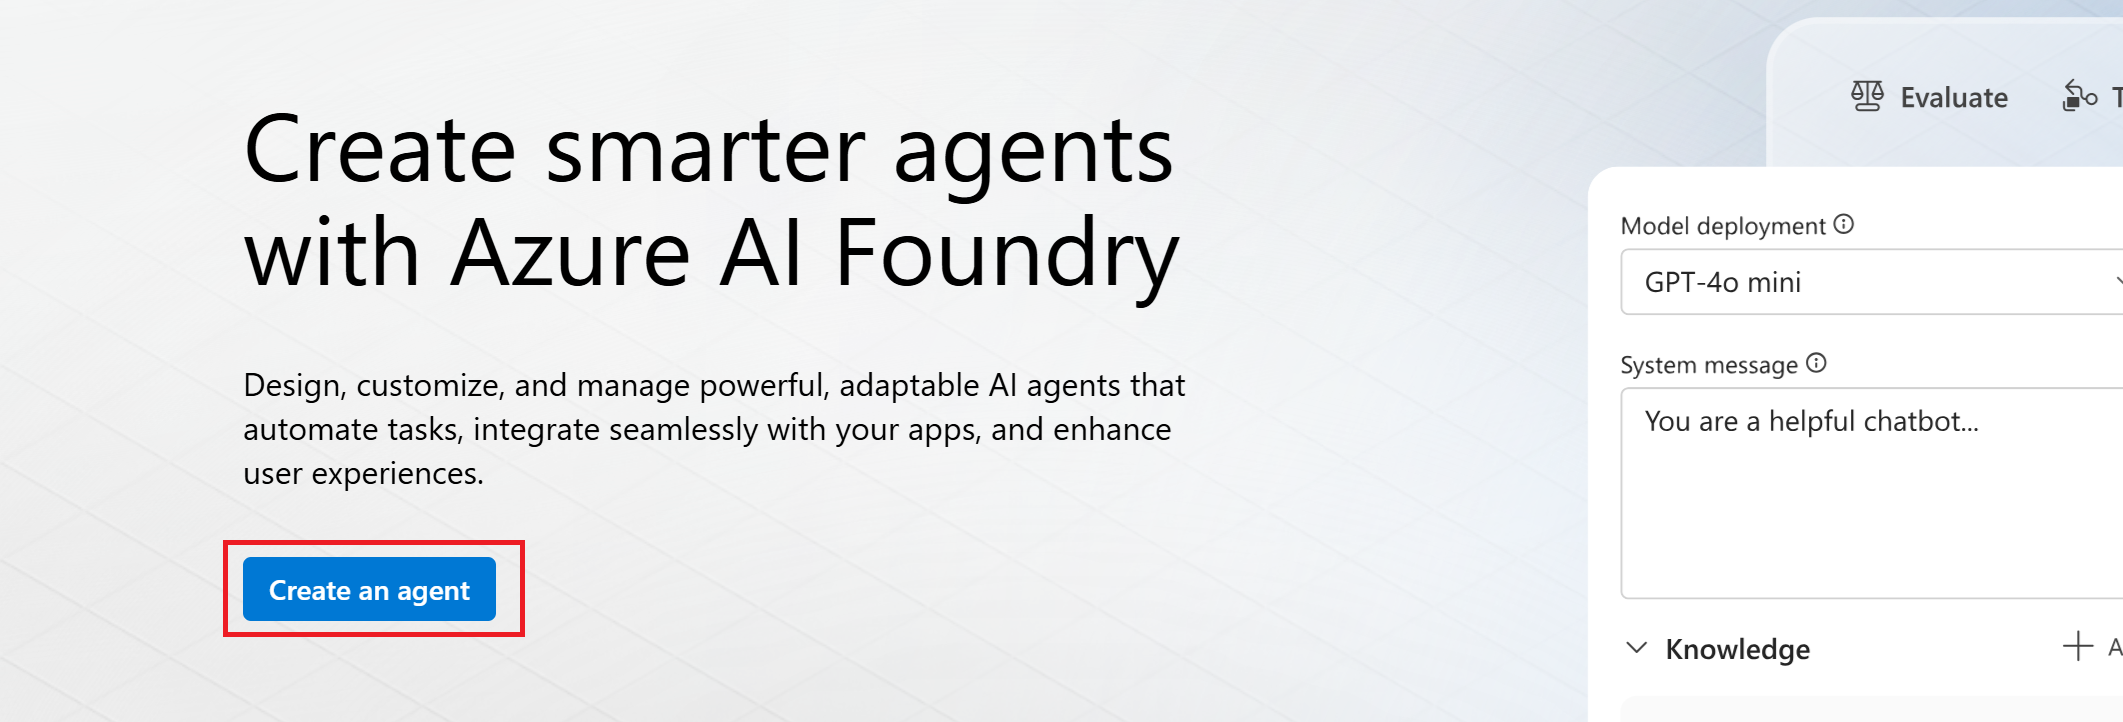
Fill in a name to use for your project and select Create.
Once your resources are created, you are in the agent playground.
If you're asked to select a model, search for and select gpt-4o.
- Select Confirm.
- Don't change the default settings. Select Deploy.
You now have both a project and a model available for your agent.
Set up your environment
No installation is necessary to use the Azure AI Foundry portal.
Install Python and Azure CLI
Install these packages:
pip install openai azure-ai-projects azure-identity
Make sure to sign in using the CLI az login (or az login --use-device-code) command to authenticate before running your Python scripts.
Install Java and Azure CLI.
Set these environment variables to use in your scripts:
# Azure AI Foundry Endpoint
AZURE_ENDPOINT=your_endpoint_here

# Azure AI Foundry Model Deployment Name
AZURE_DEPLOYMENT=your_deployment_name_here

# Project ID (Optional - will be generated if not provided)
PROJECT_ID=your_project_id_here
MODEL_DEPLOYMENT_NAME=gpt-4o

# Note: This sample uses DefaultAzureCredential for authentication
# Please ensure you are logged in with Azure CLI using 'az login'
# For more authentication options, see: https://learn.microsoft.com/en-us/java/api/overview/azure/identity-readme?view=azure-java-stable
Make sure to sign in using the CLI az login (or az login --use-device-code) command to authenticate before running your Java scripts.
Download POM.XML to your Java IDE.
Install Node.js and Azure CLI
Make sure to sign in using the CLI az login (or az login --use-device-code) command to authenticate before running your JavaScript scripts.
Download package.json.
Install packages with npm install
Set these environment variables to use in your scripts:
MODEL_DEPLOYMENT_NAME=gpt-4o
PROJECT_ENDPOINT=https://<your-foundry-resource-name>.services.ai.azure.com/api/projects/<your-foundry-project-name>
Install C# and Azure CLI
Install packages:
To work with Azure AI services in your .NET project, you'll need to install several NuGet packages. Add NuGet packages using the .NET CLI in the integrated terminal:
# Add Azure AI SDK packages
dotnet add package Azure.Identity
dotnet add package Azure.AI.Projects
dotnet add package Azure.AI.Agents.Persistent
dotnet add package Azure.AI.Inference
Set these environment variables to use in your scripts:
AZURE_AI_ENDPOINT=https://your.services.ai.azure.com/api/projects/project
AZURE_AI_MODEL=your_model_name
Make sure to sign in using the CLI az login (or az login --use-device-code) command to authenticate before running your C# scripts.
Install Azure CLI
Make sure to sign in using the CLI az login (or az login --use-device-code) command to authenticate before running the next command.
Get a temporary access token. It will expire in 60-90 minutes, you'll need to refresh after that.
az account get-access-token --scope https://ai.azure.com/.default
Save the results as the environment variable AZURE_AI_AUTH_TOKEN.
Chat with an agent
Agents have powerful capabilities through the use of tools. Start by chatting with an agent.
After the preceding steps, you're now in the agents playground.
- Add instructions, such as, "You are a helpful writing assistant."
- Start chatting with your agent, for example, "Write me a poem about flowers."
from azure.ai.projects import AIProjectClient
from azure.identity import DefaultAzureCredential
from azure.ai.agents.models import ListSortOrder

project = AIProjectClient(
    endpoint="https://your-foundry-resource-name.ai.azure.com/api/projects",
    credential=DefaultAzureCredential(),
)

agent = project.agents.create_agent(
    model="gpt-4o",
    name="my-agent",
    instructions="You are a helpful writing assistant")

thread = project.agents.threads.create()
message = project.agents.messages.create(
    thread_id=thread.id,
    role="user",
    content="Write me a poem about flowers")

run = project.agents.runs.create_and_process(thread_id=thread.id, agent_id=agent.id)
if run.status == "failed":
    # Check if you got "Rate limit is exceeded.", then you want to get more quota
    print(f"Run failed: {run.last_error}")

# Get messages from the thread
messages = project.agents.messages.list(thread_id=thread.id)

# Get the last message from the sender
messages = project.agents.messages.list(thread_id=thread.id, order=ListSortOrder.ASCENDING)
for message in messages:
    if message.run_id == run.id and message.text_messages:
        print(f"{message.role}: {message.text_messages[-1].text.value}")

# Delete the agent once done
project.agents.delete_agent(agent.id)
print("Deleted agent")
package com.azure.ai.foundry.samples;

import com.azure.ai.foundry.samples.utils.ConfigLoader;
import com.azure.ai.projects.ProjectsClient;
import com.azure.ai.projects.ProjectsClientBuilder;
import com.azure.ai.projects.models.agent.Agent;
import com.azure.ai.projects.models.agent.AgentClient;
import com.azure.ai.projects.models.agent.AgentMessage;
import com.azure.ai.projects.models.agent.AgentOptions;
import com.azure.ai.projects.models.agent.AgentRole;
import com.azure.ai.projects.models.agent.AgentRun;
import com.azure.ai.projects.models.agent.AgentRunStatus;
import com.azure.ai.projects.models.agent.AgentThread;
import com.azure.identity.DefaultAzureCredential;

import java.util.List;

/**
 * This sample demonstrates how to create and run an agent using the Azure AI Foundry SDK.
 *
 * Agents in Azure AI Foundry are specialized AI assistants that can be customized with
 * specific instructions and capabilities to perform particular tasks. They maintain conversation
 * history in threads and can be deployed for various use cases.
 *
 * This sample shows:
 * 1. How to authenticate with Azure AI Foundry using DefaultAzureCredential
 * 2. How to create an agent with specific instructions and capabilities
 * 3. How to create a thread for conversation with the agent
 * 4. How to send messages to the agent and run it
 * 5. How to wait for the agent to complete its execution
 * 6. How to retrieve and display the agent's response
 *
 * Prerequisites:
 * - An Azure account with access to Azure AI Foundry
 * - Azure CLI installed and logged in ('az login')
 * - Environment variables set in .env file (AZURE_ENDPOINT, AZURE_DEPLOYMENT)
 */
public class AgentSample {
    public static void main(String[] args) {
        // Load configuration values from the .env file
        // These include the service endpoint and the deployment name of the model to use
        String endpoint = ConfigLoader.getAzureEndpoint();
        String deploymentName = ConfigLoader.getAzureDeployment();

        // Get DefaultAzureCredential for authentication
        // This uses the most appropriate authentication method based on the environment
        // For local development, it will use your Azure CLI login credentials
        DefaultAzureCredential credential = ConfigLoader.getDefaultCredential();

        // Create a projects client to interact with Azure AI Foundry services
        // The client requires an authentication credential and an endpoint
        ProjectsClient client = new ProjectsClientBuilder()
            .credential(credential)
            .endpoint(endpoint)
            .buildClient();

        // Get an agent client, which provides operations for working with AI agents
        // This includes creating, configuring, and running agents
        AgentClient agentClient = client.getAgentClient();

        // Create a new agent with specialized capabilities and instructions
        // The agent is configured with a name, description, instructions, and underlying model
        System.out.println("Creating agent...");
        Agent agent = agentClient.createAgent(new AgentOptions()
            .setName("Research Assistant")                       // Descriptive name for the agent
            .setDescription("An agent that helps with research tasks")  // Brief description of the agent's purpose
            .setInstructions("You are a research assistant. Help users find information and summarize content.") // Detailed instructions for the agent's behavior
            .setModel(deploymentName));                          // The underlying AI model to power the agent

        System.out.println("Agent created: " + agent.getName() + " (ID: " + agent.getId() + ")");

        // Create a thread for the conversation with the agent
        // Threads maintain conversation history and state across multiple interactions
        System.out.println("Creating thread...");
        AgentThread thread = agentClient.createThread();
        System.out.println("Thread created: " + thread.getId());

        // Create a user message
        AgentMessage userMessage = new AgentMessage()
            .setRole(AgentRole.USER)
            .setContent("Explain what cloud computing is and list three benefits.");

        // Run the agent
        System.out.println("Running agent...");
        AgentRun run = agentClient.createRun(thread.getId(), agent.getId(), userMessage);
        System.out.println("Run created: " + run.getId());

        // Wait for the run to complete
        AgentRun completedRun = waitForRunCompletion(agentClient, thread.getId(), run.getId());
        System.out.println("Run completed with status: " + completedRun.getStatus());

        // Get messages from the thread
        List<AgentMessage> messages = agentClient.getMessages(thread.getId());

        // Display the assistant's response
        System.out.println("\nConversation:");
        for (AgentMessage message : messages) {
            System.out.println(message.getRole() + ": " + message.getContent());
        }
    }

    private static AgentRun waitForRunCompletion(AgentClient agentClient, String threadId, String runId) {
        AgentRun run = agentClient.getRun(threadId, runId);

        while (run.getStatus() == AgentRunStatus.QUEUED || run.getStatus() == AgentRunStatus.IN_PROGRESS) {
            try {
                System.out.println("Run status: " + run.getStatus() + " - waiting...");
                Thread.sleep(1000); // Wait for 1 second before checking again
                run = agentClient.getRun(threadId, runId);
            } catch (InterruptedException e) {
                Thread.currentThread().interrupt();
                throw new RuntimeException("Thread was interrupted", e);
            }
        }

        return run;
    }
}
const endpoint = process.env.PROJECT_ENDPOINT;
const deployment = process.env.MODEL_DEPLOYMENT_NAME || 'gpt-4o';
const client = new AIProjectClient(endpoint, new DefaultAzureCredential());

// Create an Agent
const agent = await client.agents.createAgent(deployment, {
    name: 'my-agent',
    instructions: 'You are a helpful agent'
});
console.log(`\n==================== 🕵️  POEM AGENT ====================`);

// Create a thread and message
const thread = await client.agents.threads.create();
const prompt = 'Write me a poem about flowers';
console.log(`\n---------------- 📝 User Prompt ---------------- \n${prompt}`);
await client.agents.messages.create(thread.id, 'user', prompt);

// Create run
let run = await client.agents.runs.create(thread.id, agent.id);

// Wait for run to complete
console.log(`\n---------------- 🚦 Run Status ----------------`);
while (['queued', 'in_progress', 'requires_action'].includes(run.status)) {
    // Avoid adding a lot of messages to the console
    await new Promise((resolve) => setTimeout(resolve, 1000));
    run = await client.agents.runs.get(thread.id, run.id);
    console.log(`Run status: ${run.status}`);
}

console.log('\n---------------- 📊 Token Usage ----------------');
console.table([run.usage]);

const messagesIterator = await client.agents.messages.list(thread.id);
const assistantMessage = await getAssistantMessage(messagesIterator);
console.log('\n---------------- 💬 Response ----------------');
printAssistantMessage(assistantMessage);

// Clean up
console.log(`\n---------------- 🧹 Clean Up Poem Agent ----------------`);
await client.agents.deleteAgent(agent.id);
console.log(`Deleted Agent, Agent ID: ${agent.id}`);
using Azure;
using Azure.Identity;
using Azure.AI.Agents.Persistent;

// Creating the Client for agents
var projectEndpoint = System.Environment.GetEnvironmentVariable("AZURE_AI_ENDPOINT");
var modelDeploymentName = System.Environment.GetEnvironmentVariable("AZURE_AI_MODEL");
PersistentAgentsClient client = new(projectEndpoint, new DefaultAzureCredential());

// Create an Agent with toolResources and process Agent run
PersistentAgent agent = client.Administration.CreateAgent(
        model: modelDeploymentName,
        name: "SDK Test Agent - Tutor",
        instructions: "You are a personal electronics tutor. Write and run code to answer questions.",
        tools: new List<ToolDefinition> { new CodeInterpreterToolDefinition() });

// Create thread for communication
PersistentAgentThread thread = client.Threads.CreateThread();

// Create message to thread
PersistentThreadMessage messageResponse = client.Messages.CreateMessage(
    thread.Id,
    MessageRole.User,
    "I need to solve the equation `3x + 11 = 14`. Can you help me?");

// Run the Agent
ThreadRun run = client.Runs.CreateRun(thread, agent);

// Wait for the run to complete
do
{
    Thread.Sleep(TimeSpan.FromMilliseconds(500));
    run = client.Runs.GetRun(thread.Id, run.Id);
}
while (run.Status == RunStatus.Queued
    || run.Status == RunStatus.InProgress);
Pageable<PersistentThreadMessage> messages = client.Messages.GetMessages(
    threadId: thread.Id,
    order: ListSortOrder.Ascending
);
// Print the messages in the thread
WriteMessages(messages);

// Delete the thread and agent after use
client.Threads.DeleteThread(thread.Id);
client.Administration.DeleteAgent(agent.Id);

// Temporary function to use a list of messages in the thread and write them to the console.
static void WriteMessages(IEnumerable<PersistentThreadMessage> messages)
{
    foreach (PersistentThreadMessage threadMessage in messages)
    {
        Console.Write($"{threadMessage.CreatedAt:yyyy-MM-dd HH:mm:ss} - {threadMessage.Role,10}: ");
        foreach (MessageContent contentItem in threadMessage.ContentItems)
        {
            if (contentItem is MessageTextContent textItem)
            {
                Console.Write(textItem.Text);
            }
            else if (contentItem is MessageImageFileContent imageFileItem)
            {
                Console.Write($"<image from ID: {imageFileItem.FileId}");
            }
            Console.WriteLine();
        }
    }
}
Replace YOUR-FOUNDRY-RESOURCE-NAME and YOUR-PROJECT-NAME with your values:
# Create agent
curl --request POST --url "https://YOUR-FOUNDRY-RESOURCE-NAME.services.ai.azure.com/api/projects/YOUR-PROJECT-NAME/assistants?api-version=v1" \
    -h "authorization: Bearer $AZURE_AI_AUTH_TOKEN" \
    -h "content-type: application/json" \
    -d '{
            "model": "gpt-4o",
            "name": "my-agent",
            "instructions": "You are a helpful writing assistant"
        }'
#Lets say agent ID created is asst_123456789. Use this to run the agent

# Create thread
curl --request POST --url 'https://YOUR-FOUNDRY-RESOURCE-NAME.services.ai.azure.com/api/projects/YOUR-PROJECT-NAME/threads?api-version=v1' \
    -h 'authorization: Bearer $AZURE_AI_AUTH_TOKEN' \
    -h 'content-type: application/json'

#Lets say thread ID created is thread_123456789. Use this in the next step

# Create message using thread ID
curl --request POST --url 'https://YOUR-FOUNDRY-RESOURCE-NAME.services.ai.azure.com/api/projects/YOUR-PROJECT-NAME/threads/thread_123456789/messages?api-version=v1' \
    -h 'authorization: Bearer $AZURE_AI_AUTH_TOKEN' \
    -h 'content-type: application/json' \
    -d '{
            "role": "user",
            "content": "Write me a poem about flowers"
        }'

# Run thread with the agent - use both agent id and thread id
curl --request POST --url 'https://YOUR-FOUNDRY-RESOURCE-NAME.services.ai.azure.com/api/projects/YOUR-PROJECT-NAME/threads/thread_123456789/runs?api-version=v1' \
    -h 'authorization: Bearer $AZURE_AI_AUTH_TOKEN' \
    -h 'content-type: application/json' \
    --data '{
        "assistant_id": "asst_123456789"
    }'

# List the messages in the thread using thread ID
curl --request GET --url 'https://YOUR-FOUNDRY-RESOURCE-NAME.services.ai.azure.com/api/projects/YOUR-PROJECT-NAME/threads/thread_123456789/messages?api-version=v1' \
    -h 'authorization: Bearer $AZURE_AI_AUTH_TOKEN' \
    -h 'content-type: application/json'

# Delete agent once done using agent id
curl --request DELETE --url 'https://YOUR-FOUNDRY-RESOURCE-NAME.services.ai.azure.com/api/projects/YOUR-PROJECT-NAME/assistants/asst_123456789?api-version=v1' \
    -h 'authorization: Bearer $AZURE_AI_AUTH_TOKEN' \
    -h 'content-type: application/json'
Add files to the agent
Now let's add a file search tool that enables us to do knowledge retrieval.
- In your agent's Setup pane, scroll down if necessary to find Knowledge.
- Select Add.
- Select Files to upload the product_info_1.md file.
- Select Select local files under Add files.
- Select Upload and save.
- Change your agents instructions, such as, "You are a helpful assistant and can search information from uploaded files."
- Ask a question, such as, "Hello, what Contoso products do you know?"
- To add more files, select the ... on the AgentVectorStore, then select Manage.
from azure.ai.projects import AIProjectClient
from azure.identity import DefaultAzureCredential
from azure.ai.agents.models import ListSortOrder, FileSearchTool

project = AIProjectClient(
    endpoint="https://your-foundry-resource-name.ai.azure.com/api/projects",
    credential=DefaultAzureCredential(),
)

# Upload file and create vector store
file = project.agents.files.upload(file_path="../../../data/product_info_1.md", purpose="assistants")
vector_store = project.agents.vector_stores.create_and_poll(file_ids=[file.id], name="my_vectorstore")

# Create file search tool and agent
file_search = FileSearchTool(vector_store_ids=[vector_store.id])
agent = project.agents.create_agent(
    model="gpt-4o",
    name="my-assistant",
    instructions="You are a helpful assistant and can search information from uploaded files",
    tools=file_search.definitions,
    tool_resources=file_search.resources,
)

# Create thread and process user message
thread = project.agents.threads.create()
project.agents.messages.create(thread_id=thread.id, role="user", content="Hello, what Contoso products do you know?")
run = project.agents.runs.create_and_process(thread_id=thread.id, agent_id=agent.id)

# Handle run status
if run.status == "failed":
    print(f"Run failed: {run.last_error}")

# Print thread messages
messages = project.agents.messages.list(thread_id=thread.id, order=ListSortOrder.ASCENDING)
for message in messages:
    if message.run_id == run.id and message.text_messages:
        print(f"{message.role}: {message.text_messages[-1].text.value}")

# Cleanup resources
project.agents.vector_stores.delete(vector_store.id)
project.agents.files.delete(file_id=file.id)
project.agents.delete_agent(agent.id)
package com.azure.ai.foundry.samples;

import com.azure.ai.foundry.samples.utils.ConfigLoader;
import com.azure.ai.projects.ProjectsClient;
import com.azure.ai.projects.ProjectsClientBuilder;
import com.azure.ai.projects.models.agent.Agent;
import com.azure.ai.projects.models.agent.AgentClient;
import com.azure.ai.projects.models.agent.AgentMessage;
import com.azure.ai.projects.models.agent.AgentOptions;
import com.azure.ai.projects.models.agent.AgentRole;
import com.azure.ai.projects.models.agent.AgentRun;
import com.azure.ai.projects.models.agent.AgentRunStatus;
import com.azure.ai.projects.models.agent.AgentThread;
import com.azure.ai.projects.models.agent.FileTool;
import com.azure.ai.projects.models.file.File;
import com.azure.ai.projects.models.file.FileClient;
import com.azure.identity.DefaultAzureCredential;

import java.io.IOException;
import java.nio.file.Files;
import java.nio.file.Path;
import java.util.List;

/**
 * This sample demonstrates how to create an agent with file search capability using the Azure AI Foundry SDK.
 *
 * File search agents can analyze and extract information from documents, allowing users to ask
 * questions about the content of those documents. This extends the capabilities of regular agents
 * by giving them access to specific information contained in files.
 *
 * This sample shows:
 * 1. How to authenticate with Azure AI Foundry using DefaultAzureCredential
 * 2. How to create and upload a sample document
 * 3. How to create an agent with file search capabilities
 * 4. How to configure the agent with access to specific files
 * 5. How to run the agent and ask questions about the document content
 * 6. How to retrieve and display the agent's responses
 *
 * Use cases for file search agents include:
 * - Document analysis and summarization
 * - Question answering from technical documentation
 * - Data extraction from structured files
 * - Research assistance across multiple documents
 *
 * Prerequisites:
 * - An Azure account with access to Azure AI Foundry
 * - Azure CLI installed and logged in ('az login')
 * - Environment variables set in .env file (AZURE_ENDPOINT, AZURE_DEPLOYMENT)
 */
public class FileSearchAgentSample {
    public static void main(String[] args) {
        // Load configuration values from the .env file
        // These include the service endpoint and the deployment name of the model to use
        String endpoint = ConfigLoader.getAzureEndpoint();
        String deploymentName = ConfigLoader.getAzureDeployment();

        // Get DefaultAzureCredential for authentication
        // This uses the most appropriate authentication method based on the environment
        // For local development, it will use your Azure CLI login credentials
        DefaultAzureCredential credential = ConfigLoader.getDefaultCredential();

        // Create a projects client to interact with Azure AI Foundry services
        // The client requires an authentication credential and an endpoint
        ProjectsClient client = new ProjectsClientBuilder()
            .credential(credential)
            .endpoint(endpoint)
            .buildClient();

        try {
            // Create a sample document containing information about cloud computing
            // In a real application, you would use your own existing documents
            Path tempFile = createSampleDocument();

            // Get a file client to handle file operations
            // This is used to upload files that the agent will search through
            FileClient fileClient = client.getFileClient();

            // Upload the file to Azure AI Foundry
            // The uploaded file will be available for the agent to search and analyze
            System.out.println("Uploading file: " + tempFile);
            File uploadedFile = fileClient.uploadFile(tempFile.toString());
            System.out.println("File uploaded with ID: " + uploadedFile.getId());

            // Get an agent client
            AgentClient agentClient = client.getAgentClient();

            // Create an agent with file search capability
            System.out.println("Creating agent with file search capability...");
            Agent agent = agentClient.createAgent(new AgentOptions()
                .setName("Document Assistant")
                .setDescription("An agent that helps with document searching")
                .setInstructions("You are a document assistant. Help users find information in their documents.")
                .setModel(deploymentName)
                .addTool(new FileTool()
                    .addFile(uploadedFile.getId())));

            System.out.println("Agent created: " + agent.getName() + " (ID: " + agent.getId() + ")");

            // Create a thread for the conversation
            System.out.println("Creating thread...");
            AgentThread thread = agentClient.createThread();
            System.out.println("Thread created: " + thread.getId());

            // Create a user message
            AgentMessage userMessage = new AgentMessage()
                .setRole(AgentRole.USER)
                .setContent("Find and list the benefits of cloud computing from my document.");

            // Run the agent
            System.out.println("Running agent...");
            AgentRun run = agentClient.createRun(thread.getId(), agent.getId(), userMessage);
            System.out.println("Run created: " + run.getId());

            // Wait for the run to complete
            AgentRun completedRun = waitForRunCompletion(agentClient, thread.getId(), run.getId());
            System.out.println("Run completed with status: " + completedRun.getStatus());

            // Get messages from the thread
            List<AgentMessage> messages = agentClient.getMessages(thread.getId());

            // Display the assistant's response
            System.out.println("\nConversation:");
            for (AgentMessage message : messages) {
                System.out.println(message.getRole() + ": " + message.getContent());
            }

            // Clean up the temporary file
            Files.deleteIfExists(tempFile);

        } catch (IOException e) {
            System.err.println("Error working with files: " + e.getMessage());
            e.printStackTrace();
        }
    }

    private static Path createSampleDocument() throws IOException {
        String content = "# Cloud Computing Overview\n\n" +
                "Cloud computing is the delivery of computing services—including servers, storage, databases, networking, software, analytics, and intelligence—over the Internet ("the cloud") to offer faster innovation, flexible resources, and economies of scale.\n\n" +
                "## Benefits of Cloud Computing\n\n" +
                "1. **Cost Savings**: Cloud computing eliminates the capital expense of buying hardware and software and setting up and running on-site data centers.\n\n" +
                "2. **Scalability**: Cloud services can be scaled up or down based on demand, providing businesses with flexibility as their needs change.\n\n" +
                "3. **Performance**: The biggest cloud computing services run on a worldwide network of secure data centers, which are regularly upgraded to the latest generation of fast and efficient computing hardware.\n\n" +
                "4. **Reliability**: Cloud computing makes data backup, disaster recovery, and business continuity easier and less expensive because data can be mirrored at multiple redundant sites on the cloud provider's network.\n\n" +
                "5. **Security**: Many cloud providers offer a broad set of policies, technologies, and controls that strengthen your security posture overall.";

        Path tempFile = Files.createTempFile("cloud-computing-info-", ".md");
        Files.writeString(tempFile, content);
        return tempFile;
    }

    private static AgentRun waitForRunCompletion(AgentClient agentClient, String threadId, String runId) {
        AgentRun run = agentClient.getRun(threadId, runId);

        while (run.getStatus() == AgentRunStatus.QUEUED || run.getStatus() == AgentRunStatus.IN_PROGRESS) {
            try {
                System.out.println("Run status: " + run.getStatus() + " - waiting...");
                Thread.sleep(1000); // Wait for 1 second before checking again
                run = agentClient.getRun(threadId, runId);
            } catch (InterruptedException e) {
                Thread.currentThread().interrupt();
                throw new RuntimeException("Thread was interrupted", e);
            }
        }

        return run;
    }
}
// Upload a file named product_info_1.md
console.log(`\n==================== 🕵️  FILE AGENT ====================`);
const __dirname = path.dirname(fileURLToPath(import.meta.url));
const filePath = path.join(__dirname, '../data/product_info_1.md');
const fileStream = fs.createReadStream(filePath);
fileStream.on('data', (chunk) => {
    console.log(`Read ${chunk.length} bytes of data.`);
});
const file = await client.agents.files.upload(fileStream, 'assistants', {
    fileName: 'product_info_1.md'
});
console.log(`Uploaded file, ID: ${file.id}`);
const vectorStore = await client.agents.vectorStores.create({
    fileIds: [file.id],
    name: 'my_vectorstore'
});
console.log('\n---------------- 🗃️ Vector Store Info ----------------');
console.table([
    {
        'Vector Store ID': vectorStore.id,
        'Usage (bytes)': vectorStore.usageBytes,
        'File Count': vectorStore.fileCounts?.total ?? 'N/A'
    }
]);

// Create an Agent and a FileSearch tool
const fileSearchTool = ToolUtility.createFileSearchTool([vectorStore.id]);
const fileAgent = await client.agents.createAgent(deployment, {
    name: 'my-file-agent',
    instructions: 'You are a helpful assistant and can search information from uploaded files',
    tools: [fileSearchTool.definition],
    toolResources: fileSearchTool.resources,
});

// Create a thread and message
const fileSearchThread = await client.agents.threads.create({ toolResources: fileSearchTool.resources });
const filePrompt = 'What are the steps to setup the TrailMaster X4 Tent?';
console.log(`\n---------------- 📝 User Prompt ---------------- \n${filePrompt}`);
await client.agents.messages.create(fileSearchThread.id, 'user', filePrompt);

// Create run
let fileSearchRun = await client.agents.runs.create(fileSearchThread.id, fileAgent.id).stream();

for await (const eventMessage of fileSearchRun) {
    if (eventMessage.event === DoneEvent.Done) {
        console.log(`Run completed: ${eventMessage.data}`);
    }
    if (eventMessage.event === ErrorEvent.Error) {
        console.log(`An error occurred. ${eventMessage.data}`);
    }
}

const fileSearchMessagesIterator = await client.agents.messages.list(fileSearchThread.id);
const fileAssistantMessage = await getAssistantMessage(fileSearchMessagesIterator);
console.log(`\n---------------- 💬 Response ---------------- \n`);
printAssistantMessage(fileAssistantMessage);

// Clean up
console.log(`\n---------------- 🧹 Clean Up File Agent ----------------`);
client.agents.vectorStores.delete(vectorStore.id);
client.agents.files.delete(file.id);
client.agents.deleteAgent(fileAgent.id);
console.log(`Deleted VectorStore, File, and FileAgent. FileAgent ID: ${fileAgent.id}`);
using Azure;
using Azure.Identity;
using Azure.AI.Agents.Persistent;

// Creating the Client for agents and vector stores
var projectEndpoint = System.Environment.GetEnvironmentVariable("AZURE_AI_ENDPOINT");
var modelDeploymentName = System.Environment.GetEnvironmentVariable("AZURE_AI_MODEL");
PersistentAgentsClient client = new(projectEndpoint, new DefaultAzureCredential());

PersistentAgentFileInfo uploadedAgentFile = client.Files.UploadFile(
    filePath: "product_info_1.md",
    purpose: PersistentAgentFilePurpose.Agents);

// Create a vector store with the file and wait for it to be processed.
// If you do not specify a vector store, create_message will create a vector store with a default expiration policy of seven days after they were last active

Dictionary<string, string> fileIds = new()
{
    { uploadedAgentFile.Id, uploadedAgentFile.Filename }
};

PersistentAgentsVectorStore vectorStore = client.VectorStores.CreateVectorStore(
    name: "my_vector_store");

// Add file ID to vector store.
VectorStoreFile vctFile = client.VectorStores.CreateVectorStoreFile(
    vectorStoreId: vectorStore.Id,
    fileId: uploadedAgentFile.Id
);

Console.WriteLine($"Added file to vector store. The id file in the vector store is {vctFile.Id}.");

FileSearchToolResource fileSearchToolResource = new FileSearchToolResource();
fileSearchToolResource.VectorStoreIds.Add(vectorStore.Id);

// Create an Agent with toolResources and process Agent run
PersistentAgent agent = client.Administration.CreateAgent(
        model: modelDeploymentName,
        name: "SDK Test Agent - Retrieval",
        instructions: "You are a helpful agent that can help fetch data from files you know about.",
        tools: new List<ToolDefinition> { new FileSearchToolDefinition() },
        toolResources: new ToolResources() { FileSearch = fileSearchToolResource });

// Create thread for communication
PersistentAgentThread thread = client.Threads.CreateThread();

// Create message to thread
PersistentThreadMessage messageResponse = client.Messages.CreateMessage(
    thread.Id,
    MessageRole.User,
    "Can you give me information on how to mount the product?");

// Run the Agent
ThreadRun run = client.Runs.CreateRun(thread, agent);

// Wait for the run to complete
// This is a blocking call, so it will wait until the run is completed
do
{
    Thread.Sleep(TimeSpan.FromMilliseconds(500));
    run = client.Runs.GetRun(thread.Id, run.Id);
}
while (run.Status == RunStatus.Queued
    || run.Status == RunStatus.InProgress);

// Create a list of messages in the thread and write them to the console.
Pageable<PersistentThreadMessage> messages = client.Messages.GetMessages(
    threadId: thread.Id,
    order: ListSortOrder.Ascending
);
WriteMessages(messages, fileIds);

// Delete the thread and agent after use
client.VectorStores.DeleteVectorStore(vectorStore.Id);
client.Files.DeleteFile(uploadedAgentFile.Id);
client.Threads.DeleteThread(thread.Id);
client.Administration.DeleteAgent(agent.Id);

// Helper method to write messages to the console
static void WriteMessages(IEnumerable<PersistentThreadMessage> messages, Dictionary<string, string> fileIds)
{
    foreach (PersistentThreadMessage threadMessage in messages)
    {
        Console.Write($"{threadMessage.CreatedAt:yyyy-MM-dd HH:mm:ss} - {threadMessage.Role,10}: ");
        foreach (MessageContent contentItem in threadMessage.ContentItems)
        {
            if (contentItem is MessageTextContent textItem)
            {
                if (threadMessage.Role == MessageRole.Agent && textItem.Annotations.Count > 0)
                {
                    string strMessage = textItem.Text;
                    foreach (MessageTextAnnotation annotation in textItem.Annotations)
                    {
                        if (annotation is MessageTextFilePathAnnotation pathAnnotation)
                        {
                            strMessage = replaceReferences(fileIds, pathAnnotation.FileId, pathAnnotation.Text, strMessage);
                        }
                        else if (annotation is MessageTextFileCitationAnnotation citationAnnotation)
                        {
                            strMessage = replaceReferences(fileIds, citationAnnotation.FileId, citationAnnotation.Text, strMessage);
                        }
                    }
                    Console.Write(strMessage);
                }
                else
                {
                    Console.Write(textItem.Text);
                }
            }
            else if (contentItem is MessageImageFileContent imageFileItem)
            {
                Console.Write($"<image from ID: {imageFileItem.FileId}");
            }
            Console.WriteLine();
        }
    }
}

// Helper method to replace file references in the text
static string replaceReferences(Dictionary<string, string> fileIds, string fileID, string placeholder, string text)
{
    if (fileIds.TryGetValue(fileID, out string replacement))
        return text.Replace(placeholder, $" [{replacement}]");
    else
        return text.Replace(placeholder, $" [{fileID}]");
}
Replace YOUR-FOUNDRY-RESOURCE-NAME and YOUR-PROJECT-NAME with your values:
#Upload the file
curl --request POST --url 'https://YOUR-FOUNDRY-RESOURCE-NAME.services.ai.azure.com/api/projects/YOUR-PROJECT-NAME/files?api-version=v1' \
    -h 'authorization: Bearer $AZURE_AI_AUTH_TOKEN' \
    -f purpose="assistant" \
    -f file="@product_info_1.md" #File object (not file name) to be uploaded.
#Lets say file ID created is assistant-123456789. Use this in the next step

# create vector store
curl --request POST --url 'https://YOUR-FOUNDRY-RESOURCE-NAME.services.ai.azure.com/api/projects/YOUR-PROJECT-NAME/vector_stores?api-version=v1' \
-h 'authorization: Bearer $AZURE_AI_AUTH_TOKEN' \
-h 'content-type: application/json' \
-d '{
        "name": "my_vectorstore",
        "file_ids": ["assistant-123456789"]
    }'
#Lets say Vector Store ID created is vs_123456789. Use this in the next step

# Create Agent for File Search
curl --request POST --url 'https://YOUR-FOUNDRY-RESOURCE-NAME.services.ai.azure.com/api/projects/YOUR-PROJECT-NAME/assistants?api-version=v1' \
    -h 'authorization: Bearer $AZURE_AI_AUTH_TOKEN' \
    -h 'content-type: application/json' \
    -d '{
        "model": "gpt-4o",
        "name": "my-assistant",
        "instructions": "You are a helpful assistant and can search information from uploaded files",
        "tools": [{"type": "file_search"}],
        "tool_resources": {"file_search": {"vector_store_ids": ["vs_123456789"]}}
    }'
#Lets say agent ID created is asst_123456789. Use this to run the agent

# Create thread
curl --request POST --url 'https://YOUR-FOUNDRY-RESOURCE-NAME.services.ai.azure.com/api/projects/YOUR-PROJECT-NAME/threads?api-version=v1' \
    -h 'authorization: Bearer $AZURE_AI_AUTH_TOKEN' \
    -h 'content-type: application/json'
#Lets say thread ID created is thread_123456789. Use this in the next step

# Create message using thread ID
curl --request POST --url 'https://YOUR-FOUNDRY-RESOURCE-NAME.services.ai.azure.com/api/projects/YOUR-PROJECT-NAME/threads/thread_123456789/messages?api-version=v1' \
    -h 'authorization: Bearer $AZURE_AI_AUTH_TOKEN' \
    -h 'content-type: application/json' \
    -d '{
            "role": "user",
            "content": "Hello, what Contoso products do you know?"
        }'

# Run thread with the agent - use both agent id and thread id
curl --request POST --url 'https://YOUR-FOUNDRY-RESOURCE-NAME.services.ai.azure.com/api/projects/YOUR-PROJECT-NAME/threads/thread_123456789/runs?api-version=v1' \
    -h 'authorization: Bearer $AZURE_AI_AUTH_TOKEN' \
    -h 'content-type: application/json' \
    --data '{
        "assistant_id": "asst_123456789"
    }'

# List the messages in the thread using thread ID
curl --request GET --url 'https://YOUR-FOUNDRY-RESOURCE-NAME.services.ai.azure.com/api/projects/YOUR-PROJECT-NAME/threads/thread_123456789/messages?api-version=v1' \
    -h 'authorization: Bearer $AZURE_AI_AUTH_TOKEN' \
    -h 'content-type: application/json'

# Delete agent once done using agent id
curl --request DELETE --url 'https://YOUR-FOUNDRY-RESOURCE-NAME.services.ai.azure.com/api/projects/YOUR-PROJECT-NAME/assistants/asst_123456789?api-version=v1' \
    -h 'authorization: Bearer $AZURE_AI_AUTH_TOKEN' \
    -h 'content-type: application/json'
Run a chat completion
Chat completions are the basic building block of AI applications. Using chat completions you can send a list of messages and get a response from the model instead of the agent.
- In the left pane, select Playgrounds.
- Select Try the chat playground.
- Fill in the prompt and select the Send button.
- The model returns a response in the Response pane.
Substitute your value for the endpoint in this code:
from azure.ai.projects import AIProjectClient
from azure.identity import DefaultAzureCredential

project = AIProjectClient(
    endpoint="https://your-foundry-resource-name.ai.azure.com/api/projects",
    credential=DefaultAzureCredential(),
)

models = project.inference.get_azure_openai_client(api_version="2025-04-01-preview")
response = models.chat.completions.create(
    model="gpt-4o",
    messages=[
        {"role": "system", "content": "You are a helpful writing assistant"},
        {"role": "user", "content": "Write me a poem about flowers"},
    ],
)

print(response.choices[0].message.content)
package com.azure.ai.foundry.samples;

import com.azure.ai.foundry.samples.utils.ConfigLoader;
import com.azure.ai.projects.ProjectsClient;
import com.azure.ai.projects.ProjectsClientBuilder;
import com.azure.ai.projects.models.chat.ChatClient;
import com.azure.ai.projects.models.chat.ChatCompletion;
import com.azure.ai.projects.models.chat.ChatCompletionOptions;
import com.azure.ai.projects.models.chat.ChatMessage;
import com.azure.ai.projects.models.chat.ChatRole;
import com.azure.identity.DefaultAzureCredential;
import com.azure.identity.DefaultAzureCredentialBuilder;
import com.azure.ai.projects.models.chat.ChatCompletionResponse;


import java.util.Arrays;
import java.util.List;

/**
 * This sample demonstrates how to use the chat completion API with the Azure AI Foundry SDK.
 *
 * Chat completions allow you to have interactive, conversational interactions with AI models
 * by providing a list of messages and receiving AI-generated responses that maintain context
 * across the conversation.
 *
 * This sample shows:
 * 1. How to authenticate with Azure AI Foundry using DefaultAzureCredential
 * 2. How to create a chat client for a specific model deployment
 * 3. How to structure a conversation with system and user messages
 * 4. How to configure and send a chat completion request
 * 5. How to process and display the AI-generated response
 *
 * Prerequisites:
 * - An Azure account with access to Azure AI Foundry
 * - Azure CLI installed and logged in ('az login')
 * - Environment variables set in .env file (AZURE_ENDPOINT, AZURE_DEPLOYMENT)
 */
public class ChatCompletionSample {
    public static void main(String[] args) {
        // Load configuration values from the .env file
        // These include the service endpoint and the deployment name of the model to use
        String endpoint = ConfigLoader.getAzureEndpoint();
        String deploymentName = ConfigLoader.getAzureDeployment();

        // Get DefaultAzureCredential for authentication
        // This uses the most appropriate authentication method based on the environment
        // For local development, it will use your Azure CLI login credentials
        DefaultAzureCredential credential = ConfigLoader.getDefaultCredential();

        // Create a projects client to interact with Azure AI Foundry services
        // The client requires an authentication credential and an endpoint
        ProjectsClient client = new ProjectsClientBuilder()
            .credential(credential)
            .endpoint(endpoint)
            .buildClient();

        // Get a chat client for the specified model deployment
        // This client provides access to chat completion functionality
        ChatClient chatClient = client.getChatClient(deploymentName);

        // Create a list of chat messages to form the conversation
        // This includes a system message to set the assistant's behavior
        // and a user message containing the user's question or prompt
        List<ChatMessage> messages = Arrays.asList(
            new ChatMessage(ChatRole.SYSTEM, "You are a helpful assistant."),
            new ChatMessage(ChatRole.USER, "Tell me about Azure AI Foundry.")
        );

        // Configure chat completion options including the messages, temperature, and token limit
        // - Temperature controls randomness: lower values (like 0.2) give more focused responses,
        //   higher values (like 0.8) give more creative responses
        // - MaxTokens limits the length of the response
        ChatCompletionOptions options = new ChatCompletionOptions(messages)
            .setTemperature(0.7)  // Balanced between deterministic and creative
            .setMaxTokens(800);   // Limit response length

        System.out.println("Sending chat completion request...");

        // Send the request and get the AI-generated completion
        ChatCompletion completion = chatClient.getChatCompletion(options);

        // Display the response
        System.out.println("\nResponse from assistant:");
        System.out.println(completion.getChoices().get(0).getMessage().getContent());

        // Display usage statistics
        System.out.println("\nUsage Statistics:");
        System.out.println("Prompt Tokens: " + completion.getUsage().getPromptTokens());
        System.out.println("Completion Tokens: " + completion.getUsage().getCompletionTokens());
        System.out.println("Total Tokens: " + completion.getUsage().getTotalTokens());
    }
}
// Get the Azure AI endpoint and deployment name from environment variables
const endpoint = process.env.PROJECT_ENDPOINT;
const deployment = process.env.MODEL_DEPLOYMENT_NAME || 'gpt-4o';

// Create an Azure OpenAI Client
const project = new AIProjectClient(endpoint, new DefaultAzureCredential());
const client = await project.inference.azureOpenAI({
    // The API version should match the version of the Azure OpenAI resource
    apiVersion: "2024-12-01-preview"
});

// Create a chat completion
const chatCompletion = await client.chat.completions.create({
    model: deployment,
    messages: [
        { role: "system", content: "You are a helpful writing assistant" },
        { role: "user", content: "Write me a poem about flowers" },
    ],
});
console.log(`\n==================== 🌷 COMPLETIONS POEM ====================\n`);
console.log(chatCompletion.choices[0].message.content);
using Azure;
using Azure.Identity;
using Azure.AI.Projects;
using Azure.AI.Inference;

var projectEndpoint = new Uri(System.Environment.GetEnvironmentVariable("AZURE_AI_ENDPOINT"));
var modelDeploymentName = System.Environment.GetEnvironmentVariable("AZURE_AI_MODEL");
var credential = new DefaultAzureCredential();

AIProjectClient client = new AIProjectClient(projectEndpoint, credential);

ChatCompletionsClient chatClient = client.GetChatCompletionsClient();

var requestOptions = new ChatCompletionsOptions()
{
    Messages =
        {
            new ChatRequestSystemMessage("You are a helpful assistant."),
            new ChatRequestUserMessage("How many feet are in a mile?"),
        },
    Model = modelDeploymentName
};
Response<ChatCompletions> response = chatClient.Complete(requestOptions);
Console.WriteLine(response.Value.Content);
Replace YOUR-FOUNDRY-RESOURCE-NAME with your values:
curl --request POST --url 'https://YOUR-FOUNDRY-RESOURCE-NAME.services.ai.azure.com/openai/deployments/gpt-4o/chat/completions?api-version=2024-10-21' \
-h 'authorization: Bearer $AZURE_AI_AUTH_TOKEN' \
-h 'content-type: application/json' \
-d '{
        "messages": [
            {"role": "system",
            "content": "You are a helpful writing assistant"},
            {"role": "user",
            "content": "Write me a poem about flowers"}
        ],
        "model": "gpt-4o"
    }'
Clean up resources
If you no longer need them, delete the resource group associated with your project.
In the Azure AI Foundry portal, select your project name in the top right corner. Then select the link for the resource group to open it in the Azure portal. Select the resource group, and then select Delete. Confirm that you want to delete the resource group.
Related content
Azure AI Foundry client library overview
