Note
Access to this page requires authorization. You can try signing in or changing directories.
Access to this page requires authorization. You can try changing directories.
Azure DevOps Services | Azure DevOps Server | Azure DevOps Server 2022 | Azure DevOps Server 2020
An Azure Pipelines environment is a group of resources that you can target with deployments from a pipeline. Typical environments include Development, Test, or Production.
To add physical or virtual machine (VM) resources to environments, you install agents on the machines. The environment's deployment history then provides traceability from each machine. This article describes how to define and use environments to manage deployments across VM or server resources.
Note
Azure DevOps environments are available only for YAML pipelines. For Classic pipelines, deployment groups provide similar functionality.
Prerequisites
To carry out the procedures in this article, you need the following prerequisites:
- Access to a source repository where you can create pipelines. For more information, see Supported source repositories.
- Administrator role for the deployment pool, the set of target servers available to your Azure DevOps organization. For more information, see Set deployment group security in Azure Pipelines.
- Project Administrator or Build Administrator permissions in the Azure DevOps project that contains the environment. For more information, see Resource security.
- Access and permission to download and run executable scripts on VMs you want to connect to the environment.
Create an environment and add a VM
Use the following procedure to add a VM or physical machine to an environment.
Create the environment with a VM resource
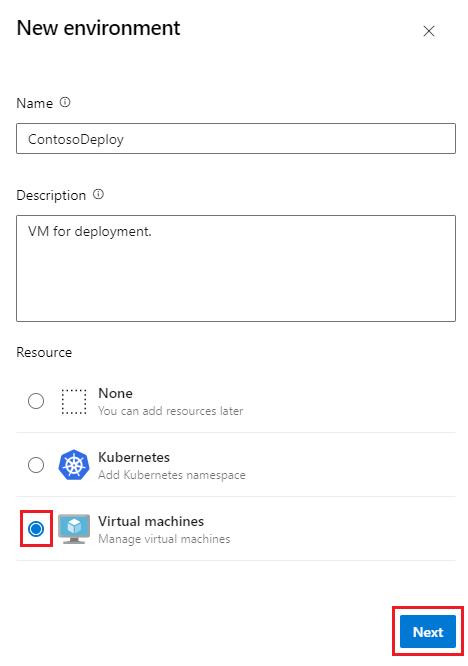
In your Azure DevOps project, go to Pipelines > Environments and then select Create environment or New environment.
On the New environment screen, enter a Name and optional Description.
Under Resource, select Virtual machines, and then select Next.
Copy the registration script
The agent scripts for VM resources are like the scripts for self-hosted agents, and use the same commands. The scripts include an Azure DevOps Personal Access Token (PAT) for the signed-in user, which expires three hours after the script is generated. You need the PAT only to install the agent.
Note
To configure a deployment group agent, or if you get an error when registering the VM environment resource, try setting your PAT Access scope to All accessible organizations in User settings > Personal access tokens.
On the Virtual machine resource screen, choose Linux under Operating system.
Select the icon to copy the Linux registration script.
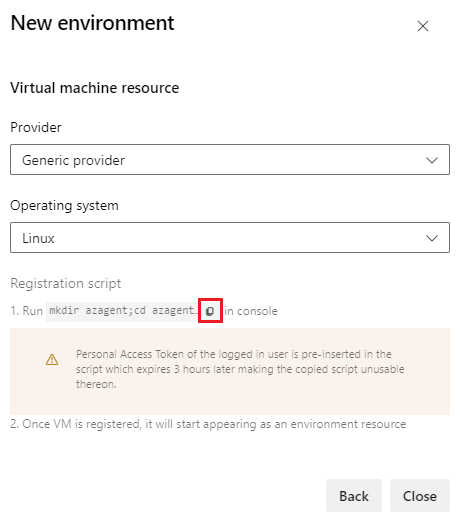
The script is the same for all the Linux VMs added to the environment. For more information about installing the agent script, see Self-hosted Linux agents.

Run the copied registration script on the VM
Select Close. The new environment is created. To copy the script again, for example if your PAT expires, select Add resource again on the environment's page.
Run the copied script on each target VM that you want to register with the environment.
Note
If the VM already has another agent running on it, provide a unique name for the new
agentto register with the environment.Once the VM is registered, verify that it appears on the Resources tab of the Azure Pipelines environment page.

Use environments in YAML pipelines
You can target VM resources in your YAML deployment jobs by referencing their environment. For more information about YAML deployment jobs, see Deployment jobs and the jobs.deployment definition in the YAML pipelines schema reference.
The following pipeline deployment job runs only on VMs in the VMEnv environment.
trigger:
- main

pool:
   vmImage: ubuntu-latest

jobs:
- deployment: VMDeploy
  displayName: Deploy to VMenv
  environment: VMenv
  strategy:
     runOnce:
        deploy:
          steps:
            - script: echo "Hello world"
You can target a specific VM in the environment by appending the VM resource name to the environment name. The following example deploys only to the VM resource named RESOURCE-PC in the VMenv environment.
trigger:
- main

pool:
   vmImage: ubuntu-latest

jobs:
- deployment: VMDeploy
  displayName: Deploy to RESOURCE-PC in VMenv
  environment: VMenv.RESOURCE-PC  # only deploy to the VM resource named RESOURCE-PC
  strategy:
     runOnce:
        deploy:
          steps:
            - script: echo "Hello world"
You can also use the full syntax of the jobs-deployment-environment keyword, and deploy to specific environment VMs by listing them in resourceName.
trigger:
- main

pool:
   vmImage: ubuntu-latest

jobs:
- deployment: VMDeploy
  displayName: Deploy to RESOURCE-PC in VMenv with full syntax
  environment:
    name: VMenv
    resourceType: virtualMachine
    resourceName: RESOURCE-PC # only deploy to the VM resource named RESOURCE-PC
  strategy:
    runOnce:
      deploy:
          steps:
          - script: echo "Hello world"
Note
- The
resourceTypevalues likevirtualMachineare case sensitive. Incorrect casing results in no matching resources found. - If you retry a stage, the deployment reruns on all specified VMs, not just on failed targets.
Deployment strategy
In a deployment job, you apply a deployment strategy to define how to roll out your application. VMs support both the runOnce and the rolling strategies. For more information about deployment strategies and lifecycle hooks, see Deployment strategies.
Permissions
The first time you run the pipeline that uses the environment, you must grant permission for all runs of the pipeline to access the agent pool and the environment. Select the Waiting symbol next to the job on the pipeline run Summary screen, and then select Permit to grant the necessary permissions.
Add and manage tags
Tags are a way to target a specific set of environment VMs for deployment. When you specify tags in the environment keyword, the pipeline deploys only to environment VMs that have the tags applied.
There's no limit to the number of tags that you can apply to VMs. Tag names are limited to 256 characters each.
You can apply or remove tags by selecting the More actions icon next to the VM on the environment's Resources tab.

You can also apply tags interactively when you register the agent script on the VM.

If you specify multiple tags, the pipeline deploys only to VMs that include all the tags. The following example targets only VMs that have both the windows and prod tags. The pipeline doesn't deploy to VMs that have only one or none of the tags.
trigger:
- main

pool:
   vmImage: ubuntu-latest

jobs:
- deployment: VMDeploy
  displayName: Deploy to VM
  environment:
    name: VMenv
    resourceType: virtualMachine
    tags: windows,prod # only deploy to VMs with both windows and prod tags
  strategy:
    runOnce:
      deploy:
          steps:
          - script: echo "Hello world"
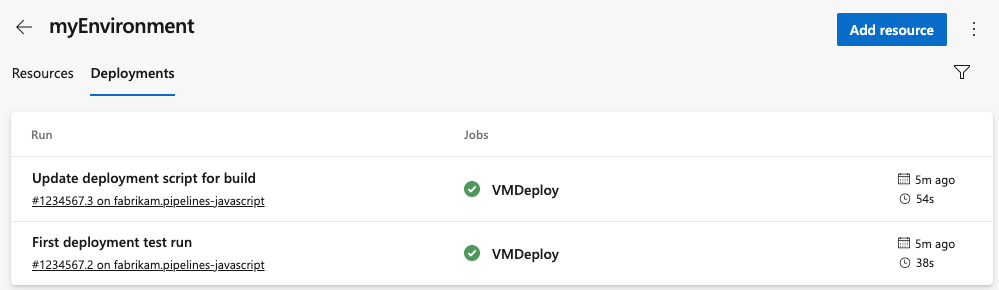
View deployment history
Select the Deployments tab of the environment page for complete traceability of commits and work items and a cross-pipeline deployment history per environment and resource.
Remove a VM from an environment
To remove a VM from a Linux environment, run the following command on the machine.
./config.sh remove