Note
Access to this page requires authorization. You can try signing in or changing directories.
Access to this page requires authorization. You can try changing directories.
Azure DevOps Services | Azure DevOps Server | Azure DevOps Server 2022 | Azure DevOps Server 2020
Warning
The Request feedback shortcut menu isn't available in Azure DevOps Services. Use one of these alternatives:
- Send an email or chat message to the stakeholders you want to reach, or
- Use the Test & Feedback extension to collect feedback directly from a browser.
Use the Test & Feedback extension in Azure DevOps for collecting stakeholder feedback. Recipients can respond in two ways:
- From the link in the Request feedback email (quick for one-off responses).
- From the Test & Feedback extension—useful when you want to manage multiple requests or when you're using Azure DevOps Services (cloud).
Prerequisites
| Category | Requirement |
|---|---|
| Project access | Project member |
| Access levels | Stakeholders should use the Test & Feedback extension. Basic users can provide feedback using the nonstakeholder flow described in this article. |
| Extensions | Test & Feedback extension installed in your browser. |
Provide feedback from a feedback request email
Follow these steps when you receive a Request feedback email.
In the feedback request email, choose Provide feedback.

The Azure DevOps landing page opens and confirms the extension is configured for the request.
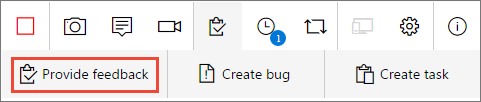
Launch the extension by selecting the Test & Feedback icon (
 ) in the browser toolbar.
- If the extension doesn't open or configure automatically, open the extension, sign in, and connect to the organization or project that sent the request.
Read the instructions in the feedback form to learn what to test and any special notes from the requestor.

Depending on your access level:
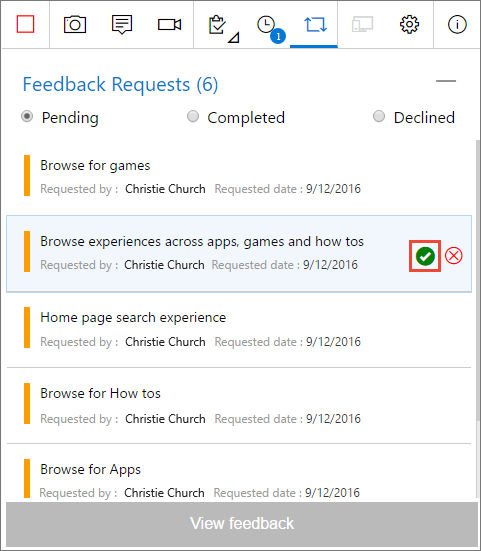
- Stakeholders: open the Feedback requests page in the extension to view and manage any pending requests.
- Basic users: the extension opens the Explore work item traceability page that shows the user story, acceptance criteria, and context.

Open the app or web page to test and capture feedback using the extension. You can:
- Capture screenshots (with inline annotations)
- Record a short screen capture
- Add notes or steps
- Annotate screenshots and highlight UI elements

Submit your feedback:
- Stakeholders: choose Provide feedback in the extension. Optionally create bugs or tasks when you submit.
- Basic users: create a bug or a task from the captured information (nonstakeholder flow).

Review the feedback and enter a meaningful title. Optionally choose a star rating, and then save. The extension creates a work item that contains your feedback and attachments.

If you responded as a Stakeholder:
- Open Feedback requests in the extension and mark the request Completed when you finish.

End your feedback session by selecting Stop in the extension.

Tips for capturing feedback
- Capture multiple screenshots and short recordings to show steps to reproduce.
- Add clear, actionable notes and include expected vs. actual behavior.
- Use annotation tools to highlight UI elements, errors, and the important parts of a screen.
- Follow any requestor-provided instructions to give the feedback they expect.
Nonstakeholder (Basic user) workflow
If you have Basic access and the requestor invited you to respond, the extension opens the Explore work item view. Use that view to capture details and then create a bug or task from the captured feedback. For full instructions, see Exploratory testing in connected mode.
Provide feedback from the Test & Feedback extension
Use this flow when you want to manage multiple requests or work directly from the extension.
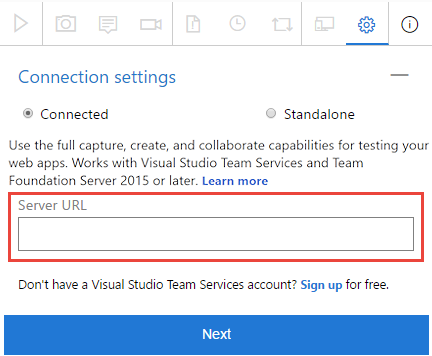
Launch the extension from the toolbar icon (
).In Connection settings, select Connected mode and sign in to the Azure DevOps organization that hosts the request.
Connect to the server and the project or team that requested feedback.
Open the Feedback requests page to list all requests for the connected project or team.

Select a request and choose View feedback, read the instructions, then choose Provide feedback.


Capture and submit feedback as previously described.