Note
Access to this page requires authorization. You can try signing in or changing directories.
Access to this page requires authorization. You can try changing directories.
Applies to: Azure Logic Apps (Consumption + Standard)
When you need to abstract values that might change in workflows across development, test, and production environments, you can define workflow parameters. When you use these parameters rather than environment-specific variables, you can focus more on designing your workflow business logic and then insert your environment-specific variables later.
This article shows how to create, use, and edit parameters for multitenant Consumption logic app workflows and for single-tenant Standard logic app workflows. You also learn how to manage environment variables.
For more information about multitenant and single-tenant Azure Logic Apps, see Single-tenant versus multitenant in Azure Logic Apps.
Prerequisites
An Azure account and subscription. If you don't have a subscription, sign up for a free Azure account.
A Consumption or Standard logic app workflow
If you don't have a logic app workflow yet, see Create a Consumption logic app workflow or Create a Standard logic app workflow.
Note
Currently, you can create parameters for Consumption logic app workflows only by using the Azure portal. You can create parameters for Standard logic app workflows by using the Azure portal or Visual Studio Code.
Parameters for Consumption versus Standard logic app workflows
For both Consumption and Standard logic app workflows, you can define parameters using the workflow designer. After you define a parameter, you can reference that parameter from any workflow or connection in the same logic app resource.
In multitenant Consumption logic app workflows, you create and use parameters in the designer. Then you define and set the environment variables in your Azure Resource Manager template (ARM template) and template parameters files. In this scenario, you have to define and set the parameters at deployment. This requirement means that even if you have to change only one variable, you must redeploy your logic app's ARM template.
In single-tenant Standard logic app workflows, you can work with environment variables both at runtime and deployment by using parameters and app settings. App settings contain global configuration options for all the workflows in the same logic app resource. For more information, see Edit host and app settings for single-tenant based logic apps.
Important
When you use sensitive information, such as connection strings that include user names and passwords, make sure to use the most secure authentication flow available. For example, in Standard logic app workflows, secure data types, such as securestring and secureobject, aren't supported. Microsoft recommends that you authenticate access to Azure resources with a managed identity when possible, and assign a role that has the least privilege necessary.
If this capability is unavailable, make sure to secure connection strings through other means, such as Azure Key Vault, which you can use with app settings. You can then directly reference secure strings, such as connection strings and keys. Similar to ARM templates, where you can define environment variables at deployment time, you can define app settings within your logic app workflow definition. You can then capture dynamically generated infrastructure values, such as connection endpoints and storage strings. For more information, see Application types for the Microsoft identity platform.
App settings have size limits. You also can't reference them from certain areas in Azure Logic Apps. Parameters offer a wider range of use cases than app settings, such as support for large value sizes and complex objects.
For example, if you use Visual Studio Code as your development tool to run workflows locally, you can define parameters using the parameters.json file. You can then reference any parameter in this parameters file from any workflow in your project's workflow.json file or from any connection object in your project's connections.json file. The following list describes common use cases:
Have a test parameters file that includes all the values that you use during testing. At deployment, replace your test parameters file with your production parameters file.
Parameterize different parts of your connections.json file. You can then check your connections.json file into source control and manage any connections through your parameters.json file.
Parameterize complex objects, such as the
authenticationJSON object. For example, you can replace theauthenticationobject value with a string that holds a single parameters expression, such as@parameters('api-auth').Review and edit the app settings in your project's local.settings.json file. Then reference these app settings in your parameters.
Note
Consider using parameters as the default way to parameterize values instead of app settings. That way, when you need to store secure keys or strings, you can follow the recommendation to reference app settings from your parameters. You can use both options in your solution by using parameters to reference app settings.
Define, use, and edit parameters
This procedure describes how to work with parameters for either Consumption or Standard logic app workflows in the Azure portal.
In the Azure portal, open your logic app resource.
For Standard logic apps, on the resource sidebar menu, under Workflows, select Workflows.
On the Workflows page, select the blank workflow to open the designer.
For Consumption logic apps, on the resource sidebar menu, under Development Tools, select the designer to open the workflow.
On the designer toolbar, select Parameters.

On the Parameters pane, select Create parameter.
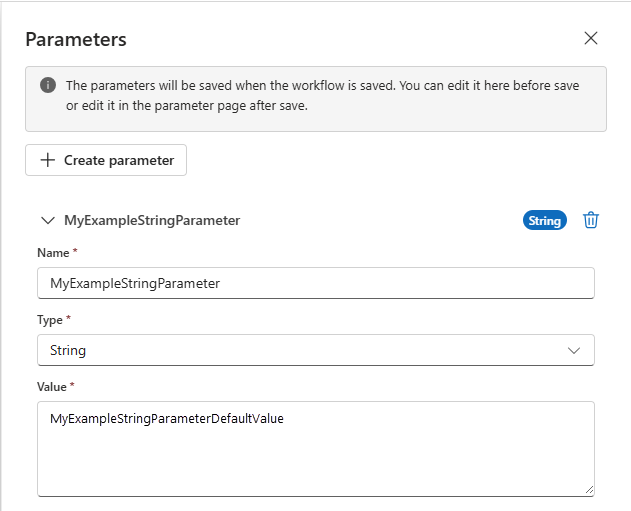
Provide the following information about the parameter to create:
Property Required Description Name Yes The name for the parameter to create. Type Yes The data type for the parameter, such as Array, Bool, Float, Int, Object, and String.
Note: In Standard logic app workflows, secure data types, such assecurestringandsecureobject, aren't supported.Value (Standard) Yes The value for the parameter.
In Standard logic app workflows, specify the parameter value. The workflow logic, connection information, and parameter values don't exist in a single ___location. The designer must be able to resolve the parameter values before it loads the workflow.Default Value (Consumption) Yes The default value for the parameter. You have to specify the default parameter value. The workflow logic, connection information, and parameter values don't exist in a single ___location. The designer must be able to resolve the parameter values before it loads the workflow.
Important: For the Secure Object and Secure String data types, avoid setting a default value because the value is stored as plain text.Actual Value (Consumption) No The actual value for the parameter. The following example shows a definition for a string parameter:
When you're done, close the Parameters pane. Make sure to save your workflow so that you save your new parameter definition.

To reference the parameter from a trigger or action in any workflow for the same logic app, follow these steps:
In the designer, open the workflow that you want, and select the trigger or action.
In the information pane, on the Parameters tab, in the property where you want to use the parameter, select inside that property's edit box. Select the lightning icon to open the dynamic content list.
From that list, under Parameters, select your previously created parameter.


To view or edit parameters in the same logic app:
Open a workflow in the workflow designer. Fon Consumption logic apps, select Development Tools > Logic app designer. For Standard logic apps, select Workflows > Workflows, then select a workflow to open the designer.
On the designer toolbar, select Parameters.
The Parameters pane opens and displays all the parameters that you defined in that logic app.
Standard workflows only: To view or edit in bulk JSON, on the resource sidebar menu, select Parameters. On the Parameters pane, select Edit in JSON.
The Parameters JSON view opens and displays all the parameters that you defined from workflows in that logic app.
Visual Studio Code
This procedure describes how to work with parameters for Standard logic app workflows using Visual Studio Code.
In a project root-level JSON file named parameters.json, define all the parameters and their values. This file has an object that includes key-value pairs. Each key is the name for each parameter. Each value is the structure for the parameter. Each structure needs to include both a
typeandvaluedeclaration.Important
Your parameters.json file must define and include all the parameters and their values that you reference or use elsewhere in your project. This requirement includes workflow definitions and connections.
The following example shows a basic parameters file:
{
    "responseString": {
        "type": "string",
        "value": "hello"
    },
    "functionAuth": {
        "type": "object",
        "value": {
            "type": "QueryString",
            "name": "Code",
            "value": "@appsetting('<AzureFunctionsOperation-FunctionAppKey>')"
        }
    }
 }
Note
In the parameters.json file,
@appsettingis the only valid expression type.To reference parameters in your trigger or action inputs, use the expression
@parameters('<parameter-name>').
Parameterize connections file
To parameterize your connections.json file, replace the values for literals, such as ConnectionRuntimeUrl, with a single parameters() expression, for example, @parameters('api-runtimeUrl'). In the connections.json file, the only valid expression types are @parameters and @appsetting.
Important
If you parameterize the connections.json file during development, the designer experience becomes restricted, both locally and in the Azure portal. If you need to use the designer for development, use a nonparameterized connections.json file instead. Then, in your deployment pipelines, replace with the parameterized file. The runtime still works with parameterization. Designer improvements are in development.
The following example shows a parameterized connections.json file that uses both app settings and parameters. This sample file uses a parameter for the complex blob_auth authentication object and app settings for the other values.
You want to use parameters where possible. Because app settings are generated during deployment and are easier to dynamically populate in a development pipeline, you should use app settings over parameters in this scenario. In this case, you can use a parameter for the authentication object because you're unlikely to reference the parameter in your workflow:
{
   "serviceProviderConnections": {
      "serviceBus": {
         "parameterValues": {
            "connectionString": "@appsetting('serviceBus_connectionString')"
        },
        "serviceProvider": {
           "id": "/serviceProviders/serviceBus"
        },
        "displayName": "servicebus"
     }
   },
   "managedApiConnections": {
      "azureblob": {
         "api": {
            "id": "/subscriptions/@{appsetting('WORKFLOWS_SUBSCRIPTION_ID')}/providers/Microsoft.Web/locations/@{appsetting('WORKFLOWS_LOCATION_NAME')}/managedApis/azureblob"
         },
         "connection": {
            "id": "/subscriptions/@{appsetting('WORKFLOWS_SUBSCRIPTION_ID')}/resourceGroups/@{appsetting('WORKFLOWS_RESOURCE_GROUP_NAME')}/providers/Microsoft.Web/connections/azureblob"
         },
         "connectionRuntimeUrl": "@appsetting('BLOB_CONNECTION_RUNTIMEURL')",
         "authentication": "@parameters('blob_auth')"
      }
   }
}
Note
When you have an expression that's inline with plain text, make sure to use the interpolated format for that expression by enclosing that expression with braces ({}). This format helps avoid parsing problems.
For example, if you have "<text>/@<function-name>('<parameter-name>')/<text>",
use the following version instead: "<text>/@{<function-name>('<parameter-name>')}/<text>".
For more information, see Considerations for using functions.
Manage parameters files
Typically, you need to manage multiple versions of parameters files. You might use targeted values for different deployment environments, such as development, testing, and production. Managing these parameters files often works like managing ARM template parameters files. When you deploy to a specific environment, you promote the corresponding parameters file, generally through a pipeline for DevOps.
To dynamically replace parameters files using the Azure CLI, run the following command:
az functionapp deploy --resource-group MyResourceGroup --name MyLogicApp --src-path C:\parameters.json --type static --target-path parameters.json
If you have a NuGet-based logic app project, you have to update your project file (<logic-app-name>.csproj) to include the parameters file in the build output, for example:
<ItemGroup>
  <None Update="parameters.json">
    <CopyToOutputDirectory>PreserveNewest</CopyToOutputDirectory>
  </None>
</ItemGroup>
Note
Currently, the capability to dynamically replace parameters files isn't available in the Azure portal or the workflow designer.
For more information about setting up your logic apps for DevOps deployments, see the following articles:
- DevOps deployment overview for single-tenant based logic apps
- Set up DevOps deployment for single-tenant based logic apps
Manage app settings
In Standard logic apps, app settings contain global configuration options for all the workflows in the same logic app. When you run workflows locally in Visual Studio Code, you can access these app settings as local environment variables in the local.settings.json file. You can then reference these app settings in your parameters.
The following sections describe how to add, update, or delete app settings for Visual Studio Code, the Azure portal, Azure CLI, and ARM (Bicep) template.
Review app settings using the Azure portal
To review the app settings for your logic app resource in the Azure portal, follow these steps:
In the Azure portal, open your logic app resource.
On the resource sidebar menu, under Settings, select Environment variables.
On the Environment variables page, on the App settings tab, review the app settings for your logic app.
To view all values, select Show Values. Or, to view a single value, select that value.
To add a new setting, follow these steps:
Under Application settings, select + Add.
For Name, enter the key or name for your new setting.
For Value, enter the value for your new setting.
If necessary, select Deployment slot setting.
When you're ready to create your new key-value pair, select Apply.
Review app settings using Azure CLI
To review your current app settings using the Azure CLI, run the command, az logicapp config appsettings list. Make sure that your command includes the --name -n and --resource-group -g parameters, for example:
az logicapp config appsettings list --name MyLogicApp --resource-group MyResourceGroup
To add or update an app setting using the Azure CLI, run the command az logicapp config appsettings set. Make sure that your command includes the --name n and --resource-group -g parameters. For example, the following command creates a setting with a key named CUSTOM_LOGIC_APP_SETTING with a value of 12345:
az logicapp config appsettings set --name MyLogicApp --resource-group MyResourceGroup --settings CUSTOM_LOGIC_APP_SETTING=12345
Review and define app settings in a Resource Manager or Bicep file
To review and define your app settings in an ARM template or Bicep file, find your logic app's resource definition, and update the appSettings JSON object. For the full resource definition, see the ARM template reference.
This example shows file settings for either ARM templates or Bicep files:
"appSettings": [
    {
        "name": "string",
        "value": "string"
    },
    {
        "name": "string",
        "value": "string"
    },
    <...>
],