Note
Access to this page requires authorization. You can try signing in or changing directories.
Access to this page requires authorization. You can try changing directories.
Note
Dynamics 365 Marketing and Dynamics 365 Customer Insights are now Customer Insights - Journeys and Customer Insights - Data. For more information, see Dynamics 365 Customer Insights FAQs
New Customer Insights - Journeys customers receive real-time journeys features only. For more information, see Default real-time journeys installation.
The event web application is a fast, lightweight, and customizable solution for showing live events from the Dynamics 365 events API directly on your website. It has a responsive, multilingual interface that lets attendees search, explore, and register for events easily.
Built with plain JavaScript, HTML, and CSS, the web application is easy to deploy on any static hosting environment and simple to customize. It's ideal for organizations that want a flexible and accessible event experience. The default setup of the web app includes an overview page with a list of live events and a link to the event detail page with the registration form.

Key features
- Live event display: Show all live events for a configured web application in a responsive grid layout that adapts to desktop and mobile screens.
- Search functionality: Find events by name or description for a streamlined experience.
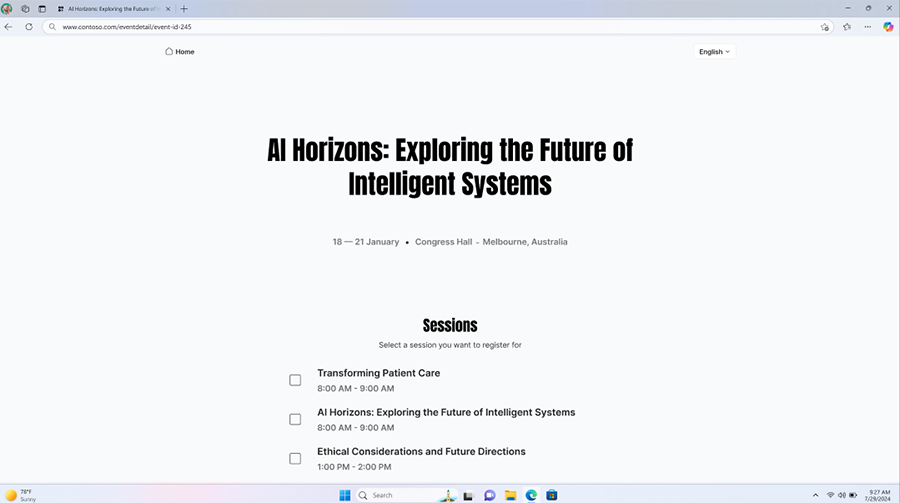
- Detailed event pages: Each event has a dedicated page with full details (title, description, date, time, ___location) and integrated registration.
- Embedded registration forms: Register attendees through Customer Insights - Journeys registration forms.
- Global accessibility: Multi-language support (i18n), right-to-left (RTL) language compatibility, and responsive design for all devices.
Getting Started
Prerequisites
Finish these steps before you set up your web application:
- Create a web application record in Customer Insights – Journeys for your ___domain.
- Complete ___domain authentication for embedded registration forms.
- Install Node.js v22+ (optional, for local development).
1. Register a new web application
The portal needs a web application record with its origin set to the ___domain where the portal is hosted so CORS requests work. To set up the web application, go to Customer Insights - Journeys > Settings > Web applications. Select +Add to register the new web application.
You're asked to enter:
- Name
- Domain (add your ___domain as the origin, for example, https://yourdomain.com)
- Token (automatically provided)
- Choose if this web app is the default web app
After you enter the required information, select Save.
2. Authenticate ___domain
To use embedded event registration forms, authenticate your ___domain in Customer Insights - Journeys > Settings > Domains. For more information, see Authenticate your domains.
Set up the web application
After you finish the prerequisites, go back to the web application configuration you set up and select Download Zip File.

The folders in the zip file have the following file structure:
/
├── public/                     # Deployable files (static assets for production)
│   ├── assets/                 # Images and other assets (SVG icons etc.)
│   │   ├── calendar.svg        # Calendar icon
│   │   ├── home.svg            # Home icon
│   │   └── search.svg          # Search icon
│   ├── css/
│   │   └── styles.css          # Styles for the event portal
│   ├── js/
│   │   ├── api-wrapper.js      # Thin wrapper around PublicApi.bundle.js
│   │   ├── config.js           # API / org configuration values
│   │   ├── event-details.js    # Event details page logic
│   │   ├── event-grid.js       # Events grid listing logic
│   │   └── localization.js     # Internationalization (i18n) system
│   ├── lib/
│   │   └── PublicApi.bundle.js # Dynamics 365 events API library (provided)
│   ├── locales/                # Translation JSON files (one per locale)
│   ├── index.html              # Events listing page
│   └── event-details.html      # Event details page (loads registration form)
├── server.js                   # Express dev server (not for production)
├── package.json                # NPM scripts & dependencies
├── LICENSE                     # Project license
└── README.md                   # Documentation
Deploying to production
Deploy the web application to production:
Update the credentials in
public/js/config.jswith your production values.const CONFIG = { BASE_URL: "your-dynamics-api-url", ORG_ID: "your-organization-id", TOKEN: "your-api-token", WEBAPP_ID: "your-webapp-id" // Optional: filter events by web application ID };Note
If the project was downloaded as a zip from Customer Insights - Journeys > Settings > Web applications, the configuration values are already set correctly and you can skip this step.
Copy the contents of the
publicdirectory to your web server.Open your browser and navigate to your ___domain. You should now see the web application. If any events are published to the web application, they're displayed as a list of events on the detail page.

For details about supported features, localization support, and customization options, see the version-controlled README in the downloaded zip file.
Local development
The included Express server (server.js) is for local development and customization:
- It serves static files from the project directory.
- Use the Express server to make changes and test them.
- It's not for production use.
For production deployment, use the files in the /public directory on your web server.
Prerequisites for local development
Set up a web application as described earlier, but set the origin to http://localhost:3000 (the default address of the development server). Authenticate your ___domain as described earlier, but use localhost as the ___domain name.
Run the local server
Unpack the zip file.
Open the extracted folder in the terminal (where
package.jsonis).Install the dependencies:
npm installUpdate the API credentials in
public/js/config.js. You find these values in Customer Insights - Journeys > Settings > Web applications.Start the development server:
npm startOpen your browser and navigate to
http://localhost:3000. You should now see the web application. If any events are published to the web application, they're displayed as a list of events on the detail page.
Publishing events to web application
Event planners can publish each event to different publishing destinations based on their needs. To learn more about ways to create an event registration experience, visit Event registration experience.
To assign an event to a web application:
- Open (or create) the event.
- Edit the event.
- Under General, go to Publishing.
- Under "Where do you want attendees to register for this event?" select Event portal using web application.
- Choose the desired web application in the dropdown.
- Publish (go live). Only live events are loaded and shown on the portal.
