Note
Access to this page requires authorization. You can try signing in or changing directories.
Access to this page requires authorization. You can try changing directories.
Applies to: ✅ Data Engineering and Data Science in Microsoft Fabric
Learn how to submit Spark session jobs using the Livy API for Fabric Data Engineering.
Prerequisites
Fabric Premium or Trial capacity with a Lakehouse
A remote client such as Visual Studio Code with Jupyter Notebooks, PySpark, and the Microsoft Authentication Library (MSAL) for Python
Either a Microsoft Entra app token. Register an application with the Microsoft identity platform
Or a Microsoft Entra SPN token. Add and manage application credentials in Microsoft Entra
Some data in your lakehouse, this example uses NYC Taxi & Limousine Commission green_tripdata_2022_08 a parquet file loaded to the lakehouse
The Livy API defines a unified endpoint for operations. Replace the placeholders {Entra_TenantID}, {Entra_ClientID}, {Fabric_WorkspaceID}, {Fabric_LakehouseID} with your appropriate values when you follow the examples in this article.
Configure Visual Studio Code for your Livy API Session
Select Lakehouse Settings in your Fabric Lakehouse.

Navigate to the Livy endpoint section.
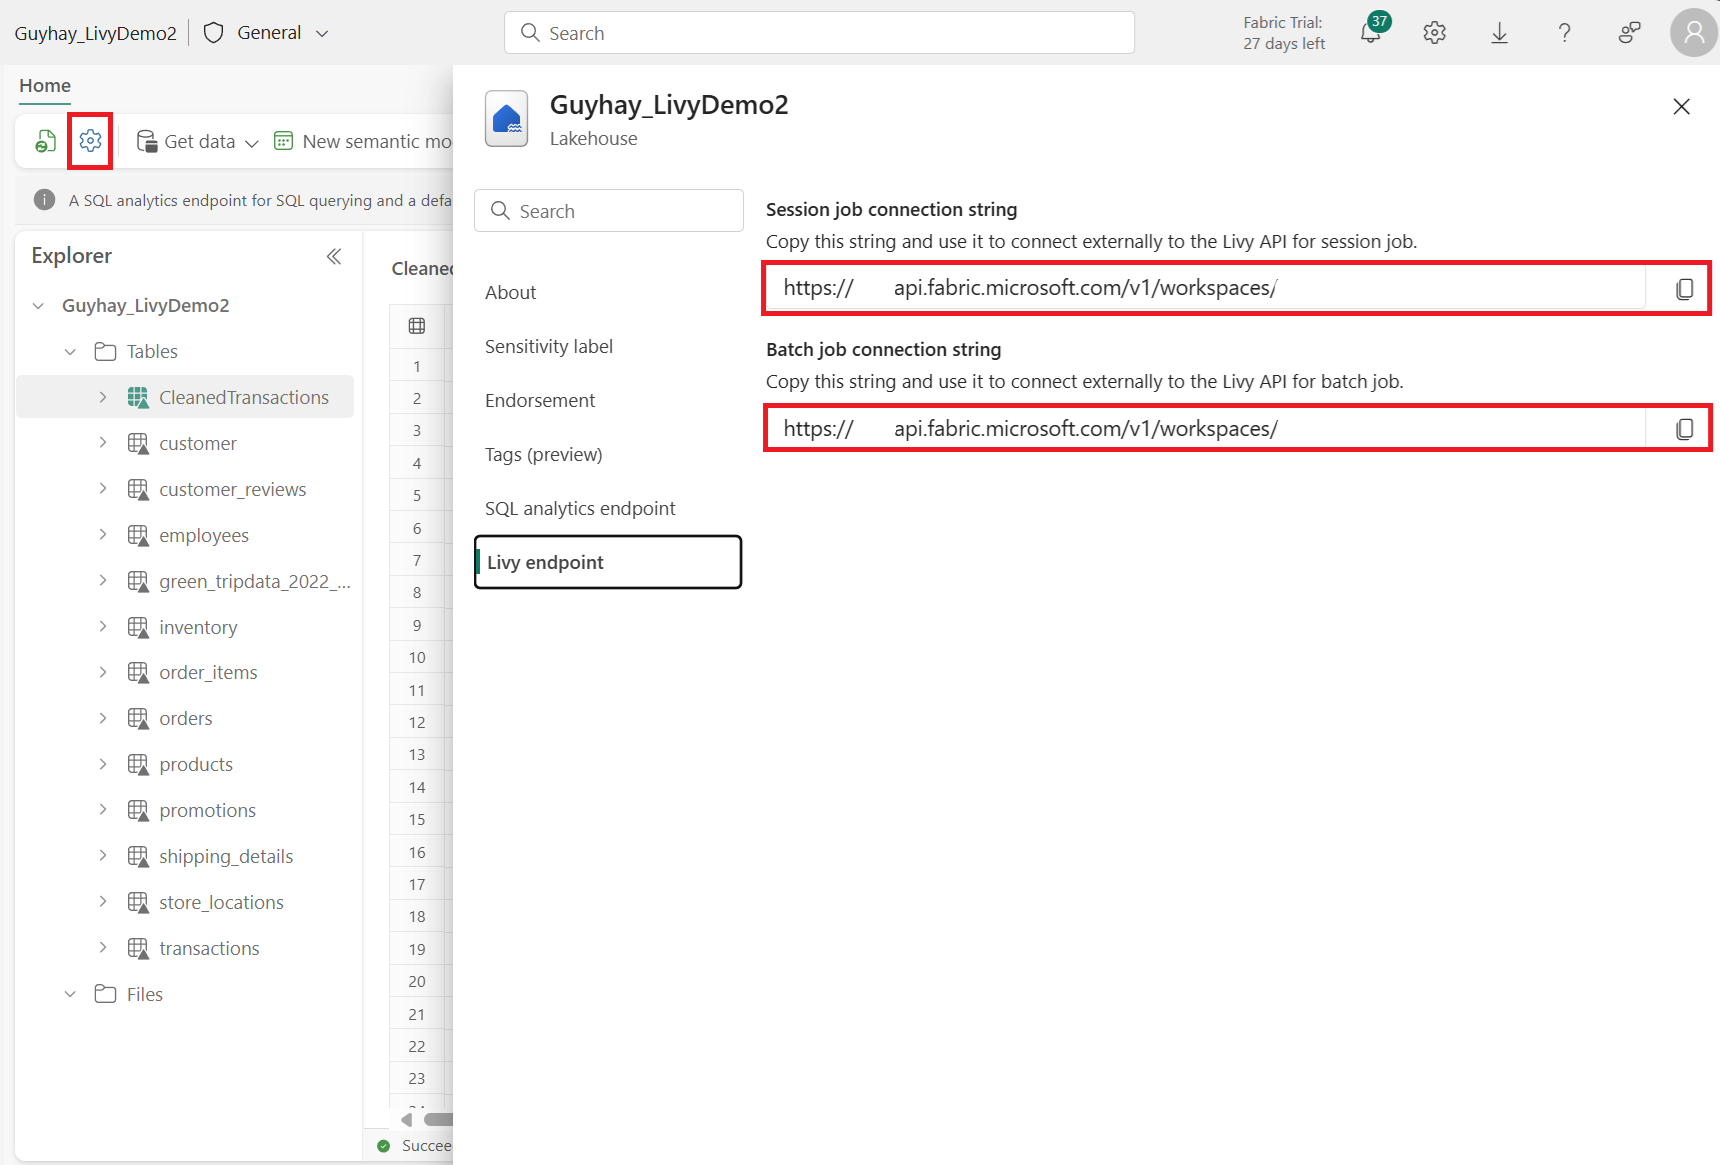
Copy the Session job connection string (first red box in the image) to your code.
Navigate to Microsoft Entra admin center and copy both the Application (client) ID and Directory (tenant) ID to your code.


Authenticate a Livy API Spark session using either a Microsoft Entra user token or a Microsoft Entra SPN token
Authenticate a Livy API Spark session using a Microsoft Entra SPN token
Create an
.ipynbnotebook in Visual Studio Code and insert the following code.import sys from msal import ConfidentialClientApplication # Configuration - Replace with your actual values tenant_id = "Entra_TenantID" # Microsoft Entra tenant ID client_id = "Entra_ClientID" # Service Principal Application ID # Certificate paths - Update these paths to your certificate files certificate_path = "PATH_TO_YOUR_CERTIFICATE.pem" # Public certificate file private_key_path = "PATH_TO_YOUR_PRIVATE_KEY.pem" # Private key file certificate_thumbprint = "YOUR_CERTIFICATE_THUMBPRINT" # Certificate thumbprint # OAuth settings audience = "https://analysis.windows.net/powerbi/api/.default" authority = f"https://login.windows.net/{tenant_id}" def get_access_token(client_id, audience, authority, certificate_path, private_key_path, certificate_thumbprint=None): """ Get an app-only access token for a Service Principal using OAuth 2.0 client credentials flow. This function uses certificate-based authentication which is more secure than client secrets. Args: client_id (str): The Service Principal's client ID audience (str): The audience for the token (resource scope) authority (str): The OAuth authority URL certificate_path (str): Path to the certificate file (.pem format) private_key_path (str): Path to the private key file (.pem format) certificate_thumbprint (str): Certificate thumbprint (optional but recommended) Returns: str: The access token for API authentication Raises: Exception: If token acquisition fails """ try: # Read the certificate from PEM file with open(certificate_path, "r", encoding="utf-8") as f: certificate_pem = f.read() # Read the private key from PEM file with open(private_key_path, "r", encoding="utf-8") as f: private_key_pem = f.read() # Create the confidential client application app = ConfidentialClientApplication( client_id=client_id, authority=authority, client_credential={ "private_key": private_key_pem, "thumbprint": certificate_thumbprint, "certificate": certificate_pem } ) # Acquire token using client credentials flow token_response = app.acquire_token_for_client(scopes=[audience]) if "access_token" in token_response: print("Successfully acquired access token") return token_response["access_token"] else: raise Exception(f"Failed to retrieve token: {token_response.get('error_description', 'Unknown error')}") except FileNotFoundError as e: print(f"Certificate file not found: {e}") sys.exit(1) except Exception as e: print(f"Error retrieving token: {e}", file=sys.stderr) sys.exit(1) # Get the access token token = get_access_token(client_id, audience, authority, certificate_path, private_key_path, certificate_thumbprint)Run the notebook cell. You should see the Microsoft Entra token returned.


Authenticate a Livy API Spark session using a Microsoft Entra user token
Create an
.ipynbnotebook in Visual Studio Code and insert the following code.from msal import PublicClientApplication import requests import time # Configuration - Replace with your actual values tenant_id = "Entra_TenantID" # Microsoft Entra tenant ID client_id = "Entra_ClientID" # Application ID (can be the same as above or different) # Required scopes for Microsoft Fabric API access scopes = [ "https://api.fabric.microsoft.com/Lakehouse.Execute.All", # Execute operations in lakehouses "https://api.fabric.microsoft.com/Lakehouse.Read.All", # Read lakehouse metadata "https://api.fabric.microsoft.com/Item.ReadWrite.All", # Read/write fabric items "https://api.fabric.microsoft.com/Workspace.ReadWrite.All", # Access workspace operations "https://api.fabric.microsoft.com/Code.AccessStorage.All", # Access storage from code "https://api.fabric.microsoft.com/Code.AccessAzureKeyvault.All", # Access Azure Key Vault "https://api.fabric.microsoft.com/Code.AccessAzureDataExplorer.All", # Access Azure Data Explorer "https://api.fabric.microsoft.com/Code.AccessAzureDataLake.All", # Access Azure Data Lake "https://api.fabric.microsoft.com/Code.AccessFabric.All" # General Fabric access ] def get_access_token(tenant_id, client_id, scopes): """ Get an access token using interactive authentication. This method will open a browser window for user authentication. Args: tenant_id (str): The Microsoft Entra tenant ID client_id (str): The application client ID scopes (list): List of required permission scopes Returns: str: The access token, or None if authentication fails """ app = PublicClientApplication( client_id, authority=f"https://login.microsoftonline.com/{tenant_id}" ) print("Opening browser for interactive authentication...") token_response = app.acquire_token_interactive(scopes=scopes) if "access_token" in token_response: print("Successfully authenticated") return token_response["access_token"] else: print(f"Authentication failed: {token_response.get('error_description', 'Unknown error')}") return None # Uncomment the lines below to use interactive authentication token = get_access_token(tenant_id, client_id, scopes) print("Access token acquired via interactive login")Run the notebook cell. You should see the Microsoft Entra token returned.


Create a Livy API Spark session
Add another notebook cell and insert this code.
import json
import requests

api_base_url = "https://api.fabric.microsoft.com/"  # Base URL for Fabric APIs

# Fabric Resource IDs - Replace with your workspace and lakehouse IDs
workspace_id = "Fabric_WorkspaceID"
lakehouse_id = "Fabric_LakehouseID"

# Construct the Livy API session URL
# URL pattern: {base_url}/v1/workspaces/{workspace_id}/lakehouses/{lakehouse_id}/livyapi/versions/{api_version}/sessions
livy_api_session_url = (f"{api_base_url}v1/workspaces/{workspace_id}/lakehouses/{lakehouse_id}/"
                       f"livyapi/versions/2023-12-01/sessions")

# Set up authentication headers
headers = {"Authorization": f"Bearer {token}"}

print(f"Livy API URL: {livy_api_session_url}")
print("Creating Livy session...")

try:
    # Create a new Livy session with default configuration
    create_livy_session = requests.post(livy_api_session_url, headers=headers, json={})

    # Check if the request was successful
    if create_livy_session.status_code == 200:
        session_info = create_livy_session.json()
        print('Livy session creation request submitted successfully')
        print(f'Session Info: {json.dumps(session_info, indent=2)}')

        # Extract session ID for future operations
        livy_session_id = session_info['id']
        livy_session_url = f"{livy_api_session_url}/{livy_session_id}"

        print(f"Session ID: {livy_session_id}")
        print(f"Session URL: {livy_session_url}")

    else:
        print(f"Failed to create session. Status code: {create_livy_session.status_code}")
        print(f"Response: {create_livy_session.text}")

except requests.exceptions.RequestException as e:
    print(f"Network error occurred: {e}")
except json.JSONDecodeError as e:
    print(f"JSON decode error: {e}")
    print(f"Response text: {create_livy_session.text}")
except Exception as e:
    print(f"Unexpected error: {e}")
Run the notebook cell, you should see one line printed as the Livy session is created.

You can verify that the Livy session is created by using the [View your jobs in the Monitoring hub](#View your jobs in the Monitoring hub).

Integration with Fabric Environments
By default, this Livy API session runs against the default starter pool for the workspace. Alternatively you can use Fabric Environments Create, configure, and use an environment in Microsoft Fabric to customize the Spark pool that the Livy API session uses for these Spark jobs. To use a Fabric Environment, update the prior notebook cell with this json payload.
create_livy_session = requests.post(livy_base_url, headers = headers, json = {
    "conf" : {
        "spark.fabric.environmentDetails" : "{\"id\" : \""EnvironmentID""}"}
        }
)
Submit a spark.sql statement using the Livy API Spark session
Add another notebook cell and insert this code.
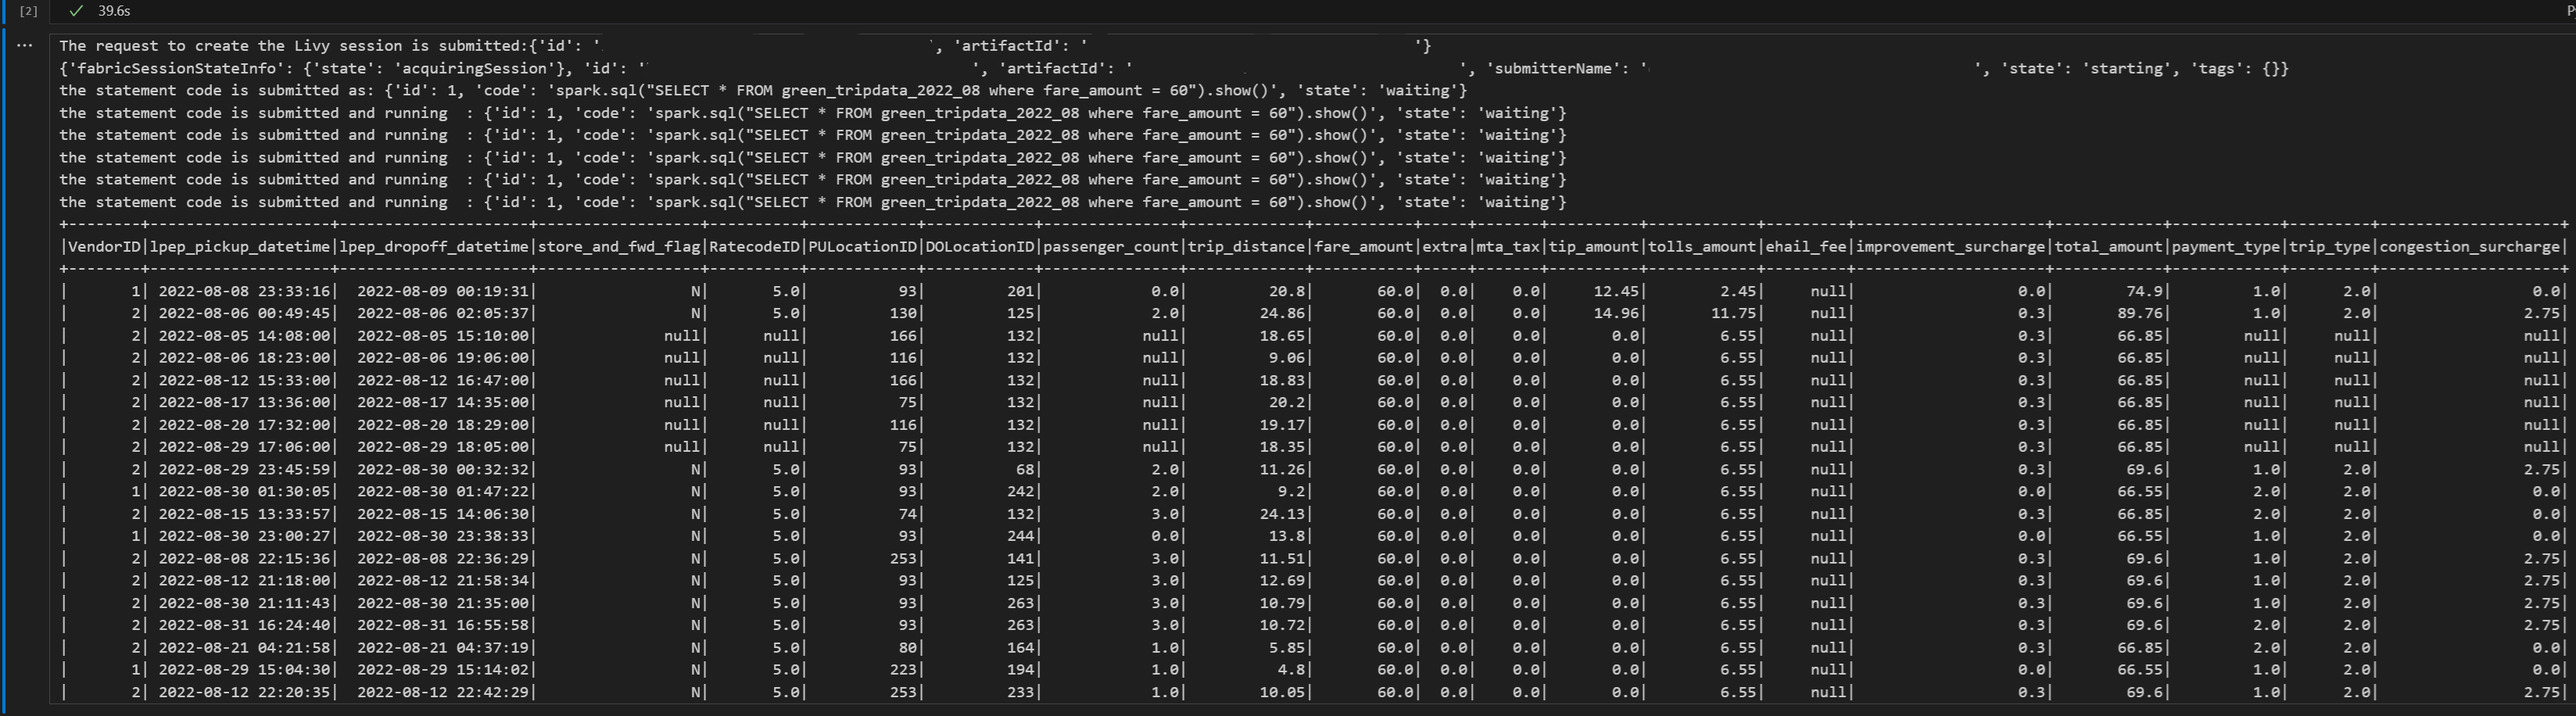
    # call get session API
import time

table_name = "green_tripdata_2022"

print("Checking session status...")

# Get current session status
get_session_response = requests.get(livy_session_url, headers=headers)
session_status = get_session_response.json()
print(f"Current session state: {session_status['state']}")

# Wait for session to become idle (ready to accept statements)
print("Waiting for session to become idle...")
while session_status["state"] != "idle":
    print(f"   Session state: {session_status['state']} - waiting 5 seconds...")
    time.sleep(5)
    get_session_response = requests.get(livy_session_url, headers=headers)
    session_status = get_session_response.json()

print("Session is now idle and ready to accept statements")

# Execute a Spark SQL statement
execute_statement_url = f"{livy_session_url}/statements"

# Define your Spark SQL query - Replace with your actual table and query
payload_data = {
    "code": "spark.sql(\"SELECT * FROM {table_name} WHERE column_name = 'some_value' LIMIT 10\").show()",
    "kind": "spark"  # Type of code (spark, pyspark, sql, etc.)
}

print("Submitting Spark SQL statement...")
print(f"Query: {payload_data['code']}")

try:
    # Submit the statement for execution
    execute_statement_response = requests.post(execute_statement_url, headers=headers, json=payload_data)

    if execute_statement_response.status_code == 200:
        statement_info = execute_statement_response.json()
        print('Statement submitted successfully')
        print(f"Statement Info: {json.dumps(statement_info, indent=2)}")

        # Get statement ID for monitoring
        statement_id = str(statement_info['id'])
        get_statement_url = f"{livy_session_url}/statements/{statement_id}"

        print(f"Statement ID: {statement_id}")

        # Monitor statement execution
        print("Monitoring statement execution...")
        get_statement_response = requests.get(get_statement_url, headers=headers)
        statement_status = get_statement_response.json()

        while statement_status["state"] != "available":
            print(f"   Statement state: {statement_status['state']} - waiting 5 seconds...")
            time.sleep(5)
            get_statement_response = requests.get(get_statement_url, headers=headers)
            statement_status = get_statement_response.json()

        # Retrieve and display results
        print("Statement execution completed!")
        if 'output' in statement_status and 'data' in statement_status['output']:
            results = statement_status['output']['data']['text/plain']
            print("Query Results:")
            print(results)
        else:
            print("No output data available")

    else:
        print(f"Failed to submit statement. Status code: {execute_statement_response.status_code}")
        print(f"Response: {execute_statement_response.text}")

except Exception as e:
    print(f"Error executing statement: {e}")
Run the notebook cell, you should see several incremental lines printed as the job is submitted and the results returned.

Submit a second spark.sql statement using the Livy API Spark session
Add another notebook cell and insert this code.
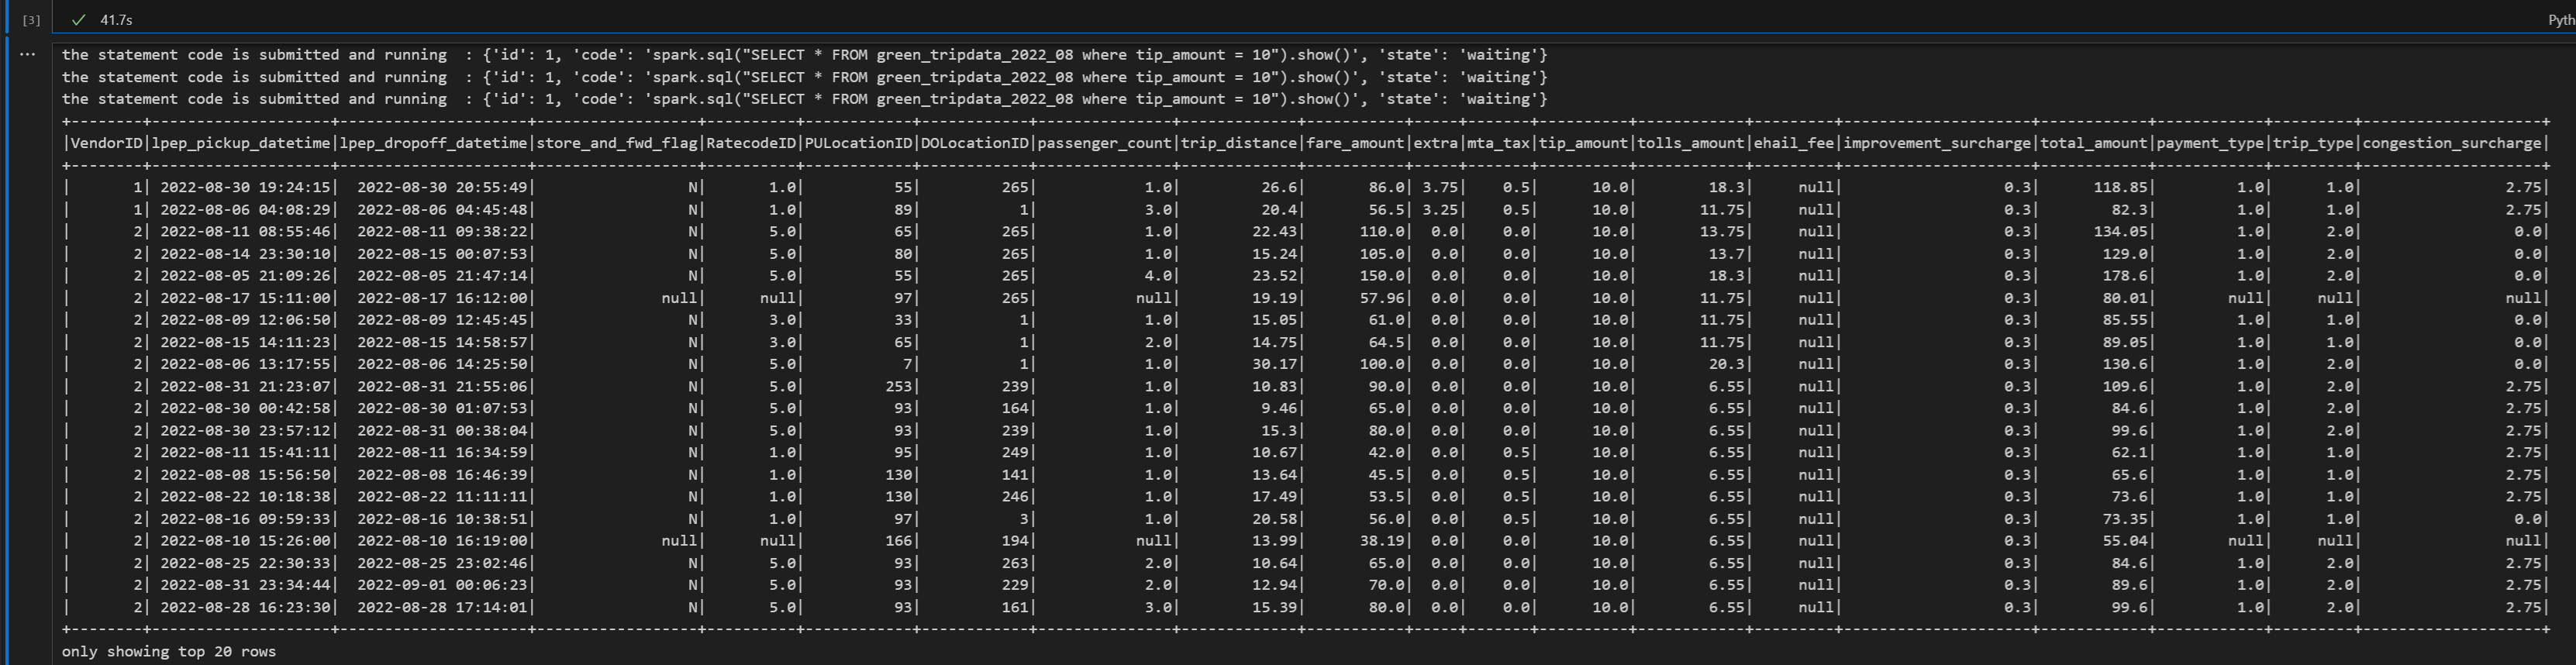
print("Executing additional Spark SQL statement...")

# Wait for session to be idle again
get_session_response = requests.get(livy_session_url, headers=headers)
session_status = get_session_response.json()

while session_status["state"] != "idle":
    print(f"   Waiting for session to be idle... Current state: {session_status['state']}")
    time.sleep(5)
    get_session_response = requests.get(livy_session_url, headers=headers)
    session_status = get_session_response.json()

# Execute another statement - Replace with your actual query
payload_data = {
    "code": f"spark.sql(\"SELECT COUNT(*) as total_records FROM {table_name}\").show()",
    "kind": "spark"
}

print(f"Executing query: {payload_data['code']}")

try:
    # Submit the second statement
    execute_statement_response = requests.post(execute_statement_url, headers=headers, json=payload_data)

    if execute_statement_response.status_code == 200:
        statement_info = execute_statement_response.json()
        print('Second statement submitted successfully')

        statement_id = str(statement_info['id'])
        get_statement_url = f"{livy_session_url}/statements/{statement_id}"

        # Monitor execution
        print("Monitoring statement execution...")
        get_statement_response = requests.get(get_statement_url, headers=headers)
        statement_status = get_statement_response.json()

        while statement_status["state"] != "available":
            print(f"   Statement state: {statement_status['state']} - waiting 5 seconds...")
            time.sleep(5)
            get_statement_response = requests.get(get_statement_url, headers=headers)
            statement_status = get_statement_response.json()

        # Display results
        print("Second statement execution completed!")
        if 'output' in statement_status and 'data' in statement_status['output']:
            results = statement_status['output']['data']['text/plain']
            print("Query Results:")
            print(results)
        else:
            print("No output data available")

    else:
        print(f"Failed to submit second statement. Status code: {execute_statement_response.status_code}")

except Exception as e:
    print(f"Error executing second statement: {e}")
Run the notebook cell, you should see several incremental lines printed as the job is submitted and the results returned.

End the Livy session
Add another notebook cell and insert this code.
print("Cleaning up Livy session...")

try:
    # Check current session status before deletion
    get_session_response = requests.get(livy_session_url, headers=headers)
    if get_session_response.status_code == 200:
        session_info = get_session_response.json()
        print(f"Session state before deletion: {session_info.get('state', 'unknown')}")

    print(f"Deleting session at: {livy_session_url}")

    # Delete the session
    delete_response = requests.delete(livy_session_url, headers=headers)

    if delete_response.status_code == 200:
        print("Session deleted successfully")
    elif delete_response.status_code == 404:
        print("Session was already deleted or not found")
    else:
        print(f"Delete request completed with status code: {delete_response.status_code}")
        print(f"Response: {delete_response.text}")

    print(f"Delete response details: {delete_response}")

except requests.exceptions.RequestException as e:
    print(f"Network error during session deletion: {e}")
except Exception as e:
    print(f"Error during session cleanup: {e}")
View your jobs in the Monitoring hub
You can access the Monitoring hub to view various Apache Spark activities by selecting Monitor in the left-side navigation links.
When the session is in progress or in completed state, you can view the session status by navigating to Monitor.

Select and open most recent activity name.

In this Livy API session case, you can see your previous sessions submissions, run details, Spark versions, and configuration. Notice the stopped status on the top right.


To recap the whole process, you need a remote client such as Visual Studio Code, a Microsoft Entra app/SPN token, Livy API endpoint URL, authentication against your Lakehouse, and finally a Session Livy API.