Note
Access to this page requires authorization. You can try signing in or changing directories.
Access to this page requires authorization. You can try changing directories.
The mapping feature within digital twin builder (preview) allows users to begin creating an ontology with semantically rich entity types, and hydrate it with data from various source systems. For conceptual information about the mapping feature in digital twin builder, see Mapping data to entity types in digital twin builder (preview). After you map data, you can complete the ontology by performing contextualization.
Important
This feature is in preview.
This document describes how to create entity types and manage their data mappings in digital twin builder (preview).
Prerequisites
Your desired data in a Fabric lakehouse with the necessary ETL done.
Time series data should be in columnar format. Columnar time series data is structured so that each column represents a different variable or attribute, while each row corresponds to a specific timestamp.
Digital twin builder supports source columns with the following data types:
bigint,boolean,char,date,datetime,decimal,double,float,integer,long,short,smallint,string,timestamp,timestampint64,tinyint.Note
Decimal type precision in the source data isn't perfectly conserved when the data's imported into digital twin builder.
Create an entity type
Select Add entity in the semantic canvas of digital twin builder (preview).

Select a system type, or select Generic to create a custom entity type. Then, select a name for your entity type. Each entity type within a namespace must have a unique name.
Note
Entity type names must be 1–26 characters, contain only alphanumeric characters, hyphens, and underscores, and start and end with an alphanumeric character.
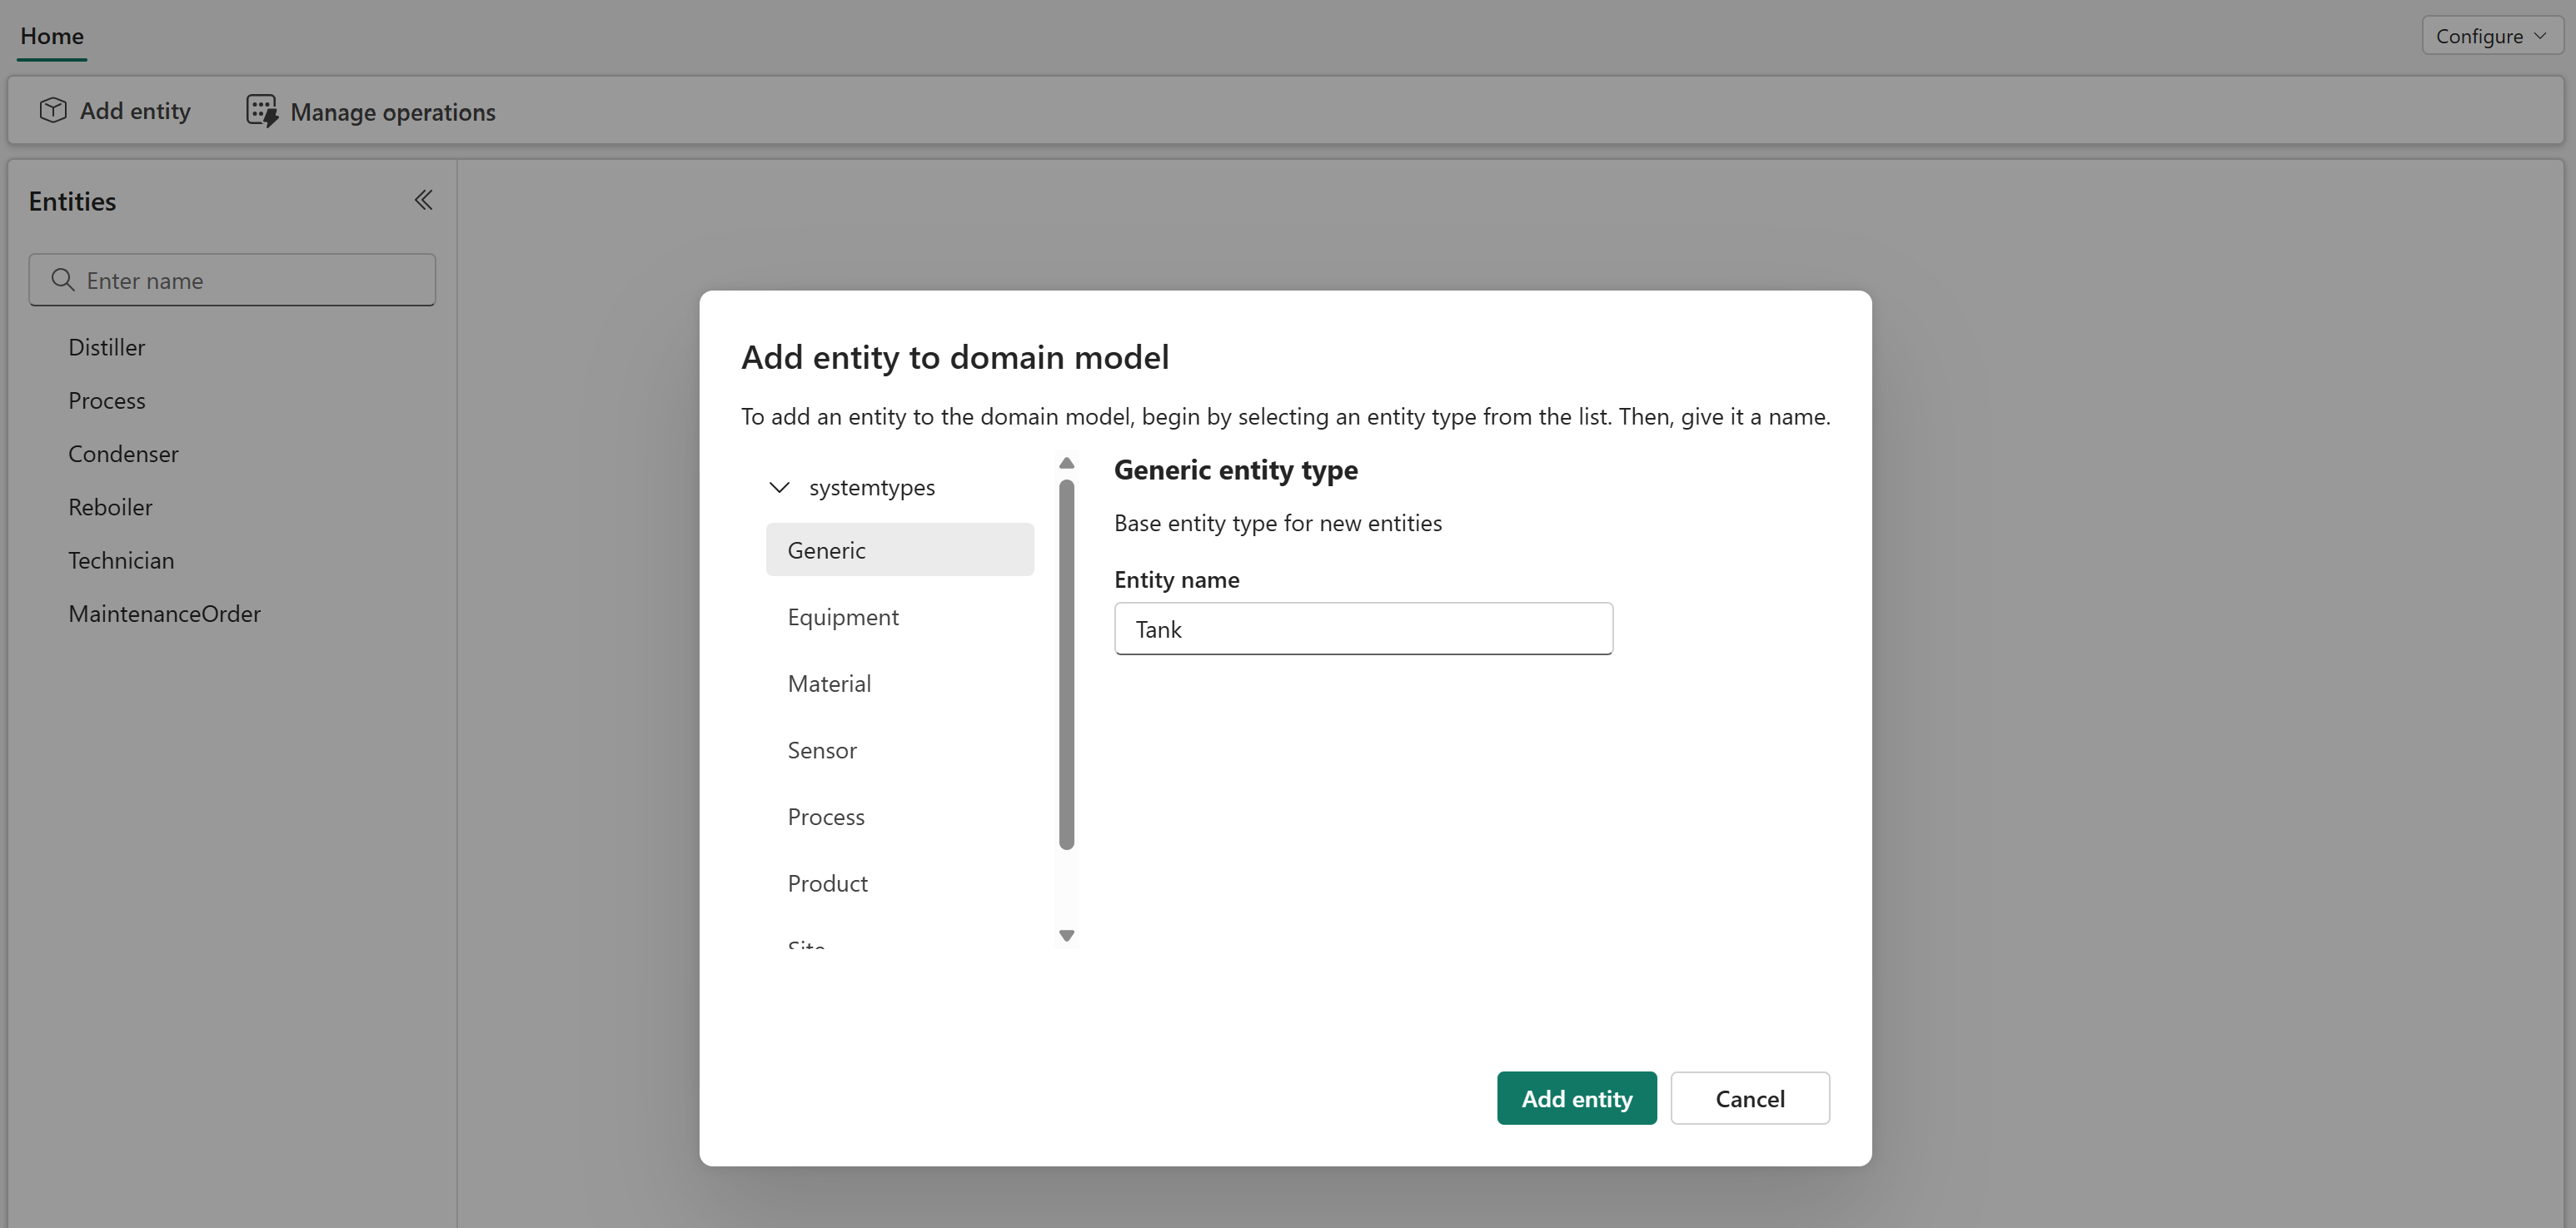
View the empty entity type on the semantic canvas.

Map non-time series data to an entity type
First, map non-time series data. Non-time series mappings must be run before time series mappings.
With the entity type selected in the Entities pane, you see the Entity configuration pane for the entity type. Select the Mappings tab and select Add data.

Select a lakehouse table from your OneLake to use as the source table for your mapping. Select Choose data source.

In the New mapping next to your Source table, select No filter applied to add a filter to your source table.
Fill in the options to create a condition, such as Name > Contains > Tank to filter only to rows where the name contains Tank. Filters are case-sensitive.

Select Apply.
Select the Property type of the source data. Only one property type can be selected per mapping. For example, say that contoso_sample_data contains descriptive attributes about tanks. The mapping for that data contains Non-time series properties.

Configure the Unique ID for each record of ingested data. You can select one or more columns for the unique ID, but we recommend a minimum set of columns.

For the Mapped properties, configure the columns from the source table that you want to model on your entity type.

Keep the following notes in mind:
Optionally, you can map a column in your source data table to the DisplayName property. This step provides a friendly name for each of your entity instances in downstream experiences.
Optionally, you can choose a new name for your source column to be shown when it's modeled on your entity instances.
Note
Custom column names must be 1–26 characters, contain only alphanumeric characters, hyphens, and underscores, and start and end with an alphanumeric character.
When you're selecting a source column, the list of options is grouped into two sections: available and unavailable. Available columns are columns in your source table that match the data type of the property you're trying to match. Unavailable columns are ones that don't match the type, so they can't be mapped to that property.
Select Save to save your non-time series mapping.

Go to the Scheduling tab and select Run to run the mapping. Running the mapping models the identified properties on your entity instances. Once properties have been modeled, they can't be deleted and their names can't be changed.

Map time series data to an entity type
Important
Before you map time series data to an entity type, make sure your non-time series mapping ran successfully.
Also, make sure you mapped one non-time series property on the entity type that can be used to contextualize your time series data. This non-time series property should exactly match a column in your time series data.
Select the Mappings tab in the entity configuration pane, and select Add data to begin creating a mapping.
Select a lakehouse table from your OneLake to use as the source table for your mapping.
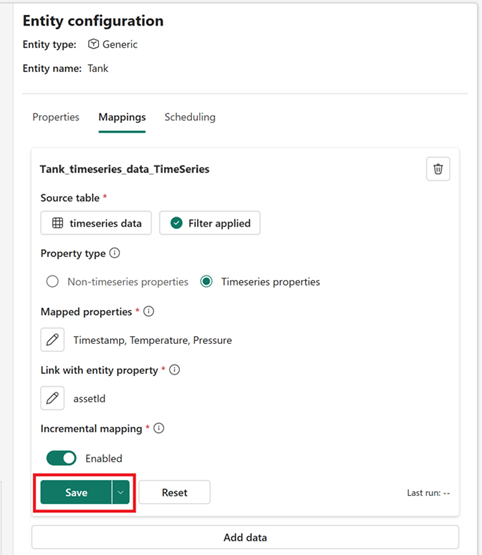
For the Property type of this mapping, select Time series properties.
Configure your Mapped properties.
Your time series data should be in columnar format in the lakehouse data source, where each column represents a different variable or attribute, and each row corresponds to a specific timestamp. A timestamp column of type
DateTimeis required for this mapping.
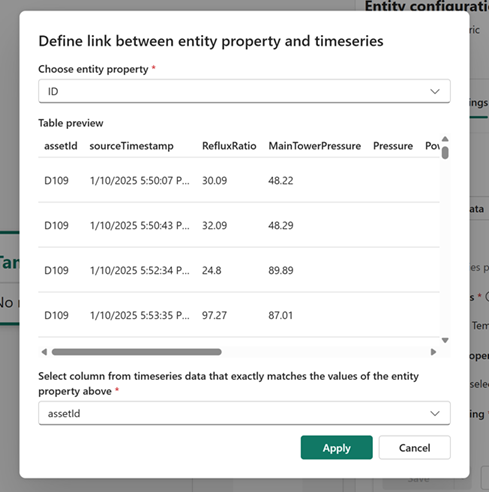
Configure the Link with entity property by selecting a column from your time series data that exactly matches a property type that was defined in the entity type. This process allows digital twin builder (preview) to contextualize your time series data with the existing entity instances.
Tip
If you don't see a non-time series property available to use, make sure to map a non-time series property first, and then return to this step.
Make sure that Incremental mapping is enabled. Once a time series mapping with incremental mapping is enabled, that mapping can't be edited.
Tip
If you do need to modify an incremental mapping, create a new mapping instead. If your goal is to remove a property, delete the existing mapping and then create a new one. If your goal is to add a property, just create an additional mapping with the same source and the new properties.
Select Save to save your time series mapping.
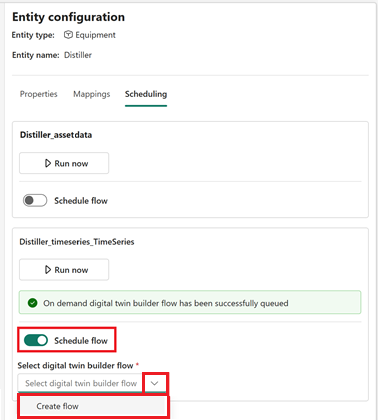
Go to the Scheduling tab and select Run to run the mapping.
Manage mappings
Here are the actions available for mapping management.
View mapping: All mappings that you create for a particular entity type can be viewed under the Mappings tab in the entity configuration pane when that entity type is selected. They can also be viewed in the digital twin builder (preview) flows view by selecting Manage operations from the ribbon.

Edit mapping: To edit a mapping, modify any part of the configuration in the entity configuration pane. Verify all configurations to avoid unintended results and save your changes.
Note
Entity type names and property names aren't editable. You can, however, remove a source column from the mapping.
Delete mapping: To delete a mapping, select the trash icon in the top right corner of the desired mapping card. Deleting this mapping doesn't delete the underlying data that was mapped with that job, or delete any properties from the entity type, but it removes the mapping from the semantic canvas.

Schedule mapping: To schedule a mapping, go to the Scheduling tab and create a digital twin builder flow. Enable Schedule flow, create a new flow, and configure its details. For more information, see Digital twin builder (preview) flow.

Deactivate an entity type
You can deactivate an entity type if it was misconfigured or is no longer needed. Deactivating an entity type removes the entity type and its mapping configurations from the semantic canvas, and removes entity instances and time series from the explorer.
When deactivating entity types, keep the following notes in mind:
- Before you deactivate an entity type, first delete all relationship types associated with it.
- When instances and time series are removed from the digital twin builder, they're only soft-deleted within the base layer.
- To permanently delete the instances and time series associated with an entity type, use Fabric tools to query all records that are soft-deleted from the base layer, and delete them.
To deactivate an entity type, hover over its name in the semantic canvas and select ... next to its name. Select Deactivate entity.
