Note
Access to this page requires authorization. You can try signing in or changing directories.
Access to this page requires authorization. You can try changing directories.
Microsoft Viva Glint Administrators can edit survey responses for closed survey cycles if question response data doesn't appear as expected. Viva Glint's Advanced configuration: External Import feature includes the option to append survey data after a survey closes for situations where response options were misconfigured.
Note
Preparing edited response data and importing to Viva Glint is complex. Consider excluding the question from User Roles' reporting views and creating a new, correct question for future surveys.
Requirements
Viva Glint Admins can only use the append survey data feature when:
- Raw response data is enabled for the survey cycle
- The survey cycle is closed
- The survey has an Ad Hoc or Recurring survey type
- Responses are tied to participants that were already invited to give feedback during the survey window
- The append survey data feature can't add new users to a survey after close. It only edits responses for users that are already part of the survey.
Reversed response options for rated questions
Viva Glint only recognizes the most negative response as: 1 - Strongly Disagree and the most positive response as 5 - Strongly Agree. When Viva Glint Admins include custom questions that don't align with the standard Viva Glint response scale, responses that should be coded as positive are coded as negative and vice versa.
Example
A Viva Glint Admin at Contoso included this question on their Engagement survey with standard Viva Glint response options:
My team struggles to communicate well with cross-functional teams.
- 1 - Strongly Disagree
- 2
- 3
- 4
- 5 - Strongly Agree
For this custom item, the most positive response would be "Strongly Disagree" but Viva Glint always codes "Strongly Disagree" as the lowest scoring, most negative response.
Edit responses with Advanced configuration
If your organization finds that responses need to be edited due to survey item setup issues, use the following guidance to:
- Pull existing reports for comparison after updates
- Prepare response data to import
- Import new responses in Advanced configuration
- Confirm updates in reports after importing new data
Export reports with current scores
Export reports with items scores as they are today, with favorability breakdowns for rated items. From the Team Summary dashboard, select the impacted question and choose Export from the question details page.
Keep these reports as a record of the original scores and use them after editing responses to compare scores before and after to confirm the update.
Prepare data
The Advanced configuration import to edit responses requires two files:
- A raw score file that contains updated response values
- A user file that includes users invited to give feedback
Important
If questions were targeted to specific groups, you need separate sets of files for each targeted population.
Raw score file
To prepare your raw score file, export raw survey responses for the survey cycle that should be edited.
Note
Save the original raw score file and edit responses in a copy of the original file.
- From the admin dashboard, go to Configuration and in Surveys, select Survey programs.
- After selecting a survey, go to the Completed tab.
- On the desired survey cycle, select the ellipsis on the far right and choose Export Raw Survey Responses from the dropdown menu.
- In the Raw Survey Responses pane that appears, update Export Options and Attributes.
- In the Export Options section, deselect all options except for Comments. Don't select Comment topics or Sensitive comment flag.
- In the Attributes section, choose Clear All and then select the field for Email Address. The attribute name can vary based on what your organization sends to Viva Glint.
- Select Export to download response data to your device.
Note
If raw survey response exports aren’t enabled for the survey cycle, editing responses with the append survey cycle feature isn’t an option.
Edit the response data file layout
- To preserve data in its original format, open the .csv file using the Text Import Wizard to import data into Excel.
- Delete these columns:
- Survey Cycle Creation Date
- Survey Cycle Completion Date
- Survey Cycle Title
- Find the column for the survey question whose responses you want to edit. Columns are labeled with question UUIDs. To find the question’s UUID:
- Go to the survey’s Program Summary and in the Actions dropdown menu, select Export Program Content.
- In the dialog that appears, select:
- Survey Content
- Languages to Include
- Export Format
- In the Question file that exports, find the question to edit based on the Reporting Label or Question Text. Copy the value from the Question ID field.
- In the raw response data, search the header row for this UUID and highlight the item and its _COMMENT column.
- IMPORTANT: ensure that all comment columns are updated from
<UUIID>_COMMENT (singular) to<UUID>_COMMENTS (plural).
- Delete all other question UUID and UUID_COMMENTS columns from the response file, keeping only the question or questions to be edited and the employee email field.
- Replace the header label for the email address field with: "User e-mail" and move the email field to the beginning of the file (column A).
- The columns in the final edited file should be:
- User e-mail
- Question UUID 1
- Question UUID 1_COMMENTS
- Question UUID 2
- Question UUID 2_COMMENTS
- (more columns as needed, depending on questions to be edited)
Caution
To avoid removing open-ended feedback for rated questions, always include the _COMMENTS columns when editing response data.
Edit rated item responses in exported raw data:
Responses to Viva Glint questions that use the standard 5-point Likert scale need to be recoded so that all negative responses (1) are calculated as positive (5) and vice versa:
- 1 becomes 5
- 2 becomes 4
- 3 remains 3
- 4 becomes 2
- 5 becomes 1
To recode your survey question's responses in Excel:
- To preserve data in its original format, open the .csv file using the Text Import Wizard to import data into Excel.
- Insert a column to the right of the survey question column that contains response values:
Confirm that the cell formatting on the column is General
Paste the following formula:
=SUBSTITUTE(SUBSTITUTE(SUBSTITUTE(SUBSTITUTE(SUBSTITUTE(SUBSTITUTE(B2,"1","Five"),"2","Four"),"4","2"),"5","1"),"Four","4"),"Five","5")Select Return or Enter to run the formula.

To copy the formula to all records in the column, place your cursor on the bottom right corner of the cell with the formula and click twice.
Copy the output of the formula in the new column and Paste Values into the survey question column to overwrite the existing values.
Highlight the survey question column and Find & Replace All ".0" with nothing. This ensures that numeric response values are in the correct format.
Delete the formula column.
- Save the edited file as .csv with UTF-8 encoding.

User file
Note
Save the original survey cycle user export file and edit data in a copy of the original file.
- Export survey cycle data with the EXPORT_USERS_FROM_SURVEY_CYCLE Data App for the survey that needs to be updated.
- Prepare an update file with the EXPORT_USERS_FROM_SURVEY_CYCLE file from Step 1.
- To preserve special characters and formatting, open the .csv file using the Text Import Wizard to import data into Excel.
- Delete all columns except for:
- Email Address: must be labeled Email Address
- First Name: label must match your attribute setup
- Last Name: label must match your attribute setup
- Employee ID: label must match your attribute setup
- Save your edited file with corrected values as a .csv with UTF-8 encoding.
Advanced configuration: External import - append data
To complete your import of edited responses, access Viva Glint’s Advanced configuration page. If you don't have access, confirm that:
- You're in the Company Admin User Role
- Advanced Configuration access is enabled on your user profile
Caution
Your Viva Glint survey program must be in an approved state while you import edited survey data and while reports update. Ensure that your survey is approved before continuing.
From your admin dashboard, select the Configuration symbol, then in Service configuration choose Advanced configuration.
In the menu on the left, select External Import.
On the External Import page, make selections to import your data:
Are you looking to append data to a survey cycle?: Switch this toggle switched to Yes.
Survey Name: Select your survey from the dropdown list.
Exception Date: Leave blank, your survey already has a start date.
Raw Score File: Select Choose File and browse to select your Raw Score File, which is your file of edited response values.
New Distribution List Name: Leave blank.
User File: Select Choose File and browse to select your User File, which is your list of exported survey cycle users.
Survey Cycle: Select Load Values and choose a survey date from the dropdown menu.
Extra Options menu: Leave collapsed, not applicable.
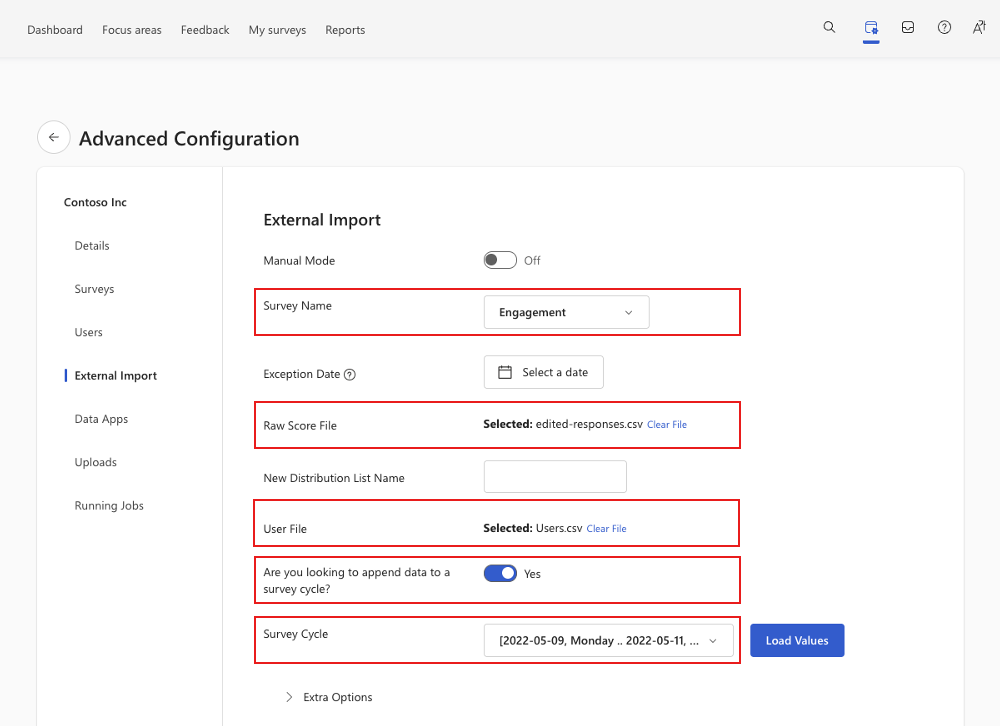
Manual Mode: Switch this toggle switched to On.
With Manual Mode set to On, External Import breaks out into four separate sections, but all selections made in previous steps are retained.

Skip sections 1-3 and go to Step 4: Raw Score Import and select Run Step 4.
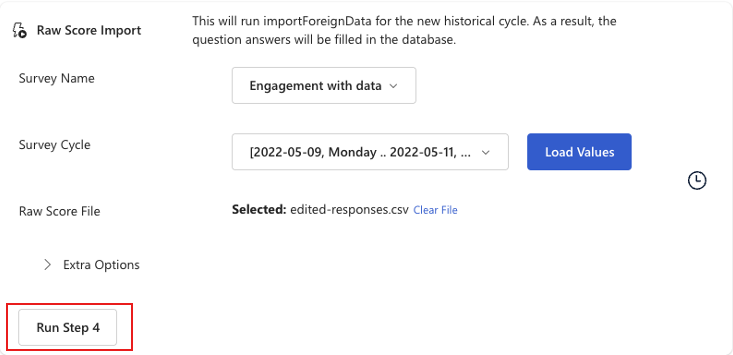
When new response values successfully load, the Raw Score Import section turns green.

To start a refresh of reporting data based on new response values, go to Advanced configuration and select Data Apps.
Select RETROACTIVE_PULSE_UPDATE.
Update selections:
- Survey name: Load values and select a survey
- Cycle name: Load values and select a survey cycle
- Role or Distribution list: Load values and select a role or list.
- Attribute name: Load values and select an attribute that isn't a report filter and always contains current data, like Birth year. Select an attribute that has no reporting or Distribution list impact but allows you to begin the analytics reload in the next step to refresh reports.
- Reload analytics: Switch to On.
Select Execute and show first 500 log records to start the reporting refresh. Select Execute and Save as ZIP to start the reporting refresh and export a file of update activity.
Select the Running Jobs option in the Advanced Configuration menu to view the status of the RETROACTIVE_PULSE_UPDATE/reporting refresh.


Important
For updates that involve several users (more than 5,000), updates to the Viva Glint dashboard, reports, and comments can take up to 24 hours to complete.
Troubleshoot
Use the following guidance to troubleshoot common errors you may encounter when importing corrected responses:
Confirm updated reports
After successfully importing updated question responses, go to your Viva Glint Dashboard and Reports for the survey items that you edited and confirm updates based on reports pulled before the response edit.
For rated question response updates, review:
- Dashboard scores
- Reports like Team Summary and Executive Summary to view new favorability breakdowns
- Comment counts to confirm no changes