Note
Access to this page requires authorization. You can try signing in or changing directories.
Access to this page requires authorization. You can try changing directories.
The Azure AI Foundry portal model catalog offers over 1,600 models. A common way to deploy these models is to use the managed compute deployment option. This option is also sometimes referred to as a managed online deployment.
When you deploy a large language model (LLM), you make it available for use in a website, an application, or other production environment. Deployment typically involves hosting the model on a server or in the cloud and creating an API or other interface for users to interact with the model. You can invoke the deployment for real-time inference of generative AI applications such as chat and copilot.
In this article, you learn to deploy models with the managed compute deployment option and to perform inference on the deployed model.
Prerequisites
An Azure subscription with a valid payment method. Free or trial Azure subscriptions don't work. If you don't have an Azure subscription, create a paid Azure account to begin.
If you don't have one, create a hub-based project.
Foundry Models from Partners and Community require access to Azure Marketplace, while Foundry Models Sold Directly by Azure don't have this requirement. Ensure your Azure subscription has the permissions required to subscribe to model offerings in Azure Marketplace. See Enable Azure Marketplace purchases to learn more.
Azure role-based access controls (Azure RBAC) grant access to operations in Azure AI Foundry portal. To perform the steps in this article, your user account must be assigned the Azure AI Developer role on the resource group. For more information on permissions, see Role-based access control in Azure AI Foundry portal.
Find your model in the model catalog
- Sign in to Azure AI Foundry.
- If you’re not already in your project, select it.
- Select Model catalog from the left pane.
In the Deployment options filter, select Managed compute.
Tip
Because you can customize the left pane in the Azure AI Foundry portal, you might see different items than shown in these steps. If you don't see what you're looking for, select ... More at the bottom of the left pane.

Select a model to open its model card. In this article, use the model
deepset-roberta-base-squad2.

Deploy the model
From the model's page, select Use this model to open the deployment window.
The deployment window is pre-filled with some selections and parameter values. You can either keep them or change them as desired. You can also select an existing endpoint for the deployment or create a new one. For this example, specify an instance count of
1and create a new endpoint for the deployment.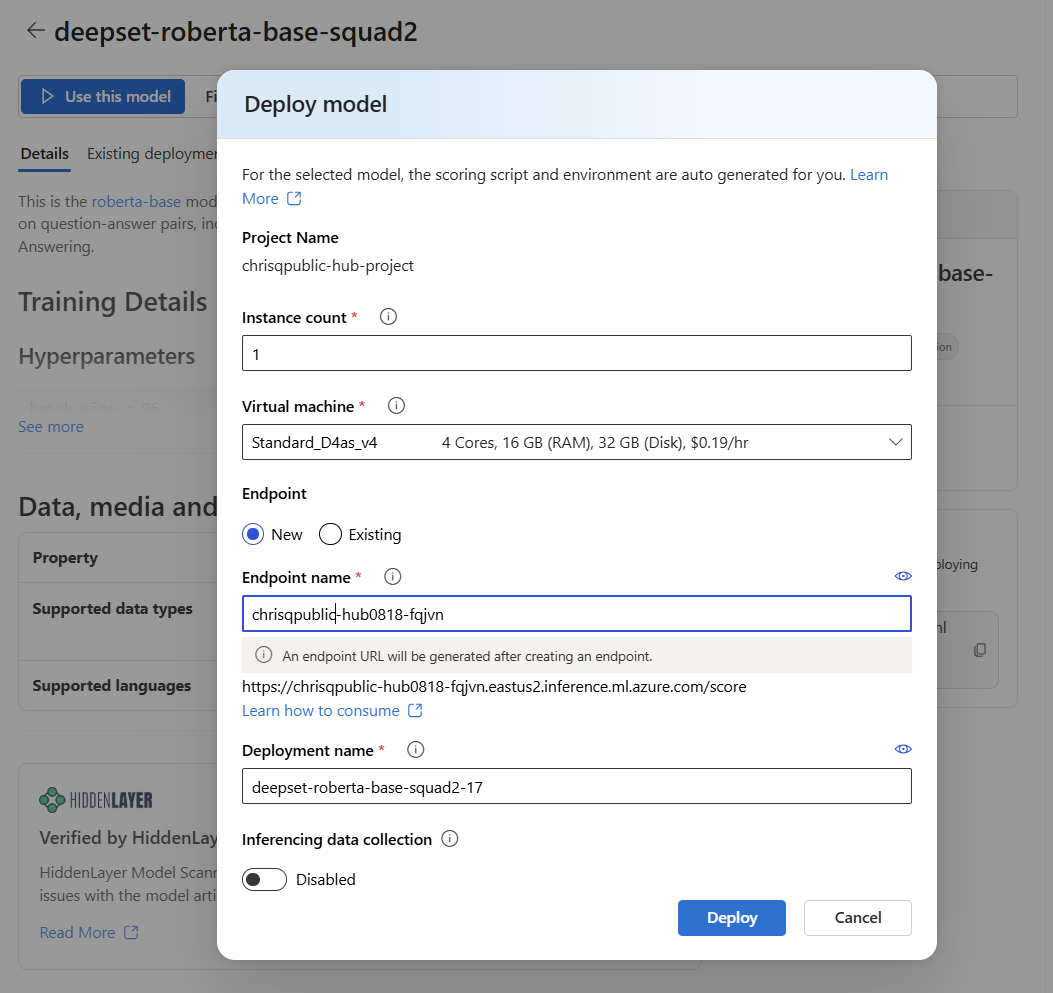
Select Deploy to create your deployment. The creation process might take a few minutes to complete. When it's complete, the portal opens the model deployment page.
Tip
To see endpoints deployed to your project, go to the My assets section of the left pane and select Models + endpoints.
The created endpoint uses key authentication for authorization. To get the keys associated with a given endpoint, follow these steps:
- Select the deployment, and note the endpoint's Target URI and Key.
- Use these credentials to call the deployment and generate predictions.

Consume deployments
After you create your deployment, follow these steps to consume it:
- Select Models + endpoints under the My assets section in your Azure AI Foundry project.
- Select your deployment from the Model deployments tab.
- Go to the Test tab for sample inference to the endpoint.
- Return to the Details tab to copy the deployment's "Target URI", which you can use to run inference with code.
- Go to the Consume tab of the deployment to find code samples for consumption.
- Copy the model ID from the details page of the model you selected. It looks like this for the selected model:
azureml://registries/azureml/models/deepset-roberta-base-squad2/versions/17.
Deploy the model
Install the Azure Machine Learning SDK.
pip install azure-ai-ml
pip install azure-identity
Authenticate with Azure Machine Learning and create a client object. Replace the placeholders with your subscription ID, resource group name, and Azure AI Foundry project name.
from azure.ai.ml import MLClient
from azure.identity import InteractiveBrowserCredential

workspace_ml_client = MLClient(
    credential=InteractiveBrowserCredential,
    subscription_id="your subscription ID goes here",
    resource_group_name="your resource group name goes here",
    workspace_name="your project name goes here",
)
Create an endpoint. For the managed compute deployment option, you need to create an endpoint before a model deployment. Think of an endpoint as a container that can house multiple model deployments. The endpoint names need to be unique in a region, so in this example use the timestamp to create a unique endpoint name.
import time, sys
from azure.ai.ml.entities import (
    ManagedOnlineEndpoint,
    ManagedOnlineDeployment,
    ProbeSettings,
)

# Make the endpoint name unique
timestamp = int(time.time())
online_endpoint_name = "customize your endpoint name here" + str(timestamp)

# Create an online endpoint
endpoint = ManagedOnlineEndpoint(
    name=online_endpoint_name,
    auth_mode="key",
)
workspace_ml_client.online_endpoints.begin_create_or_update(endpoint).wait()
Create a deployment. Replace the model ID in the next code with the model ID that you copied from the details page of the model you selected in the Find your model in the model catalog section.
model_name = "azureml://registries/azureml/models/deepset-roberta-base-squad2/versions/17"

demo_deployment = ManagedOnlineDeployment(
    name="demo",
    endpoint_name=online_endpoint_name,
    model=model_name,
    instance_type="Standard_DS3_v2",
    instance_count=2,
    liveness_probe=ProbeSettings(
        failure_threshold=30,
        success_threshold=1,
        timeout=2,
        period=10,
        initial_delay=1000,
    ),
    readiness_probe=ProbeSettings(
        failure_threshold=10,
        success_threshold=1,
        timeout=10,
        period=10,
        initial_delay=1000,
    ),
)
workspace_ml_client.online_deployments.begin_create_or_update(demo_deployment).wait()
endpoint.traffic = {"demo": 100}
workspace_ml_client.online_endpoints.begin_create_or_update(endpoint).result()
Inference the deployment
You need a sample json data to test inferencing. Create
sample_score.jsonwith the following example.{ "inputs": { "question": [ "Where do I live?", "Where do I live?", "What's my name?", "Which name is also used to describe the Amazon rainforest in English?" ], "context": [ "My name is Wolfgang and I live in Berlin", "My name is Sarah and I live in London", "My name is Clara and I live in Berkeley.", "The Amazon rainforest (Portuguese: Floresta Amaz\u00f4nica or Amaz\u00f4nia; Spanish: Selva Amaz\u00f3nica, Amazon\u00eda or usually Amazonia; French: For\u00eat amazonienne; Dutch: Amazoneregenwoud), also known in English as Amazonia or the Amazon Jungle, is a moist broadleaf forest that covers most of the Amazon basin of South America. This basin encompasses 7,000,000 square kilometres (2,700,000 sq mi), of which 5,500,000 square kilometres (2,100,000 sq mi) are covered by the rainforest. This region includes territory belonging to nine nations. The majority of the forest is contained within Brazil, with 60% of the rainforest, followed by Peru with 13%, Colombia with 10%, and with minor amounts in Venezuela, Ecuador, Bolivia, Guyana, Suriname and French Guiana. States or departments in four nations contain \"Amazonas\" in their names. The Amazon represents over half of the planet's remaining rainforests, and comprises the largest and most biodiverse tract of tropical rainforest in the world, with an estimated 390 billion individual trees divided into 16,000 species." ] } }Inference with
sample_score.json. Change the ___location of the scoring file in the next code, based on where you saved your sample json file.scoring_file = "./sample_score.json" response = workspace_ml_client.online_endpoints.invoke( endpoint_name=online_endpoint_name, deployment_name="demo", request_file=scoring_file, ) response_json = json.loads(response) print(json.dumps(response_json, indent=2))
Configure autoscaling
To configure autoscaling for deployments, follow these steps:
- Sign in to the Azure portal.
- Locate the Azure resource type
Machine learning online deploymentfor the model you just deployed in the resource group of the AI project. - Select Settings > Scaling from the left pane.
- Select Custom autoscale and configure autoscale settings. For more information on autoscaling, see Autoscale online endpoints in the Azure Machine Learning documentation.
Delete the deployment
To delete deployments in the Azure AI Foundry portal, select Delete deployment on the top panel of the deployment details page.
Quota considerations
To deploy and perform inferencing with real-time endpoints, you consume Virtual Machine (VM) core quota that Azure assigns to your subscription on a per-region basis. When you sign up for Azure AI Foundry, you receive a default VM quota for several VM families available in the region. You can continue to create deployments until you reach your quota limit. Once that happens, you can request a quota increase.
Related content
- Learn more about what you can do in Azure AI Foundry
- Get answers to frequently asked questions in the Azure AI FAQ article